これは、このセクションの複数ページの印刷可能なビューです。 印刷するには、ここをクリックしてください.

このページの通常のビューに戻る.

Seleniumブラウザー自動化プロジェクト

Seleniumはブラウザー自動化を可能にし、それを支えるツール群とライブラリー群プロジェクトです。

ユーザーとブラウザーのやり取りのエミュレーション、ブラウザーの割当を増強したり縮減する分散型サーバー、そしてすべてのメジャーなブラウザー用に置換可能なコードの実装を可能にするW3C WebDriver 仕様インフラの提供します。

このプロジェクトは多くの有志貢献者の何千時間に及ぶ個々の時間を費やした事とソースコード自由に利用可能を誰にでも利用、楽しめ、そして改良できることによって実現しました。

Seleniumはウェブプラットフォームの自動化のより開かれた議論をするためブラウザーベンダー、エンジニア、愛好家をまとめます。このプロジェクトはコミュニティーを導きと育成のために年次カンファレンス開催します。

Seleniumの中核はWebDriverであり、様々なブラウザーを変えてインストラクション集を実行できるインターフェースです。これは作りえる一番基本的な インストラクションの一つです:

package dev.selenium.hello;

import org.openqa.selenium.WebDriver;
import org.openqa.selenium.chrome.ChromeDriver;

public class HelloSelenium {
    public static void main(String[] args) {
        WebDriver driver = new ChromeDriver();

        driver.get("https://selenium.dev");

        driver.quit();
    }
}
from selenium import webdriver


driver = webdriver.Chrome()

driver.get("http://selenium.dev")

driver.quit()
using OpenQA.Selenium.Chrome;

namespace SeleniumDocs.Hello;

public static class HelloSelenium
{
    public static void Main()
    {
        var driver = new ChromeDriver();
            
        driver.Navigate().GoToUrl("https://selenium.dev");
            
        driver.Quit();
    }
}
require 'selenium-webdriver'

driver = Selenium::WebDriver.for :chrome

driver.get 'https://selenium.dev'

driver.quit
const {Builder} = require('selenium-webdriver');

(async function helloSelenium() {
  let driver = await new Builder().forBrowser('chrome').build();

  await driver.get('https://selenium.dev');

  await driver.quit();
})();
package dev.selenium.hello

import org.openqa.selenium.chrome.ChromeDriver

fun main() {
    val driver = ChromeDriver()

    driver.get("https://selenium.dev")

    driver.quit()
}

概要を参照して、さまざまなプロジェクトコンポーネントを確認し、 Seleniumが適切なツールであるかどうかを判断してください。

入門に進んで、 Seleniumをインストールし、テスト自動化ツールとして正常に使用する方法を理解し、 このような単純なテストをスケーリングして、複数のブラウザー、 複数の異なるオペレーティングシステムの大規模な分散環境で実行する必要があります。

1 - 概要

Seleniumはあなたに適していますか?さまざまなプロジェクトのコンポーネントの概要を参照してください。

Seleniumは一つのツールやAPIではありません。たくさんのツールから構成されています。

WebDriver

デスクトップのウェブサイトのテスト自動化をはじめるのなら、WebDriver APIを使いましょう。 WebDriver はブラウザ自動化のAPIを使用します。このAPIは、ブラウザをコントロールしてテストを実行するためにブラウザベンダーによって提供されています。これは現実のユーザーがブラウザを操作するかのように動きます。 WebDriverのAPIはアプリケーションのコードと一緒にコンパイルする必要がありませんから、全く邪魔になりません。 これによって、あなたは本番環境と同じアプリケーションをテストすることができます。

IDE

IDE (Integrated Development Environment: 統合開発環境)はSeleniumのテストケースを開発するためのツールです。 これは利用しやすいChromeとFirefoxの拡張機能であり、テストケースを開発するための一般に最も効率的なツールです。 IDEはあなたのブラウザ上で、その要素で定義されたパラメーターと共にSeleniumのコマンドを使いユーザーの動作を記録します。 これは時間の節約だけでなく、Seleniumスクリプトのシンタックスを学ぶための優れた方法です。

Grid

Selenium Grid を使用すると、さまざまなプラットフォームのさまざまなマシンでテストケースを実行できます。 テストケースの起動の制御はローカル端末で行われ、テストケースが起動されると、 リモート端末によって自動的に実行されます。

WebDriverテストの開発後、複数のブラウザーとオペレーティングシステムの組み合わせでテストを実行する必要が出てくる場合があります。 ここで Grid が登場します。

1.1 - コンポーネントを理解する

WebDriverを使ってテストスイートを構築するには、多くの異なるコンポーネントを理解し、効率的に使用する必要があります。 ソフトウェアのすべてがそうであるように、人によっては同じ概念に異なる用語を使用します。 以下は、本説明での用語の使用方法の内訳です。

用語

  • API: アプリケーション プログラミング インターフェイス。これはWebDriverを操作するために使用する"コマンド"をまとめたものです。
  • ライブラリ: APIとそれらを実装する必要なコードを含むコードモジュール。 ライブラリは各言語バインディング向けのものです。例 .jar files for Java, .dll files for .NET, など.
  • ドライバー: 実際のブラウザを制御します。 ほとんどのドライバーはブラウザベンダー自身が作成します。ドライバーは一般的にブラウザ自体を備えたシステムで実行される実行可能モジュールであり、テストスイートを実行するシステムにはありません。(ただし、それらは同じシステムであっても構いません。)注: 一部の人々はドライバーをプロキシと呼んでいます。
  • フレームワーク: WebDriverスイートのサポートとして使用する追加ライブラリ。これらのフレームワークは、JUnitやNUnitなどのテストフレームワークです。また、CucumberまたはRobotiumといった自然言語機能をサポートするフレームワークでもあります。フレームワークは、テスト対象のシステムの操作や構成、データ作成、テストオラクルなどに記述、利用されます。

部品構成

最低限、WebDriverはドライバーを経由してブラウザーと通信します。 コミュニケーションは双方向です:WebDriverは、ドライバーを経由してブラウザーにコマンドを渡し、同じルートを経由して情報を受け取ります。

基本通信

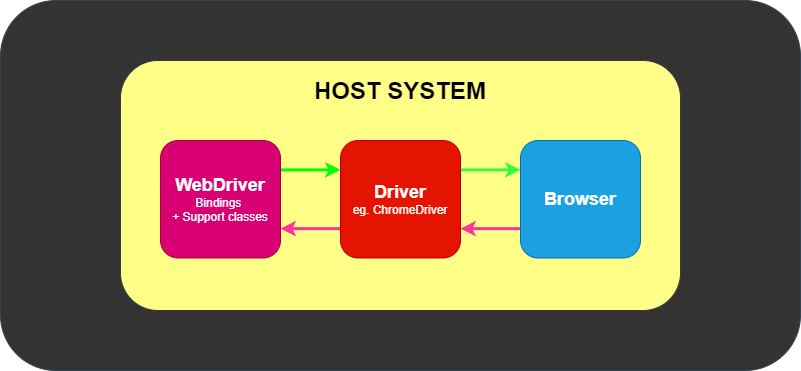
ドライバーは、ChromeDriver for GoogleのChrome/Chromium、MozillaのFirefox用GeckoDriverなどブラウザー固有のものです。 ドライバーはブラウザと同じシステムで動きます。これは、テスト自体を実行するところが同じシステムである場合とそうでない場合があります。

上記の簡単な例は 直接 通信です。ブラウザへのコミュニケーションは、Selenium ServerまたはRemoteWebDriverを経由した リモート 通信もできます。RemoteWebDriverは、ドライバーおよびブラウザと同じシステムで実行されます。

リモート通信

リモート通信は、ホストシステム上のドライバーと順に通信するSelenium ServerまたはSelenium Gridを使用して行うこともできます。

SeleniumGridを用いたリモート通信

どのフレームワークに適しているか

WebDriverには1つのジョブしかありません: 上記の任意のメソッドを経由してブラウザと通信します。WebDriverはテストに関することを知りません: WebDriverは物事を比較する方法、成功または失敗を確認する方法を知りません、そして、レポートや Given/When/Then 文法に関しても確実に知りません。

ここで、さまざまなフレームワークが登場します。 最低限必要なのは言語バインディングに一致するテストフレームワーク、例えば NUnit for .NET, JUnitfor Java, RSpec for Ruby などです。

テストフレームワークは、WebDriverおよびテストの関連手順の実行を担当します。 それは下記図に似ていると考えることができます。

テストフレームワーク

上図でCucumberなどの自然言語のフレームワーク/ツールがテストフレームワークボックスの一部として存在する場合があります、またはテストフレームワークを独自の実装で完全に密閉する場合があります。

1.2 - Selenium 詳細

Seleniumは、Web ブラウザーの自動化を可能にし、 サポートするさまざまなツールとライブラリーの包括的なプロジェクトです。

Selenium 詳細

Selenium にはさまざまな機能がありますが、その核となるのは、 ブラウザーのインスタンスをリモートで制御し、 ユーザーとブラウザーのやりとりをエミュレートするために利用できる最高の技術を使用する、 Webブラウザー自動化のためのツールセットです。

Seleniumを使用すると、ユーザーはエンド ユーザーが実行する一般的なアクティビティをシミュレートできます。 フィールドにテキストを入力し、ドロップダウン値とチェック ボックスを選択し、ドキュメント内のリンクをクリックします。 また、マウスの移動、任意の JavaScript の実行など、他の多くのコントロールも提供します。

主にWebサイトのフロントエンドのテストに使用されますが、その中核として、Seleniumは、 ユーザーがブラウザーを代理で操作する ライブラリ です。 インターフェースはアプリケーションに遍在しており、目的に合わせて他のライブラリとの構成を促進します。

すべてを支配する 1 つのインターフェース

プロジェクトの指針となる原則の1つは、すべての (主要な) ブラウザー テクノロジに共通のインターフェイスをサポートすることです。 Webブラウザーは非常に複雑で、高度に設計されたアプリケーションであり、 まったく異なる方法で操作を実行しますが、実行中は同じように見えることがよくあります。 テキストは同じフォントで表示されますが、画像は同じ場所に表示され、リンク先は同じです。 水面下で起こっていることは、昼と夜と同じくらい異なります。 Selenium はこれらの違いを “抽象化” し、コードを書いている人からその詳細や複雑さを隠蔽します。 これにより、数行のコードを記述して複雑なワークフローを実行できますが、 これらの同じ行は、Firefox、Internet Explorer、Chrome、およびその他のサポートされているすべてのブラウザーで実行されます。

ツールとサポート

Seleniumの必要最小限な設計アプローチは、より大きなアプリケーションのコンポーネントとして含まれる汎用性を提供します。 Seleniumの包括的なプロジェクトの下で提供される周辺インフラストラクチャは、 ブラウザーのgridをまとめるためのツールを提供し、 さまざまなブラウザーやさまざまなマシンの複数のオペレーティングシステムでテストを実行できるようにします。

サーバールームやデータセンター内の一連のコンピューターがすべて同時にブラウザーを起動して、 サイトのリンク、フォーム、テーブルにアクセスし、1日24時間アプリケーションをテストしていると想像してください。 最も一般的な言語用に提供されているシンプルなプログラミングインターフェイスを介して、 これらのテストは並行して休むことなく実行され、エラーが発生するとレポートが返されます。

ブラウザーを制御するだけでなく、そのようなgridを簡単に拡張および展開できるようにするための ツールとドキュメントをユーザーに提供することで、これを実現するお手伝いをするのが目的です。

誰がSeleniumを利用するのか

世界で最も重要な企業の多くは、ブラウザベースのテストに Seleniumを採用しており、 多くの場合、他の独自ツールを使用した長年にわたる取り組みに取って代わりました。 人気が高まるにつれて、その要件と課題も倍増しています。

ウェブがより複雑になり、新しいテクノロジーがウェブサイトに追加されるにつれて、 可能な限りそれらに遅れずについていくことがこのプロジェクトの使命です。 オープンソースプロジェクトであるため、このサポートは多くのボランティアからの惜しみない時間の寄付によって提供されます。

このプロジェクトのもう1つの使命は、より多くのボランティアがこの取り組みに参加することを奨励し、 強力なコミュニティを構築して、プロジェクトが新しいテクノロジに対応し続け、 機能テスト自動化の主要なプラットフォームであり続けることができるようにすることです。

2 - WebDriver

WebDriverはブラウザをネイティブに操作します。詳細については、こちらをご覧ください。

WebDriverは、ユーザーがローカルまたはSeleniumサーバーを使用するリモートマシンで行うように、ブラウザをネイティブに動かし、ブラウザの自動化に関して大きく前進します。

Selenium WebDriverは言語バインディングと個々のブラウザ制御コードの実装の両方を参照します。
これは通常、単に WebDriver と呼ばれます。

Selenium WebDriverは、W3C勧告です。

  • WebDriverはシンプルでより簡潔なプログラミングインターフェイスとして設計されています。

  • WebDriverはコンパクトなオブジェクト指向APIです。

  • ブラウザーを効果的に動かします。

2.1 - 入門

Seleniumを初めて使用する場合は、すぐに習得するのに役立つリソースがいくつかあります。

Seleniumは市場で主要なブラウザの全てを WebDriver を使うことでサポートしています。 WebDriverとはAPI群とプロトコルです。これらはウェブブラウザの動作をコントロールするための言語中立なインターフェイスを定義しています。 それぞれのブラウザは特定のWebDriverの実装を持っており、これらは driver と呼ばれます。 driverはブラウザに委譲する責務を持つコンポーネントであり、Seleniumとブラウザ間の通信を処理します。

この分離は、ブラウザベンダーに自分たちのブラウザでの実装の責任を持たせるための意図的な努力のひとつです。 Seleniumは可能な場合これらのサードパーティ製のdriverを使いますが、それが現実的でない場合のためにプロジェクトでメンテナンスしているdriverも提供しています。

Seleniumフレームワークはこれら全ての要素をユーザ向けのインターフェイスを通して結びつけます。このインターフェイスは異なるブラウザバックエンドを透過的に使えるようにし、クロスブラウザ・クロスプラットフォームの自動化を可能にします。

Selenium setup is quite different from the setup of other commercial tools. Before you can start writing Selenium code, you have to install the language bindings libraries for your language of choice, the browser you want to use, and the driver for that browser.

Follow the links below to get up and going with Selenium WebDriver.

If you wish to start with a low-code/record and playback tool, please check Selenium IDE

Once you get things working, if you want to scale up your tests, check out the Selenium Grid.

2.1.1 - Seleniumライブラリのインストール

お気に入りのプログラミング言語用にSeleniumライブラリを設定します。

最初にあなたの自動化プロジェクトにSeleniumのバインディングをインストールする必要があります。 インストールの方法は選択した言語によって異なります。

Requirements by language

View the minimum supported Java version here.

Installation of Selenium libraries for Java is accomplished using a build tool.

Maven

Specify the dependencies in the project’s pom.xml file:

        <dependency>
            <groupId>org.seleniumhq.selenium</groupId>
            <artifactId>selenium-java</artifactId>
            <version>4.15.0</version>
        </dependency>

Gradle

Specify the dependency in the project build.gradle file as testImplementation:

    testImplementation 'org.seleniumhq.selenium:selenium-java:4.15.0'
    testImplementation 'org.junit.jupiter:junit-jupiter-engine:5.10.0'

The minimum supported Python version for each Selenium version can be found in Supported Python Versions on PyPi

There are a couple different ways to install Selenium.

Pip

pip install selenium

Download

Alternatively you can download the PyPI source archive (selenium-x.x.x.tar.gz) and install it using setup.py:

python setup.py install

Require in project

To use it in a project, add it to the requirements.txt file:

selenium==4.15.2

A list of all supported frameworks for each version of Selenium is available on Nuget

There are a few options for installing Selenium.

Packet Manager

Install-Package Selenium.WebDriver

.NET CLI

dotnet add package Selenium.WebDriver

CSProj

in the project’s csproj file, specify the dependency as a PackageReference in ItemGroup:

      <PackageReference Include="Selenium.WebDriver" Version="4.15.0" />

Additional considerations

Further items of note for using Visual Studio Code (vscode) and C#

Install the compatible .NET SDK as per the section above. Also install the vscode extensions (Ctrl-Shift-X) for C# and NuGet. Follow the instruction here to create and run the “Hello World” console project using C#. You may also create a NUnit starter project using the command line dotnet new NUnit. Make sure the file %appdata%\NuGet\nuget.config is configured properly as some developers reported that it will be empty due to some issues. If nuget.config is empty, or not configured properly, then .NET builds will fail for Selenium Projects. Add the following section to the file nuget.config if it is empty:

<configuration>
  <packageSources>
    <add key="nuget.org" value="https://api.nuget.org/v3/index.json" protocolVersion="3" />
    <add key="nuget.org" value="https://www.nuget.org/api/v2/" />   
  </packageSources>
...

For more info about nuget.config click here. You may have to customize nuget.config to meet you needs.

Now, go back to vscode, press Ctrl-Shift-P, and type “NuGet Add Package”, and enter the required Selenium packages such as Selenium.WebDriver. Press Enter and select the version. Now you can use the examples in the documentation related to C# with vscode.

You can see the minimum required version of Ruby for any given Selenium version on rubygems.org

Selenium can be installed two different ways.

Install manually

gem install selenium-webdriver

Add to project’s gemfile

gem 'selenium-devtools', '~> 0.119'

You can find the minimum required version of Node for any given version of Selenium in the Node Support Policy section on npmjs

Selenium is typically installed using npm.

Install locally

npm install selenium-webdriver

Add to project

In your project’s package.json, add requirement to dependencies:

        "mocha": "^10.2.0"
Use the Java bindings for Kotlin.

Next Step

Create your first Selenium script

2.1.2 - 最初のSeleniumスクリプトを書く

Seleniumスクリプトを作成するための段階的な説明

Seleniumをインストールし、 すると、Seleniumコードを書く準備が整います。

Eight Basic Components

Seleniumが行うことはすべて、ブラウザコマンドを送信して、何かを実行したり、情報の要求を送信したりすることです。 Seleniumで行うことのほとんどは、次の基本的なコマンドの組み合わせです。

Click on the link to “View full example on GitHub” to see the code in context.

1. ドライバーインスタンスでセッションを開始します

For more details on starting a session read our documentation on driver sessions

        WebDriver driver = new ChromeDriver();
driver = webdriver.Chrome()
        IWebDriver driver = new ChromeDriver();
driver = Selenium::WebDriver.for :chrome
    driver = await new Builder().forBrowser('chrome').build();
        driver = ChromeDriver()

2. Take action on browser

In this example we are ブラウザがナビゲートするコマンドを送信します

        driver.get("https://www.selenium.dev/selenium/web/web-form.html");
driver.get("https://www.selenium.dev/selenium/web/web-form.html")
        driver.Navigate().GoToUrl("https://www.selenium.dev/selenium/web/web-form.html");
driver.get('https://www.selenium.dev/selenium/web/web-form.html')
    await driver.get('https://www.selenium.dev/selenium/web/web-form.html');
        driver.get("https://www.selenium.dev/selenium/web/web-form.html")

3. ブラウザに関する情報をリクエストします

There are a bunch of types of information about the browser you can request, including window handles, browser size / position, cookies, alerts, etc.

        driver.getTitle();
title = driver.title
        var title = driver.Title;
    let title = await driver.getTitle();
        val title = driver.title

4. Establish Waiting Strategy

Synchronizing the code with the current state of the browser is one of the biggest challenges with Selenium, and doing it well is an advanced topic.

Essentially you want to make sure that the element is on the page before you attempt to locate it and the element is in an interactable state before you attempt to interact with it.

An implicit wait is rarely the best solution, but it’s the easiest to demonstrate here, so we’ll use it as a placeholder.

Read more about Waiting strategies.

        driver.manage().timeouts().implicitlyWait(Duration.ofMillis(500));
driver.implicitly_wait(0.5)
        driver.Manage().Timeouts().ImplicitWait = TimeSpan.FromMilliseconds(500);
driver.manage.timeouts.implicit_wait = 500
    await driver.manage().setTimeouts({implicit: 500});
        driver.manage().timeouts().implicitlyWait(Duration.ofMillis(500))

5. 要素を検索するためのコマンドを送信します

The majority of commands in most Selenium sessions are element related, and you can’t interact with one without first finding an element

        WebElement textBox = driver.findElement(By.name("my-text"));
        WebElement submitButton = driver.findElement(By.cssSelector("button"));
text_box = driver.find_element(by=By.NAME, value="my-text")
submit_button = driver.find_element(by=By.CSS_SELECTOR, value="button")
        var textBox = driver.FindElement(By.Name("my-text"));
        var submitButton = driver.FindElement(By.TagName("button"));
text_box = driver.find_element(name: 'my-text')
submit_button = driver.find_element(tag_name: 'button')
    let textBox = await driver.findElement(By.name('my-text'));
    let submitButton = await driver.findElement(By.css('button'));
        var textBox = driver.findElement(By.name("my-text"))
        val submitButton = driver.findElement(By.cssSelector("button"))

6. 要素に対してアクションを実行する

There are only a handful of actions to take on an element, but you will use them frequently.

        textBox.sendKeys("Selenium");
        submitButton.click();
text_box.send_keys("Selenium")
submit_button.click()
        textBox.SendKeys("Selenium");
        submitButton.Click();
text_box.send_keys('Selenium')
submit_button.click
    await textBox.sendKeys('Selenium');
    await submitButton.click();
        textBox.sendKeys("Selenium")
        submitButton.click()

7. 要素に関する情報をリクエストします

Elements store a lot of information that can be requested.

        message.getText();
text = message.text
        var value = message.Text;
    let value = await message.getText();
        val value = message.getText()

8. セッションを終了します

This ends the driver process, which by default closes the browser as well. No more commands can be sent to this driver instance.

See Quitting Sessions.

Running Selenium File

Next Steps

Most Selenium users execute many sessions and need to organize them to minimize duplication and keep the code more maintainable. Read on to learn about how to put this code into context for your use case with Using Selenium.

2.1.3 - Organizing and Executing Selenium Code

Scaling Selenium execution with an IDE and a Test Runner library

If you want to run more than a handful of one-off scripts, you need to be able to organize and work with your code. This page should give you ideas for how to actually do productive things with your Selenium code.

Common Uses

Most people use Selenium to execute automated tests for web applications, but Selenium support any use case of browser automation.

Repetitive Tasks

Perhaps you need to log into a website and download something, or submit a form. You can create a Selenium script to run with a service at preset times.

Web Scraping

Are you looking to collect data from a site that doesn’t have an API? Selenium will let you do this, but please make sure you are familiar with the website’s terms of service as some websites do not permit it and others will even block Selenium.

Testing

Running Selenium for testing requires making assertions on actions taken by Selenium. So a good assertion library is required. Additional features to provide structure for tests require use of Test Runner.

IDEs

Regardless of how you use Selenium code, you won’t be very effective writing or executing it without a good Integrated Developer Environment. Here are some common options…

Test Runner

Even if you aren’t using Selenium for testing, if you have advanced use cases, it might make sense to use a test runner to better organize your code. Being able to use before/after hooks and run things in groups or in parallel can be very useful.

Choosing

There are many different test runners available.

All the code examples in this documentation can be found in (or is being moved to) our example directories that use test runners and get executed every release to ensure all the code is correct and updated. Here is a list of test runners with links. The first item is the one that is used by this repository and the one that will be used for all examples on this page.

  • JUnit - A widely-used testing framework for Java-based Selenium tests.
  • TestNG - Offers extra features like parallel test execution and parameterized tests.
  • pytest - A preferred choice for many, thanks to its simplicity and powerful plugins.
  • unittest - Python’s standard library testing framework.
  • NUnit - A popular unit-testing framework for .NET.
  • MS Test - Microsoft’s own unit testing framework.
  • RSpec - The most widely used testing library for running Selenium tests in Ruby.
  • Minitest - A lightweight testing framework that comes with Ruby standard library.
  • Jest - Primarily known as a testing framework for React, it can also be used for Selenium tests.
  • Mocha - The most common JS library for running Selenium tests.

Installing

This is very similar to what was required in Install a Selenium Library. This code is only showing examples for what is being used in our Documentation Examples project.

Maven

Gradle

To use it in a project, add it to the requirements.txt file:

in the project’s csproj file, specify the dependency as a PackageReference in ItemGroup:

Add to project’s gemfile

In your project’s package.json, add requirement to dependencies:

Asserting

Setting Up and Tearing Down

Executing

Maven

mvn clean test

Gradle

gradle clean test
mocha runningTests.spec.js

Examples

In First script, we saw each of the components of a Selenium script. Here’s an example of that code using a test runner:

package dev.selenium.getting_started;

import org.junit.jupiter.api.Test;
import org.openqa.selenium.By;
import org.openqa.selenium.WebDriver;
import org.openqa.selenium.WebElement;
import org.openqa.selenium.chrome.ChromeDriver;

import java.time.Duration;

import static org.junit.jupiter.api.Assertions.assertEquals;

public class UsingSeleniumTest {

    @Test
    public void eightComponents() {
        WebDriver driver = new ChromeDriver();
        driver.get("https://www.selenium.dev/selenium/web/web-form.html");

        String title = driver.getTitle();
        assertEquals("Web form", title);

        driver.manage().timeouts().implicitlyWait(Duration.ofMillis(500));

        WebElement textBox = driver.findElement(By.name("my-text"));
        WebElement submitButton = driver.findElement(By.cssSelector("button"));

        textBox.sendKeys("Selenium");
        submitButton.click();

        WebElement message = driver.findElement(By.id("message"));
        String value = message.getText();
        assertEquals("Received!", value);

        driver.quit();
    }

}
from selenium import webdriver
from selenium.webdriver.common.by import By


def test_eight_components():
    driver = webdriver.Chrome()

    driver.get("https://www.selenium.dev/selenium/web/web-form.html")

    title = driver.title
    assert title == "Web form"

    driver.implicitly_wait(0.5)

    text_box = driver.find_element(by=By.NAME, value="my-text")
    submit_button = driver.find_element(by=By.CSS_SELECTOR, value="button")

    text_box.send_keys("Selenium")
    submit_button.click()

    message = driver.find_element(by=By.ID, value="message")
    value = message.text
    assert value == "Received!"

    driver.quit()
using System;
using Microsoft.VisualStudio.TestTools.UnitTesting;
using OpenQA.Selenium;
using OpenQA.Selenium.Chrome;

namespace SeleniumDocs.GettingStarted
{
    [TestClass]
    public class UsingSeleniumTest
    {

        [TestMethod]
        public void EightComponents()
        {
            IWebDriver driver = new ChromeDriver();

            driver.Navigate().GoToUrl("https://www.selenium.dev/selenium/web/web-form.html");

            var title = driver.Title;
            Assert.AreEqual("Web form", title);

            driver.Manage().Timeouts().ImplicitWait = TimeSpan.FromMilliseconds(500);

            var textBox = driver.FindElement(By.Name("my-text"));
            var submitButton = driver.FindElement(By.TagName("button"));
            
            textBox.SendKeys("Selenium");
            submitButton.Click();
            
            var message = driver.FindElement(By.Id("message"));
            var value = message.Text;
            Assert.AreEqual("Received!", value);
            
            driver.Quit();
        }
    }
}
# frozen_string_literal: true

require 'spec_helper'

RSpec.describe 'Using Selenium' do
  it 'uses eight components' do
    driver = Selenium::WebDriver.for :chrome

    driver.get('https://www.selenium.dev/selenium/web/web-form.html')

    title = driver.title
    expect(title).to eq('Web form')

    driver.manage.timeouts.implicit_wait = 500

    text_box = driver.find_element(name: 'my-text')
    submit_button = driver.find_element(tag_name: 'button')

    text_box.send_keys('Selenium')
    submit_button.click

    message = driver.find_element(id: 'message')
    value = message.text
    expect(value).to eq('Received!')

    driver.quit
  end
end
const {By, Builder} = require('selenium-webdriver');
const assert = require("assert");

  describe('First script', function () {
    let driver;
    
    before(async function () {
      driver = await new Builder().forBrowser('chrome').build();
    });
    
    it('First Selenium script with mocha', async function () {
      await driver.get('https://www.selenium.dev/selenium/web/web-form.html');
      
      let title = await driver.getTitle();
      assert.equal("Web form", title);
      
      await driver.manage().setTimeouts({implicit: 500});
      
      let textBox = await driver.findElement(By.name('my-text'));
      let submitButton = await driver.findElement(By.css('button'));
      
      await textBox.sendKeys('Selenium');
      await submitButton.click();
      
      let message = await driver.findElement(By.id('message'));
      let value = await message.getText();
      assert.equal("Received!", value);
    });
  
    after(async () => await driver.quit());
  });

Next Steps

Take what you’ve learned and build out your Selenium code!

As you find more functionality that you need, read up on the rest of our WebDriver documentation.

2.2 - ドライバーセッション

セッションの開始と停止は、ブラウザーを開いたり閉じたりするためのものです。

セッションの作成

新しいセッションの作成は、W3C コマンド New session に対応しています。

セッションは、新しいDriverクラスオブジェクトを初期化することによって自動的に作成されます。

各言語では、次のいずれかのクラス (または同等のもの) の引数を使用してセッションを作成することができます。

ローカルドライバー

ローカルドライバーを起動するための主な一意の引数には、ローカルコンピューターで必要なドライバーサービスを起動するための情報が含まれます。

  • Serviceオブジェクトはローカルドライバーにのみ適用され、ブラウザーのドライバーに関する情報を提供します。

リモートドライバー

リモートドライバーを起動するための主な一意の引数には、コードを実行する場所に関する情報を含みます。 詳細は、リモートドライバーをご覧ください。

セッションの終了

セッションの終了に対するW3Cコマンドは、セッションの削除です。

重要: quit メソッドは close メソッドとは異なり、 セッションを終了するには常に quit を使用することをお勧めします。

2.2.1 - ブラウザーオプション

これらのCapabilityはすべてのブラウザで共通です。

Selenium 3 では、Capabilitiesは Desired Capabilities クラスを使用してセッションで定義していました。 Selenium 4 以降、ブラウザ オプション クラスを使用する必要があります。 リモート ドライバー セッションの場合、使用するブラウザーを決めるため、ブラウザーオプションインスタンスが必要です。

これらのオプションは、Capabilities の w3c仕様で説明しています。

各ブラウザには、w3c仕様で定義しているものに加えて定義可能な カスタム オプション があります。

browserName

Browser name is set by default when using an Options class instance.

browserVersion

This capability is optional, this is used to set the available browser version at remote end. In recent versions of Selenium, if the version is not found on the system, it will be automatically downloaded by Selenium Manager

pageLoadStrategy

3種類のページ読み込み戦略を利用できます。

ページ読み込み戦略は、次の表で説明しています。

戦略準備完了状態注釈
normalcompleteデフォルトで使用され、すべてのリソースをダウンロードするのを待ちます
eagerinteractiveDOM アクセスの準備は整っていますが、画像などの他のリソースはまだロード中の可能性があります
noneAnyWebDriver をまったくブロックしません

ドキュメントの document.readyState プロパティは、現在のドキュメントの読み込み状態を示します。

URL 経由で新しいページに移動する場合、デフォルトでは、WebDriver は、ドキュメントの準備完了状態が完了するまで、 ナビゲーション メソッド (driver.navigate().get() など) の完了を保留します。 これは必ずしもページの読み込みが完了したことを意味するわけではありません。 特に、Ready State が完了した後に JavaScript を使用してコンテンツを動的に読み込むシングル ページ アプリケーションのようなサイトの場合はそうです。 また、この動作は、要素のクリックまたはフォームの送信の結果であるナビゲーションには適用されないことに注意してください。

自動化にとって重要ではないアセット (画像、css、js など) をダウンロードした結果、ページの読み込みに時間がかかる場合は、 デフォルトのパラメーターである normaleager または none に変更して、セッションの読み込みを高速化できます。 この値はセッション全体に適用されるため、 待機戦略 が不安定さを最小限に抑えるのに十分であることを確認してください。

normal (デフォルト)

WebDriver は load イベント検知するまで待機します。

import org.openqa.selenium.PageLoadStrategy;
import org.openqa.selenium.WebDriver;
import org.openqa.selenium.chrome.ChromeOptions;
import org.openqa.selenium.chrome.ChromeDriver;

public class pageLoadStrategy {
  public static void main(String[] args) {
    ChromeOptions chromeOptions = new ChromeOptions();
    chromeOptions.setPageLoadStrategy(PageLoadStrategy.NORMAL);
    WebDriver driver = new ChromeDriver(chromeOptions);
    try {
      // Navigate to Url
      driver.get("https://google.com");
    } finally {
      driver.quit();
    }
  }
}
from selenium import webdriver
from selenium.webdriver.chrome.options import Options
options = Options()
options.page_load_strategy = 'normal'
driver = webdriver.Chrome(options=options)
driver.get("http://www.google.com")
driver.quit()
using OpenQA.Selenium;
using OpenQA.Selenium.Chrome;

namespace pageLoadStrategy {
  class pageLoadStrategy {
    public static void Main(string[] args) {
      var chromeOptions = new ChromeOptions();
      chromeOptions.PageLoadStrategy = PageLoadStrategy.Normal;
      IWebDriver driver = new ChromeDriver(chromeOptions);
      try {
        driver.Navigate().GoToUrl("https://example.com");
      } finally {
        driver.Quit();
      }
    }
  }
}
require 'selenium-webdriver'
options = Selenium::WebDriver::Options.chrome
options.page_load_strategy = :normal

driver = Selenium::WebDriver.for :chrome, options: options
driver.get('https://www.google.com')
    it('Navigate using normal page loading strategy', async function () {
      let driver = await env
        .builder()
        .setChromeOptions(options.setPageLoadStrategy('normal'))
        .build();

      await driver.get('https://www.selenium.dev/selenium/web/blank.html');
import org.openqa.selenium.PageLoadStrategy
import org.openqa.selenium.chrome.ChromeDriver
import org.openqa.selenium.chrome.ChromeOptions

fun main() {
  val chromeOptions = ChromeOptions()
  chromeOptions.setPageLoadStrategy(PageLoadStrategy.NORMAL)
  val driver = ChromeDriver(chromeOptions)
  try {
    driver.get("https://www.google.com")
  }
  finally {
    driver.quit()
  }
}

eager

WebDriver は、DOMContentLoaded イベントを検知するまで待機します。

import org.openqa.selenium.PageLoadStrategy;
import org.openqa.selenium.WebDriver;
import org.openqa.selenium.chrome.ChromeOptions;
import org.openqa.selenium.chrome.ChromeDriver;

public class pageLoadStrategy {
  public static void main(String[] args) {
    ChromeOptions chromeOptions = new ChromeOptions();
    chromeOptions.setPageLoadStrategy(PageLoadStrategy.EAGER);
    WebDriver driver = new ChromeDriver(chromeOptions);
    try {
      // Navigate to Url
      driver.get("https://google.com");
    } finally {
      driver.quit();
    }
  }
}
from selenium import webdriver
from selenium.webdriver.chrome.options import Options
options = Options()
options.page_load_strategy = 'eager'
driver = webdriver.Chrome(options=options)
driver.get("http://www.google.com")
driver.quit()
using OpenQA.Selenium;
using OpenQA.Selenium.Chrome;

namespace pageLoadStrategy {
  class pageLoadStrategy {
    public static void Main(string[] args) {
      var chromeOptions = new ChromeOptions();
      chromeOptions.PageLoadStrategy = PageLoadStrategy.Eager;
      IWebDriver driver = new ChromeDriver(chromeOptions);
      try {
        driver.Navigate().GoToUrl("https://example.com");
      } finally {
        driver.Quit();
      }
    }
  }
}
require 'selenium-webdriver'
options = Selenium::WebDriver::Options.chrome
options.page_load_strategy = :eager

driver = Selenium::WebDriver.for :chrome, options: options
driver.get('https://www.google.com')
    it('Navigate using eager page loading strategy', async function () {
      let driver = await env
        .builder()
        .setChromeOptions(options.setPageLoadStrategy('eager'))
        .build();

      await driver.get('https://www.selenium.dev/selenium/web/blank.html');
import org.openqa.selenium.PageLoadStrategy
import org.openqa.selenium.chrome.ChromeDriver
import org.openqa.selenium.chrome.ChromeOptions

fun main() {
  val chromeOptions = ChromeOptions()
  chromeOptions.setPageLoadStrategy(PageLoadStrategy.EAGER)
  val driver = ChromeDriver(chromeOptions)
  try {
    driver.get("https://www.google.com")
  }
  finally {
    driver.quit()
  }
}

none

WebDriver は、最初のページがダウンロードされるまで待機します。

import org.openqa.selenium.PageLoadStrategy;
import org.openqa.selenium.WebDriver;
import org.openqa.selenium.chrome.ChromeOptions;
import org.openqa.selenium.chrome.ChromeDriver;

public class pageLoadStrategy {
  public static void main(String[] args) {
    ChromeOptions chromeOptions = new ChromeOptions();
    chromeOptions.setPageLoadStrategy(PageLoadStrategy.NONE);
    WebDriver driver = new ChromeDriver(chromeOptions);
    try {
      // Navigate to Url
      driver.get("https://google.com");
    } finally {
      driver.quit();
    }
  }
}
from selenium import webdriver
from selenium.webdriver.chrome.options import Options
options = Options()
options.page_load_strategy = 'none'
driver = webdriver.Chrome(options=options)
driver.get("http://www.google.com")
driver.quit()
using OpenQA.Selenium;
using OpenQA.Selenium.Chrome;

namespace pageLoadStrategy {
  class pageLoadStrategy {
    public static void Main(string[] args) {
      var chromeOptions = new ChromeOptions();
      chromeOptions.PageLoadStrategy = PageLoadStrategy.None;
      IWebDriver driver = new ChromeDriver(chromeOptions);
      try {
        driver.Navigate().GoToUrl("https://example.com");
      } finally {
        driver.Quit();
      }
    }
  }
}
require 'selenium-webdriver'
options = Selenium::WebDriver::Options.chrome
options.page_load_strategy = :none

driver = Selenium::WebDriver.for :chrome, options: options
driver.get('https://www.google.com')
    it('Navigate using none page loading strategy', async function () {
      let driver = await env
        .builder()
        .setChromeOptions(options.setPageLoadStrategy('none'))
        .build();

      await driver.get('https://www.selenium.dev/selenium/web/blank.html');
import org.openqa.selenium.PageLoadStrategy
import org.openqa.selenium.chrome.ChromeDriver
import org.openqa.selenium.chrome.ChromeOptions

fun main() {
  val chromeOptions = ChromeOptions()
  chromeOptions.setPageLoadStrategy(PageLoadStrategy.NONE)
  val driver = ChromeDriver(chromeOptions)
  try {
    driver.get("https://www.google.com")
  }
  finally {
    driver.quit()
  }
}

platformName

これにより、リモートエンドのオペレーティングシステムが識別され、 platformName を取得するとOS名が返されます。

クラウドベースのプロバイダーでは、 platformName を設定すると、リモートエンドのOSが設定されます。

acceptInsecureCerts

この機能は、セッション中のナビゲーション中に、期限切れ(または)無効な TLS証明書 が使用されているかどうかを確認します。

機能が false に設定されている場合、ナビゲーションでドメイン証明書の問題が発生すると、 insecure certificate error が返されます。 true に設定すると、無効な証明書はブラウザーによって信頼されます。

すべての自己署名証明書は、デフォルトでこの機能によって信頼されます。 一度設定すると、 acceptInsecureCerts Capabilityはセッション全体に影響します。

timeouts

WebDriverの セッション には特定の セッションタイムアウト 間隔が設定されており、 その間、ユーザーはスクリプトの実行またはブラウザーからの情報の取得の動作を制御できます。

各セッションタイムアウトは、以下で説明するように、異なる タイムアウト の組み合わせで構成されます。

Script Timeout:

現在のブラウジングコンテキストで実行中のスクリプトをいつ中断するかを指定します。 新しいセッションがWebDriverによって作成されると、デフォルトのタイムアウト 30,000 が課されます。

Page Load Timeout:

現在のブラウジングコンテキストでWebページをロードする必要がある時間間隔を指定します。 新しいセッションがWebDriverによって作成されると、デフォルトのタイムアウト 300,000 が課されます。 ページの読み込みが指定/デフォルトの時間枠を制限する場合、スクリプトは TimeoutException によって停止されます。

Implicit Wait Timeout

これは、要素を検索するときに暗黙的な要素の検索戦略を待つ時間を指定します。 新しいセッションがWebDriverによって作成されると、デフォルトのタイムアウト 0 が課されます。

unhandledPromptBehavior

現在のセッションの ユーザープロンプトハンドラー の状態を指定します。 デフォルトでは、 dismiss and notify (却下して通知する) 状態 となります。

User Prompt Handler

これは、リモートエンドでユーザープロンプトが表示されたときに実行する必要があるアクションを定義します。 これは、 unhandledPromptBehavior Capabilityによって定義され、次の状態があります。

  • dismiss (却下)
  • accept (受入)
  • dismiss and notify (却下して通知)
  • accept and notify (受け入れて通知)
  • ignore (無視)

setWindowRect

リモート エンドがすべての サイズ変更および再配置 コマンド をサポートするかどうかを示します。

strictFileInteractability

この新しいcapabilityは、厳密な相互作用チェックを input type = file 要素に適用する必要があるかどうかを示します。 厳密な相互作用チェックはデフォルトでオフになっているため、隠しファイルのアップロードコントロールで Element Send Keys を使用する場合の動作が変更されます。

proxy

プロキシサーバーは、クライアントとサーバー間の要求の仲介役として機能します。 簡単に言えば、トラフィックはプロキシサーバーを経由して、要求したアドレスに戻り、戻ってきます。

Seleniumを使用した自動化スクリプト用のプロキシサーバーは、

  • ネットワークトラフィックをキャプチャする
  • ウェブサイトによって行われた模擬バックエンドを呼び出す
  • 複雑なネットワークトポロジーまたは厳格な企業の制限/ポリシーの下で、必要なWebサイトにアクセスします。

企業環境でブラウザがURLへの接続に失敗した場合、環境にアクセスするにはプロキシが必要であることが原因であることが最も可能性が高いです。

Selenium WebDriverは設定をプロキシする方法を提供します。

import org.openqa.selenium.Proxy;
import org.openqa.selenium.WebDriver;
import org.openqa.selenium.chrome.ChromeDriver;
import org.openqa.selenium.chrome.ChromeOptions;

public class ProxyTest {
  public static void main(String[] args) {
    Proxy proxy = new Proxy();
    proxy.setHttpProxy("<HOST:PORT>");
    ChromeOptions options = new ChromeOptions();
    options.setCapability("proxy", proxy);
    WebDriver driver = new ChromeDriver(options);
    driver.get("https://www.google.com/");
    driver.manage().window().maximize();
    driver.quit();
  }
}
from selenium import webdriver

PROXY = "<HOST:PORT>"
webdriver.DesiredCapabilities.FIREFOX['proxy'] = {
"httpProxy": PROXY,
"ftpProxy": PROXY,
"sslProxy": PROXY,
"proxyType": "MANUAL",

}

with webdriver.Firefox() as driver:
# Open URL
    driver.get("https://selenium.dev")
using OpenQA.Selenium;
using OpenQA.Selenium.Chrome;

public class ProxyTest{
public static void Main() {
ChromeOptions options = new ChromeOptions();
Proxy proxy = new Proxy();
proxy.Kind = ProxyKind.Manual;
proxy.IsAutoDetect = false;
proxy.SslProxy = "<HOST:PORT>";
options.Proxy = proxy;
options.AddArgument("ignore-certificate-errors");
IWebDriver driver = new ChromeDriver(options);
driver.Navigate().GoToUrl("https://www.selenium.dev/");
}
}
# this code was written with Selenium 4

proxy = Selenium::WebDriver::Proxy.new(http: '<HOST:PORT>')
cap   = Selenium::WebDriver::Remote::Capabilities.chrome(proxy: proxy)

driver = Selenium::WebDriver.for(:chrome, capabilities: cap)
driver.get('http://google.com')
let webdriver = require('selenium-webdriver');
let chrome = require('selenium-webdriver/chrome');
let proxy = require('selenium-webdriver/proxy');
let opts = new chrome.Options();

(async function example() {
opts.setProxy(proxy.manual({http: '<HOST:PORT>'}));
let driver = new webdriver.Builder()
.forBrowser('chrome')
.setChromeOptions(opts)
.build();
try {
await driver.get("https://selenium.dev");
}
finally {
await driver.quit();
}
}());
import org.openqa.selenium.Proxy
import org.openqa.selenium.WebDriver
import org.openqa.selenium.chrome.ChromeDriver
import org.openqa.selenium.chrome.ChromeOptions

class proxyTest {
fun main() {

        val proxy = Proxy()
        proxy.setHttpProxy("<HOST:PORT>")
        val options = ChromeOptions()
        options.setCapability("proxy", proxy)
        val driver: WebDriver = ChromeDriver(options)
        driver["https://www.google.com/"]
        driver.manage().window().maximize()
        driver.quit()
    }
}

2.2.2 - HTTP Client Configuration

These allow you to set various parameters for the HTTP library

2.2.3 - Driver Service Class

The Service classes are for managing the starting and stopping of drivers. They can not be used with a Remote WebDriver session.

Service classes allow you to specify information about the driver, like location and which port to use. They also let you specify what arguments get passed to the command line. Most of the useful arguments are related to logging.

Default Service instance

To start a driver with a default service instance:

    ChromeDriverService service = new ChromeDriverService.Builder().build();
    driver = new ChromeDriver(service);
    service = webdriver.ChromeService()
    driver = webdriver.Chrome(service=service)
            var service = ChromeDriverService.CreateDefaultService();
            driver = new ChromeDriver(service);
    service = Selenium::WebDriver::Service.chrome
    @driver = Selenium::WebDriver.for :chrome, service: service

Driver location

Note: If you are using Selenium 4.6 or greater, you shouldn’t need to set a driver location. If you can not update Selenium or have an advanced use case here is how to specify the driver location:

    ChromeDriverService service =
        new ChromeDriverService.Builder().usingDriverExecutable(driverPath).build();
    service = webdriver.ChromeService(executable_path=chromedriver_bin)
            var service = ChromeDriverService.CreateDefaultService(GetDriverLocation(options));
    service.executable_path = driver_path

Driver port

If you want the driver to run on a specific port, you may specify it as follows:

    ChromeDriverService service = new ChromeDriverService.Builder().usingPort(1234).build();
    service = webdriver.ChromeService(port=1234)
            service.Port = 1234;
    service.port = 1234

Logging

Logging functionality varies between browsers. Most browsers allow you to specify location and level of logs. Take a look at the respective browser page:

2.2.4 - Remote WebDriver

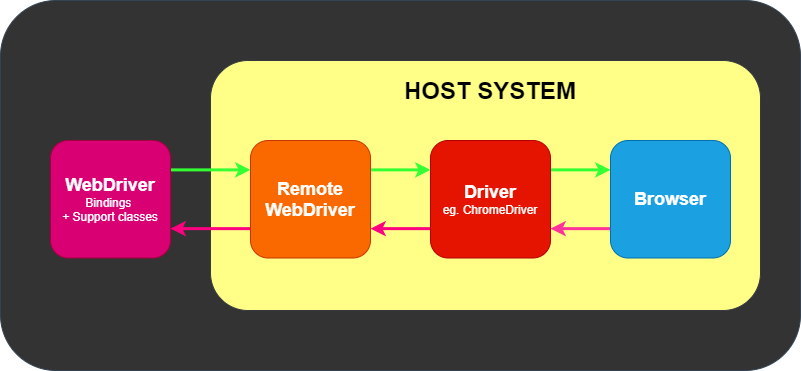
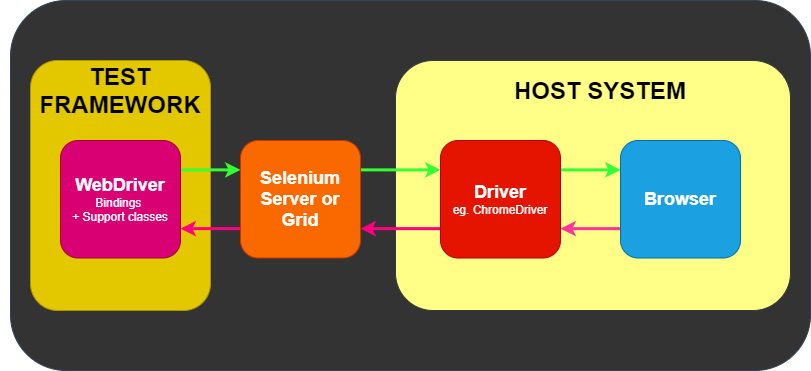
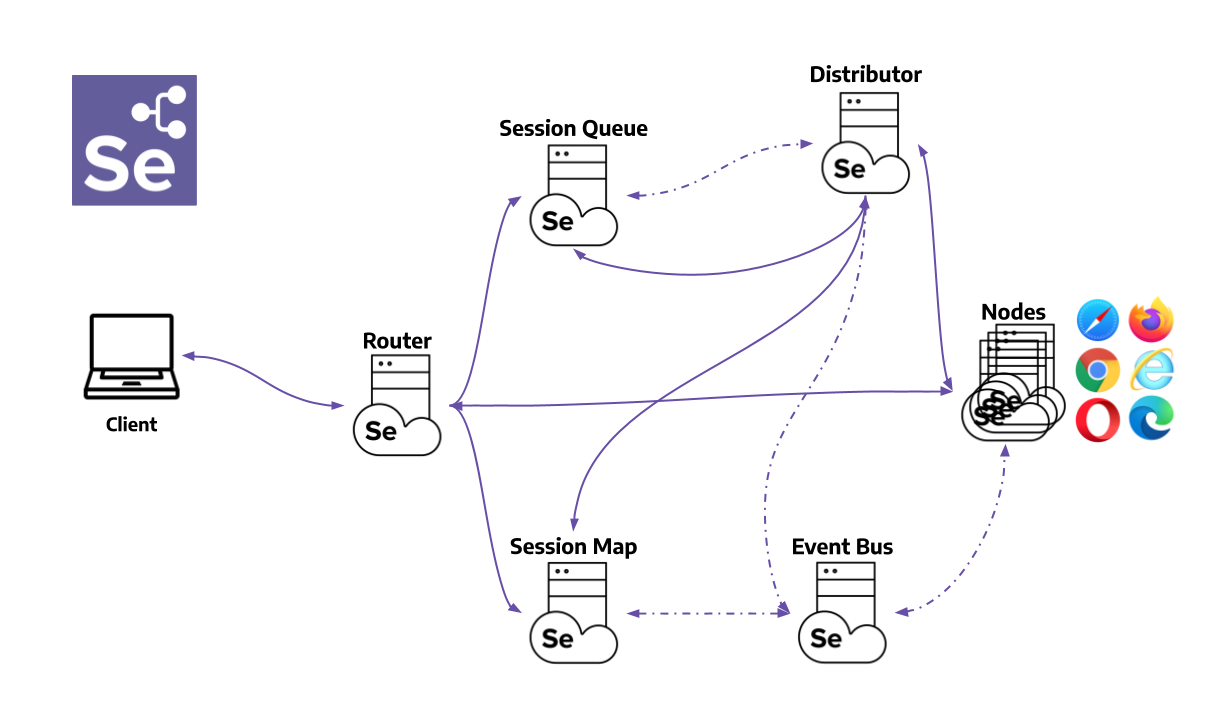
Selenium lets you automate browsers on remote computers if there is a Selenium Grid running on them. The computer that executes the code is referred to as the client computer, and the computer with the browser and driver is referred to as the remote computer or sometimes as an end-node. To direct Selenium tests to the remote computer, you need to use a Remote WebDriver class and pass the URL including the port of the grid on that machine. Please see the grid documentation for all the various ways the grid can be configured.

Basic Example

The driver needs to know where to send commands to and which browser to start on the Remote computer. So an address and an options instance are both required.

    ChromeOptions options = new ChromeOptions();
    driver = new RemoteWebDriver(gridUrl, options);
    options = webdriver.ChromeOptions()
    driver = webdriver.Remote(command_executor=server, options=options)
            var options = new ChromeOptions();
            driver = new RemoteWebDriver(GridUrl, options);
    options = Selenium::WebDriver::Options.chrome
    driver = Selenium::WebDriver.for :remote, url: grid_url, options: options

Uploads

Uploading a file is more complicated for Remote WebDriver sessions because the file you want to upload is likely on the computer executing the code, but the driver on the remote computer is looking for the provided path on its local file system. The solution is to use a Local File Detector. When one is set, Selenium will bundle the file, and send it to the remote machine, so the driver can see the reference to it. Some bindings include a basic local file detector by default, and all of them allow for a custom file detector.

Java does not include a Local File Detector by default, so you must always add one to do uploads.
    ((RemoteWebDriver) driver).setFileDetector(new LocalFileDetector());
    WebElement fileInput = driver.findElement(By.cssSelector("input[type=file]"));
    fileInput.sendKeys(uploadFile.getAbsolutePath());
    driver.findElement(By.id("file-submit")).click();

Python adds a local file detector to remote webdriver instances by default, but you can also create your own class.

    driver.file_detector = LocalFileDetector()
    file_input = driver.find_element(By.CSS_SELECTOR, "input[type='file']")
    file_input.send_keys(upload_file)
    driver.find_element(By.ID, "file-submit").click()
.NET adds a local file detector to remote webdriver instances by default, but you can also create your own class.
            ((RemoteWebDriver)driver).FileDetector = new LocalFileDetector();
            IWebElement fileInput = driver.FindElement(By.CssSelector("input[type=file]"));
            fileInput.SendKeys(uploadFile);
            driver.FindElement(By.Id("file-submit")).Click();
Ruby adds a local file detector to remote webdriver instances by default, but you can also create your own lambda:
    driver.file_detector = ->((filename, *)) { filename.include?('selenium') && filename }
    file_input = driver.find_element(css: 'input[type=file]')
    file_input.send_keys(upload_file)
    driver.find_element(id: 'file-submit').click

Downloads

Chrome, Edge and Firefox each allow you to set the location of the download directory. When you do this on a remote computer, though, the location is on the remote computer’s local file system. Selenium allows you to enable downloads to get these files onto the client computer.

Enable Downloads in the Grid

Regardless of the client, when starting the grid in node or standalone mode, you must add the flag:

--enable-managed-downloads true

Enable Downloads in the Client

The grid uses the se:downloadsEnabled capability to toggle whether to be responsible for managing the browser location. Each of the bindings have a method in the options class to set this.

    ChromeOptions options = new ChromeOptions();
    options.setEnableDownloads(true);
    driver = new RemoteWebDriver(gridUrl, options);
    options = webdriver.ChromeOptions()
    options.enable_downloads = True
    driver = webdriver.Remote(command_executor=server, options=options)
            ChromeOptions options = new ChromeOptions
            {
                EnableDownloads = true
            };
            driver = new RemoteWebDriver(GridUrl, options);
    options = Selenium::WebDriver::Options.chrome(enable_downloads: true)
    driver = Selenium::WebDriver.for :remote, url: grid_url, options: options

List Downloadable Files

Be aware that Selenium is not waiting for files to finish downloading, so the list is an immediate snapshot of what file names are currently in the directory for the given session.

    List<String> files = ((HasDownloads) driver).getDownloadableFiles();
    files = driver.get_downloadable_files()
            List<string> names = ((RemoteWebDriver)driver).GetDownloadableFiles();
    files = driver.downloadable_files

Download a File

Selenium looks for the name of the provided file in the list and downloads it to the provided target directory.

    ((HasDownloads) driver).downloadFile(downloadableFile, targetDirectory);
    driver.download_file(downloadable_file, target_directory)
            ((RemoteWebDriver)driver).DownloadFile(downloadableFile, targetDirectory);
    driver.download_file(downloadable_file, target_directory)

Delete Downloaded Files

By default, the download directory is deleted at the end of the applicable session, but you can also delete all files during the session.

    ((HasDownloads) driver).deleteDownloadableFiles();
    driver.delete_downloadable_files()
            ((RemoteWebDriver)driver).DeleteDownloadableFiles();
    driver.delete_downloadable_files

Browser specific functionalities

Each browser has implemented special functionality that is available only to that browser. Each of the Selenium bindings has implemented a different way to use those features in a Remote Session

Java requires you to use the Augmenter class, which allows it to automatically pull in implementations for all interfaces that match the capabilities used with the RemoteWebDriver

    driver = new Augmenter().augment(driver);

Of interest, using the RemoteWebDriverBuilder automatically augments the driver, so it is a great way to get all the functionality by default:

    driver =
        RemoteWebDriver.builder()
            .address(gridUrl)
            .oneOf(new ChromeOptions())
            .setCapability("ext:options", Map.of("key", "value"))
            .config(ClientConfig.defaultConfig())
            .build();
.NET uses a custom command executor for executing commands that are valid for the given browser in the remote driver.
            var customCommandDriver = driver as ICustomDriverCommandExecutor;
            customCommandDriver.RegisterCustomDriverCommands(FirefoxDriver.CustomCommandDefinitions);

            var screenshotResponse = customCommandDriver
                .ExecuteCustomDriverCommand(FirefoxDriver.GetFullPageScreenshotCommand, null);
Ruby uses mixins to add applicable browser specific methods to the Remote WebDriver session; the methods should always just work for you.

クライアントのリクエストをトレースする

この機能は、Java クライアント バインディング (ベータ版以降) でのみ利用できます。 Remote WebDriver クライアントは Selenium Grid サーバーにリクエストを送信し、 Selenium Grid サーバーはリクエストを WebDriver に渡します。 HTTP リクエストをエンド ツー エンドでトレースするには、サーバー側とクライアント側でトレースを有効にする必要があります。 両端には、視覚化フレームワークを指すトレース エクスポーターのセットアップが必要です。 デフォルトでは、トレースはクライアントとサーバーの両方で有効になっています。 視覚化フレームワークの Jaeger UI と Selenium Grid 4 を設定するには、目的のバージョンの トレースのセットアップ を参照してください。

クライアント側のセットアップについては、以下の手順に従ってください。

必要な依存関係を追加する

トレーシング エクスポーターの外部ライブラリのインストールは、Maven を使って実行できます。 プロジェクト pom.xml に opentelemetry-exporter-jaeger および grpc-netty の依存関係を追加します。

  <dependency>
      <groupId>io.opentelemetry</groupId>
      <artifactId>opentelemetry-exporter-jaeger</artifactId>
      <version>1.0.0</version>
    </dependency>
    <dependency>
      <groupId>io.grpc</groupId>
      <artifactId>grpc-netty</artifactId>
      <version>1.35.0</version>
    </dependency>

クライアントの実行中に必要なシステムプロパティを追加/渡す

System.setProperty("otel.traces.exporter", "jaeger");
System.setProperty("otel.exporter.jaeger.endpoint", "http://localhost:14250");
System.setProperty("otel.resource.attributes", "service.name=selenium-java-client");

ImmutableCapabilities capabilities = new ImmutableCapabilities("browserName", "chrome");

WebDriver driver = new RemoteWebDriver(new URL("http://www.example.com"), capabilities);

driver.get("http://www.google.com");

driver.quit();


ご希望のSeleniumのバージョンに必要な外部依存関係のバージョンの詳細については、 トレースのセットアップ を参照してください。

詳細については、下記URLを参照してください。

2.3 - 対応ブラウザ

各ブラウザには、カスタムCapabilityと固有の機能があります。

2.3.1 - Chrome固有の機能

これらは、Google Chrome ブラウザに固有のCapabilityです。

デフォルトでは、Selenium 4 は Chrome v75 以降と互換性があります。 Chromeブラウザのバージョンと chromedriverのバージョンは、メジャーバージョンと一致する必要があることに注意してください。

Options

全てのブラウザに共通のCapabilityについては、オプション ページで説明しています。

Chrome に固有のCapabilityは、Google のCapabilities & ChromeOptionsページにあります。

基本的な定義済みオプションを使用してChromeセッションを開始すると、次のようになります。

    ChromeOptions options = new ChromeOptions();
    driver = new ChromeDriver(options);
    options = webdriver.ChromeOptions()
    driver = webdriver.Chrome(options=options)
            var options = new ChromeOptions();
            driver = new ChromeDriver(options);
      options = Selenium::WebDriver::Options.chrome
      @driver = Selenium::WebDriver.for :chrome, options: options
      const Options = new Chrome.Options();
      let driver = await env
        .builder()
        .setChromeOptions(Options)
        .build();

さまざまなCapabilityを備えた一般的な使用例をいくつか示します。

引数

The args parameter is for a list of command line switches to be used when starting the browser. There are two excellent resources for investigating these arguments:

Commonly used args include --start-maximized, --headless=new and --user-data-dir=...

Add an argument to options:

    options.addArguments("--start-maximized");
    options.add_argument("--start-maximized")
            options.AddArgument("--start-maximized");
      options.args << '--start-maximized'
      let driver = await env
        .builder()
        .setChromeOptions(options.addArguments('--headless=new'))
        .build();

指定したロケーションでブラウザを起動する

binaryパラメーターは、使用するブラウザの別のロケーションのパスを取ります。 このパラメーターを使用すると、chromedriver を使用して、さまざまな Chromium ベースのブラウザを駆動できます。

オプションにブラウザのロケーションを追加します。

    options.setBinary(getChromeLocation());
    options.binary_location = chrome_bin
            options.BinaryLocation = GetChromeLocation();
      options.binary = chrome_location
      let driver = await env
        .builder()
        .setChromeOptions(options.setChromeBinaryPath(`Path to chrome binary`))
        .build();

拡張機能を追加する

extensions パラメーターはcrxファイルを受け入れます

The extensions parameter accepts crx files. As for unpacked directories, please use the load-extension argument instead, as mentioned in this post.

オプションに拡張機能を追加します。

    options.addExtensions(extensionFilePath);
    options.add_extension(extension_file_path)
            options.AddExtension(extensionFilePath);
      options.add_extension(extension_file_path)
      const options = new Chrome.Options();
      let driver = await env
        .builder()
        .setChromeOptions(options.addExtensions(['./test/resources/extensions/webextensions-selenium-example.crx']))
        .build();

ブラウザを開いたままにする

detach パラメータをtrueに設定すると、ドライバープロセスが終了した後もブラウザを開いたままにできます。

Note: This is already the default behavior in Java.

    options.add_experimental_option("detach", True)

Note: This is already the default behavior in .NET.

      options.detach = true
      let driver = await env
        .builder()
        .setChromeOptions(options.detachDriver(true))
        .build();

引数を除外する

Chrome はさまざまな引数を追加します。 これらの引数を追加したくない場合は、それらを excludeSwitches に渡します。 一般的な例は、ポップアップブロッカーをオンに設定することです。

A full list of default arguments can be parsed from the Chromium Source Code

オプションに除外された引数を設定します。

    options.setExperimentalOption("excludeSwitches", List.of("disable-popup-blocking"));
    options.add_experimental_option('excludeSwitches', ['disable-popup-blocking'])
            options.AddExcludedArgument("disable-popup-blocking");
      options.exclude_switches << 'disable-popup-blocking'
      let driver = await env
        .builder()
        .setChromeOptions(options.excludeSwitches('enable-automation'))
        .build();

Service

Examples for creating a default Service object, and for setting driver location and port can be found on the Driver Service page.

Log output

Getting driver logs can be helpful for debugging issues. The Service class lets you direct where the logs will go. Logging output is ignored unless the user directs it somewhere.

File output

To change the logging output to save to a specific file:

    ChromeDriverService service =
        new ChromeDriverService.Builder().withLogFile(logLocation).build();

Note: Java also allows setting file output by System Property:
Property key: ChromeDriverService.CHROME_DRIVER_LOG_PROPERTY
Property value: String representing path to log file

    service = webdriver.ChromeService(log_output=log_path)
            service.LogPath = GetLogLocation();
      service.log = file_name

Console output

To change the logging output to display in the console as STDOUT:

    ChromeDriverService service =
        new ChromeDriverService.Builder().withLogOutput(System.out).build();

Note: Java also allows setting console output by System Property;
Property key: ChromeDriverService.CHROME_DRIVER_LOG_PROPERTY
Property value: DriverService.LOG_STDOUT or DriverService.LOG_STDERR

    service = webdriver.ChromeService(log_output=subprocess.STDOUT)

$stdout and $stderr are both valid values

      service.log = $stdout

Log level

There are 6 available log levels: ALL, DEBUG, INFO, WARNING, SEVERE, and OFF. Note that --verbose is equivalent to --log-level=ALL and --silent is equivalent to --log-level=OFF, so this example is just setting the log level generically:

    ChromeDriverService service =
        new ChromeDriverService.Builder().withLogLevel(ChromiumDriverLogLevel.DEBUG).build();

Note: Java also allows setting log level by System Property:
Property key: ChromeDriverService.CHROME_DRIVER_LOG_LEVEL_PROPERTY
Property value: String representation of ChromiumDriverLogLevel enum

    service = webdriver.ChromeService(service_args=['--log-level=DEBUG'], log_output=subprocess.STDOUT)
      service.args << '--log-level=DEBUG'

Log file features

There are 2 features that are only available when logging to a file:

  • append log
  • readable timestamps

To use them, you need to also explicitly specify the log path and log level. The log output will be managed by the driver, not the process, so minor differences may be seen.

    ChromeDriverService service =
        new ChromeDriverService.Builder().withAppendLog(true).withReadableTimestamp(true).build();

Note: Java also allows toggling these features by System Property:
Property keys: ChromeDriverService.CHROME_DRIVER_APPEND_LOG_PROPERTY and ChromeDriverService.CHROME_DRIVER_READABLE_TIMESTAMP
Property value: "true" or "false"

    service = webdriver.ChromeService(service_args=['--append-log', '--readable-timestamp'], log_output=log_path)
      service.args << '--append-log'
      service.args << '--readable-timestamp'

Disabling build check

Chromedriver and Chrome browser versions should match, and if they don’t the driver will error. If you disable the build check, you can force the driver to be used with any version of Chrome. Note that this is an unsupported feature, and bugs will not be investigated.

    ChromeDriverService service =
        new ChromeDriverService.Builder().withBuildCheckDisabled(true).build();

Note: Java also allows disabling build checks by System Property:
Property key: ChromeDriverService.CHROME_DRIVER_DISABLE_BUILD_CHECK
Property value: "true" or "false"

    service = webdriver.ChromeService(service_args=['--disable-build-check'], log_output=subprocess.STDOUT)
            service.DisableBuildCheck = true;
      service.args << '--disable-build-check'

Special Features

キャスティング

タブの共有など、Chrome Castデバイスを操作できます。

ネットワークの状態

さまざまなネットワークの状態をシミュレートできます。

The following examples are for local webdrivers. For remote webdrivers, please refer to the Remote WebDriver page.

ログ

パーミッション

デベロッパー ツール

Chromeデベロッパーツールの使用に関する詳細については、Chromeデベロッパー ツールセクションを参照してください。

2.3.2 - Edge固有の機能

これらは、Microsoft Edgeブラウザに固有のCapabilityです。

Microsoft EdgeはChromiumで実装されており、サポートされている最も古いバージョンはv79です。 Chromeと同様に、edgedriverのメジャー バージョン番号は、Edgeブラウザのメジャーバージョンと一致する必要があります。

Chromeページ にあるすべての機能とオプションは、Edgeでも機能します。

オプション

Capabilities common to all browsers are described on the Options page.

Capabilities unique to Chromium are documented at Google’s page for Capabilities & ChromeOptions

基本的な定義済みオプションを使用して Edgeセッションを開始すると、次のようになります。

    EdgeOptions options = new EdgeOptions();
    driver = new EdgeDriver(options);
    options = webdriver.EdgeOptions()
    driver = webdriver.Edge(options=options)
            var options = new EdgeOptions();
            driver = new EdgeDriver(options);
      options = Selenium::WebDriver::Options.edge
      @driver = Selenium::WebDriver.for :edge, options: options
      driver = await env.builder()
        .setEdgeOptions(options)
        .build();
    });

引数

The args parameter is for a list of command line switches to be used when starting the browser. There are two excellent resources for investigating these arguments:

一般的に使用される引数には、--start-maximized および --headless=new が含まれます。 and --user-data-dir=...

オプションに引数を追加します。

    options.addArguments("--start-maximized");
    options.add_argument("--start-maximized")
            options.AddArgument("--start-maximized");
      options.args << '--start-maximized'

Start browser in a specified location

The binary parameter takes the path of an alternate location of browser to use. With this parameter you can use chromedriver to drive various Chromium based browsers.

Add a browser location to options:

    options.setBinary(getEdgeLocation());
    options.binary_location = edge_bin
            options.BinaryLocation = GetEdgeLocation();
      options.binary = edge_location

Add extensions

The extensions parameter accepts crx files. As for unpacked directories, please use the load-extension argument instead, as mentioned in this post.

Add an extension to options:

    options.addExtensions(extensionFilePath);
    options.add_extension(extension_file_path)
            options.AddExtension(extensionFilePath);
      options.add_extension(extension_file_path)

Keeping browser open

Setting the detach parameter to true will keep the browser open after the process has ended, so long as the quit command is not sent to the driver.

Note: This is already the default behavior in Java.

    options.add_experimental_option("detach", True)

Note: This is already the default behavior in .NET.

      options.detach = true

Excluding arguments

MSEdgedriver has several default arguments it uses to start the browser. If you do not want those arguments added, pass them into excludeSwitches. A common example is to turn the popup blocker back on. A full list of default arguments can be parsed from the Chromium Source Code

Set excluded arguments on options:

    options.setExperimentalOption("excludeSwitches", List.of("disable-popup-blocking"));
    options.add_experimental_option('excludeSwitches', ['disable-popup-blocking'])
            options.AddExcludedArgument("disable-popup-blocking");
      options.exclude_switches << 'disable-popup-blocking'

Service

Examples for creating a default Service object, and for setting driver location and port can be found on the Driver Service page.

Log output

Getting driver logs can be helpful for debugging issues. The Service class lets you direct where the logs will go. Logging output is ignored unless the user directs it somewhere.

File output

To change the logging output to save to a specific file:

    EdgeDriverService service = new EdgeDriverService.Builder().withLogFile(logLocation).build();

Note: Java also allows setting file output by System Property:
Property key: EdgeDriverService.EDGE_DRIVER_LOG_PROPERTY
Property value: String representing path to log file

    service = webdriver.EdgeService(log_output=log_path)
            service.LogPath = GetLogLocation();
      service.log = file_name

Console output

To change the logging output to display in the console as STDOUT:

    EdgeDriverService service = new EdgeDriverService.Builder().withLogOutput(System.out).build();

Note: Java also allows setting console output by System Property;
Property key: EdgeDriverService.EDGE_DRIVER_LOG_PROPERTY
Property value: DriverService.LOG_STDOUT or DriverService.LOG_STDERR

$stdout and $stderr are both valid values

      service.log = $stdout

Log level

There are 6 available log levels: ALL, DEBUG, INFO, WARNING, SEVERE, and OFF. Note that --verbose is equivalent to --log-level=ALL and --silent is equivalent to --log-level=OFF, so this example is just setting the log level generically:

    EdgeDriverService service =
        new EdgeDriverService.Builder().withLoglevel(ChromiumDriverLogLevel.DEBUG).build();

Note: Java also allows setting log level by System Property:
Property key: EdgeDriverService.EDGE_DRIVER_LOG_LEVEL_PROPERTY
Property value: String representation of ChromiumDriverLogLevel enum

    service = webdriver.EdgeService(service_args=['--log-level=DEBUG'], log_output=log_path)
      service.args << '--log-level=DEBUG'

Log file features

There are 2 features that are only available when logging to a file:

  • append log
  • readable timestamps

To use them, you need to also explicitly specify the log path and log level. The log output will be managed by the driver, not the process, so minor differences may be seen.

    EdgeDriverService service =
        new EdgeDriverService.Builder().withAppendLog(true).withReadableTimestamp(true).build();

Note: Java also allows toggling these features by System Property:
Property keys: EdgeDriverService.EDGE_DRIVER_APPEND_LOG_PROPERTY and EdgeDriverService.EDGE_DRIVER_READABLE_TIMESTAMP
Property value: "true" or "false"

    service = webdriver.EdgeService(service_args=['--append-log', '--readable-timestamp'], log_output=log_path)
      service.args << '--append-log'
      service.args << '--readable-timestamp'

Disabling build check

Edge browser and msedgedriver versions should match, and if they don’t the driver will error. If you disable the build check, you can force the driver to be used with any version of Edge. Note that this is an unsupported feature, and bugs will not be investigated.

    EdgeDriverService service =
        new EdgeDriverService.Builder().withBuildCheckDisabled(true).build();

Note: Java also allows disabling build checks by System Property:
Property key: EdgeDriverService.EDGE_DRIVER_DISABLE_BUILD_CHECK
Property value: "true" or "false"

    service = webdriver.EdgeService(service_args=['--disable-build-check'], log_output=log_path)
            service.DisableBuildCheck = true;
      service.args << '--disable-build-check'

Internet Explorer Compatibility モード

Microsoft Edge は、Internet Explorer ドライバークラスを Microsoft Edgeと組み合わせて使用する “Internet Explorer 互換モード"で動かすことができます。 詳細については、Internet Explorerページを参照してください。

Special Features

Some browsers have implemented additional features that are unique to them.

Casting

You can drive Chrome Cast devices with Edge, including sharing tabs

Network conditions

You can simulate various network conditions.

Logs

Permissions

DevTools

See the Chrome DevTools section for more information about using DevTools in Edge

2.3.3 - Firefox 固有のCapability

Mozilla Firefox ブラウザーに固有のCapabilityです。

Selenium 4 には Firefox 78 以降が必要です。 常に最新バージョンの geckodriver を使用することをお勧めします。

オプション

全ブラウザに共通のCapabilityについては、オプションページで説明しています。

Firefox に固有のCapabilityは、Mozilla のページの firefoxOptions にあります。

基本的な定義済みのオプションを使用して Firefox セッションを開始すると、以下のようになります。

    FirefoxOptions options = new FirefoxOptions();
    driver = new FirefoxDriver(options);
    options = webdriver.FirefoxOptions()
    driver = webdriver.Firefox(options=options)
            var options = new FirefoxOptions();
            driver = new FirefoxDriver(options);
      options = Selenium::WebDriver::Options.firefox
      @driver = Selenium::WebDriver.for :firefox, options: options
      let options = new firefox.Options();
      driver = await env.builder()
        .setFirefoxOptions(options)
        .build();

さまざまなCapabilityを備えた一般的な使用例をいくつか示します。

引数

args パラメータは、ブラウザの起動時に使用するコマンドラインスイッチのリストです。 一般的に使用される引数には、 -headless"-profile""/path/to/profile" が含まれます。

オプションに引数を追加します。

    options.addArguments("-headless");
    options.add_argument("-headless")
            options.AddArgument("-headless");
      options.args << '-headless'
    let driver = await env.builder()
      .setFirefoxOptions(options.addArguments('--headless'))
      .build();

指定したロケーションでブラウザを起動する

binary パラメーターは、使用するブラウザーの別のロケーションのパスを取ります。 たとえば、このパラメーターを使用すると、geckodriver を使用して、製品版とFirefox Nightlyの両方がコンピューターに存在する場合、 製品版の代わりに Firefox Nightly を駆動できます 。

オプションにブラウザーのロケーションを追加します。

    options.setBinary(getFirefoxLocation());
    options.binary_location = firefox_bin
            options.BinaryLocation = GetFirefoxLocation();
      options.binary = firefox_location

プロファイル

Firefoxプロファイルを操作するにはいくつかの方法があります。

FirefoxProfile profile = new FirefoxProfile();
FirefoxOptions options = new FirefoxOptions();
options.setProfile(profile);
driver = new RemoteWebDriver(options);
  
from selenium.webdriver.firefox.options import Options
from selenium.webdriver.firefox.firefox_profile import FirefoxProfile
options=Options()
firefox_profile = FirefoxProfile()
firefox_profile.set_preference("javascript.enabled", False)
options.profile = firefox_profile
  
var options = new FirefoxOptions();
var profile = new FirefoxProfile();
options.Profile = profile;
var driver = new RemoteWebDriver(options);
  
profile = Selenium::WebDriver::Firefox::Profile.new
profile['browser.download.dir'] = "/tmp/webdriver-downloads"
options = Selenium::WebDriver::Firefox::Options.new(profile: profile)
driver = Selenium::WebDriver.for :firefox, options: options
  
const { Builder } = require("selenium-webdriver");
const firefox = require('selenium-webdriver/firefox');

const options = new firefox.Options();
let profile = '/path to custom profile';
options.setProfile(profile);
const driver = new Builder()
    .forBrowser('firefox')
    .setFirefoxOptions(options)
    .build();
  
val options = FirefoxOptions()
options.profile = FirefoxProfile()
driver = RemoteWebDriver(options)
  

Service

Service settings common to all browsers are described on the Service page.

Log output

Getting driver logs can be helpful for debugging various issues. The Service class lets you direct where the logs will go. Logging output is ignored unless the user directs it somewhere.

File output

To change the logging output to save to a specific file:

    FirefoxDriverService service =
        new GeckoDriverService.Builder().withLogFile(logLocation).build();

Note: Java also allows setting file output by System Property:
Property key: GeckoDriverService.GECKO_DRIVER_LOG_PROPERTY
Property value: String representing path to log file

    service = webdriver.FirefoxService(log_output=log_path, service_args=['--log', 'debug'])
      service.log = file_name

Console output

To change the logging output to display in the console:

    FirefoxDriverService service =
        new GeckoDriverService.Builder().withLogOutput(System.out).build();

Note: Java also allows setting console output by System Property;
Property key: GeckoDriverService.GECKO_DRIVER_LOG_PROPERTY
Property value: DriverService.LOG_STDOUT or DriverService.LOG_STDERR

    service = webdriver.FirefoxService(log_output=subprocess.STDOUT)
      service.log = $stdout

Log level

There are 7 available log levels: fatal, error, warn, info, config, debug, trace. If logging is specified the level defaults to info.

Note that -v is equivalent to -log debug and -vv is equivalent to log trace, so this examples is just for setting the log level generically:

    FirefoxDriverService service =
        new GeckoDriverService.Builder().withLogLevel(FirefoxDriverLogLevel.DEBUG).build();

Note: Java also allows setting log level by System Property:
Property key: GeckoDriverService.GECKO_DRIVER_LOG_LEVEL_PROPERTY
Property value: String representation of FirefoxDriverLogLevel enum

    service = webdriver.FirefoxService(log_output=log_path, service_args=['--log', 'debug'])
      service.args += %w[--log debug]

Truncated Logs

The driver logs everything that gets sent to it, including string representations of large binaries, so Firefox truncates lines by default. To turn off truncation:

    FirefoxDriverService service =
        new GeckoDriverService.Builder().withTruncatedLogs(false).build();

Note: Java also allows setting log level by System Property:
Property key: GeckoDriverService.GECKO_DRIVER_LOG_NO_TRUNCATE
Property value: "true" or "false"

    service = webdriver.FirefoxService(service_args=['--log-no-truncate', '--log', 'debug'], log_output=log_path)
      service.args << '--log-no-truncate'

Profile Root

The default directory for profiles is the system temporary directory. If you do not have access to that directory, or want profiles to be created some place specific, you can change the profile root directory:

    FirefoxDriverService service =
        new GeckoDriverService.Builder().withProfileRoot(profileDirectory).build();

Note: Java also allows setting log level by System Property:
Property key: GeckoDriverService.GECKO_DRIVER_PROFILE_ROOT
Property value: String representing path to profile root directory

    service = webdriver.FirefoxService(service_args=['--profile-root', temp_dir])
      service.args += ['--profile-root', root_directory]

Special Features

アドオン

Chromeとは異なり、Firefoxの拡張機能はCapabilityの一部として追加されるのではなく、ドライバーの起動後に作成されます。

Unlike Chrome, Firefox extensions are not added as part of capabilities as mentioned in this issue, they are created after starting the driver.

The following examples are for local webdrivers. For remote webdrivers, please refer to the Remote WebDriver page.

インストール

Mozilla Add-Onsページ から取得する署名付きxpiファイル

    driver.installExtension(xpiPath);
    driver.install_addon(addon_path)
            driver.InstallAddOnFromFile(Path.GetFullPath(extensionFilePath));
      driver.install_addon(extension_file_path)
    const xpiPath = path.resolve('./test/resources/extensions/selenium-example.xpi')
    let driver = await env.builder().build();
    let id = await driver.installAddon(xpiPath);

アンインストール

アドオンをアンインストールするには、そのIDを知る必要があります。 IDはアドオンインストール時の戻り値から取得できます。

    driver.uninstallExtension(id);
    driver.uninstall_addon(id)
            driver.UninstallAddOn(extensionId);
      driver.uninstall_addon(extension_id)
    const xpiPath = path.resolve('./test/resources/extensions/selenium-example.xpi')
    let driver = await env.builder().build();
    let id = await driver.installAddon(xpiPath);
    await driver.uninstallAddon(id);

署名なしのインストール

未完成または未公開の拡張機能を使用する場合、署名されていない可能性があります。 そのため、“一時的なもの” としてのみインストールできます。 これは、zipファイルまたはディレクトリを渡すことで実行できます。ディレクトリの例を次に示します。

    driver.installExtension(path, true);
    driver.install_addon(addon_path, temporary=True)
            driver.InstallAddOnFromDirectory(Path.GetFullPath(extensionDirPath), true);
      driver.install_addon(extension_dir_path, true)

ページ全体のスクリーンショット

The following examples are for local webdrivers. For remote webdrivers, please refer to the Remote WebDriver page.

コンテキスト

The following examples are for local webdrivers. For remote webdrivers, please refer to the Remote WebDriver page.

2.3.4 - IE specific functionality

These are capabilities and features specific to Microsoft Internet Explorer browsers.

As of June 2022, Selenium officially no longer supports standalone Internet Explorer. The Internet Explorer driver still supports running Microsoft Edge in “IE Compatibility Mode.”

Special considerations

The IE Driver is the only driver maintained by the Selenium Project directly. While binaries for both the 32-bit and 64-bit versions of Internet Explorer are available, there are some known limitations with the 64-bit driver. As such it is recommended to use the 32-bit driver.

Additional information about using Internet Explorer can be found on the IE Driver Server page

Options

Starting a Microsoft Edge browser in Internet Explorer Compatibility mode with basic defined options looks like this:

        InternetExplorerOptions options = new InternetExplorerOptions();
        options.attachToEdgeChrome();
        options.withEdgeExecutablePath(getEdgeLocation());
        driver = new InternetExplorerDriver(options);
    options = webdriver.IeOptions()
    options.attach_to_edge_chrome = True
    options.edge_executable_path = edge_bin
    driver = webdriver.Ie(options=options)
            var options = new InternetExplorerOptions();
            options.AttachToEdgeChrome = true;
            options.EdgeExecutablePath = GetEdgeLocation();
            driver = new InternetExplorerDriver(options);
      options = Selenium::WebDriver::Options.ie
      options.attach_to_edge_chrome = true
      options.edge_executable_path = edge_location
      @driver = Selenium::WebDriver.for :ie, options: options

As of Internet Explorer Driver v4.5.0:

  • If IE is not present on the system (default in Windows 11), you do not need to use the two parameters above. IE Driver will use Edge and will automatically locate it.
  • If IE and Edge are both present on the system, you only need to set attaching to Edge, IE Driver will automatically locate Edge on your system.

So, if IE is not on the system, you only need:

        InternetExplorerOptions options = new InternetExplorerOptions();
        driver = new InternetExplorerDriver(options);
    options = webdriver.IeOptions()
    driver = webdriver.Ie(options=options)
            var options = new InternetExplorerOptions();
            driver = new InternetExplorerDriver(options);
      options = Selenium::WebDriver::Options.ie
      @driver = Selenium::WebDriver.for :ie, options: options
let driver = await new Builder()
.forBrowser('internet explorer')
.setIEOptions(options)
.build();
<p><a href=/documentation/about/contributing/#moving-examples>
<span class="selenium-badge-code" data-bs-toggle="tooltip" data-bs-placement="right"
      title="One or more of these examples need to be implemented in the examples directory; click for details in the contribution guide">Move Code</span></a></p>


val options = InternetExplorerOptions()
val driver = InternetExplorerDriver(options)

Here are a few common use cases with different capabilities:

fileUploadDialogTimeout

環境によっては、ファイルアップロードダイアログを開くときにInternet Explorerがタイムアウトする場合があります。 IEDriverのデフォルトのタイムアウトは1000ミリ秒ですが、fileUploadDialogTimeout capabilityを使用してタイムアウトを増やすことができます。

InternetExplorerOptions options = new InternetExplorerOptions();
options.waitForUploadDialogUpTo(Duration.ofSeconds(2));
WebDriver driver = new RemoteWebDriver(options);
  
from selenium import webdriver

options = webdriver.IeOptions()
options.file_upload_dialog_timeout = 2000
driver = webdriver.Ie(options=options)

driver.get("http://www.google.com")

driver.quit()
  
var options = new InternetExplorerOptions();
options.FileUploadDialogTimeout = TimeSpan.FromMilliseconds(2000);
var driver = new RemoteWebDriver(options);
  
options = Selenium::WebDriver::IE::Options.new
options.file_upload_dialog_timeout = 2000
driver = Selenium::WebDriver.for(:ie, options: options)
  
const ie = require('selenium-webdriver/ie');
let options = new ie.Options().fileUploadDialogTimeout(2000);
let driver = await Builder()
          .setIeOptions(options)
          .build(); 
  
val options = InternetExplorerOptions()
options.waitForUploadDialogUpTo(Duration.ofSeconds(2))
val driver = RemoteWebDriver(options)
  

ensureCleanSession

この機能を true に設定すると、手動またはドライバーによって開始されたものを含め、 InternetExplorerの実行中のすべてのインスタンスのキャッシュ、ブラウザー履歴、およびCookieがクリアされます。 デフォルトでは、false に設定されています。

この機能を使用すると、ドライバーがIEブラウザーを起動する前にキャッシュがクリアされるまで待機するため、 ブラウザーの起動中にパフォーマンスが低下します。

このケイパビリティは、ブール値をパラメーターとして受け入れます。

InternetExplorerOptions options = new InternetExplorerOptions();
options.destructivelyEnsureCleanSession();
WebDriver driver = new RemoteWebDriver(options);
  
from selenium import webdriver

options = webdriver.IeOptions()
options.ensure_clean_session = True
driver = webdriver.Ie(options=options)

driver.get("http://www.google.com")

driver.quit()
  
var options = new InternetExplorerOptions();
options.EnsureCleanSession = true;
var driver = new RemoteWebDriver(options);
  
options = Selenium::WebDriver::IE::Options.new
options.ensure_clean_session = true
driver = Selenium::WebDriver.for(:ie, options: options)
  
const ie = require('selenium-webdriver/ie');
let options = new ie.Options().ensureCleanSession(true);
let driver = await Builder()
          .setIeOptions(options)
          .build(); 
  
val options = InternetExplorerOptions()
options.destructivelyEnsureCleanSession()
val driver = RemoteWebDriver(options)
  

ignoreZoomSetting

InternetExplorerドライバーは、ブラウザーのズームレベルが100%であることを想定しています。 それ以外の場合、ドライバーは例外をスローします。 このデフォルトの動作は、 ignoreZoomSettingtrue に設定することで無効にできます。

このケイパビリティは、ブール値をパラメーターとして受け入れます。

InternetExplorerOptions options = new InternetExplorerOptions();
options.ignoreZoomSettings();
WebDriver driver = new RemoteWebDriver(options);
  
from selenium import webdriver

options = webdriver.IeOptions()
options.ignore_zoom_level = True
driver = webdriver.Ie(options=options)

driver.get("http://www.google.com")

driver.quit()
  
var options = new InternetExplorerOptions();
options.IgnoreZoomLevel = true;
var driver = new RemoteWebDriver(options);
  
options = Selenium::WebDriver::IE::Options.new
options.ignore_zoom_level = true
driver = Selenium::WebDriver.for(:ie, options: options)
  
const ie = require('selenium-webdriver/ie');
let options = new ie.Options().ignoreZoomSetting(true);
let driver = await Builder()
          .setIeOptions(options)
          .build(); 
  
val options = InternetExplorerOptions()
options.ignoreZoomSettings()
val driver = RemoteWebDriver(options)
  

ignoreProtectedModeSettings

新しいIEセッションの起動中に 保護モード チェックをスキップするかどうか。

設定されておらず、 保護モード 設定がすべてのゾーンで同じでない場合、 ドライバーによって例外がスローされます。

ケイパビリティを true に設定すると、テストが不安定になったり、応答しなくなったり、 ブラウザがハングしたりする場合があります。 ただし、これはまだ2番目に良い選択であり、最初の選択は 常に 各ゾーンの保護モード設定を手動で実際に設定することです。 ユーザーがこのプロパティを使用している場合、「ベストエフォート」のみがサポートされます。

このケイパビリティは、ブール値をパラメーターとして受け入れます。

InternetExplorerOptions options = new InternetExplorerOptions();
options.introduceFlakinessByIgnoringSecurityDomains();
WebDriver driver = new RemoteWebDriver(options);
  
from selenium import webdriver

options = webdriver.IeOptions()
options.ignore_protected_mode_settings = True
driver = webdriver.Ie(options=options)

driver.get("http://www.google.com")

driver.quit()
  
var options = new InternetExplorerOptions();
options.IntroduceInstabilityByIgnoringProtectedModeSettings = true;
var driver = new RemoteWebDriver(options);
  
options = Selenium::WebDriver::IE::Options.new
options.ignore_protected_mode_settings = true
driver = Selenium::WebDriver.for(:ie, options: options)
  
const ie = require('selenium-webdriver/ie');
let options = new ie.Options().introduceFlakinessByIgnoringProtectedModeSettings(true);
let driver = await Builder()
          .setIeOptions(options)
          .build(); 
  
val options = InternetExplorerOptions()
options.introduceFlakinessByIgnoringSecurityDomains()
val driver = RemoteWebDriver(options)
  

silent

true に設定すると、このケイパビリティはIEDriverServerの診断出力を抑制します。

このケイパビリティは、ブール値をパラメーターとして受け入れます。

InternetExplorerOptions options = new InternetExplorerOptions();
options.setCapability("silent", true);
WebDriver driver = new InternetExplorerDriver(options);
  
from selenium import webdriver

options = webdriver.IeOptions()
options.set_capability("silent", True)
driver = webdriver.Ie(options=options)

driver.get("http://www.google.com")

driver.quit()
  
InternetExplorerOptions options = new InternetExplorerOptions();
options.AddAdditionalInternetExplorerOption("silent", true);
IWebDriver driver = new InternetExplorerDriver(options);


    <p><a href=/documentation/about/contributing/#creating-examples>
    <span class="selenium-badge-code" data-bs-toggle="tooltip" data-bs-placement="right"
          title="This code example is missing. Examples are added to the examples directory; click for details in the contribution guide">Add Example</span></a></p>


const {Builder,By, Capabilities} = require('selenium-webdriver');
let caps = Capabilities.ie();
caps.set('silent', true);

(async function example() {
    let driver = await new Builder()
        .forBrowser('internet explorer')
        .withCapabilities(caps)
        .build();
    try {
        await driver.get('http://www.google.com/ncr');
    }
    finally {
        await driver.quit();
    }
})();
  
import org.openqa.selenium.Capabilities
import org.openqa.selenium.ie.InternetExplorerDriver
import org.openqa.selenium.ie.InternetExplorerOptions

fun main() {
    val options = InternetExplorerOptions()
    options.setCapability("silent", true)
    val driver = InternetExplorerDriver(options)
    try {
        driver.get("https://google.com/ncr")
        val caps = driver.getCapabilities()
        println(caps)
    } finally {
        driver.quit()
    }
}
  

IE Command-Line Options

Internet Explorerには、ブラウザーのトラブルシューティングと構成を可能にするいくつかのコマンドラインオプションが含まれています。

次に、サポートされているいくつかのコマンドラインオプションについて説明します。

  • -private : IEをプライベートブラウジングモードで起動するために使用されます。 これはIE 8以降のバージョンで機能します。

  • -k : Internet Explorerをキオスクモードで起動します。 ブラウザは、アドレスバー、ナビゲーションボタン、またはステータスバーを表示しない最大化されたウィンドウで開きます。

  • -extoff : アドオンなしモードでIEを起動します。 このオプションは、ブラウザーのアドオンに関する問題のトラブルシューティングに特に使用されます。 IE 7以降のバージョンで動作します。

注:コマンドライン引数が機能するためには、 forceCreateProcessApi を順番に有効にする必要があります。

import org.openqa.selenium.Capabilities;
import org.openqa.selenium.ie.InternetExplorerDriver;
import org.openqa.selenium.ie.InternetExplorerOptions;

public class ieTest {
    public static void main(String[] args) {
        InternetExplorerOptions options = new InternetExplorerOptions();
        options.useCreateProcessApiToLaunchIe();
        options.addCommandSwitches("-k");
        InternetExplorerDriver driver = new InternetExplorerDriver(options);
        try {
            driver.get("https://google.com/ncr");
            Capabilities caps = driver.getCapabilities();
            System.out.println(caps);
        } finally {
            driver.quit();
        }
    }
}
  
from selenium import webdriver

options = webdriver.IeOptions()
options.add_argument('-private')
options.force_create_process_api = True
driver = webdriver.Ie(options=options)

driver.get("http://www.google.com")

driver.quit()
  
using System;
using OpenQA.Selenium;
using OpenQA.Selenium.IE;

namespace ieTest {
 class Program {
  static void Main(string[] args) {
   InternetExplorerOptions options = new InternetExplorerOptions();
   options.ForceCreateProcessApi = true;
   options.BrowserCommandLineArguments = "-k";
   IWebDriver driver = new InternetExplorerDriver(options);
   driver.Url = "https://google.com/ncr";
  }
 }
}
  
require 'selenium-webdriver'
options = Selenium::WebDriver::IE::Options.new
options.force_create_process_api = true
options.add_argument('-k')
driver = Selenium::WebDriver.for(:ie, options: options)

begin
  driver.get 'https://google.com'
  puts(driver.capabilities.to_json)
ensure
  driver.quit
end
  
const ie = require('selenium-webdriver/ie');
let options = new ie.Options();
options.addBrowserCommandSwitches('-k');
options.addBrowserCommandSwitches('-private');
options.forceCreateProcessApi(true);

driver = await env.builder()
          .setIeOptions(options)
          .build();
  
import org.openqa.selenium.Capabilities
import org.openqa.selenium.ie.InternetExplorerDriver
import org.openqa.selenium.ie.InternetExplorerOptions

fun main() {
    val options = InternetExplorerOptions()
    options.useCreateProcessApiToLaunchIe()
    options.addCommandSwitches("-k")
    val driver = InternetExplorerDriver(options)
    try {
        driver.get("https://google.com/ncr")
        val caps = driver.getCapabilities()
        println(caps);
    } finally {
        driver.quit()
    }
}
  

forceCreateProcessApi

CreateProcess APIを使用してInternet Explorerを強制的に起動します。 デフォルト値はfalseです。

IE 8以降の場合、このオプションでは “TabProcGrowth” レジストリの値を0に設定する必要があります。

import org.openqa.selenium.Capabilities;
import org.openqa.selenium.ie.InternetExplorerDriver;
import org.openqa.selenium.ie.InternetExplorerOptions;

public class ieTest {
    public static void main(String[] args) {
        InternetExplorerOptions options = new InternetExplorerOptions();
        options.useCreateProcessApiToLaunchIe();
        InternetExplorerDriver driver = new InternetExplorerDriver(options);
        try {
            driver.get("https://google.com/ncr");
            Capabilities caps = driver.getCapabilities();
            System.out.println(caps);
        } finally {
            driver.quit();
        }
    }
}
  
from selenium import webdriver

options = webdriver.IeOptions()
options.force_create_process_api = True
driver = webdriver.Ie(options=options)

driver.get("http://www.google.com")

driver.quit()
  
using System;
using OpenQA.Selenium;
using OpenQA.Selenium.IE;

namespace ieTest {
 class Program {
  static void Main(string[] args) {
   InternetExplorerOptions options = new InternetExplorerOptions();
   options.ForceCreateProcessApi = true;
   IWebDriver driver = new InternetExplorerDriver(options);
   driver.Url = "https://google.com/ncr";
  }
 }
}
  
require 'selenium-webdriver'
options = Selenium::WebDriver::IE::Options.new
options.force_create_process_api = true
driver = Selenium::WebDriver.for(:ie, options: options)

begin
  driver.get 'https://google.com'
  puts(driver.capabilities.to_json)
ensure
  driver.quit
end
  
const ie = require('selenium-webdriver/ie');
let options = new ie.Options();
options.forceCreateProcessApi(true);

driver = await env.builder()
          .setIeOptions(options)
          .build();
  
import org.openqa.selenium.Capabilities
import org.openqa.selenium.ie.InternetExplorerDriver
import org.openqa.selenium.ie.InternetExplorerOptions

fun main() {
    val options = InternetExplorerOptions()
    options.useCreateProcessApiToLaunchIe()
    val driver = InternetExplorerDriver(options)
    try {
        driver.get("https://google.com/ncr")
        val caps = driver.getCapabilities()
        println(caps)
    } finally {
        driver.quit()
    }
}


Service

Service settings common to all browsers are described on the Service page.

Log output

Getting driver logs can be helpful for debugging various issues. The Service class lets you direct where the logs will go. Logging output is ignored unless the user directs it somewhere.

File output

To change the logging output to save to a specific file:

                .withLogFile(getLogLocation())

Note: Java also allows setting file output by System Property:
Property key: InternetExplorerDriverService.IE_DRIVER_LOGFILE_PROPERTY
Property value: String representing path to log file

    service = webdriver.IeService(log_output=log_path, log_level='INFO')
      service.log = file_name

Console output

To change the logging output to display in the console as STDOUT:

                .withLogOutput(System.out)

Note: Java also allows setting console output by System Property;
Property key: InternetExplorerDriverService.IE_DRIVER_LOGFILE_PROPERTY
Property value: DriverService.LOG_STDOUT or DriverService.LOG_STDERR

    service = webdriver.IeService(log_output=subprocess.STDOUT)
      service.log = $stdout

Log Level

There are 6 available log levels: FATAL, ERROR, WARN, INFO, DEBUG, and TRACE If logging output is specified, the default level is FATAL

                .withLogLevel(InternetExplorerDriverLogLevel.WARN)

Note: Java also allows setting log level by System Property:
Property key: InternetExplorerDriverService.IE_DRIVER_LOGLEVEL_PROPERTY
Property value: String representation of InternetExplorerDriverLogLevel.DEBUG.toString() enum

    service = webdriver.IeService(log_output=log_path, log_level='WARN')
            service.LoggingLevel = InternetExplorerDriverLogLevel.Warn;
      service.args << '-log-level=WARN'

Supporting Files Path

                .withExtractPath(getTempDirectory())
**Note**: Java also allows setting log level by System Property:\ Property key: `InternetExplorerDriverService.IE_DRIVER_EXTRACT_PATH_PROPERTY`\ Property value: String representing path to supporting files directory
    service = webdriver.IeService(service_args=["–extract-path="+temp_dir])
            service.LibraryExtractionPath = GetTempDirectory();
      service.args << "–extract-path=#{root_directory}"

2.3.5 - Safari specific functionality

These are capabilities and features specific to Apple Safari browsers.

Unlike Chromium and Firefox drivers, the safaridriver is installed with the Operating System. To enable automation on Safari, run the following command from the terminal:

safaridriver --enable

Options

Capabilities common to all browsers are described on the Options page.

Capabilities unique to Safari can be found at Apple’s page About WebDriver for Safari

Starting a Safari session with basic defined options looks like this:

        SafariOptions options = new SafariOptions();
        driver = new SafariDriver(options);
    options = webdriver.SafariOptions()
    driver = webdriver.Safari(options=options)
            var options = new SafariOptions();
            driver = new SafariDriver(options);
      options = Selenium::WebDriver::Options.safari
      @driver = Selenium::WebDriver.for :safari, options: options
      let driver = await env.builder()
      .setSafariOptions(options)
      .build();
val options = SafariOptions()
val driver = SafariDriver(options)

Mobile

Those looking to automate Safari on iOS should look to the Appium project.

Service

Service settings common to all browsers are described on the Service page.

Logging

Unlike other browsers, Safari doesn’t let you choose where logs are output, or change levels. The one option available is to turn logs off or on. If logs are toggled on, they can be found at:~/Library/Logs/com.apple.WebDriver/.

                .withLogging(true)

Note: Java also allows setting console output by System Property;
Property key: SafariDriverService.SAFARI_DRIVER_LOGGING
Property value: "true" or "false"

    service = webdriver.SafariService(service_args=["--diagnose"])
      service.args << '--diagnose'

Safari Technology Preview

Apple provides a development version of their browser — Safari Technology Preview To use this version in your code:

2.4 - 待機

Perhaps the most common challenge for browser automation is ensuring that the web application is in a state to execute a particular Selenium command as desired. The processes often end up in a race condition where sometimes the browser gets into the right state first (things work as intended) and sometimes the Selenium code executes first (things do not work as intended). This is one of the primary causes of flaky tests.

All navigation commands wait for a specific readyState value based on the page load strategy (the default value to wait for is "complete") before the driver returns control to the code. The readyState only concerns itself with loading assets defined in the HTML, but loaded JavaScript assets often result in changes to the site, and elements that need to be interacted with may not yet be on the page when the code is ready to execute the next Selenium command.

Similarly, in a lot of single page applications, elements get dynamically added to a page or change visibility based on a click. An element must be both present and displayed on the page in order for Selenium to interact with it.

Take this page for example: https://www.selenium.dev/selenium/web/dynamic.html When the “Add a box!” button is clicked, a “div” element that does not exist is created. When the “Reveal a new input” button is clicked, a hidden text field element is displayed. In both cases the transition takes a couple seconds. If the Selenium code is to click one of these buttons and interact with the resulting element, it will do so before that element is ready and fail.

The first solution many people turn to is adding a sleep statement to pause the code execution for a set period of time. Because the code can’t know exactly how long it needs to wait, this can fail when it doesn’t sleep long enough. Alternately, if the value is set too high and a sleep statement is added in every place it is needed, the duration of the session can become prohibitive.

Selenium provides two different mechanisms for synchronization that are better.

Implicit waits

Selenium has a built-in way to automatically wait for elements called an implicit wait. An implicit wait value can be set either with the timeouts capability in the browser options, or with a driver method (as shown below).

This is a global setting that applies to every element location call for the entire session. The default value is 0, which means that if the element is not found, it will immediately return an error. If an implicit wait is set, the driver will wait for the duration of the provided value before returning the error. Note that as soon as the element is located, the driver will return the element reference and the code will continue executing, so a larger implicit wait value won’t necessarily increase the duration of the session.

Warning: Do not mix implicit and explicit waits. Doing so can cause unpredictable wait times. For example, setting an implicit wait of 10 seconds and an explicit wait of 15 seconds could cause a timeout to occur after 20 seconds.

Solving our example with an implicit wait looks like this:

    driver.manage().timeouts().implicitlyWait(Duration.ofSeconds(2));
    driver.implicitly_wait(2)
            driver.Manage().Timeouts().ImplicitWait = TimeSpan.FromSeconds(2);
    driver.manage.timeouts.implicit_wait = 2
            await driver.manage().setTimeouts({ implicit: 2000 });
            await driver.get('https://www.selenium.dev/selenium/web/dynamic.html');
            await driver.findElement(By.id("adder")).click();

            let added = await driver.findElement(By.id("box0"));

Explicit waits

Explicit waits are loops added to the code that poll the application for a specific condition to evaluate as true before it exits the loop and continues to the next command in the code. If the condition is not met before a designated timeout value, the code will give a timeout error. Since there are many ways for the application not to be in the desired state, so explicit waits are a great choice to specify the exact condition to wait for in each place it is needed. Another nice feature is that, by default, the Selenium Wait class automatically waits for the designated element to exist.

This example shows the condition being waited for as a lambda. Java also supports Expected Conditions

    Wait<WebDriver> wait = new WebDriverWait(driver, Duration.ofSeconds(2));
    wait.until(d -> revealed.isDisplayed());

This example shows the condition being waited for as a lambda. Python also supports Expected Conditions

    wait = WebDriverWait(driver, timeout=2)
    wait.until(lambda d : revealed.is_displayed())
            WebDriverWait wait = new WebDriverWait(driver, TimeSpan.FromSeconds(2));
            wait.Until(d => revealed.Displayed);
    wait = Selenium::WebDriver::Wait.new
    wait.until { revealed.displayed? }

JavaScript also supports Expected Conditions

            await driver.get('https://www.selenium.dev/selenium/web/dynamic.html');
            let revealed = await driver.findElement(By.id("revealed"));
            await driver.findElement(By.id("reveal")).click();
            await driver.wait(until.elementIsVisible(revealed), 2000);
            await revealed.sendKeys("Displayed");

Customization

The Wait class can be instantiated with various parameters that will change how the conditions are evaluated.

This can include:

  • Changing how often the code is evaluated (polling interval)
  • Specifying which exceptions should be handled automatically
  • Changing the total timeout length
  • Customizing the timeout message

For instance, if the element not interactable error is retried by default, then we can add an action on a method inside the code getting executed (we just need to make sure that the code returns true when it is successful):

The easiest way to customize Waits in Java is to use the FluentWait class:

    Wait<WebDriver> wait =
        new FluentWait<>(driver)
            .withTimeout(Duration.ofSeconds(2))
            .pollingEvery(Duration.ofMillis(300))
            .ignoring(ElementNotInteractableException.class);

    wait.until(
        d -> {
          revealed.sendKeys("Displayed");
          return true;
        });
    errors = [NoSuchElementException, ElementNotInteractableException]
    wait = WebDriverWait(driver, timeout=2, poll_frequency=.2, ignored_exceptions=errors)
    wait.until(lambda d : revealed.send_keys("Displayed") or True)
            WebDriverWait wait = new WebDriverWait(driver, TimeSpan.FromSeconds(2))
            {
                PollingInterval = TimeSpan.FromMilliseconds(300),
            };
            wait.IgnoreExceptionTypes(typeof(ElementNotInteractableException));

            wait.Until(d => {
                revealed.SendKeys("Displayed");
                return true;
            });
    errors = [Selenium::WebDriver::Error::NoSuchElementError,
              Selenium::WebDriver::Error::ElementNotInteractableError]
    wait = Selenium::WebDriver::Wait.new(timeout: 2,
                                         interval: 0.3,
                                         ignore: errors)

    wait.until { revealed.send_keys('Displayed') || true }

2.5 - Web要素

DOM内の要素オブジェクトの識別と操作

ほとんどの人のSeleniumコードの大部分は、Web要素の操作に関連しています。

2.5.1 - File Upload

Because Selenium cannot interact with the file upload dialog, it provides a way to upload files without opening the dialog. If the element is an input element with type file, you can use the send keys method to send the full path to the file that will be uploaded.

    WebElement fileInput = driver.findElement(By.cssSelector("input[type=file]"));
    fileInput.sendKeys(uploadFile.getAbsolutePath());
    driver.findElement(By.id("file-submit")).click();
    file_input = driver.find_element(By.CSS_SELECTOR, "input[type='file']")
    file_input.send_keys(upload_file)
    driver.find_element(By.ID, "file-submit").click()
            IWebElement fileInput = driver.FindElement(By.CssSelector("input[type=file]"));
            fileInput.SendKeys(uploadFile);
            driver.FindElement(By.Id("file-submit")).Click();
    file_input = driver.find_element(css: 'input[type=file]')
    file_input.send_keys(upload_file)
    driver.find_element(id: 'file-submit').click
      await driver.findElement(By.id("file-upload")).sendKeys(image);
      await driver.findElement(By.id("file-submit")).submit();

Move Code

```java import org.openqa.selenium.By import org.openqa.selenium.chrome.ChromeDriver fun main() { val driver = ChromeDriver() driver.get("https://the-internet.herokuapp.com/upload") driver.findElement(By.id("file-upload")).sendKeys("selenium-snapshot.jpg") driver.findElement(By.id("file-submit")).submit() if(driver.pageSource.contains("File Uploaded!")) { println("file uploaded") } else{ println("file not uploaded") } } ```

2.5.2 - 要素を探す

DOM内の1つ以上の特定の要素を識別する方法

ロケーターは、ページ上の要素を識別する方法です。 これは、検索要素 メソッドに渡される引数です。

検出方法とは別にロケーターを宣言するタイミングと理由など、 ロケーターに関するヒントについては、 推奨されるテストプラクティス を確認してください。

要素選択の方法

WebDriverには標準のロケータが8種類あります。

ロケータ詳細
class nameclass名に値を含む要素を探す (複合クラス名は使えない)
css selectorCSSセレクタが一致する要素を探す
idid属性が一致する要素を探す
namename属性が一致する要素を探す
link texta要素のテキストが一致する要素を探す
partial link texta要素のテキストが部分一致する要素を探す
tag nameタグ名が一致する要素を探す
xpathXPathと一致する要素を探す

Creating Locators

To work on a web element using Selenium, we need to first locate it on the web page. Selenium provides us above mentioned ways, using which we can locate element on the page. To understand and create locator we will use the following HTML snippet.

<html>
<body>
<style>
.information {
  background-color: white;
  color: black;
  padding: 10px;
}
</style>
<h2>Contact Selenium</h2>

<form action="/action_page.php">
  <input type="radio" name="gender" value="m" />Male &nbsp;
  <input type="radio" name="gender" value="f" />Female <br>
  <br>
  <label for="fname">First name:</label><br>
  <input class="information" type="text" id="fname" name="fname" value="Jane"><br><br>
  <label for="lname">Last name:</label><br>
  <input class="information" type="text" id="lname" name="lname" value="Doe"><br><br>
  <label for="newsletter">Newsletter:</label>
  <input type="checkbox" name="newsletter" value="1" /><br><br>
  <input type="submit" value="Submit">
</form> 

<p>To know more about Selenium, visit the official page 
<a href ="www.selenium.dev">Selenium Official Page</a> 
</p>

</body>
</html>

class name

The HTML page web element can have attribute class. We can see an example in the above shown HTML snippet. We can identify these elements using the class name locator available in Selenium.

    WebDriver driver = new ChromeDriver();
	driver.findElement(By.className("information"));
  
    driver = webdriver.Chrome()
	driver.find_element(By.CLASS_NAME, "information")
  
    var driver = new ChromeDriver();
	driver.FindElement(By.ClassName("information"));
  
    driver = Selenium::WebDriver.for :chrome
	driver.find_element(class: 'information')
  
    let driver = await new Builder().forBrowser('chrome').build();
	const loc = await driver.findElement(By.className('information'));
  
    val driver = ChromeDriver()
	val loc: WebElement = driver.findElement(By.className("information"))
  

css selector

CSS is the language used to style HTML pages. We can use css selector locator strategy to identify the element on the page. If the element has an id, we create the locator as css = #id. Otherwise the format we follow is css =[attribute=value] . Let us see an example from above HTML snippet. We will create locator for First Name textbox, using css.

    WebDriver driver = new ChromeDriver();
	driver.findElement(By.cssSelector("#fname"));
  
    driver = webdriver.Chrome()
	driver.find_element(By.CSS_SELECTOR, "#fname")
  
    var driver = new ChromeDriver();
	driver.FindElement(By.CssSelector("#fname"));
  
    driver = Selenium::WebDriver.for :chrome
	driver.find_element(css: '#fname')
  
    let driver = await new Builder().forBrowser('chrome').build();
	const loc = await driver.findElement(By.css('#fname'));
  
    val driver = ChromeDriver()
	val loc: WebElement = driver.findElement(By.css("#fname"))
  

id

We can use the ID attribute available with element in a web page to locate it. Generally the ID property should be unique for a element on the web page. We will identify the Last Name field using it.

    WebDriver driver = new ChromeDriver();
	driver.findElement(By.id("lname"));
  
    driver = webdriver.Chrome()
	driver.find_element(By.ID, "lname")
  
    var driver = new ChromeDriver();
	driver.FindElement(By.Id("lname"));
  
    driver = Selenium::WebDriver.for :chrome
	driver.find_element(id: 'lname')
  
    let driver = await new Builder().forBrowser('chrome').build();
	const loc = await driver.findElement(By.id('lname'));
  
    val driver = ChromeDriver()
	val loc: WebElement = driver.findElement(By.id("lname"))
  

name

We can use the NAME attribute available with element in a web page to locate it. Generally the NAME property should be unique for a element on the web page. We will identify the Newsletter checkbox using it.

    WebDriver driver = new ChromeDriver();
	driver.findElement(By.name("newsletter"));
  
    driver = webdriver.Chrome()
	driver.find_element(By.NAME, "newsletter")
  
    var driver = new ChromeDriver();
	driver.FindElement(By.Name("newsletter"));
  
    driver = Selenium::WebDriver.for :chrome
	driver.find_element(name: 'newsletter')
  
    let driver = await new Builder().forBrowser('chrome').build();
	const loc = await driver.findElement(By.name('newsletter'));
  
    val driver = ChromeDriver()
	val loc: WebElement = driver.findElement(By.name("newsletter"))
  

If the element we want to locate is a link, we can use the link text locator to identify it on the web page. The link text is the text displayed of the link. In the HTML snippet shared, we have a link available, lets see how will we locate it.

    WebDriver driver = new ChromeDriver();
	driver.findElement(By.linkText("Selenium Official Page"));
  
    driver = webdriver.Chrome()
	driver.find_element(By.LINK_TEXT, "Selenium Official Page")
  
    var driver = new ChromeDriver();
	driver.FindElement(By.LinkText("Selenium Official Page"));
  
    driver = Selenium::WebDriver.for :chrome
	driver.find_element(link_text: 'Selenium Official Page')
  
    let driver = await new Builder().forBrowser('chrome').build();
	const loc = await driver.findElement(By.linkText('Selenium Official Page'));
  
    val driver = ChromeDriver()
	val loc: WebElement = driver.findElement(By.linkText("Selenium Official Page"))
  

If the element we want to locate is a link, we can use the partial link text locator to identify it on the web page. The link text is the text displayed of the link. We can pass partial text as value. In the HTML snippet shared, we have a link available, lets see how will we locate it.

    WebDriver driver = new ChromeDriver();
	driver.findElement(By.partialLinkText("Official Page"));
  
    driver = webdriver.Chrome()
	driver.find_element(By.PARTIAL_LINK_TEXT, "Official Page")
  
    var driver = new ChromeDriver();
	driver.FindElement(By.PartialLinkText("Official Page"));
  
    driver = Selenium::WebDriver.for :chrome
	driver.find_element(partial_link_text: 'Official Page')
  
    let driver = await new Builder().forBrowser('chrome').build();
	const loc = await driver.findElement(By.partialLinkText('Official Page'));
  
    val driver = ChromeDriver()
	val loc: WebElement = driver.findElement(By.partialLinkText("Official Page"))
  

tag name

We can use the HTML TAG itself as a locator to identify the web element on the page. From the above HTML snippet shared, lets identify the link, using its html tag “a”.

    WebDriver driver = new ChromeDriver();
	driver.findElement(By.tagName("a"));
  
    driver = webdriver.Chrome()
	driver.find_element(By.TAG_NAME, "a")
  
    var driver = new ChromeDriver();
	driver.FindElement(By.TagName("a"));
  
    driver = Selenium::WebDriver.for :chrome
	driver.find_element(tag_name: 'a')
  
    let driver = await new Builder().forBrowser('chrome').build();
	const loc = await driver.findElement(By.tagName('a'));
  
    val driver = ChromeDriver()
	val loc: WebElement = driver.findElement(By.tagName("a"))
  

xpath

A HTML document can be considered as a XML document, and then we can use xpath which will be the path traversed to reach the element of interest to locate the element. The XPath could be absolute xpath, which is created from the root of the document. Example - /html/form/input[1]. This will return the male radio button. Or the xpath could be relative. Example- //input[@name=‘fname’]. This will return the first name text box. Let us create locator for female radio button using xpath.

    WebDriver driver = new ChromeDriver();
	driver.findElement(By.xpath("//input[@value='f']"));
  
    driver = webdriver.Chrome()
	driver.find_element(By.XPATH, "//input[@value='f']")
  
    var driver = new ChromeDriver();
	driver.FindElement(By.Xpath("//input[@value='f']"));
  
    driver = Selenium::WebDriver.for :chrome
	driver.find_element(xpath: '//input[@value='f']')
  
    let driver = await new Builder().forBrowser('chrome').build();
	const loc = await driver.findElement(By.xpath('//input[@value='f']'));
  
    val driver = ChromeDriver()
	val loc: WebElement = driver.findElement(By.xpath('//input[@value='f']'))
  

相対ロケーター

Selenium 4 introduces Relative Locators (previously called as Friendly Locators). These locators are helpful when it is not easy to construct a locator for the desired element, but easy to describe spatially where the element is in relation to an element that does have an easily constructed locator.

How it works

Selenium uses the JavaScript function getBoundingClientRect() to determine the size and position of elements on the page, and can use this information to locate neighboring elements.
find the relative elements.

Relative locator methods can take as the argument for the point of origin, either a previously located element reference, or another locator. In these examples we’ll be using locators only, but you could swap the locator in the final method with an element object and it will work the same.

Let us consider the below example for understanding the relative locators.

Relative Locators

Available relative locators

Above

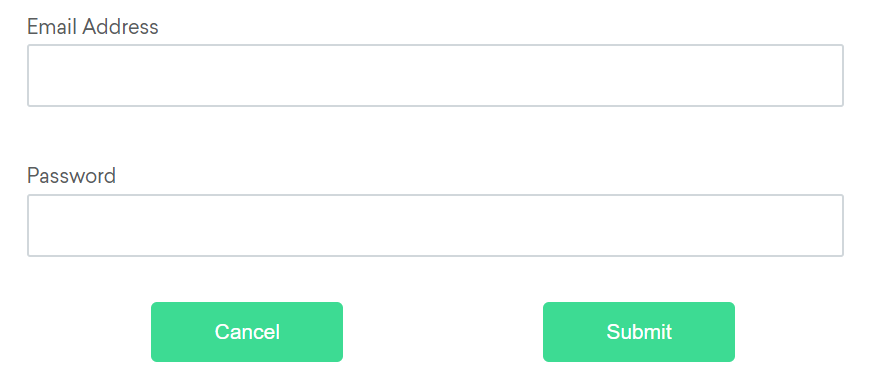
If the email text field element is not easily identifiable for some reason, but the password text field element is, we can locate the text field element using the fact that it is an “input” element “above” the password element.

By emailLocator = RelativeLocator.with(By.tagName("input")).above(By.id("password"));
email_locator = locate_with(By.TAG_NAME, "input").above({By.ID: "password"})
var emailLocator = RelativeBy.WithLocator(By.TagName("input")).Above(By.Id("password"));
email_locator = {relative: {tag_name: 'input', above: {id: 'password'}}}
let emailLocator = locateWith(By.tagName('input')).above(By.id('password'));
val emailLocator = RelativeLocator.with(By.tagName("input")).above(By.id("password"))

Below

If the password text field element is not easily identifiable for some reason, but the email text field element is, we can locate the text field element using the fact that it is an “input” element “below” the email element.

By passwordLocator = RelativeLocator.with(By.tagName("input")).below(By.id("email"));
password_locator = locate_with(By.TAG_NAME, "input").below({By.ID: "email"})
var passwordLocator = RelativeBy.WithLocator(By.TagName("input")).Below(By.Id("email"));
password_locator = {relative: {tag_name: 'input', below: {id: 'email'}}}
let passwordLocator = locateWith(By.tagName('input')).below(By.id('email'));
val passwordLocator = RelativeLocator.with(By.tagName("input")).below(By.id("email"))

Left of

If the cancel button is not easily identifiable for some reason, but the submit button element is, we can locate the cancel button element using the fact that it is a “button” element to the “left of” the submit element.

By cancelLocator = RelativeLocator.with(By.tagName("button")).toLeftOf(By.id("submit"));
cancel_locator = locate_with(By.TAG_NAME, "button").to_left_of({By.ID: "submit"})
var cancelLocator = RelativeBy.WithLocator(By.tagName("button")).LeftOf(By.Id("submit"));
cancel_locator = {relative: {tag_name: 'button', left: {id: 'submit'}}}
let cancelLocator = locateWith(By.tagName('button')).toLeftOf(By.id('submit'));
val cancelLocator = RelativeLocator.with(By.tagName("button")).toLeftOf(By.id("submit"))

Right of

If the submit button is not easily identifiable for some reason, but the cancel button element is, we can locate the submit button element using the fact that it is a “button” element “to the right of” the cancel element.

By submitLocator = RelativeLocator.with(By.tagName("button")).toRightOf(By.id("cancel"));
submit_locator = locate_with(By.TAG_NAME, "button").to_right_of({By.ID: "cancel"})
var submitLocator = RelativeBy.WithLocator(By.tagName("button")).RightOf(By.Id("cancel"));
submit_locator = {relative: {tag_name: 'button', right: {id: 'cancel'}}}
let submitLocator = locateWith(By.tagName('button')).toRightOf(By.id('cancel'));
val submitLocator = RelativeLocator.with(By.tagName("button")).toRightOf(By.id("cancel"))

Near

If the relative positioning is not obvious, or it varies based on window size, you can use the near method to identify an element that is at most 50px away from the provided locator. One great use case for this is to work with a form element that doesn’t have an easily constructed locator, but its associated input label element does.

By emailLocator = RelativeLocator.with(By.tagName("input")).near(By.id("lbl-email"));
email_locator = locate_with(By.TAG_NAME, "input").near({By.ID: "lbl-email"})
var emailLocator = RelativeBy.WithLocator(By.tagName("input")).Near(By.Id("lbl-email"));
email_locator = {relative: {tag_name: 'input', near: {id: 'lbl-email'}}}
let emailLocator = locateWith(By.tagName('input')).near(By.id('lbl-email'));
val emailLocator = RelativeLocator.with(By.tagName("input")).near(By.id("lbl-email"));

Chaining relative locators

You can also chain locators if needed. Sometimes the element is most easily identified as being both above/below one element and right/left of another.

By submitLocator = RelativeLocator.with(By.tagName("button")).below(By.id("email")).toRightOf(By.id("cancel"));
submit_locator = locate_with(By.TAG_NAME, "button").below({By.ID: "email"}).to_right_of({By.ID: "cancel"})
var submitLocator = RelativeBy.WithLocator(By.tagName("button")).Below(By.Id("email")).RightOf(By.Id("cancel"));
submit_locator = {relative: {tag_name: 'button', below: {id: 'email'}, right: {id: 'cancel'}}}
let submitLocator = locateWith(By.tagName('button')).below(By.id('email')).toRightOf(By.id('cancel'));
val submitLocator = RelativeLocator.with(By.tagName("button")).below(By.id("email")).toRightOf(By.id("cancel"))

2.5.3 - Interacting with web elements

A high-level instruction set for manipulating form controls.

There are only 5 basic commands that can be executed on an element:

  • click (applies to any element)
  • send keys (only applies to text fields and content editable elements)
  • clear (only applies to text fields and content editable elements)
  • submit (only applies to form elements)
  • select (see Select List Elements)

Additional validations

These methods are designed to closely emulate a user’s experience, so, unlike the Actions API, it attempts to perform two things before attempting the specified action.

  1. If it determines the element is outside the viewport, it scrolls the element into view, specifically it will align the bottom of the element with the bottom of the viewport.
  2. It ensures the element is interactable before taking the action. This could mean that the scrolling was unsuccessful, or that the element is not otherwise displayed. Determining if an element is displayed on a page was too difficult to define directly in the webdriver specification, so Selenium sends an execute command with a JavaScript atom that checks for things that would keep the element from being displayed. If it determines an element is not in the viewport, not displayed, not keyboard-interactable, or not pointer-interactable, it returns an element not interactable error.

Click

The element click command is executed on the center of the element. If the center of the element is obscured for some reason, Selenium will return an element click intercepted error.

        driver.get("https://www.selenium.dev/selenium/web/inputs.html");

	    // Click on the element 
        WebElement checkInput=driver.findElement(By.name("checkbox_input"));
        checkInput.click();
    # Navigate to url
	driver.get("https://www.selenium.dev/selenium/web/inputs.html")

    # Click on the element 
	driver.find_element(By.NAME, "color_input").click()
  
  // Navigate to Url
  driver.Navigate().GoToUrl("https://www.selenium.dev/selenium/web/inputs.html");

  // Click the element
  driver.FindElement(By.Name("color_input")).Click();
  
  
    # Navigate to URL
  driver.get 'https://www.selenium.dev/selenium/web/inputs.html'

    # Click the element
  driver.find_element(name: 'color_input').click

  
    // Navigate to Url
    await driver.get('https://www.selenium.dev/selenium/web/inputs.html');

    // Click the element
    await driver.findElement(By.name('color_input')).click();
  
  
    // Navigate to Url
    driver.get("https://www.selenium.dev/selenium/web/inputs.html")

    // Click the element
    driver.findElement(By.name("color_input")).click();


Send keys

The element send keys command types the provided keys into an editable element. Typically, this means an element is an input element of a form with a text type or an element with a content-editable attribute. If it is not editable, an invalid element state error is returned.

Here is the list of possible keystrokes that WebDriver Supports.

        // Clear field to empty it from any previous data
        WebElement emailInput=driver.findElement(By.name("email_input"));
        emailInput.clear();
	    //Enter Text
        String email="admin@localhost.dev";
	    emailInput.sendKeys(email);
    # Navigate to url
	driver.get("https://www.selenium.dev/selenium/web/inputs.html")

    # Clear field to empty it from any previous data
	driver.find_element(By.NAME, "email_input").clear()

	# Enter Text
	driver.find_element(By.NAME, "email_input").send_keys("admin@localhost.dev" )

  
  // Navigate to Url
  driver.Navigate().GoToUrl("https://www.selenium.dev/selenium/web/inputs.html");

  // Clear field to empty it from any previous data
  driver.FindElement(By.Name("email_input")).Clear();
  
  //Enter Text
  driver.FindElement(By.Name("email_input")).SendKeys("admin@localhost.dev");
  
  
}
  
    # Navigate to URL
	driver.get 'https://www.selenium.dev/selenium/web/inputs.html'

    # Clear field to empty it from any previous data
	driver.find_element(name: 'email_input').clear
	
	# Enter Text
	driver.find_element(name: 'email_input').send_keys 'admin@localhost.dev'

  
    // Navigate to Url
    await driver.get('https://www.selenium.dev/selenium/web/inputs.html');

	//Clear field to empty it from any previous data
	await driver.findElement(By.name('email_input')).clear();

    // Enter text 
    await driver.findElement(By.name('email_input')).sendKeys('admin@localhost.dev');


    // Navigate to Url
    driver.get("https://www.selenium.dev/selenium/web/inputs.html")

	//Clear field to empty it from any previous data
	driver.findElement(By.name("email_input")).clear()
	
    // Enter text 
    driver.findElement(By.name("email_input")).sendKeys("admin@localhost.dev")


Clear

The element clear command resets the content of an element. This requires an element to be editable, and resettable. Typically, this means an element is an input element of a form with a text type or an element with acontent-editable attribute. If these conditions are not met, an invalid element state error is returned.

        //Clear Element
        // Clear field to empty it from any previous data
        emailInput.clear();
    # Navigate to url
	driver.get("https://www.selenium.dev/selenium/web/inputs.html")

    # Clear field to empty it from any previous data
	driver.find_element(By.NAME, "email_input").clear()


  // Navigate to Url
  driver.Navigate().GoToUrl("https://www.selenium.dev/selenium/web/inputs.html");

  // Clear field to empty it from any previous data
  driver.FindElement(By.Name("email_input")).Clear();


}
  
    # Navigate to URL
	driver.get 'https://www.selenium.dev/selenium/web/inputs.html'

    # Clear field to empty it from any previous data
	driver.find_element(name: 'email_input').clear

  
    // Navigate to Url
    await driver.get('https://www.selenium.dev/selenium/web/inputs.html');

	//Clear field to empty it from any previous data
	await driver.findElement(By.name('email_input')).clear();


    // Navigate to Url
    driver.get("https://www.selenium.dev/selenium/web/inputs.html")

	//Clear field to empty it from any previous data
	driver.findElement(By.name("email_input")).clear()


Submit

In Selenium 4 this is no longer implemented with a separate endpoint and functions by executing a script. As such, it is recommended not to use this method and to click the applicable form submission button instead.

2.5.4 - Web要素の検索

提供されたロケーターの値に基づいて要素を検索します。

Seleniumを使用する最も基本的な側面の1つは、操作する要素の参照を取得することです。 Seleniumは、要素を一意に識別するための多数の組み込みロケーター戦略を提供します。 非常に高度なシナリオでロケーターを使用する方法はたくさんあります。 このドキュメントの目的のために、このHTMLスニペットについて考えてみましょう。

<ol id="vegetables">
 <li class="potatoes"> <li class="onions"> <li class="tomatoes"><span>Tomato is a Vegetable</span></ol>
<ul id="fruits">
  <li class="bananas">  <li class="apples">  <li class="tomatoes"><span>Tomato is a Fruit</span></ul>

最初に一致する要素

多くのロケーターは、ページ上の複数の要素と一致します。 単数の find elementメソッドは、指定されたコンテキスト内で最初に見つかった要素への参照を返します。

DOM全体の評価

ドライバーインスタンスで要素の検索メソッドが呼び出されると、提供されたロケーターと一致するDOMの最初の要素への参照が返されます。 この値は保存して、将来の要素アクションに使用できます。 上記のHTMLの例では、クラス名が “tomatoes” の要素が2つあるため、このメソッドは “vegetables” リストの要素を返します。

WebElement vegetable = driver.findElement(By.className("tomatoes"));
  
vegetable = driver.find_element(By.CLASS_NAME, "tomatoes")
  
var vegetable = driver.FindElement(By.ClassName("tomatoes"));
  
vegetable = driver.find_element(class: 'tomatoes')
  
const vegetable = await driver.findElement(By.className('tomatoes'));
  
val vegetable: WebElement = driver.findElement(By.className("tomatoes"))
  

DOMのサブセットの評価

DOM全体で一意のロケーターを見つけるのではなく、検索を別の検索された要素のスコープに絞り込むと便利なことがよくあります。 上記の例では、クラス名が “トマト” の2つの要素があり、2番目の要素の参照を取得するのは少し困難です。

1つの解決策は、目的の要素の祖先であり、不要な要素の祖先ではない一意の属性を持つ要素を見つけて、そのオブジェクトでfind要素を呼び出すことです。

WebElement fruits = driver.findElement(By.id("fruits"));
WebElement fruit = fruits.findElement(By.className("tomatoes"));
  
fruits = driver.find_element(By.ID, "fruits")
fruit = fruits.find_element(By.CLASS_NAME,"tomatoes")
  
IWebElement fruits = driver.FindElement(By.Id("fruits"));
IWebElement fruit = fruits.FindElement(By.ClassName("tomatoes"));
  
fruits = driver.find_element(id: 'fruits')
fruit = fruits.find_element(class: 'tomatoes')
  
const fruits = await driver.findElement(By.id('fruits'));
const fruit = fruits.findElement(By.className('tomatoes'));
  
val fruits = driver.findElement(By.id("fruits"))
val fruit = fruits.findElement(By.className("tomatoes"))
  

Java and C#
WebDriverWebElement 、および ShadowRoot クラスはすべて、 ロールベースのインターフェイス と見なされる SearchContext インターフェイスを実装します。 ロールベースのインターフェイスを使用すると、特定のドライバーの実装が特定の機能をサポートしているかどうかを判断できます。 これらのインターフェースは明確に定義されており、責任の役割を1つだけ持つように努めています。

最適化されたロケーター

ネストされたルックアップは、ブラウザに2つの別々のコマンドを発行する必要があるため、最も効果的なロケーション戦略ではない可能性があります。

パフォーマンスをわずかに向上させるために、CSSまたはXPathのいずれかを使用して、単一のコマンドでこの要素を見つけることができます。 推奨されるテストプラクティスの章で、ロケーター戦略の提案を参照してください。

この例では、CSSセレクターを使用します。

WebElement fruit = driver.findElement(By.cssSelector("#fruits .tomatoes"));
  
fruit = driver.find_element(By.CSS_SELECTOR,"#fruits .tomatoes")
  
var fruit = driver.FindElement(By.CssSelector("#fruits .tomatoes"));
  
fruit = driver.find_element(css: '#fruits .tomatoes')
  
const fruit = await driver.findElement(By.css('#fruits .tomatoes'));
  
val fruit = driver.findElement(By.cssSelector("#fruits .tomatoes"))
  

一致するすべての要素

最初の要素だけでなく、ロケーターに一致するすべての要素への参照を取得する必要があるユースケースがいくつかあります。 複数の要素の検索メソッドは、要素参照のコレクションを返します。 一致するものがない場合は、空のリストが返されます。 この場合、すべてのfruitsとvegetableのリストアイテムへの参照がコレクションに返されます。

List<WebElement> plants = driver.findElements(By.tagName("li"));
  
plants = driver.find_elements(By.TAG_NAME, "li")
  
IReadOnlyList<IWebElement> plants = driver.FindElements(By.TagName("li"));
  
plants = driver.find_elements(tag_name: 'li')
  
const plants = await driver.findElements(By.tagName('li'));
  
val plants: List<WebElement> = driver.findElements(By.tagName("li"))
  

要素の取得

多くの場合、要素のコレクションを取得しますが、特定の要素を操作したいので、コレクションを繰り返し処理して、 必要な要素を特定する必要があります。

List<WebElement> elements = driver.findElements(By.tagName("li"));

for (WebElement element : elements) {
    System.out.println("Paragraph text:" + element.getText());
}
  
from selenium import webdriver
from selenium.webdriver.common.by import By

driver = webdriver.Firefox()

    # Navigate to Url
driver.get("https://www.example.com")

    # Get all the elements available with tag name 'p'
elements = driver.find_elements(By.TAG_NAME, 'p')

for e in elements:
    print(e.text)
  
using OpenQA.Selenium;
using OpenQA.Selenium.Firefox;
using System.Collections.Generic;

namespace FindElementsExample {
 class FindElementsExample {
  public static void Main(string[] args) {
   IWebDriver driver = new FirefoxDriver();
   try {
    // Navigate to Url
    driver.Navigate().GoToUrl("https://example.com");

    // Get all the elements available with tag name 'p'
    IList < IWebElement > elements = driver.FindElements(By.TagName("p"));
    foreach(IWebElement e in elements) {
     System.Console.WriteLine(e.Text);
    }

   } finally {
    driver.Quit();
   }
  }
 }
}
  
require 'selenium-webdriver'
driver = Selenium::WebDriver.for :firefox
begin
     # Navigate to URL
  driver.get 'https://www.example.com'

     # Get all the elements available with tag name 'p'
  elements = driver.find_elements(:tag_name,'p')

  elements.each { |e|
    puts e.text
  }
ensure
  driver.quit
end
  
const {Builder, By} = require('selenium-webdriver');
(async function example() {
    let driver = await new Builder().forBrowser('firefox').build();
    try {
        // Navigate to Url
        await driver.get('https://www.example.com');

        // Get all the elements available with tag 'p'
        let elements = await driver.findElements(By.css('p'));
        for(let e of elements) {
            console.log(await e.getText());
        }
    }
    finally {
        await driver.quit();
    }
})();
  
import org.openqa.selenium.By
import org.openqa.selenium.firefox.FirefoxDriver

fun main() {
    val driver = FirefoxDriver()
    try {
        driver.get("https://example.com")
        // Get all the elements available with tag name 'p'
        val elements = driver.findElements(By.tagName("p"))
        for (element in elements) {
            println("Paragraph text:" + element.text)
        }
    } finally {
        driver.quit()
    }
}
  

要素から要素を検索

これは、親要素のコンテキスト内で一致する子のWebElementのリストを見つけるために利用されます。 これを実現するために、親WebElementは’findElements’と連鎖して子要素にアクセスします。

  import org.openqa.selenium.By;
  import org.openqa.selenium.WebDriver;
  import org.openqa.selenium.WebElement;
  import org.openqa.selenium.chrome.ChromeDriver;
  import java.util.List;

  public class findElementsFromElement {
      public static void main(String[] args) {
          WebDriver driver = new ChromeDriver();
          try {
              driver.get("https://example.com");

              // Get element with tag name 'div'
              WebElement element = driver.findElement(By.tagName("div"));

              // Get all the elements available with tag name 'p'
              List<WebElement> elements = element.findElements(By.tagName("p"));
              for (WebElement e : elements) {
                  System.out.println(e.getText());
              }
          } finally {
              driver.quit();
          }
      }
  }
  
from selenium import webdriver
from selenium.webdriver.common.by import By

driver = webdriver.Chrome()
driver.get("https://www.example.com")

    # Get element with tag name 'div'
element = driver.find_element(By.TAG_NAME, 'div')

    # Get all the elements available with tag name 'p'
elements = element.find_elements(By.TAG_NAME, 'p')
for e in elements:
    print(e.text)
  
using OpenQA.Selenium;
using OpenQA.Selenium.Chrome;
using System.Collections.Generic;

namespace FindElementsFromElement {
 class FindElementsFromElement {
  public static void Main(string[] args) {
   IWebDriver driver = new ChromeDriver();
   try {
    driver.Navigate().GoToUrl("https://example.com");

    // Get element with tag name 'div'
    IWebElement element = driver.FindElement(By.TagName("div"));

    // Get all the elements available with tag name 'p'
    IList < IWebElement > elements = element.FindElements(By.TagName("p"));
    foreach(IWebElement e in elements) {
     System.Console.WriteLine(e.Text);
    }
   } finally {
    driver.Quit();
   }
  }
 }
}
  
  require 'selenium-webdriver'
  driver = Selenium::WebDriver.for :chrome
  begin
    # Navigate to URL
    driver.get 'https://www.example.com'

    # Get element with tag name 'div'
    element = driver.find_element(:tag_name,'div')

    # Get all the elements available with tag name 'p'
    elements = element.find_elements(:tag_name,'p')

    elements.each { |e|
      puts e.text
    }
  ensure
    driver.quit
  end
  
  const {Builder, By} = require('selenium-webdriver');

  (async function example() {
      let driver = new Builder()
          .forBrowser('chrome')
          .build();

      await driver.get('https://www.example.com');

      // Get element with tag name 'div'
      let element = driver.findElement(By.css("div"));

      // Get all the elements available with tag name 'p'
      let elements = await element.findElements(By.css("p"));
      for(let e of elements) {
          console.log(await e.getText());
      }
  })();
  
  import org.openqa.selenium.By
  import org.openqa.selenium.chrome.ChromeDriver

  fun main() {
      val driver = ChromeDriver()
      try {
          driver.get("https://example.com")

          // Get element with tag name 'div'
          val element = driver.findElement(By.tagName("div"))

          // Get all the elements available with tag name 'p'
          val elements = element.findElements(By.tagName("p"))
          for (e in elements) {
              println(e.text)
          }
      } finally {
          driver.quit()
      }
  }
  

アクティブな要素を取得する

これは、現在のブラウジングコンテキストでフォーカスを持っているDOM要素を追跡(または)検索するために使用されます。

  import org.openqa.selenium.*;
  import org.openqa.selenium.chrome.ChromeDriver;

  public class activeElementTest {
    public static void main(String[] args) {
      WebDriver driver = new ChromeDriver();
      try {
        driver.get("http://www.google.com");
        driver.findElement(By.cssSelector("[name='q']")).sendKeys("webElement");

        // Get attribute of current active element
        String attr = driver.switchTo().activeElement().getAttribute("title");
        System.out.println(attr);
      } finally {
        driver.quit();
      }
    }
  }
  
  from selenium import webdriver
  from selenium.webdriver.common.by import By

  driver = webdriver.Chrome()
  driver.get("https://www.google.com")
  driver.find_element(By.CSS_SELECTOR, '[name="q"]').send_keys("webElement")

    # Get attribute of current active element
  attr = driver.switch_to.active_element.get_attribute("title")
  print(attr)
  
    using OpenQA.Selenium;
    using OpenQA.Selenium.Chrome;

    namespace ActiveElement {
     class ActiveElement {
      public static void Main(string[] args) {
       IWebDriver driver = new ChromeDriver();
       try {
        // Navigate to Url
        driver.Navigate().GoToUrl("https://www.google.com");
        driver.FindElement(By.CssSelector("[name='q']")).SendKeys("webElement");

        // Get attribute of current active element
        string attr = driver.SwitchTo().ActiveElement().GetAttribute("title");
        System.Console.WriteLine(attr);
       } finally {
        driver.Quit();
       }
      }
     }
    }
  
  require 'selenium-webdriver'
  driver = Selenium::WebDriver.for :chrome
  begin
    driver.get 'https://www.google.com'
    driver.find_element(css: '[name="q"]').send_keys('webElement')

    # Get attribute of current active element
    attr = driver.switch_to.active_element.attribute('title')
    puts attr
  ensure
    driver.quit
  end
  
  const {Builder, By} = require('selenium-webdriver');

  (async function example() {
      let driver = await new Builder().forBrowser('chrome').build();
      await driver.get('https://www.google.com');
      await  driver.findElement(By.css('[name="q"]')).sendKeys("webElement");

      // Get attribute of current active element
      let attr = await driver.switchTo().activeElement().getAttribute("title");
      console.log(`${attr}`)
  })();
  
  import org.openqa.selenium.By
  import org.openqa.selenium.chrome.ChromeDriver

  fun main() {
      val driver = ChromeDriver()
      try {
          driver.get("https://www.google.com")
          driver.findElement(By.cssSelector("[name='q']")).sendKeys("webElement")

          // Get attribute of current active element
          val attr = driver.switchTo().activeElement().getAttribute("title")
          print(attr)
      } finally {
          driver.quit()
      }
  }
  

2.5.5 - Web要素に関する情報

要素について学ぶことができること。

特定の要素についてクエリできる詳細情報がいくつかあります。

表示されているかどうか

This method is used to check if the connected Element is displayed on a webpage. Returns a Boolean value, True if the connected element is displayed in the current browsing context else returns false.

This functionality is mentioned in, but not defined by the w3c specification due to the impossibility of covering all potential conditions. As such, Selenium cannot expect drivers to implement this functionality directly, and now relies on executing a large JavaScript function directly. This function makes many approximations about an element’s nature and relationship in the tree to return a value.

// Navigate to the url
driver.get("https://www.selenium.dev/selenium/web/inputs.html");

// Get boolean value for is element display
boolean isEmailVisible = driver.findElement(By.name("email_input")).isDisplayed();
# Navigate to the url
driver.get("https://www.selenium.dev/selenium/web/inputs.html")

# Get boolean value for is element display
is_email_visible = driver.find_element(By.NAME, "email_input").is_displayed()
//Navigate to the url
driver.Url = "https://www.selenium.dev/selenium/web/inputs.html";

//Get boolean value for is element display
Boolean is_email_visible = driver.FindElement(By.Name("email_input")).Displayed;
# Navigate to the url
driver.get("https://www.selenium.dev/selenium/web/inputs.html");

#fetch display status
val = driver.find_element(name: 'email_input').displayed?
    // Resolves Promise and returns boolean value
    let result =  await driver.findElement(By.name("email_input")).isDisplayed();
//navigates to url
 driver.get("https://www.selenium.dev/selenium/web/inputs.html")

 //returns true if element is displayed else returns false
 val flag = driver.findElement(By.name("email_input")).isDisplayed()

要素が有効か

このメソッドは、接続された要素がWebページで有効または無効になっているかどうかを確認するために使います。 ブール値を返し、現在のブラウジングコンテキストで接続されている要素が 有効(enabled) になっている場合は True 、そうでない場合は false を返します。

  //navigates to url
  driver.get("https://www.selenium.dev/selenium/web/inputs.html");

  //returns true if element is enabled else returns false
  boolean value = driver.findElement(By.name("button_input")).isEnabled();
  
    # Navigate to url
driver.get("https://www.selenium.dev/selenium/web/inputs.html")

    # Returns true if element is enabled else returns false
value = driver.find_element(By.NAME, 'button_input').is_enabled()
  
// Navigate to Url
driver.Navigate().GoToUrl("https://www.selenium.dev/selenium/web/inputs.html");

// Store the WebElement
IWebElement element = driver.FindElement(By.Name("button_input"));

// Prints true if element is enabled else returns false
System.Console.WriteLine(element.Enabled);
  
    # Navigate to url
driver.get 'https://www.selenium.dev/selenium/web/inputs.html'

    # Returns true if element is enabled else returns false
ele = driver.find_element(name: 'button_input').enabled?
  
    // Resolves Promise and returns boolean value
    let element =  await driver.findElement(By.name("button_input")).isEnabled();
 //navigates to url
 driver.get("https://www.selenium.dev/selenium/web/inputs.html")

 //returns true if element is enabled else returns false
 val attr = driver.findElement(By.name("button_input")).isEnabled()
  

要素が選択されているかどうか

このメソッドは、参照された要素が選択されているかどうかを判断します。 このメソッドは、チェックボックス、ラジオボタン、入力要素、およびオプション要素で広く使われています。

ブール値を返し、現在のブラウジングコンテキストで参照された要素が 選択されている 場合は True 、そうでない場合は false を返します。

 //navigates to url
 driver.get("https://www.selenium.dev/selenium/web/inputs.html");

 //returns true if element is checked else returns false
 boolean value = driver.findElement(By.name("checkbox_input")).isSelected();
  
    # Navigate to url
driver.get("https://www.selenium.dev/selenium/web/inputs.html")

    # Returns true if element is checked else returns false
value = driver.find_element(By.NAME, "checkbox_input").is_selected()
  
// Navigate to Url
driver.Navigate().GoToUrl("https://www.selenium.dev/selenium/web/inputs.html");

// Returns true if element ins checked else returns false
bool value = driver.FindElement(By.Name("checkbox_input")).Selected;
  
    # Navigate to url
driver.get 'https://www.selenium.dev/selenium/web/inputs.html'

    # Returns true if element is checked else returns false
ele = driver.find_element(name: "checkbox_input").selected?
  
    // Returns true if element ins checked else returns false
    let isSelected = await driver.findElement(By.name("checkbox_input")).isSelected();
 //navigates to url
 driver.get("https://www.selenium.dev/selenium/web/inputs.html")

 //returns true if element is checked else returns false
 val attr =  driver.findElement(By.name("checkbox_input")).isSelected()
  

要素のタグ名を取得

これは、現在のブラウジングコンテキストにフォーカスがある参照された要素の TagName を取得するために使います。

 //navigates to url
 driver.get("https://www.selenium.dev/selenium/web/inputs.html");

 //returns TagName of the element
 String value = driver.findElement(By.name("email_input")).getTagName();
  
    # Navigate to url
driver.get("https://www.selenium.dev/selenium/web/inputs.html")

    # Returns TagName of the element
attr = driver.find_element(By.NAME, "email_input").tag_name
  
// Navigate to Url
driver.Navigate().GoToUrl("https://www.selenium.dev/selenium/web/inputs.html");

// Returns TagName of the element
string attr = driver.FindElement(By.Name("email_input")).TagName;
  
    # Navigate to url
driver.get 'https://www.selenium.dev/selenium/web/inputs.html'

    # Returns TagName of the element
attr = driver.find_element(name: "email_input").tag_name
  
    // Returns TagName of the element
    let value = await driver.findElement(By.name('email_input')).getTagName();
 //navigates to url
 driver.get("https://www.selenium.dev/selenium/web/inputs.html")

 //returns TagName of the element
 val attr =  driver.findElement(By.name("email_input")).getTagName()
  

要素矩形を取得

参照される要素の寸法と座標を取得するために使います。

取得データのbodyには、次の詳細が含まれます。

  • 要素の左上隅からのx軸の位置
  • 要素の左上隅からのy軸の位置
  • 要素の高さ
  • 要素の幅
// Navigate to url
driver.get("https://www.selenium.dev/selenium/web/inputs.html");

// Returns height, width, x and y coordinates referenced element
Rectangle res =  driver.findElement(By.name("range_input")).getRect();

// Rectangle class provides getX,getY, getWidth, getHeight methods
System.out.println(res.getX());
  
    # Navigate to url
driver.get("https://www.selenium.dev/selenium/web/inputs.html")

    # Returns height, width, x and y coordinates referenced element
res = driver.find_element(By.NAME, "range_input").rect
  
// Navigate to Url
driver.Navigate().GoToUrl("https://www.selenium.dev/selenium/web/inputs.html");

var res = driver.FindElement(By.Name("range_input"));
// Return x and y coordinates referenced element
System.Console.WriteLine(res.Location);
// Returns height, width
System.Console.WriteLine(res.Size);
  
    # Navigate to url
driver.get 'https://www.selenium.dev/selenium/web/inputs.html'

    # Returns height, width, x and y coordinates referenced element
res = driver.find_element(name: "range_input").rect
  
    let object = await driver.findElement(By.name('range_input')).getRect();
// Navigate to url
driver.get("https://www.selenium.dev/selenium/web/inputs.html")

// Returns height, width, x and y coordinates referenced element
val res = driver.findElement(By.name("range_input")).rect

// Rectangle class provides getX,getY, getWidth, getHeight methods
println(res.getX())
  

要素のCSSの値を取得

現在のブラウジングコンテキスト内の要素の指定された計算したスタイル属性の値を取得します。

// Navigate to Url
driver.get("https://www.selenium.dev/selenium/web/colorPage.html");

// Retrieves the computed style property 'color' of linktext
String cssValue = driver.findElement(By.id("namedColor")).getCssValue("background-color");

  
    # Navigate to Url
driver.get('https://www.selenium.dev/selenium/web/colorPage.html')

    # Retrieves the computed style property 'color' of linktext
cssValue = driver.find_element(By.ID, "namedColor").value_of_css_property('background-color')

  
// Navigate to Url
driver.Navigate().GoToUrl("https://www.selenium.dev/selenium/web/colorPage.html");

// Retrieves the computed style property 'color' of linktext
String cssValue = driver.FindElement(By.Id("namedColor")).GetCssValue("background-color");

  
    # Navigate to Url
driver.get 'https://www.selenium.dev/selenium/web/colorPage.html'

    # Retrieves the computed style property 'color' of linktext
cssValue = driver.find_element(:id, 'namedColor').css_value('background-color')

  
    await driver.get('https://www.selenium.dev/selenium/web/colorPage.html');
      // Returns background color of the element
      let value = await driver.findElement(By.id('namedColor')).getCssValue('background-color');
// Navigate to Url
driver.get("https://www.selenium.dev/selenium/web/colorPage.html")

// Retrieves the computed style property 'color' of linktext
val cssValue = driver.findElement(By.id("namedColor")).getCssValue("background-color")


要素テキストを取得

指定された要素のレンダリングされたテキストを取得します。

// Navigate to url
driver.get("https://www.selenium.dev/selenium/web/linked_image.html");

// Retrieves the text of the element
String text = driver.findElement(By.id("justanotherlink")).getText();
  
    # Navigate to url
driver.get("https://www.selenium.dev/selenium/web/linked_image.html")

    # Retrieves the text of the element
text = driver.find_element(By.ID, "justanotherlink").text
  
// Navigate to url
driver.Url="https://www.selenium.dev/selenium/web/linked_image.html";

// Retrieves the text of the element
String text = driver.FindElement(By.Id("justanotherlink")).Text;
  
    # Navigate to url
driver.get 'https://www.selenium.dev/selenium/web/linked_image.html'

    # Retrieves the text of the element
text = driver.find_element(:id, 'justanotherlink').text
  
    await driver.get('https://www.selenium.dev/selenium/web/linked_image.html');
    // Returns text of the element
    let text = await driver.findElement(By.id('justanotherLink')).getText();
// Navigate to URL
driver.get("https://www.selenium.dev/selenium/web/linked_image.html")

// retrieves the text of the element
val text = driver.findElement(By.id("justanotherlink")).getText()
  

Fetching Attributes or Properties

Fetches the run time value associated with a DOM attribute. It returns the data associated with the DOM attribute or property of the element.

//Navigate to the url
driver.get("https://www.selenium.dev/selenium/web/inputs.html");

//identify the email text box
WebElement emailTxt = driver.findElement(By.name(("email_input")));

//fetch the value property associated with the textbox
String valueInfo = eleSelLink.getAttribute("value");
  
# Navigate to the url
driver.get("https://www.selenium.dev/selenium/web/inputs.html")

# Identify the email text box
email_txt = driver.find_element(By.NAME, "email_input")

# Fetch the value property associated with the textbox
value_info = email_txt.get_attribute("value")
  
 //Navigate to the url
driver.Url="https://www.selenium.dev/selenium/web/inputs.html";

//identify the email text box
IWebElement emailTxt = driver.FindElement(By.Name(("email_input")));

//fetch the value property associated with the textbox
String valueInfo = eleSelLink.GetAttribute("value");
  
# Navigate to the url
driver.get("https://www.selenium.dev/selenium/web/inputs.html");

#identify the email text box
email_element=driver.find_element(name: 'email_input')

#fetch the value property associated with the textbox
emailVal = email_element.attribute("value");
  
    // identify the email text box
    const emailElement = await driver.findElement(By.xpath('//input[@name="email_input"]'));
    
    //fetch the attribute "name" associated with the textbox
    const nameAttribute = await emailElement.getAttribute("name");
// Navigate to URL
driver.get("https://www.selenium.dev/selenium/web/inputs.html")

//fetch the value property associated with the textbox
val attr = driver.findElement(By.name("email_input")).getAttribute("value")
  

2.6 - Browser interactions

ブラウザーの情報

タイトルの取得

ブラウザーから現在のページタイトルを読むことができます。

driver.getTitle();
driver.title
driver.Title;
driver.title
await driver.getTitle();
driver.title

現在のURLを取得

ブラウザーのアドレスバーから現在のURLを読むには、次を使用します。

driver.getCurrentUrl();
driver.current_url
driver.Url;
driver.current_url
await driver.getCurrentUrl();
driver.currentUrl

2.6.1 - ブラウザー ナビゲーション

ナビゲート

ブラウザーを起動した後に最初に行うことは、Webサイトを開くことです。これは1行で実現できます。

//Convenient
driver.get("https://selenium.dev");

//Longer way
driver.navigate().to("https://selenium.dev");
  
driver.get("https://selenium.dev")
  
driver.Navigate().GoToUrl(@"https://selenium.dev");
  
    # Convenient way
driver.get 'https://selenium.dev'

    # Longer Way
driver.navigate.to 'https://selenium.dev'
  
await driver.get('https://selenium.dev');
  
//Convenient
driver.get("https://selenium.dev")

//Longer way
driver.navigate().to("https://selenium.dev")
  

戻る

ブラウザーの戻るボタンを押す。

driver.navigate().back();
driver.back()
driver.Navigate().Back();
driver.navigate.back
await driver.navigate().back();
driver.navigate().back() 

次へ

ブラウザーの次へボタンを押す。

driver.navigate().forward();
driver.forward()
driver.Navigate().Forward();
driver.navigate.forward
await driver.navigate().forward();
driver.navigate().forward()

更新

現在のページを更新する。

driver.navigate().refresh();
driver.refresh()
driver.Navigate().Refresh();
driver.navigate.refresh
await driver.navigate().refresh();
driver.navigate().refresh()

2.6.2 - JavaScript アラート、プロンプトおよび確認

WebDriverは、JavaScriptが提供する3種類のネイティブポップアップメッセージを操作するためのAPIを提供します。 これらのポップアップはブラウザーによってスタイルが設定され、カスタマイズが制限されています。

アラート

これらの最も単純なものはアラートと呼ばれ、カスタムメッセージと、ほとんどのブラウザーでOKのラベルが付いたアラートを非表示にする単一のボタンを表示します。 ほとんどのブラウザーでは閉じるボタンを押すことで閉じることもできますが、これは常にOKボタンと同じことを行います。 アラートの例を参照してください

WebDriverはポップアップからテキストを取得し、これらのアラートを受け入れるか、または閉じることができます。

//Click the link to activate the alert
driver.findElement(By.linkText("See an example alert")).click();

//Wait for the alert to be displayed and store it in a variable
Alert alert = wait.until(ExpectedConditions.alertIsPresent());

//Store the alert text in a variable
String text = alert.getText();

//Press the OK button
alert.accept();
  
# Click the link to activate the alert
driver.find_element(By.LINK_TEXT, "See an example alert").click()

# Wait for the alert to be displayed and store it in a variable
alert = wait.until(expected_conditions.alert_is_present())

# Store the alert text in a variable
text = alert.text

# Press the OK button
alert.accept()
  
//Click the link to activate the alert
driver.FindElement(By.LinkText("See an example alert")).Click();

//Wait for the alert to be displayed and store it in a variable
IAlert alert = wait.Until(ExpectedConditions.AlertIsPresent());

//Store the alert text in a variable
string text = alert.Text;

//Press the OK button
alert.Accept();
  
# Click the link to activate the alert
driver.find_element(:link_text, 'See an example alert').click

# Store the alert reference in a variable
alert = driver.switch_to.alert

# Store the alert text in a variable
alert_text = alert.text

# Press on OK button
alert.accept
  
//Click the link to activate the alert
await driver.findElement(By.linkText('See an example alert')).click();

// Wait for the alert to be displayed
await driver.wait(until.alertIsPresent());

// Store the alert in a variable
let alert = await driver.switchTo().alert();

//Store the alert text in a variable
let alertText = await alert.getText();

//Press the OK button
await alert.accept();

// Note: To use await, the above code should be inside an async function
  
//Click the link to activate the alert
driver.findElement(By.linkText("See an example alert")).click()

//Wait for the alert to be displayed and store it in a variable
val alert = wait.until(ExpectedConditions.alertIsPresent())

//Store the alert text in a variable
val text = alert.getText()

//Press the OK button
alert.accept()
  

確認

確認ダイアログボックスはアラートに似ていますが、ユーザーがメッセージをキャンセルすることも選択できる点が異なります。 サンプルを確認してください

この例は、アラートを保存する別の方法も示しています。

//Click the link to activate the alert
driver.findElement(By.linkText("See a sample confirm")).click();

//Wait for the alert to be displayed
wait.until(ExpectedConditions.alertIsPresent());

//Store the alert in a variable
Alert alert = driver.switchTo().alert();

//Store the alert in a variable for reuse
String text = alert.getText();

//Press the Cancel button
alert.dismiss();
  
# Click the link to activate the alert
driver.find_element(By.LINK_TEXT, "See a sample confirm").click()

# Wait for the alert to be displayed
wait.until(expected_conditions.alert_is_present())

# Store the alert in a variable for reuse
alert = driver.switch_to.alert

# Store the alert text in a variable
text = alert.text

# Press the Cancel button
alert.dismiss()
  
//Click the link to activate the alert
driver.FindElement(By.LinkText("See a sample confirm")).Click();

//Wait for the alert to be displayed
wait.Until(ExpectedConditions.AlertIsPresent());

//Store the alert in a variable
IAlert alert = driver.SwitchTo().Alert();

//Store the alert in a variable for reuse
string text = alert.Text;

//Press the Cancel button
alert.Dismiss();
  
# Click the link to activate the alert
driver.find_element(:link_text, 'See a sample confirm').click

# Store the alert reference in a variable
alert = driver.switch_to.alert

# Store the alert text in a variable
alert_text = alert.text

# Press on Cancel button
alert.dismiss
  
//Click the link to activate the alert
await driver.findElement(By.linkText('See a sample confirm')).click();

// Wait for the alert to be displayed
await driver.wait(until.alertIsPresent());

// Store the alert in a variable
let alert = await driver.switchTo().alert();

//Store the alert text in a variable
let alertText = await alert.getText();

//Press the Cancel button
await alert.dismiss();

// Note: To use await, the above code should be inside an async function
  
//Click the link to activate the alert
driver.findElement(By.linkText("See a sample confirm")).click()

//Wait for the alert to be displayed
wait.until(ExpectedConditions.alertIsPresent())

//Store the alert in a variable
val alert = driver.switchTo().alert()

//Store the alert in a variable for reuse
val text = alert.text

//Press the Cancel button
alert.dismiss()
  

プロンプト

プロンプトは確認ボックスに似ていますが、テキスト入力も含まれている点が異なります。 フォーム要素の操作と同様に、WebDriverの送信キーを使用して応答を入力できます。 これにより、プレースホルダーテキストが完全に置き換えられます。 キャンセルボタンを押してもテキストは送信されません。 サンプルプロンプトを参照してください

//Click the link to activate the alert
driver.findElement(By.linkText("See a sample prompt")).click();

//Wait for the alert to be displayed and store it in a variable
Alert alert = wait.until(ExpectedConditions.alertIsPresent());

//Type your message
alert.sendKeys("Selenium");

//Press the OK button
alert.accept();
  
# Click the link to activate the alert
driver.find_element(By.LINK_TEXT, "See a sample prompt").click()

# Wait for the alert to be displayed
wait.until(expected_conditions.alert_is_present())

# Store the alert in a variable for reuse
alert = Alert(driver)

# Type your message
alert.send_keys("Selenium")

# Press the OK button
alert.accept()
  
//Click the link to activate the alert
driver.FindElement(By.LinkText("See a sample prompt")).Click();

//Wait for the alert to be displayed and store it in a variable
IAlert alert = wait.Until(ExpectedConditions.AlertIsPresent());

//Type your message
alert.SendKeys("Selenium");

//Press the OK button
alert.Accept();
  
# Click the link to activate the alert
driver.find_element(:link_text, 'See a sample prompt').click

# Store the alert reference in a variable
alert = driver.switch_to.alert

# Type a message
alert.send_keys("selenium")

# Press on Ok button
alert.accept
  
//Click the link to activate the alert
await driver.findElement(By.linkText('See a sample prompt')).click();

// Wait for the alert to be displayed
await driver.wait(until.alertIsPresent());

// Store the alert in a variable
let alert = await driver.switchTo().alert();

//Type your message
await alert.sendKeys("Selenium");

//Press the OK button
await alert.accept();

//Note: To use await, the above code should be inside an async function
  
//Click the link to activate the alert
driver.findElement(By.linkText("See a sample prompt")).click()

//Wait for the alert to be displayed and store it in a variable
val alert = wait.until(ExpectedConditions.alertIsPresent())

//Type your message
alert.sendKeys("Selenium")

//Press the OK button
alert.accept()
  

2.6.3 - クッキーの使用

Cookieは、Webサイトから送信され、コンピューターに保存される小さなデータです。 Cookieは、主にユーザーを認識し、保存されている情報を読み込むために使用されます。

WebDriver APIは、組み込みメソッドでCookieと対話するメソッドを提供します。

クッキーの追加

現在のブラウジングコンテキストにCookieを追加するために使用されます。 Cookieの追加では、一連の定義済みのシリアル化可能なJSONオブジェクトのみを受け入れます。 受け入れられたJSONキー値のリストへのリンクはこちらにあります。

まず、Cookieが有効になるドメインにいる必要があります。 サイトとの対話を開始する前にCookieを事前設定しようとしていて、ホームページが大きい場合/代替の読み込みに時間がかかる場合は、サイトで小さいページを見つけることです。(通常、たとえば http://example.com/some404page のような、404ページは小さいです。)

import org.openqa.selenium.*;
import org.openqa.selenium.chrome.ChromeDriver;

public class addCookie {
    public static void main(String[] args) {
        WebDriver driver = new ChromeDriver();
        try {
            driver.get("http://www.example.com");

            // Adds the cookie into current browser context
            driver.manage().addCookie(new Cookie("key", "value"));
        } finally {
            driver.quit();
        }
    }
}
  
from selenium import webdriver

driver = webdriver.Chrome()

driver.get("http://www.example.com")

# Adds the cookie into current browser context
driver.add_cookie({"name": "key", "value": "value"})
  
using OpenQA.Selenium;
using OpenQA.Selenium.Chrome;

namespace AddCookie {
 class AddCookie {
  public static void Main(string[] args) {
   IWebDriver driver = new ChromeDriver();
   try {
    // Navigate to Url
    driver.Navigate().GoToUrl("https://example.com");

    // Adds the cookie into current browser context
    driver.Manage().Cookies.AddCookie(new Cookie("key", "value"));
   } finally {
    driver.Quit();
   }
  }
 }
}
  
require 'selenium-webdriver'
driver = Selenium::WebDriver.for :chrome

begin
  driver.get 'https://www.example.com'
  
  # Adds the cookie into current browser context
  driver.manage.add_cookie(name: "key", value: "value")
ensure
  driver.quit
end
  

        it('Create a cookie', async function() {
            await driver.get('https://www.selenium.dev/selenium/web/blank.html');

            // set a cookie on the current domain
            await driver.manage().addCookie({ name: 'key', value: 'value' });
import org.openqa.selenium.Cookie
import org.openqa.selenium.chrome.ChromeDriver

fun main() {
    val driver = ChromeDriver()
    try {
        driver.get("https://example.com")

        // Adds the cookie into current browser context
        driver.manage().addCookie(Cookie("key", "value"))
    } finally {
        driver.quit()
    }
}  
  

命名されたクッキーの取得

関連付けられているすべてのCookieの中で、Cookie名と一致するシリアル化されたCookieデータを返します。

import org.openqa.selenium.*;
import org.openqa.selenium.chrome.ChromeDriver;

public class getCookieNamed {
    public static void main(String[] args) {
        WebDriver driver = new ChromeDriver();
        try {
            driver.get("http://www.example.com");
            driver.manage().addCookie(new Cookie("foo", "bar"));

            // Get cookie details with named cookie 'foo'
            Cookie cookie1 = driver.manage().getCookieNamed("foo");
            System.out.println(cookie1);
        } finally {
            driver.quit();
        }
    }
}
  
from selenium import webdriver

driver = webdriver.Chrome()

# Navigate to url
driver.get("http://www.example.com")

# Adds the cookie into current browser context
driver.add_cookie({"name": "foo", "value": "bar"})

# Get cookie details with named cookie 'foo'
print(driver.get_cookie("foo"))
  
using OpenQA.Selenium;
using OpenQA.Selenium.Chrome;

namespace GetCookieNamed {
 class GetCookieNamed {
  public static void Main(string[] args) {
   IWebDriver driver = new ChromeDriver();
   try {
    // Navigate to Url
    driver.Navigate().GoToUrl("https://example.com");
    driver.Manage().Cookies.AddCookie(new Cookie("foo", "bar"));

    // Get cookie details with named cookie 'foo'
    var cookie = driver.Manage().Cookies.GetCookieNamed("foo");
    System.Console.WriteLine(cookie);
   } finally {
    driver.Quit();
   }
  }
 }
}
  
require 'selenium-webdriver'
driver = Selenium::WebDriver.for :chrome

begin
  driver.get 'https://www.example.com'
  driver.manage.add_cookie(name: "foo", value: "bar")

  # Get cookie details with named cookie 'foo'
  puts driver.manage.cookie_named('foo')
ensure
  driver.quit
end
  

        it('Read cookie', async function() {
            await driver.get('https://www.selenium.dev/selenium/web/blank.html');

            // set a cookie on the current domain
            await driver.manage().addCookie({ name: 'foo', value: 'bar' });

            // Get cookie details with named cookie 'foo'
            await driver.manage().getCookie('foo').then(function(cookie) {
                console.log('cookie details => ', cookie);
            });
import org.openqa.selenium.Cookie
import org.openqa.selenium.chrome.ChromeDriver

fun main() {
    val driver = ChromeDriver()
    try {
        driver.get("https://example.com")
        driver.manage().addCookie(Cookie("foo", "bar"))

        // Get cookie details with named cookie 'foo'
        val cookie = driver.manage().getCookieNamed("foo")
        println(cookie)
    } finally {
        driver.quit()
    }
}  
  

全てのクッキーの取得

現在のブラウジングコンテキストの ‘成功したシリアル化されたCookieデータ’ を返します。 ブラウザが使用できなくなった場合、エラーが返されます。

import org.openqa.selenium.*;
import org.openqa.selenium.chrome.ChromeDriver;
import java.util.Set;

public class getAllCookies {
    public static void main(String[] args) {
        WebDriver driver = new ChromeDriver();
        try {
            driver.get("http://www.example.com");
            // Add few cookies
            driver.manage().addCookie(new Cookie("test1", "cookie1"));
            driver.manage().addCookie(new Cookie("test2", "cookie2"));

            // Get All available cookies
            Set<Cookie> cookies = driver.manage().getCookies();
            System.out.println(cookies);
        } finally {
            driver.quit();
        }
    }
}
  
from selenium import webdriver

driver = webdriver.Chrome()

# Navigate to url
driver.get("http://www.example.com")

driver.add_cookie({"name": "test1", "value": "cookie1"})
driver.add_cookie({"name": "test2", "value": "cookie2"})

# Get all available cookies
print(driver.get_cookies())
  
using OpenQA.Selenium;
using OpenQA.Selenium.Chrome;

namespace GetAllCookies {
 class GetAllCookies {
  public static void Main(string[] args) {
   IWebDriver driver = new ChromeDriver();
   try {
    // Navigate to Url
    driver.Navigate().GoToUrl("https://example.com");
    driver.Manage().Cookies.AddCookie(new Cookie("test1", "cookie1"));
    driver.Manage().Cookies.AddCookie(new Cookie("test2", "cookie2"));

    // Get All available cookies
    var cookies = driver.Manage().Cookies.AllCookies;
   } finally {
    driver.Quit();
   }
  }
 }
}
  
require 'selenium-webdriver'
driver = Selenium::WebDriver.for :chrome

begin
  driver.get 'https://www.example.com'
  driver.manage.add_cookie(name: "test1", value: "cookie1")
  driver.manage.add_cookie(name: "test2", value: "cookie2")

  # Get all available cookies
  puts driver.manage.all_cookies
ensure
  driver.quit
end
  

        it('Read all cookies', async function() {
            await driver.get('https://www.selenium.dev/selenium/web/blank.html');

            // Add few cookies
            await driver.manage().addCookie({ name: 'test1', value: 'cookie1' });
            await driver.manage().addCookie({ name: 'test2', value: 'cookie2' });

            // Get all Available cookies
            await driver.manage().getCookies().then(function(cookies) {
                console.log('cookie details => ', cookies);
            });
import org.openqa.selenium.Cookie
import org.openqa.selenium.chrome.ChromeDriver

fun main() {
    val driver = ChromeDriver()
    try {
        driver.get("https://example.com")
        driver.manage().addCookie(Cookie("test1", "cookie1"))
        driver.manage().addCookie(Cookie("test2", "cookie2"))

        // Get All available cookies
        val cookies = driver.manage().cookies
        println(cookies)
    } finally {
        driver.quit()
    }
}  
  

クッキーの削除

指定されたCookie名と一致するCookieデータを削除します。

import org.openqa.selenium.*;
import org.openqa.selenium.chrome.ChromeDriver;

public class deleteCookie {
    public static void main(String[] args) {
        WebDriver driver = new ChromeDriver();
        try {
            driver.get("http://www.example.com");
            driver.manage().addCookie(new Cookie("test1", "cookie1"));
            Cookie cookie1 = new Cookie("test2", "cookie2");
            driver.manage().addCookie(cookie1);

            // delete a cookie with name 'test1'
            driver.manage().deleteCookieNamed("test1");

            /*
             Selenium Java bindings also provides a way to delete
             cookie by passing cookie object of current browsing context
             */
            driver.manage().deleteCookie(cookie1);
        } finally {
            driver.quit();
        }
    }
}
  
from selenium import webdriver
driver = webdriver.Chrome()

# Navigate to url
driver.get("http://www.example.com")
driver.add_cookie({"name": "test1", "value": "cookie1"})
driver.add_cookie({"name": "test2", "value": "cookie2"})

# Delete a cookie with name 'test1'
driver.delete_cookie("test1")
  
using OpenQA.Selenium;
using OpenQA.Selenium.Chrome;

namespace DeleteCookie {
 class DeleteCookie {
  public static void Main(string[] args) {
   IWebDriver driver = new ChromeDriver();
   try {
    // Navigate to Url
    driver.Navigate().GoToUrl("https://example.com");
    driver.Manage().Cookies.AddCookie(new Cookie("test1", "cookie1"));
    var cookie = new Cookie("test2", "cookie2");
    driver.Manage().Cookies.AddCookie(cookie);

    // delete a cookie with name 'test1'	
    driver.Manage().Cookies.DeleteCookieNamed("test1");

    // Selenium .net bindings also provides a way to delete
    // cookie by passing cookie object of current browsing context
    driver.Manage().Cookies.DeleteCookie(cookie);
   } finally {
    driver.Quit();
   }
  }
 }
}
  
require 'selenium-webdriver'
driver = Selenium::WebDriver.for :chrome

begin
  driver.get 'https://www.example.com'
  driver.manage.add_cookie(name: "test1", value: "cookie1")
  driver.manage.add_cookie(name: "test2", value: "cookie2")

  # delete a cookie with name 'test1'
  driver.manage.delete_cookie('test1')
ensure
  driver.quit
end
  

        it('Delete a cookie', async function() {
            await driver.get('https://www.selenium.dev/selenium/web/blank.html');

            // Add few cookies
            await driver.manage().addCookie({ name: 'test1', value: 'cookie1' });
            await driver.manage().addCookie({ name: 'test2', value: 'cookie2' });

            // Delete a cookie with name 'test1'
            await driver.manage().deleteCookie('test1');

            // Get all Available cookies
            await driver.manage().getCookies().then(function(cookies) {
                console.log('cookie details => ', cookies);
            });
import org.openqa.selenium.Cookie
import org.openqa.selenium.chrome.ChromeDriver

fun main() {
    val driver = ChromeDriver()
    try {
        driver.get("https://example.com")
        driver.manage().addCookie(Cookie("test1", "cookie1"))
        val cookie1 = Cookie("test2", "cookie2")
        driver.manage().addCookie(cookie1)

        // delete a cookie with name 'test1'
        driver.manage().deleteCookieNamed("test1")

        // delete cookie by passing cookie object of current browsing context.
        driver.manage().deleteCookie(cookie1)
    } finally {
        driver.quit()
    }
}  
  

全てのクッキーの削除

現在のブラウジングコンテキストの全てのCookieを削除します。

import org.openqa.selenium.*;
import org.openqa.selenium.chrome.ChromeDriver;

public class deleteAllCookies {
    public static void main(String[] args) {
        WebDriver driver = new ChromeDriver();
        try {
            driver.get("http://www.example.com");
            driver.manage().addCookie(new Cookie("test1", "cookie1"));
            driver.manage().addCookie(new Cookie("test2", "cookie2"));

            // deletes all cookies
            driver.manage().deleteAllCookies();
        } finally {
            driver.quit();
        }
    }
}
  
from selenium import webdriver
driver = webdriver.Chrome()

# Navigate to url
driver.get("http://www.example.com")
driver.add_cookie({"name": "test1", "value": "cookie1"})
driver.add_cookie({"name": "test2", "value": "cookie2"})

#  Deletes all cookies
driver.delete_all_cookies()
  
using OpenQA.Selenium;
using OpenQA.Selenium.Chrome;

namespace DeleteAllCookies {
 class DeleteAllCookies {
  public static void Main(string[] args) {
   IWebDriver driver = new ChromeDriver();
   try {
    // Navigate to Url
    driver.Navigate().GoToUrl("https://example.com");
    driver.Manage().Cookies.AddCookie(new Cookie("test1", "cookie1"));
    driver.Manage().Cookies.AddCookie(new Cookie("test2", "cookie2"));

    // deletes all cookies
    driver.Manage().Cookies.DeleteAllCookies();
   } finally {
    driver.Quit();
   }
  }
 }
}
  
require 'selenium-webdriver'
driver = Selenium::WebDriver.for :chrome

begin
  driver.get 'https://www.example.com'
  driver.manage.add_cookie(name: "test1", value: "cookie1")
  driver.manage.add_cookie(name: "test2", value: "cookie2")

  # deletes all cookies
  driver.manage.delete_all_cookies
ensure
  driver.quit
end
  

        it('Delete all cookies', async function() {
            await driver.get('https://www.selenium.dev/selenium/web/blank.html');

            // Add few cookies
            await driver.manage().addCookie({ name: 'test1', value: 'cookie1' });
            await driver.manage().addCookie({ name: 'test2', value: 'cookie2' });

            // Delete all cookies
            await driver.manage().deleteAllCookies();
import org.openqa.selenium.Cookie
import org.openqa.selenium.chrome.ChromeDriver

fun main() {
    val driver = ChromeDriver()
    try {
        driver.get("https://example.com")
        driver.manage().addCookie(Cookie("test1", "cookie1"))
        driver.manage().addCookie(Cookie("test2", "cookie2"))

        // deletes all cookies
        driver.manage().deleteAllCookies()
    } finally {
        driver.quit()
    }
}  
  

SameSite Cookie属性

これにより、ユーザーは、サードパーティのサイトによって開始されたリクエストとともに Cookieを送信するかどうかをブラウザに指示できます。 CSRF(クロスサイトリクエストフォージェリ)攻撃を防ぐために導入されました。

SameSite Cookie属性は、2つのパラメーターを命令として受け入れます。

Strict:

SameSite属性が Strict に設定されている場合、CookieはサードパーティのWebサイトによって 開始されたリクエストとともに送信されません。

Lax:

CookieのSameSite属性を Lax に設定すると、CookieはサードパーティのWebサイトによって 開始されたGETリクエストとともに送信されます。

Note: As of now this feature is landed in chrome(80+version), Firefox(79+version) and works with Selenium 4 and later versions.

import org.openqa.selenium.*;
import org.openqa.selenium.chrome.ChromeDriver;

public class cookieTest {
  public static void main(String[] args) {
    WebDriver driver = new ChromeDriver();
    try {
      driver.get("http://www.example.com");
      Cookie cookie = new Cookie.Builder("key", "value").sameSite("Strict").build();
      Cookie cookie1 = new Cookie.Builder("key", "value").sameSite("Lax").build();
      driver.manage().addCookie(cookie);
      driver.manage().addCookie(cookie1);
      System.out.println(cookie.getSameSite());
      System.out.println(cookie1.getSameSite());
    } finally {
      driver.quit();
    }
  }
}
  
from selenium import webdriver

driver = webdriver.Chrome()

driver.get("http://www.example.com")
# Adds the cookie into current browser context with sameSite 'Strict' (or) 'Lax'
driver.add_cookie({"name": "foo", "value": "value", 'sameSite': 'Strict'})
driver.add_cookie({"name": "foo1", "value": "value", 'sameSite': 'Lax'})
cookie1 = driver.get_cookie('foo')
cookie2 = driver.get_cookie('foo1')
print(cookie1)
print(cookie2)
  
using OpenQA.Selenium;
using OpenQA.Selenium.Chrome;

namespace SameSiteCookie {
  class SameSiteCookie {
    static void Main(string[] args) {
      IWebDriver driver = new ChromeDriver();
      try {
        driver.Navigate().GoToUrl("http://www.example.com");

        var cookie1Dictionary = new System.Collections.Generic.Dictionary<string, object>() {
          { "name", "test1" }, { "value", "cookie1" }, { "sameSite", "Strict" } };
        var cookie1 = Cookie.FromDictionary(cookie1Dictionary);

        var cookie2Dictionary = new System.Collections.Generic.Dictionary<string, object>() {
          { "name", "test2" }, { "value", "cookie2" }, { "sameSite", "Lax" } };
        var cookie2 = Cookie.FromDictionary(cookie2Dictionary);

        driver.Manage().Cookies.AddCookie(cookie1);
        driver.Manage().Cookies.AddCookie(cookie2);

        System.Console.WriteLine(cookie1.SameSite);
        System.Console.WriteLine(cookie2.SameSite);
      } finally {
        driver.Quit();
      }
    }
  }
}
  
require 'selenium-webdriver'
driver = Selenium::WebDriver.for :chrome

begin
  driver.get 'https://www.example.com'
  # Adds the cookie into current browser context with sameSite 'Strict' (or) 'Lax'
  driver.manage.add_cookie(name: "foo", value: "bar", same_site: "Strict")
  driver.manage.add_cookie(name: "foo1", value: "bar", same_site: "Lax")
  puts driver.manage.cookie_named('foo')
  puts driver.manage.cookie_named('foo1')
ensure
  driver.quit
end
  

        it('Create cookies with sameSite', async function() {
            await driver.get('https://www.selenium.dev/selenium/web/blank.html');

            // set a cookie on the current domain with sameSite 'Strict' (or) 'Lax'
            await driver.manage().addCookie({ name: 'key', value: 'value', sameSite: 'Strict' });
            await driver.manage().addCookie({ name: 'key', value: 'value', sameSite: 'Lax' });
import org.openqa.selenium.Cookie
import org.openqa.selenium.chrome.ChromeDriver

fun main() {
    val driver = ChromeDriver()
    try {
        driver.get("http://www.example.com")
        val cookie = Cookie.Builder("key", "value").sameSite("Strict").build()
        val cookie1 = Cookie.Builder("key", "value").sameSite("Lax").build()
        driver.manage().addCookie(cookie)
        driver.manage().addCookie(cookie1)
        println(cookie.getSameSite())
        println(cookie1.getSameSite())
    } finally {
        driver.quit()
    }
} 
  

2.6.4 - IFrame と Frame の操作

Frameは、同じドメイン上の複数のドキュメントからサイトレイアウトを構築する非推奨の手段となりました。 HTML5以前のWebアプリを使用している場合を除き、frameを使用することはほとんどありません。 iFrameは、まったく異なるドメインからのドキュメントの挿入を許可し、今でも一般的に使用されています。

FrameまたはiFrameを使用する必要がある場合、Webdriverを使用して同じ方法で作業できます。 iFrame内のボタンがある場合を考えてみましょう。ブラウザー開発ツールを使用して要素を検査すると、次のように表示される場合があります。

<div id="modal">
  <iframe id="buttonframe" name="myframe"  src="https://seleniumhq.github.io">
   <button>Click here</button>
 </iframe>
</div>

iFrameがなければ、次のようなボタンを使用してボタンをクリックします。

//This won't work
driver.findElement(By.tagName("button")).click();
  
    # This Wont work
driver.find_element(By.TAG_NAME, 'button').click()
  
//This won't work
driver.FindElement(By.TagName("button")).Click();
  
    # This won't work
driver.find_element(:tag_name,'button').click
  
// This won't work
await driver.findElement(By.css('button')).click();
  
//This won't work
driver.findElement(By.tagName("button")).click()
  

ただし、iFrameの外側にボタンがない場合は、代わりにno such elementエラーが発生する可能性があります。 これは、Seleniumがトップレベルのドキュメントの要素のみを認識するために発生します。 ボタンを操作するには、ウィンドウを切り替える方法と同様に、最初にFrameに切り替える必要があります。 WebDriverは、Frameに切り替える3つの方法を提供します。

WebElementを使う

WebElementを使用した切り替えは、最も柔軟なオプションです。好みのセレクタを使用してFrameを見つけ、それに切り替えることができます。

//Store the web element
WebElement iframe = driver.findElement(By.cssSelector("#modal>iframe"));

//Switch to the frame
driver.switchTo().frame(iframe);

//Now we can click the button
driver.findElement(By.tagName("button")).click();
  
    # Store iframe web element
iframe = driver.find_element(By.CSS_SELECTOR, "#modal > iframe")

    # switch to selected iframe
driver.switch_to.frame(iframe)

    # Now click on button
driver.find_element(By.TAG_NAME, 'button').click()
  
//Store the web element
IWebElement iframe = driver.FindElement(By.CssSelector("#modal>iframe"));

//Switch to the frame
driver.SwitchTo().Frame(iframe);

//Now we can click the button
driver.FindElement(By.TagName("button")).Click();
  
    # Store iframe web element
iframe = driver.find_element(:css,'#modal > iframe')

    # Switch to the frame
driver.switch_to.frame iframe

    # Now, Click on the button
driver.find_element(:tag_name,'button').click
  
// Store the web element
const iframe = driver.findElement(By.css('#modal > iframe'));

// Switch to the frame
await driver.switchTo().frame(iframe);

// Now we can click the button
await driver.findElement(By.css('button')).click();
  
//Store the web element
val iframe = driver.findElement(By.cssSelector("#modal>iframe"))

//Switch to the frame
driver.switchTo().frame(iframe)

//Now we can click the button
driver.findElement(By.tagName("button")).click()
  

nameまたはIDを使う

FrameまたはiFrameにidまたはname属性がある場合、代わりにこれを使うことができます。 名前またはIDがページ上で一意でない場合、最初に見つかったものに切り替えます。

//Using the ID
driver.switchTo().frame("buttonframe");

//Or using the name instead
driver.switchTo().frame("myframe");

//Now we can click the button
driver.findElement(By.tagName("button")).click();
  
    # Switch frame by id
driver.switch_to.frame('buttonframe')

    # Now, Click on the button
driver.find_element(By.TAG_NAME, 'button').click()
  
//Using the ID
driver.SwitchTo().Frame("buttonframe");

//Or using the name instead
driver.SwitchTo().Frame("myframe");

//Now we can click the button
driver.FindElement(By.TagName("button")).Click();
  
    # Switch by ID
driver.switch_to.frame 'buttonframe'

    # Now, Click on the button
driver.find_element(:tag_name,'button').click
  
// Using the ID
await driver.switchTo().frame('buttonframe');

// Or using the name instead
await driver.switchTo().frame('myframe');

// Now we can click the button
await driver.findElement(By.css('button')).click();
  
//Using the ID
driver.switchTo().frame("buttonframe")

//Or using the name instead
driver.switchTo().frame("myframe")

//Now we can click the button
driver.findElement(By.tagName("button")).click()
  

インデックスを使う

JavaScriptの window.frames を使用して照会できるように、Frameのインデックスを使用することもできます。

// Switches to the second frame
driver.switchTo().frame(1);
  
    # Switch to the second frame
driver.switch_to.frame(1)
  
// Switches to the second frame
driver.SwitchTo().Frame(1);
  
    # switching to second iframe based on index
iframe = driver.find_elements(By.TAG_NAME,'iframe')[1]

    # switch to selected iframe
driver.switch_to.frame(iframe)
  
// Switches to the second frame
await driver.switchTo().frame(1);
  
// Switches to the second frame
driver.switchTo().frame(1)
  

Frameを終了する

iFrameまたはFrameセットを終了するには、次のようにデフォルトのコンテンツに切り替えます。

// Return to the top level
driver.switchTo().defaultContent();
  
    # switch back to default content
driver.switch_to.default_content()
  
// Return to the top level
driver.SwitchTo().DefaultContent();
  
    # Return to the top level
driver.switch_to.default_content
  
// Return to the top level
await driver.switchTo().defaultContent();
  
// Return to the top level
driver.switchTo().defaultContent()
  

2.6.5 - ウィンドウとタブの操作

ウィンドウとタブ

ウィンドウハンドルの取得

WebDriverは、ウィンドウとタブを区別しません。 サイトが新しいタブまたはウィンドウを開く場合、Seleniumはウィンドウハンドルを使って連動します。 各ウィンドウには一意の識別子があり、これは単一のセッションで持続します。 次のコードを使用して、現在のウィンドウのウィンドウハンドルを取得できます。

driver.getWindowHandle();
driver.current_window_handle
driver.CurrentWindowHandle;
driver.window_handle
await driver.getWindowHandle();
driver.windowHandle

ウィンドウまたはタブの切り替え

新しいウィンドウで開くリンクをクリックすると、新しいウィンドウまたはタブが画面にフォーカスされますが、WebDriverはオペレーティングシステムがアクティブと見なすウィンドウを認識しません。 新しいウィンドウで作業するには、それに切り替える必要があります。 開いているタブまたはウィンドウが2つしかなく、どちらのウィンドウから開始するかがわかっている場合、削除のプロセスによって、WebDriverが表示できる両方のウィンドウまたはタブをループし、元のウィンドウまたはタブに切り替えることができます。

ただし、Selenium 4には、新しいタブ(または)新しいウィンドウを作成して自動的に切り替える新しいAPI NewWindow が用意されています。

//Store the ID of the original window
String originalWindow = driver.getWindowHandle();

//Check we don't have other windows open already
assert driver.getWindowHandles().size() == 1;

//Click the link which opens in a new window
driver.findElement(By.linkText("new window")).click();

//Wait for the new window or tab
wait.until(numberOfWindowsToBe(2));

//Loop through until we find a new window handle
for (String windowHandle : driver.getWindowHandles()) {
    if(!originalWindow.contentEquals(windowHandle)) {
        driver.switchTo().window(windowHandle);
        break;
    }
}

//Wait for the new tab to finish loading content
wait.until(titleIs("Selenium documentation"));
  
from selenium import webdriver
from selenium.webdriver.support.ui import WebDriverWait
from selenium.webdriver.support import expected_conditions as EC

    # Start the driver
with webdriver.Firefox() as driver:
    # Open URL
    driver.get("https://seleniumhq.github.io")

    # Setup wait for later
    wait = WebDriverWait(driver, 10)

    # Store the ID of the original window
    original_window = driver.current_window_handle

    # Check we don't have other windows open already
    assert len(driver.window_handles) == 1

    # Click the link which opens in a new window
    driver.find_element(By.LINK_TEXT, "new window").click()

    # Wait for the new window or tab
    wait.until(EC.number_of_windows_to_be(2))

    # Loop through until we find a new window handle
    for window_handle in driver.window_handles:
        if window_handle != original_window:
            driver.switch_to.window(window_handle)
            break

    # Wait for the new tab to finish loading content
    wait.until(EC.title_is("SeleniumHQ Browser Automation"))
  
//Store the ID of the original window
string originalWindow = driver.CurrentWindowHandle;

//Check we don't have other windows open already
Assert.AreEqual(driver.WindowHandles.Count, 1);

//Click the link which opens in a new window
driver.FindElement(By.LinkText("new window")).Click();

//Wait for the new window or tab
wait.Until(wd => wd.WindowHandles.Count == 2);

//Loop through until we find a new window handle
foreach(string window in driver.WindowHandles)
{
    if(originalWindow != window)
    {
        driver.SwitchTo().Window(window);
        break;
    }
}
//Wait for the new tab to finish loading content
wait.Until(wd => wd.Title == "Selenium documentation");
  
    #Store the ID of the original window
original_window = driver.window_handle

    #Check we don't have other windows open already
assert(driver.window_handles.length == 1, 'Expected one window')

    #Click the link which opens in a new window
driver.find_element(link: 'new window').click

    #Wait for the new window or tab
wait.until { driver.window_handles.length == 2 }

    #Loop through until we find a new window handle
driver.window_handles.each do |handle|
    if handle != original_window
        driver.switch_to.window handle
        break
    end
end

    #Wait for the new tab to finish loading content
wait.until { driver.title == 'Selenium documentation'}
  
//Store the ID of the original window
const originalWindow = await driver.getWindowHandle();

//Check we don't have other windows open already
assert((await driver.getAllWindowHandles()).length === 1);

//Click the link which opens in a new window
await driver.findElement(By.linkText('new window')).click();

//Wait for the new window or tab
await driver.wait(
    async () => (await driver.getAllWindowHandles()).length === 2,
    10000
  );

//Loop through until we find a new window handle
const windows = await driver.getAllWindowHandles();
windows.forEach(async handle => {
  if (handle !== originalWindow) {
    await driver.switchTo().window(handle);
  }
});

//Wait for the new tab to finish loading content
await driver.wait(until.titleIs('Selenium documentation'), 10000);
  
//Store the ID of the original window
val originalWindow = driver.getWindowHandle()

//Check we don't have other windows open already
assert(driver.getWindowHandles().size() === 1)

//Click the link which opens in a new window
driver.findElement(By.linkText("new window")).click()

//Wait for the new window or tab
wait.until(numberOfWindowsToBe(2))

//Loop through until we find a new window handle
for (windowHandle in driver.getWindowHandles()) {
    if (!originalWindow.contentEquals(windowHandle)) {
        driver.switchTo().window(windowHandle)
        break
    }
}

//Wait for the new tab to finish loading content
wait.until(titleIs("Selenium documentation"))


新しいウィンドウ(または)新しいタブを作成して切り替える

新しいウィンドウ(または)タブを作成し、画面上の新しいウィンドウまたはタブにフォーカスします。 新しいウィンドウ(または)タブを使用するように切り替える必要はありません。 新しいウィンドウ以外に3つ以上のウィンドウ(または)タブを開いている場合、WebDriverが表示できる両方のウィンドウまたはタブをループして、元のものではないものに切り替えることができます。

注意: この機能は、Selenium 4以降のバージョンで機能します。

// Opens a new tab and switches to new tab
driver.switchTo().newWindow(WindowType.TAB);

// Opens a new window and switches to new window
driver.switchTo().newWindow(WindowType.WINDOW);
  
    # Opens a new tab and switches to new tab
driver.switch_to.new_window('tab')

    # Opens a new window and switches to new window
driver.switch_to.new_window('window')
  
// Opens a new tab and switches to new tab
driver.SwitchTo().NewWindow(WindowType.Tab)

// Opens a new window and switches to new window
driver.SwitchTo().NewWindow(WindowType.Window)
  
    # Note: The new_window in ruby only opens a new tab (or) Window and will not switch automatically
    # The user has to switch to new tab (or) new window

    # Opens a new tab and switches to new tab
driver.manage.new_window(:tab)

    # Opens a new window and switches to new window
driver.manage.new_window(:window)
  
// Opens a new tab and switches to new tab
await driver.switchTo().newWindow('tab');

// Opens a new window and switches to new window
await driver.switchTo().newWindow('window');

  
// Opens a new tab and switches to new tab
driver.switchTo().newWindow(WindowType.TAB)

// Opens a new window and switches to new window
driver.switchTo().newWindow(WindowType.WINDOW)
  

ウィンドウまたはタブを閉じる

ウィンドウまたはタブでの作業が終了し、 かつ ブラウザーで最後に開いたウィンドウまたはタブではない場合、それを閉じて、以前使用していたウィンドウに切り替える必要があります。 前のセクションのコードサンプルに従ったと仮定すると、変数に前のウィンドウハンドルが格納されます。 これをまとめると以下のようになります。

//Close the tab or window
driver.close();

//Switch back to the old tab or window
driver.switchTo().window(originalWindow);
  
    #Close the tab or window
driver.close()

    #Switch back to the old tab or window
driver.switch_to.window(original_window)
  
//Close the tab or window
driver.Close();

//Switch back to the old tab or window
driver.SwitchTo().Window(originalWindow);
  
    #Close the tab or window
driver.close

    #Switch back to the old tab or window
driver.switch_to.window original_window
  
//Close the tab or window
await driver.close();

//Switch back to the old tab or window
await driver.switchTo().window(originalWindow);
  
//Close the tab or window
driver.close()

//Switch back to the old tab or window
driver.switchTo().window(originalWindow)


ウィンドウを閉じた後に別のウィンドウハンドルに切り替えるのを忘れると、現在閉じられているページでWebDriverが実行されたままになり、 No Such Window Exception が発行されます。実行を継続するには、有効なウィンドウハンドルに切り替える必要があります。

セッションの終了時にブラウザーを終了する

ブラウザーセッションを終了したら、closeではなく、quitを呼び出す必要があります。

driver.quit();
driver.quit()
driver.Quit();
driver.quit
await driver.quit();
driver.quit()
  • Quitは、
    • そのWebDriverセッションに関連付けられているすべてのウィンドウとタブを閉じます
    • ブラウザーのプロセス
    • バックグラウンドのドライバーのプロセス
    • ブラウザーが使用されなくなったことをSelenium Gridに通知して、別のセッションで使用できるようにします(Selenium Gridを使用している場合)

quitの呼び出しに失敗すると、余分なバックグラウンドプロセスとポートがマシン上で実行されたままになり、後で問題が発生する可能性があります。

一部のテストフレームワークでは、テストの終了時にフックできるメソッドとアノテーションを提供しています。

/**
 * Example using JUnit
 * https://junit.org/junit5/docs/current/api/org/junit/jupiter/api/AfterAll.html
 */
@AfterAll
public static void tearDown() {
    driver.quit();
}
  
    # unittest teardown
    # https://docs.python.org/3/library/unittest.html?highlight=teardown#unittest.TestCase.tearDown
def tearDown(self):
    self.driver.quit()
  
/*
    Example using Visual Studio's UnitTesting
    https://msdn.microsoft.com/en-us/library/microsoft.visualstudio.testtools.unittesting.aspx
*/
[TestCleanup]
public void TearDown()
{
    driver.Quit();
}
  
    # UnitTest Teardown
    # https://www.rubydoc.info/github/test-unit/test-unit/Test/Unit/TestCase
def teardown
    @driver.quit
end
  
/**
 * Example using Mocha
 * https://mochajs.org/#hooks
 */
after('Tear down', async function () {
  await driver.quit();
});
  
/**
 * Example using JUnit
 * https://junit.org/junit5/docs/current/api/org/junit/jupiter/api/AfterAll.html
 */
@AfterAll
fun tearDown() {
    driver.quit()
}
  

テストコンテキストでWebDriverを実行していない場合は、ほとんどの言語で提供されている try / finally の使用を検討して、例外がWebDriverセッションをクリーンアップするようにします。

try {
    //WebDriver code here...
} finally {
    driver.quit();
}
  
try:
    #WebDriver code here...
finally:
    driver.quit()
  
try {
    //WebDriver code here...
} finally {
    driver.Quit();
}
  
begin
    #WebDriver code here...
ensure
    driver.quit
end
  
try {
    //WebDriver code here...
} finally {
    await driver.quit();
}
  
try {
    //WebDriver code here...
} finally {
    driver.quit()
}
  

PythonのWebDriverは、pythonコンテキストマネージャーをサポートするようになりました。 withキーワードを使用すると、実行終了時にドライバーを自動的に終了できます。

with webdriver.Firefox() as driver:
  # WebDriver code here...

# WebDriver will automatically quit after indentation

ウィンドウマネジメント

画面解像度はWebアプリケーションのレンダリング方法に影響を与える可能性があるため、WebDriverはブラウザーウィンドウを移動およびサイズ変更するメカニズムを提供します。

ウィンドウサイズの取得

ブラウザーウィンドウのサイズをピクセル単位で取得します。

//Access each dimension individually
int width = driver.manage().window().getSize().getWidth();
int height = driver.manage().window().getSize().getHeight();

//Or store the dimensions and query them later
Dimension size = driver.manage().window().getSize();
int width1 = size.getWidth();
int height1 = size.getHeight();
  
    # Access each dimension individually
width = driver.get_window_size().get("width")
height = driver.get_window_size().get("height")

    # Or store the dimensions and query them later
size = driver.get_window_size()
width1 = size.get("width")
height1 = size.get("height")
  
//Access each dimension individually
int width = driver.Manage().Window.Size.Width;
int height = driver.Manage().Window.Size.Height;

//Or store the dimensions and query them later
System.Drawing.Size size = driver.Manage().Window.Size;
int width1 = size.Width;
int height1 = size.Height;
  
    # Access each dimension individually
width = driver.manage.window.size.width
height = driver.manage.window.size.height

    # Or store the dimensions and query them later
size = driver.manage.window.size
width1 = size.width
height1 = size.height
  
// Access each dimension individually
const { width, height } = await driver.manage().window().getRect();

// Or store the dimensions and query them later
const rect = await driver.manage().window().getRect();
const width1 = rect.width;
const height1 = rect.height;
  
//Access each dimension individually
val width = driver.manage().window().size.width
val height = driver.manage().window().size.height

//Or store the dimensions and query them later
val size = driver.manage().window().size
val width1 = size.width
val height1 = size.height
  

ウィンドウサイズの設定

ウィンドウを復元し、ウィンドウサイズを設定します。

driver.manage().window().setSize(new Dimension(1024, 768));
driver.set_window_size(1024, 768)
driver.Manage().Window.Size = new Size(1024, 768);
driver.manage.window.resize_to(1024,768)
await driver.manage().window().setRect({ width: 1024, height: 768 });
driver.manage().window().size = Dimension(1024, 768)

ウィンドウの位置を取得

ブラウザーウィンドウの左上の座標を取得します。

// Access each dimension individually
int x = driver.manage().window().getPosition().getX();
int y = driver.manage().window().getPosition().getY();

// Or store the dimensions and query them later
Point position = driver.manage().window().getPosition();
int x1 = position.getX();
int y1 = position.getY();
  
    # Access each dimension individually
x = driver.get_window_position().get('x')
y = driver.get_window_position().get('y')

    # Or store the dimensions and query them later
position = driver.get_window_position()
x1 = position.get('x')
y1 = position.get('y')
  
//Access each dimension individually
int x = driver.Manage().Window.Position.X;
int y = driver.Manage().Window.Position.Y;

//Or store the dimensions and query them later
Point position = driver.Manage().Window.Position;
int x1 = position.X;
int y1 = position.Y;
  
    #Access each dimension individually
x = driver.manage.window.position.x
y = driver.manage.window.position.y

    # Or store the dimensions and query them later
rect  = driver.manage.window.rect
x1 = rect.x
y1 = rect.y
  
// Access each dimension individually
const { x, y } = await driver.manage().window().getRect();

// Or store the dimensions and query them later
const rect = await driver.manage().window().getRect();
const x1 = rect.x;
const y1 = rect.y;
  
// Access each dimension individually
val x = driver.manage().window().position.x
val y = driver.manage().window().position.y

// Or store the dimensions and query them later
val position = driver.manage().window().position
val x1 = position.x
val y1 = position.y

  
## ウィンドウの位置設定

選択した位置にウィンドウを移動します。

// Move the window to the top left of the primary monitor
driver.manage().window().setPosition(new Point(0, 0));
  
    # Move the window to the top left of the primary monitor
driver.set_window_position(0, 0)
  
// Move the window to the top left of the primary monitor
driver.Manage().Window.Position = new Point(0, 0);
  
driver.manage.window.move_to(0,0)
  
// Move the window to the top left of the primary monitor
await driver.manage().window().setRect({ x: 0, y: 0 });
  
// Move the window to the top left of the primary monitor
driver.manage().window().position = Point(0,0)
    

ウィンドウの最大化

ウィンドウを拡大します。ほとんどのオペレーティングシステムでは、オペレーティングシステムのメニューとツールバーをブロックすることなく、ウィンドウが画面いっぱいに表示されます。

driver.manage().window().maximize();
driver.maximize_window()
driver.Manage().Window.Maximize();
driver.manage.window.maximize
await driver.manage().window().maximize();
driver.manage().window().maximize()

ウィンドウを最小化

現在のブラウジングコンテキストのウィンドウを最小化します。 このコマンドの正確な動作は、個々のウィンドウマネージャーに固有のものです。

ウィンドウを最小化すると、通常、システムトレイのウィンドウが非表示になります。

注:この機能は、Selenium 4以降のバージョンで機能します。

driver.manage().window().minimize();
driver.minimize_window()
driver.Manage().Window.Minimize();
driver.manage.window.minimize
await driver.manage().window().minimize();
driver.manage().window().minimize()

全画面ウィンドウ

ほとんどのブラウザーでF11を押すのと同じように、画面全体に表示されます。

driver.manage().window().fullscreen();
driver.fullscreen_window()
driver.Manage().Window.FullScreen();
driver.manage.window.full_screen
await driver.manage().window().fullscreen();
driver.manage().window().fullscreen()

スクリーンショットの取得

現在のブラウジング コンテキストのスクリーンショットをキャプチャするために使います。
WebDriver エンドポイントの スクリーンショット は、 Base64 形式でエンコードされたスクリーンショットを返します。

import org.apache.commons.io.FileUtils;
import org.openqa.selenium.chrome.ChromeDriver;
import java.io.*;
import org.openqa.selenium.*;

public class SeleniumTakeScreenshot {
    public static void main(String args[]) throws IOException {
        WebDriver driver = new ChromeDriver();
        driver.get("http://www.example.com");
        File scrFile = ((TakesScreenshot)driver).getScreenshotAs(OutputType.FILE);
        FileUtils.copyFile(scrFile, new File("./image.png"));
        driver.quit();
    }
}
  
from selenium import webdriver

driver = webdriver.Chrome()

    # Navigate to url
driver.get("http://www.example.com")

    # Returns and base64 encoded string into image
driver.save_screenshot('./image.png')

driver.quit()
  using OpenQA.Selenium;
  using OpenQA.Selenium.Chrome;
  using OpenQA.Selenium.Support.UI;

  var driver = new ChromeDriver();
  driver.Navigate().GoToUrl("http://www.example.com");
  Screenshot screenshot = (driver as ITakesScreenshot).GetScreenshot();
  screenshot.SaveAsFile("screenshot.png", ScreenshotImageFormat.Png); // Format values are Bmp, Gif, Jpeg, Png, Tiff
  
require 'selenium-webdriver'
driver = Selenium::WebDriver.for :chrome

begin
  driver.get 'https://example.com/'

    # Takes and Stores the screenshot in specified path
  driver.save_screenshot('./image.png')

end
  
let {Builder} = require('selenium-webdriver');
let fs = require('fs');

(async function example() {
    let driver = await new Builder()
      .forBrowser('chrome')
      .build();

    await driver.get('https://www.example.com');
    // Returns base64 encoded string
    let encodedString = await driver.takeScreenshot();
    await fs.writeFileSync('./image.png', encodedString, 'base64');
    await driver.quit();
}())
  
import com.oracle.tools.packager.IOUtils.copyFile
import org.openqa.selenium.*
import org.openqa.selenium.chrome.ChromeDriver
import java.io.File

fun main(){
    val driver =  ChromeDriver()
    driver.get("https://www.example.com")
    val scrFile = (driver as TakesScreenshot).getScreenshotAs<File>(OutputType.FILE)
    copyFile(scrFile, File("./image.png"))
    driver.quit()
}
  

要素のスクリーンショットの取得

現在のブラウジング コンテキストの要素のスクリーンショットをキャプチャするために使います。 WebDriver エンドポイントの スクリーンショット は、 Base64 形式でエンコードされたスクリーンショットを返します。

import org.apache.commons.io.FileUtils;
import org.openqa.selenium.*;
import org.openqa.selenium.chrome.ChromeDriver;
import java.io.File;
import java.io.IOException;

public class SeleniumelementTakeScreenshot {
  public static void main(String args[]) throws IOException {
    WebDriver driver = new ChromeDriver();
    driver.get("https://www.example.com");
    WebElement element = driver.findElement(By.cssSelector("h1"));
    File scrFile = element.getScreenshotAs(OutputType.FILE);
    FileUtils.copyFile(scrFile, new File("./image.png"));
    driver.quit();
  }
}
 
from selenium import webdriver
from selenium.webdriver.common.by import By

driver = webdriver.Chrome()

    # Navigate to url
driver.get("http://www.example.com")

ele = driver.find_element(By.CSS_SELECTOR, 'h1')

    # Returns and base64 encoded string into image
ele.screenshot('./image.png')

driver.quit()
  
    using OpenQA.Selenium;
    using OpenQA.Selenium.Chrome;
    using OpenQA.Selenium.Support.UI;

    // Webdriver
    var driver = new ChromeDriver();
    driver.Navigate().GoToUrl("http://www.example.com");

    // Fetch element using FindElement
    var webElement = driver.FindElement(By.CssSelector("h1"));

    // Screenshot for the element
    var elementScreenshot = (webElement as ITakesScreenshot).GetScreenshot();
    elementScreenshot.SaveAsFile("screenshot_of_element.png");
  
    # Works with Selenium4-alpha7 Ruby bindings and above
require 'selenium-webdriver'
driver = Selenium::WebDriver.for :chrome

begin
  driver.get 'https://example.com/'
  ele = driver.find_element(:css, 'h1')

    # Takes and Stores the element screenshot in specified path
  ele.save_screenshot('./image.jpg')
end
  
const {Builder, By} = require('selenium-webdriver');
let fs = require('fs');

(async function example() {
   let driver = await new Builder()
       .forBrowser('chrome')
       .build();

   await driver.get('https://www.example.com');
   let ele = await driver.findElement(By.css("h1"));
   // Captures the element screenshot
   let encodedString = await ele.takeScreenshot(true);
   await fs.writeFileSync('./image.png', encodedString, 'base64');
   await driver.quit();
}())
  
import org.apache.commons.io.FileUtils
import org.openqa.selenium.chrome.ChromeDriver
import org.openqa.selenium.*
import java.io.File

fun main() {
    val driver = ChromeDriver()
    driver.get("https://www.example.com")
    val element = driver.findElement(By.cssSelector("h1"))
    val scrFile: File = element.getScreenshotAs(OutputType.FILE)
    FileUtils.copyFile(scrFile, File("./image.png"))
    driver.quit()
}
  

スクリプトの実行

選択したフレームまたはウィンドウの現在のコンテキストで、JavaScript コードスニペットを実行します。

    //Creating the JavascriptExecutor interface object by Type casting
      JavascriptExecutor js = (JavascriptExecutor)driver;
    //Button Element
      WebElement button =driver.findElement(By.name("btnLogin"));
    //Executing JavaScript to click on element
      js.executeScript("arguments[0].click();", button);
    //Get return value from script
      String text = (String) js.executeScript("return arguments[0].innerText", button);
    //Executing JavaScript directly
      js.executeScript("console.log('hello world')");
  
    # Stores the header element
header = driver.find_element(By.CSS_SELECTOR, "h1")

    # Executing JavaScript to capture innerText of header element
driver.execute_script('return arguments[0].innerText', header)
  
    //creating Chromedriver instance
	IWebDriver driver = new ChromeDriver();
	//Creating the JavascriptExecutor interface object by Type casting
	IJavaScriptExecutor js = (IJavaScriptExecutor) driver;
	//Button Element
	IWebElement button = driver.FindElement(By.Name("btnLogin"));
	//Executing JavaScript to click on element
	js.ExecuteScript("arguments[0].click();", button);
	//Get return value from script
	String text = (String)js.ExecuteScript("return arguments[0].innerText", button);
	//Executing JavaScript directly
	js.ExecuteScript("console.log('hello world')");
  
    # Stores the header element
header = driver.find_element(css: 'h1')

    # Get return value from script
result = driver.execute_script("return arguments[0].innerText", header)

    # Executing JavaScript directly
driver.execute_script("alert('hello world')")
  
// Stores the header element
let header = await driver.findElement(By.css('h1'));

// Executing JavaScript to capture innerText of header element
let text = await driver.executeScript('return arguments[0].innerText', header);
  
// Stores the header element
val header = driver.findElement(By.cssSelector("h1"))

// Get return value from script
val result = driver.executeScript("return arguments[0].innerText", header)

// Executing JavaScript directly
driver.executeScript("alert('hello world')")
  

ページの印刷

ブラウザ内の現在のページを印刷します。

Note: Chromium ブラウザがヘッドレスモードである必要があります。

    import org.openqa.selenium.print.PrintOptions;

    driver.get("https://www.selenium.dev");
    printer = (PrintsPage) driver;

    PrintOptions printOptions = new PrintOptions();
    printOptions.setPageRanges("1-2");

    Pdf pdf = printer.print(printOptions);
    String content = pdf.getContent();
  
    from selenium.webdriver.common.print_page_options import PrintOptions

    print_options = PrintOptions()
    print_options.page_ranges = ['1-2']

    driver.get("printPage.html")

    base64code = driver.print_page(print_options)
  
    // code sample not available please raise a PR
  
    driver.navigate_to 'https://www.selenium.dev'

    base64encodedContent = driver.print_page(orientation: 'landscape')
  
  const {Builder} = require('selenium-webdriver');
  const chrome = require('selenium-webdriver/chrome');
  let opts = new chrome.Options();
  let fs = require('fs');
  (async function example() {
  let driver = new Builder()
  .forBrowser('chrome')
  .setChromeOptions(opts.headless())
  .build();
  await driver.get('https://www.selenium.dev');
  try {
  let base64 = await driver.printPage({pageRanges:["1-2"]});
  await fs.writeFileSync('./test.pdf', base64, 'base64');
  } catch (e) {
  console.log(e)
  }
  await driver.quit();
  
    driver.get("https://www.selenium.dev")
    val printer = driver as PrintsPage

    val printOptions = PrintOptions()
    printOptions.setPageRanges("1-2")
    
    val pdf: Pdf = printer.print(printOptions)
    val content = pdf.content
  

2.6.6 - Virtual Authenticator

A representation of the Web Authenticator model.

Page being translated from English to Japanese. Do you speak Japanese? Help us to translate it by sending us pull requests!

Web applications can enable a public key-based authentication mechanism known as Web Authentication to authenticate users in a passwordless manner. Web Authentication defines APIs that allows a user to create a public-key credential and register it with an authenticator. An authenticator can be a hardware device or a software entity that stores user’s public-key credentials and retrieves them on request.

As the name suggests, Virtual Authenticator emulates such authenticators for testing.

Virtual Authenticator Options

A Virtual Authenticatior has a set of properties. These properties are mapped as VirtualAuthenticatorOptions in the Selenium bindings.

    VirtualAuthenticatorOptions options = new VirtualAuthenticatorOptions()
      .setIsUserVerified(true)
      .setHasUserVerification(true)
      .setIsUserConsenting(true)
      .setTransport(VirtualAuthenticatorOptions.Transport.USB)
      .setProtocol(VirtualAuthenticatorOptions.Protocol.U2F)
      .setHasResidentKey(false);
            // Create virtual authenticator options
            VirtualAuthenticatorOptions options = new VirtualAuthenticatorOptions()
                .SetIsUserVerified(true)
                .SetHasUserVerification(true)
                .SetIsUserConsenting(true)
                .SetTransport(VirtualAuthenticatorOptions.Transport.USB)
                .SetProtocol(VirtualAuthenticatorOptions.Protocol.U2F)
                .SetHasResidentKey(false);
    it('Virtual options', async function () {
      options = new VirtualAuthenticatorOptions();
      options.setIsUserVerified(true);
      options.setHasUserVerification(true);
      options.setIsUserConsenting(true);
      options.setTransport(Transport['USB']);
      options.setProtocol(Protocol['U2F']);

Add Virtual Authenticator

It creates a new virtual authenticator with the provided properties.

    VirtualAuthenticatorOptions options = new VirtualAuthenticatorOptions()
      .setProtocol(VirtualAuthenticatorOptions.Protocol.U2F)
      .setHasResidentKey(false);

    VirtualAuthenticator authenticator =
      ((HasVirtualAuthenticator) driver).addVirtualAuthenticator(options);
            // Create virtual authenticator options
            VirtualAuthenticatorOptions options = new VirtualAuthenticatorOptions()
                .SetProtocol(VirtualAuthenticatorOptions.Protocol.U2F)
                .SetHasResidentKey(false);

            // Register a virtual authenticator
            ((WebDriver)driver).AddVirtualAuthenticator(options);

            List<Credential> credentialList = ((WebDriver)driver).GetCredentials();
            options.setProtocol(Protocol['U2F']);
            options.setHasResidentKey(false);

            // Register a virtual authenticator
            await driver.addVirtualAuthenticator(options);

Remove Virtual Authenticator

Removes the previously added virtual authenticator.

    ((HasVirtualAuthenticator) driver).removeVirtualAuthenticator(authenticator);
            VirtualAuthenticatorOptions options = new VirtualAuthenticatorOptions()
                .SetProtocol(VirtualAuthenticatorOptions.Protocol.U2F)
                .SetHasResidentKey(false);

            String virtualAuthenticatorId = ((WebDriver)driver).AddVirtualAuthenticator(options);

            ((WebDriver)driver).RemoveVirtualAuthenticator(virtualAuthenticatorId);
            await driver.addVirtualAuthenticator(options);
            await driver.removeVirtualAuthenticator();

Create Resident Credential

Creates a resident (stateful) credential with the given required credential parameters.

    byte[] credentialId = {1, 2, 3, 4};
    byte[] userHandle = {1};
    Credential residentCredential = Credential.createResidentCredential(
      credentialId, "localhost", rsaPrivateKey, userHandle, /*signCount=*/0);
            byte[] credentialId = { 1, 2, 3, 4 };
            byte[] userHandle = { 1 };

            Credential residentCredential = Credential.CreateResidentCredential(
              credentialId, "localhost", base64EncodedPK, userHandle, 0);

Create Non-Resident Credential

Creates a resident (stateless) credential with the given required credential parameters.

    byte[] credentialId = {1, 2, 3, 4};
    Credential nonResidentCredential = Credential.createNonResidentCredential(
      credentialId, "localhost", ec256PrivateKey, /*signCount=*/0);
            byte[] credentialId = { 1, 2, 3, 4 };

            Credential nonResidentCredential = Credential.CreateNonResidentCredential(
              credentialId, "localhost", base64EncodedEC256PK, 0);

Add Credential

Registers the credential with the authenticator.

    VirtualAuthenticatorOptions options = new VirtualAuthenticatorOptions()
      .setProtocol(VirtualAuthenticatorOptions.Protocol.U2F)
      .setHasResidentKey(false);

    VirtualAuthenticator authenticator = ((HasVirtualAuthenticator) driver).addVirtualAuthenticator(options);

    byte[] credentialId = {1, 2, 3, 4};
    Credential nonResidentCredential = Credential.createNonResidentCredential(
      credentialId, "localhost", ec256PrivateKey, /*signCount=*/0);
    authenticator.addCredential(nonResidentCredential);
            VirtualAuthenticatorOptions options = new VirtualAuthenticatorOptions()
                .SetProtocol(VirtualAuthenticatorOptions.Protocol.U2F)
                .SetHasResidentKey(false);

            ((WebDriver)driver).AddVirtualAuthenticator(options);

            byte[] credentialId = { 1, 2, 3, 4 };

            Credential nonResidentCredential = Credential.CreateNonResidentCredential(
              credentialId, "localhost", base64EncodedEC256PK, 0);

            ((WebDriver)driver).AddCredential(nonResidentCredential);

Get Credential

Returns the list of credentials owned by the authenticator.

    VirtualAuthenticatorOptions options = new VirtualAuthenticatorOptions()
      .setProtocol(VirtualAuthenticatorOptions.Protocol.CTAP2)
      .setHasResidentKey(true)
      .setHasUserVerification(true)
      .setIsUserVerified(true);
    VirtualAuthenticator authenticator = ((HasVirtualAuthenticator) driver).addVirtualAuthenticator(options);

    byte[] credentialId = {1, 2, 3, 4};
    byte[] userHandle = {1};
    Credential residentCredential = Credential.createResidentCredential(
      credentialId, "localhost", rsaPrivateKey, userHandle, /*signCount=*/0);

    authenticator.addCredential(residentCredential);

    List<Credential> credentialList = authenticator.getCredentials();
            VirtualAuthenticatorOptions options = new VirtualAuthenticatorOptions()
                .SetProtocol(Protocol.CTAP2)
                .SetHasResidentKey(true)
                .SetHasUserVerification(true)
                .SetIsUserVerified(true);

            ((WebDriver)driver).AddVirtualAuthenticator(options);

            byte[] credentialId = { 1, 2, 3, 4 };
            byte[] userHandle = { 1 };

            Credential residentCredential = Credential.CreateResidentCredential(
              credentialId, "localhost", base64EncodedPK, userHandle, 0);

            ((WebDriver)driver).AddCredential(residentCredential);

            List<Credential> credentialList = ((WebDriver)driver).GetCredentials();

Remove Credential

Removes a credential from the authenticator based on the passed credential id.

            ((WebDriver)driver).AddVirtualAuthenticator(new VirtualAuthenticatorOptions());

            byte[] credentialId = { 1, 2, 3, 4 };

            Credential nonResidentCredential = Credential.CreateNonResidentCredential(
              credentialId, "localhost", base64EncodedEC256PK, 0);

            ((WebDriver)driver).AddCredential(nonResidentCredential);

            ((WebDriver)driver).RemoveCredential(credentialId);
    VirtualAuthenticator authenticator =
      ((HasVirtualAuthenticator) driver).addVirtualAuthenticator(new VirtualAuthenticatorOptions());

    byte[] credentialId = {1, 2, 3, 4};
    Credential credential = Credential.createNonResidentCredential(
      credentialId, "localhost", rsaPrivateKey, 0);

    authenticator.addCredential(credential);

    authenticator.removeCredential(credentialId);

Remove All Credentials

Removes all the credentials from the authenticator.

    VirtualAuthenticator authenticator =
      ((HasVirtualAuthenticator) driver).addVirtualAuthenticator(new VirtualAuthenticatorOptions());

    byte[] credentialId = {1, 2, 3, 4};
    Credential residentCredential = Credential.createNonResidentCredential(
      credentialId, "localhost", rsaPrivateKey, /*signCount=*/0);

    authenticator.addCredential(residentCredential);

    authenticator.removeAllCredentials();
            ((WebDriver)driver).AddVirtualAuthenticator(new VirtualAuthenticatorOptions());

            byte[] credentialId = { 1, 2, 3, 4 };

            Credential nonResidentCredential = Credential.CreateNonResidentCredential(
              credentialId, "localhost", base64EncodedEC256PK, 0);

            ((WebDriver)driver).AddCredential(nonResidentCredential);

            ((WebDriver)driver).RemoveAllCredentials();

Set User Verified

Sets whether the authenticator will simulate success or fail on user verification.

    VirtualAuthenticatorOptions options = new VirtualAuthenticatorOptions()
      .setIsUserVerified(true);
            VirtualAuthenticatorOptions options = new VirtualAuthenticatorOptions()
                .SetIsUserVerified(true);

2.7 - Actions API

A low-level interface for providing virtualized device input actions to the web browser.

In addition to the high-level element interactions, the Actions API provides granular control over exactly what designated input devices can do. Selenium provides an interface for 3 kinds of input sources: a key input for keyboard devices, a pointer input for a mouse, pen or touch devices, and wheel inputs for scroll wheel devices (introduced in Selenium 4.2). Selenium allows you to construct individual action commands assigned to specific inputs and chain them together and call the associated perform method to execute them all at once.

Action Builder

In the move from the legacy JSON Wire Protocol to the new W3C WebDriver Protocol, the low level building blocks of actions became especially detailed. It is extremely powerful, but each input device has a number of ways to use it and if you need to manage more than one device, you are responsible for ensuring proper synchronization between them.

Thankfully, you likely do not need to learn how to use the low level commands directly, since almost everything you might want to do has been given a convenience method that combines the lower level commands for you. These are all documented in keyboard, mouse, pen, and wheel pages.

Pause

Pointer movements and Wheel scrolling allow the user to set a duration for the action, but sometimes you just need to wait a beat between actions for things to work correctly.

        WebElement clickable = driver.findElement(By.id("clickable"));
        new Actions(driver)
                .moveToElement(clickable)
                .pause(Duration.ofSeconds(1))
                .clickAndHold()
                .pause(Duration.ofSeconds(1))
                .sendKeys("abc")
                .perform();
    clickable = driver.find_element(By.ID, "clickable")
    ActionChains(driver)\
        .move_to_element(clickable)\
        .pause(1)\
        .click_and_hold()\
        .pause(1)\
        .send_keys("abc")\
        .perform()
            IWebElement clickable = driver.FindElement(By.Id("clickable"));
            new Actions(driver)
                .MoveToElement(clickable)
                .Pause(TimeSpan.FromSeconds(1))
                .ClickAndHold()
                .Pause(TimeSpan.FromSeconds(1))
                .SendKeys("abc")
                .Perform();
    clickable = driver.find_element(id: 'clickable')
    driver.action
          .move_to(clickable)
          .pause(duration: 1)
          .click_and_hold
          .pause(duration: 1)
          .send_keys('abc')
          .perform
      const clickable = await driver.findElement(By.id('clickable'))
      await driver.actions()
        .move({ origin: clickable })
        .pause(1000)
        .press()
        .pause(1000)
        .sendKeys('abc')
        .perform()
        val clickable = driver.findElement(By.id("clickable"))
        Actions(driver)
            .moveToElement(clickable)
            .pause(Duration.ofSeconds(1))
            .clickAndHold()
            .pause(Duration.ofSeconds(1))
            .sendKeys("abc")
            .perform() 

Release All Actions

An important thing to note is that the driver remembers the state of all the input items throughout a session. Even if you create a new instance of an actions class, the depressed keys and the location of the pointer will be in whatever state a previously performed action left them.

There is a special method to release all currently depressed keys and pointer buttons. This method is implemented differently in each of the languages because it does not get executed with the perform method.

        ((RemoteWebDriver) driver).resetInputState();
    ActionBuilder(driver).clear_actions()
            ((WebDriver)driver).ResetInputState();
    driver.action.release_actions
      await driver.actions().clear()
        (driver as RemoteWebDriver).resetInputState()

2.7.1 - Keyboard actions

A representation of any key input device for interacting with a web page.

There are only 2 actions that can be accomplished with a keyboard: pressing down on a key, and releasing a pressed key. In addition to supporting ASCII characters, each keyboard key has a representation that can be pressed or released in designated sequences.

Keys

In addition to the keys represented by regular unicode, unicode values have been assigned to other keyboard keys for use with Selenium. Each language has its own way to reference these keys; the full list can be found here.

Use the [Java Keys enum](https://github.com/SeleniumHQ/selenium/blob/selenium-4.2.0/java/src/org/openqa/selenium/Keys.java#L28)
Use the [Python Keys class](https://github.com/SeleniumHQ/selenium/blob/selenium-4.2.0/py/selenium/webdriver/common/keys.py#L23)
Use the [.NET static Keys class](https://github.com/SeleniumHQ/selenium/blob/selenium-4.2.0/dotnet/src/webdriver/Keys.cs#L28)
Use the [Ruby KEYS constant](https://github.com/SeleniumHQ/selenium/blob/selenium-4.2.0/rb/lib/selenium/webdriver/common/keys.rb#L28)
Use the [JavaScript KEYS constant](https://github.com/SeleniumHQ/selenium/blob/selenium-4.2.0/javascript/node/selenium-webdriver/lib/input.js#L44)
Use the [Java Keys enum](https://github.com/SeleniumHQ/selenium/blob/selenium-4.2.0/java/src/org/openqa/selenium/Keys.java#L28)

Key down

        new Actions(driver)
                .keyDown(Keys.SHIFT)
                .sendKeys("a")
                .perform();
    ActionChains(driver)\
        .key_down(Keys.SHIFT)\
        .send_keys("abc")\
        .perform()
                .KeyDown(Keys.Shift)
                .SendKeys("a")
                .Perform();
    driver.action
          .key_down(:shift)
          .send_keys('a')
          .perform
      await driver.actions()
        .keyDown(Key.SHIFT)
        .sendKeys('a')
        .perform()
        Actions(driver)
                .keyDown(Keys.SHIFT)
                .sendKeys("a")
                .perform()

Key up

        new Actions(driver)
                .keyDown(Keys.SHIFT)
                .sendKeys("a")
                .keyUp(Keys.SHIFT)
                .sendKeys("b")
                .perform();
    ActionChains(driver)\
        .key_down(Keys.SHIFT)\
        .send_keys("a")\
        .key_up(Keys.SHIFT)\
        .send_keys("b")\
        .perform()
            new Actions(driver)
                .KeyDown(Keys.Shift)
                .SendKeys("a")
                .KeyUp(Keys.Shift)
                .SendKeys("b")
                .Perform();
    driver.action
          .key_down(:shift)
          .send_keys('a')
          .key_up(:shift)
          .send_keys('b')
          .perform
      await driver.actions()
        .keyDown(Key.SHIFT)
        .sendKeys('a')
        .keyUp(Key.SHIFT)
        .sendKeys('b')
        .perform()
        Actions(driver)
                .keyDown(Keys.SHIFT)
                .sendKeys("a")
                .keyUp(Keys.SHIFT)
                .sendKeys("b")
                .perform()

Send keys

This is a convenience method in the Actions API that combines keyDown and keyUp commands in one action. Executing this command differs slightly from using the element method, but primarily this gets used when needing to type multiple characters in the middle of other actions.

Active Element

        new Actions(driver)
                .sendKeys("abc")
                .perform();
    ActionChains(driver)\
        .send_keys("abc")\
        .perform()

            new Actions(driver)
                .SendKeys("abc")
    driver.action
          .send_keys('abc')
          .perform
      const textField = driver.findElement(By.id('textInput'))
      await textField.click()
        Actions(driver)
                .sendKeys("abc")
                .perform()

Designated Element

        new Actions(driver)
                .sendKeys(textField, "Selenium!")
                .perform();
    text_input = driver.find_element(By.ID, "textInput")
    ActionChains(driver)\
        .send_keys_to_element(text_input, "abc")\
        .perform()
            driver.FindElement(By.TagName("body")).Click();
            
            IWebElement textField = driver.FindElement(By.Id("textInput"));
            new Actions(driver)
    text_field = driver.find_element(id: 'textInput')
    driver.action
          .send_keys(text_field, 'Selenium!')
          .perform
      const textField = await driver.findElement(By.id('textInput'))

      await driver.actions()
        .sendKeys(textField, 'abc')
        .perform()
        val textField = driver.findElement(By.id("textInput"))
        Actions(driver)
                .sendKeys(textField, "Selenium!")
                .perform()

Copy and Paste

Here’s an example of using all of the above methods to conduct a copy / paste action. Note that the key to use for this operation will be different depending on if it is a Mac OS or not. This code will end up with the text: SeleniumSelenium!

        Keys cmdCtrl = Platform.getCurrent().is(Platform.MAC) ? Keys.COMMAND : Keys.CONTROL;

        WebElement textField = driver.findElement(By.id("textInput"));
        new Actions(driver)
                .sendKeys(textField, "Selenium!")
                .sendKeys(Keys.ARROW_LEFT)
                .keyDown(Keys.SHIFT)
                .sendKeys(Keys.ARROW_UP)
                .keyUp(Keys.SHIFT)
                .keyDown(cmdCtrl)
                .sendKeys("xvv")
                .keyUp(cmdCtrl)
                .perform();

        Assertions.assertEquals("SeleniumSelenium!", textField.getAttribute("value"));
    cmd_ctrl = Keys.COMMAND if sys.platform == 'darwin' else Keys.CONTROL

    ActionChains(driver)\
        .send_keys("Selenium!")\
        .send_keys(Keys.ARROW_LEFT)\
        .key_down(Keys.SHIFT)\
        .send_keys(Keys.ARROW_UP)\
        .key_up(Keys.SHIFT)\
        .key_down(cmd_ctrl)\
        .send_keys("xvv")\
        .key_up(cmd_ctrl)\
        .perform()

            var capabilities = ((WebDriver)driver).Capabilities;
            String platformName = (string)capabilities.GetCapability("platformName");

            String cmdCtrl = platformName.Contains("mac") ? Keys.Command : Keys.Control;

            new Actions(driver)
                .SendKeys("Selenium!")
                .SendKeys(Keys.ArrowLeft)
                .KeyDown(Keys.Shift)
                .SendKeys(Keys.ArrowUp)
    cmd_ctrl = driver.capabilities.platform_name.include?('mac') ? :command : :control
    driver.action
          .send_keys('Selenium!')
          .send_keys(:arrow_left)
          .key_down(:shift)
          .send_keys(:arrow_up)
          .key_up(:shift)
          .key_down(cmd_ctrl)
          .send_keys('xvv')
          .key_up(cmd_ctrl)
          .perform
      const cmdCtrl = platform.includes('darwin') ? Key.COMMAND : Key.CONTROL

      await driver.actions()
        .click(textField)
        .sendKeys('Selenium!')
        .sendKeys(Key.ARROW_LEFT)
        .keyDown(Key.SHIFT)
        .sendKeys(Key.ARROW_UP)
        .keyUp(Key.SHIFT)
        .keyDown(cmdCtrl)
        .sendKeys('xvv')
        .keyUp(cmdCtrl)
        .perform()
        val cmdCtrl = if(platformName == Platform.MAC) Keys.COMMAND else Keys.CONTROL

        val textField = driver.findElement(By.id("textInput"))
        Actions(driver)
                .sendKeys(textField, "Selenium!")
                .sendKeys(Keys.ARROW_LEFT)
                .keyDown(Keys.SHIFT)
                .sendKeys(Keys.ARROW_UP)
                .keyUp(Keys.SHIFT)
                .keyDown(cmdCtrl)
                .sendKeys("xvv")
                .keyUp(cmdCtrl)
                .perform()

2.7.2 - Mouse actions

A representation of any pointer device for interacting with a web page.

There are only 3 actions that can be accomplished with a mouse: pressing down on a button, releasing a pressed button, and moving the mouse. Selenium provides convenience methods that combine these actions in the most common ways.

Click and hold

This method combines moving the mouse to the center of an element with pressing the left mouse button. This is useful for focusing a specific element:

        WebElement clickable = driver.findElement(By.id("clickable"));
        new Actions(driver)
                .clickAndHold(clickable)
                .perform();
    clickable = driver.find_element(By.ID, "clickable")
    ActionChains(driver)\
        .click_and_hold(clickable)\
        .perform()
            IWebElement clickable = driver.FindElement(By.Id("clickable"));
            new Actions(driver)
                .ClickAndHold(clickable)
                .Perform();
    clickable = driver.find_element(id: 'clickable')
    driver.action
          .click_and_hold(clickable)
          .perform
      let clickable = driver.findElement(By.id("clickable"));
      const actions = driver.actions({async: true});
      await actions.move({origin: clickable}).press().perform();
        val clickable = driver.findElement(By.id("clickable"))
        Actions(driver)
                .clickAndHold(clickable)
                .perform()

Click and release

This method combines moving to the center of an element with pressing and releasing the left mouse button. This is otherwise known as “clicking”:

        WebElement clickable = driver.findElement(By.id("click"));
        new Actions(driver)
                .click(clickable)
                .perform();
    clickable = driver.find_element(By.ID, "click")
    ActionChains(driver)\
        .click(clickable)\
        .perform()
            IWebElement clickable = driver.FindElement(By.Id("click"));
            new Actions(driver)
                .Click(clickable)
                .Perform();
    clickable = driver.find_element(id: 'click')
    driver.action
          .click(clickable)
          .perform
      let click = driver.findElement(By.id("click"));
      const actions = driver.actions({async: true});
      await actions.move({origin: click}).click().perform();
        val clickable = driver.findElement(By.id("click"))
        Actions(driver)
                .click(clickable)
                .perform()

Alternate Button Clicks

There are a total of 5 defined buttons for a Mouse:

  • 0 — Left Button (the default)
  • 1 — Middle Button (currently unsupported)
  • 2 — Right Button
  • 3 — X1 (Back) Button
  • 4 — X2 (Forward) Button

Context Click

This method combines moving to the center of an element with pressing and releasing the right mouse button (button 2). This is otherwise known as “right-clicking”:

        WebElement clickable = driver.findElement(By.id("clickable"));
        new Actions(driver)
                .contextClick(clickable)
                .perform();
    clickable = driver.find_element(By.ID, "clickable")
    ActionChains(driver)\
        .context_click(clickable)\
        .perform()
            IWebElement clickable = driver.FindElement(By.Id("clickable"));
            new Actions(driver)
                .ContextClick(clickable)
                .Perform();
      clickable = driver.find_element(id: 'clickable')
      driver.action
            .context_click(clickable)
            .perform
      const clickable = driver.findElement(By.id("clickable"));
      const actions = driver.actions({async: true});
      await actions.contextClick(clickable).perform();
        val clickable = driver.findElement(By.id("clickable"))
        Actions(driver)
                .contextClick(clickable)
                .perform()

Back Click

There is no convenience method for this, it is just pressing and releasing mouse button 3

        PointerInput mouse = new PointerInput(PointerInput.Kind.MOUSE, "default mouse");

        Sequence actions = new Sequence(mouse, 0)
                .addAction(mouse.createPointerDown(PointerInput.MouseButton.BACK.asArg()))
                .addAction(mouse.createPointerUp(PointerInput.MouseButton.BACK.asArg()));

        ((RemoteWebDriver) driver).perform(Collections.singletonList(actions));
    action = ActionBuilder(driver)
    action.pointer_action.pointer_down(MouseButton.BACK)
    action.pointer_action.pointer_up(MouseButton.BACK)
    action.perform()
            ActionBuilder actionBuilder = new ActionBuilder();
            PointerInputDevice mouse = new PointerInputDevice(PointerKind.Mouse, "default mouse");
            actionBuilder.AddAction(mouse.CreatePointerDown(MouseButton.Back));
            actionBuilder.AddAction(mouse.CreatePointerUp(MouseButton.Back));
            ((IActionExecutor)driver).PerformActions(actionBuilder.ToActionSequenceList());
      driver.action
            .pointer_down(:back)
            .pointer_up(:back)
            .perform
      const actions = driver.actions({async: true});
      await actions.press(Button.BACK).release(Button.BACK).perform()
        val mouse = PointerInput(PointerInput.Kind.MOUSE, "default mouse")

        val actions = Sequence(mouse, 0)
                .addAction(mouse.createPointerDown(PointerInput.MouseButton.BACK.asArg()))
                .addAction(mouse.createPointerUp(PointerInput.MouseButton.BACK.asArg()))

        (driver as RemoteWebDriver).perform(Collections.singletonList(actions))

Forward Click

There is no convenience method for this, it is just pressing and releasing mouse button 4

        PointerInput mouse = new PointerInput(PointerInput.Kind.MOUSE, "default mouse");

        Sequence actions = new Sequence(mouse, 0)
                .addAction(mouse.createPointerDown(PointerInput.MouseButton.FORWARD.asArg()))
                .addAction(mouse.createPointerUp(PointerInput.MouseButton.FORWARD.asArg()));

        ((RemoteWebDriver) driver).perform(Collections.singletonList(actions));
    action = ActionBuilder(driver)
    action.pointer_action.pointer_down(MouseButton.FORWARD)
    action.pointer_action.pointer_up(MouseButton.FORWARD)
    action.perform()
            ActionBuilder actionBuilder = new ActionBuilder();
            PointerInputDevice mouse = new PointerInputDevice(PointerKind.Mouse, "default mouse");
            actionBuilder.AddAction(mouse.CreatePointerDown(MouseButton.Forward));
            actionBuilder.AddAction(mouse.CreatePointerUp(MouseButton.Forward));
            ((IActionExecutor)driver).PerformActions(actionBuilder.ToActionSequenceList());
      driver.action
            .pointer_down(:forward)
            .pointer_up(:forward)
            .perform
      const actions = driver.actions({async: true});
      await actions.press(Button.FORWARD).release(Button.FORWARD).perform()
        val mouse = PointerInput(PointerInput.Kind.MOUSE, "default mouse")

        val actions = Sequence(mouse, 0)
                .addAction(mouse.createPointerDown(PointerInput.MouseButton.FORWARD.asArg()))
                .addAction(mouse.createPointerUp(PointerInput.MouseButton.FORWARD.asArg()))

        (driver as RemoteWebDriver).perform(Collections.singletonList(actions))

Double click

This method combines moving to the center of an element with pressing and releasing the left mouse button twice.

        WebElement clickable = driver.findElement(By.id("clickable"));
        new Actions(driver)
                .doubleClick(clickable)
                .perform();
    clickable = driver.find_element(By.ID, "clickable")
    ActionChains(driver)\
        .double_click(clickable)\
        .perform()
            IWebElement clickable = driver.FindElement(By.Id("clickable"));
            new Actions(driver)
                .DoubleClick(clickable)
                .Perform();
    clickable = driver.find_element(id: 'clickable')
    driver.action
          .double_click(clickable)
          .perform
      const clickable = driver.findElement(By.id("clickable"));
      const actions = driver.actions({async: true});
      await actions.doubleClick(clickable).perform();
        val clickable = driver.findElement(By.id("clickable"))
        Actions(driver)
                .doubleClick(clickable)
                .perform()

Move to element

This method moves the mouse to the in-view center point of the element. This is otherwise known as “hovering.” Note that the element must be in the viewport or else the command will error.

        WebElement hoverable = driver.findElement(By.id("hover"));
        new Actions(driver)
                .moveToElement(hoverable)
                .perform();
    hoverable = driver.find_element(By.ID, "hover")
    ActionChains(driver)\
        .move_to_element(hoverable)\
        .perform()
            IWebElement hoverable = driver.FindElement(By.Id("hover"));
            new Actions(driver)
                .MoveToElement(hoverable)
                .Perform();
    hoverable = driver.find_element(id: 'hover')
    driver.action
          .move_to(hoverable)
          .perform
      const hoverable = driver.findElement(By.id("hover"));
      const actions = driver.actions({async: true});
      await actions.move({origin: hoverable}).perform();
        val hoverable = driver.findElement(By.id("hover"))
        Actions(driver)
                .moveToElement(hoverable)
                .perform()

Move by offset

These methods first move the mouse to the designated origin and then by the number of pixels in the provided offset. Note that the position of the mouse must be in the viewport or else the command will error.

Offset from Element

This method moves the mouse to the in-view center point of the element, then moves by the provided offset.

        WebElement tracker = driver.findElement(By.id("mouse-tracker"));
        new Actions(driver)
                .moveToElement(tracker, 8, 0)
                .perform();
    mouse_tracker = driver.find_element(By.ID, "mouse-tracker")
    ActionChains(driver)\
        .move_to_element_with_offset(mouse_tracker, 8, 0)\
        .perform()
            IWebElement tracker = driver.FindElement(By.Id("mouse-tracker"));
            new Actions(driver)
                .MoveToElement(tracker, 8, 0)
                .Perform();
      mouse_tracker = driver.find_element(id: 'mouse-tracker')
      driver.action
            .move_to(mouse_tracker, 8, 11)
            .perform
        val tracker = driver.findElement(By.id("mouse-tracker"))
        Actions(driver)
                .moveToElement(tracker, 8, 0)
                .perform()

Offset from Viewport

This method moves the mouse from the upper left corner of the current viewport by the provided offset.

        PointerInput mouse = new PointerInput(PointerInput.Kind.MOUSE, "default mouse");

        Sequence actions = new Sequence(mouse, 0)
                .addAction(mouse.createPointerMove(Duration.ZERO, PointerInput.Origin.viewport(), 8, 12));

        ((RemoteWebDriver) driver).perform(Collections.singletonList(actions));
    action = ActionBuilder(driver)
    action.pointer_action.move_to_location(8, 0)
    action.perform()
            ActionBuilder actionBuilder = new ActionBuilder();
            PointerInputDevice mouse = new PointerInputDevice(PointerKind.Mouse, "default mouse");
            actionBuilder.AddAction(mouse.CreatePointerMove(CoordinateOrigin.Viewport,
                8, 0, TimeSpan.Zero));
            ((IActionExecutor)driver).PerformActions(actionBuilder.ToActionSequenceList());
      driver.action
            .move_to_location(8, 12)
            .perform
      const actions = driver.actions({async: true});
      await actions.move({x: 8, y: 0}).perform();
        val mouse = PointerInput(PointerInput.Kind.MOUSE, "default mouse")

        val actions = Sequence(mouse, 0)
                .addAction(mouse.createPointerMove(Duration.ZERO, PointerInput.Origin.viewport(), 8, 12))

        (driver as RemoteWebDriver).perform(Collections.singletonList(actions))

Offset from Current Pointer Location

This method moves the mouse from its current position by the offset provided by the user. If the mouse has not previously been moved, the position will be in the upper left corner of the viewport. Note that the pointer position does not change when the page is scrolled.

Note that the first argument X specifies to move right when positive, while the second argument Y specifies to move down when positive. So moveByOffset(30, -10) moves right 30 and up 10 from the current mouse position.

        new Actions(driver)
                .moveByOffset(13, 15)
                .perform();
    ActionChains(driver)\
        .move_by_offset( 13, 15)\
        .perform()
            new Actions(driver)
                .MoveByOffset(13, 15)
                .Perform();
      driver.action
            .move_by(13, 15)
            .perform
      await actions.move({x: 13, y: 15, origin: Origin.POINTER}).perform()
        Actions(driver)
                .moveByOffset(13, 15)
                .perform()

Drag and Drop on Element

This method firstly performs a click-and-hold on the source element, moves to the location of the target element and then releases the mouse.

        WebElement draggable = driver.findElement(By.id("draggable"));
        WebElement droppable = driver.findElement(By.id("droppable"));
        new Actions(driver)
                .dragAndDrop(draggable, droppable)
                .perform();
    draggable = driver.find_element(By.ID, "draggable")
    droppable = driver.find_element(By.ID, "droppable")
    ActionChains(driver)\
        .drag_and_drop(draggable, droppable)\
        .perform()
            IWebElement draggable = driver.FindElement(By.Id("draggable"));
            IWebElement droppable = driver.FindElement(By.Id("droppable"));
            new Actions(driver)
                .DragAndDrop(draggable, droppable)
                .Perform();
    draggable = driver.find_element(id: 'draggable')
    droppable = driver.find_element(id: 'droppable')
    driver.action
          .drag_and_drop(draggable, droppable)
          .perform
      const draggable = driver.findElement(By.id("draggable"));
      const droppable = await driver.findElement(By.id("droppable"));
      const actions = driver.actions({async: true});
      await actions.dragAndDrop(draggable, droppable).perform();
        val draggable = driver.findElement(By.id("draggable"))
        val droppable = driver.findElement(By.id("droppable"))
        Actions(driver)
                .dragAndDrop(draggable, droppable)
                .perform()

Drag and Drop by Offset

This method firstly performs a click-and-hold on the source element, moves to the given offset and then releases the mouse.

        WebElement draggable = driver.findElement(By.id("draggable"));
        Rectangle start = draggable.getRect();
        Rectangle finish = driver.findElement(By.id("droppable")).getRect();
        new Actions(driver)
                .dragAndDropBy(draggable, finish.getX() - start.getX(), finish.getY() - start.getY())
                .perform();
    draggable = driver.find_element(By.ID, "draggable")
    start = draggable.location
    finish = driver.find_element(By.ID, "droppable").location
    ActionChains(driver)\
        .drag_and_drop_by_offset(draggable, finish['x'] - start['x'], finish['y'] - start['y'])\
        .perform()
            IWebElement draggable = driver.FindElement(By.Id("draggable"));
            Point start = draggable.Location;
            Point finish = driver.FindElement(By.Id("droppable")).Location;
            new Actions(driver)
                .DragAndDropToOffset(draggable, finish.X - start.X, finish.Y - start.Y)
                .Perform();
    draggable = driver.find_element(id: 'draggable')
    start = draggable.rect
    finish = driver.find_element(id: 'droppable').rect
    driver.action
          .drag_and_drop_by(draggable, finish.x - start.x, finish.y - start.y)
          .perform
      const draggable = driver.findElement(By.id("draggable"));
      let start = await draggable.getRect();
      let finish = await driver.findElement(By.id("droppable")).getRect();
      const actions = driver.actions({async: true});
      await actions.dragAndDrop(draggable, {x: finish.x - start.x, y: finish.y - start.y}).perform();
        val draggable = driver.findElement(By.id("draggable"))
        val start = draggable.getRect()
        val finish = driver.findElement(By.id("droppable")).getRect()
        Actions(driver)
                .dragAndDropBy(draggable, finish.getX() - start.getX(), finish.getY() - start.getY())
                .perform()

2.7.3 - Pen actions

A representation of a pen stylus kind of pointer input for interacting with a web page.

Chromium Only

A Pen is a type of pointer input that has most of the same behavior as a mouse, but can also have event properties unique to a stylus. Additionally, while a mouse has 5 buttons, a pen has 3 equivalent button states:

  • 0 — Touch Contact (the default; equivalent to a left click)
  • 2 — Barrel Button (equivalent to a right click)
  • 5 — Eraser Button (currently unsupported by drivers)

Using a Pen

        WebElement pointerArea = driver.findElement(By.id("pointerArea"));
        new Actions(driver)
                .setActivePointer(PointerInput.Kind.PEN, "default pen")
                .moveToElement(pointerArea)
                .clickAndHold()
                .moveByOffset(2, 2)
                .release()
                .perform();
    pointer_area = driver.find_element(By.ID, "pointerArea")
    pen_input = PointerInput(POINTER_PEN, "default pen")
    action = ActionBuilder(driver, mouse=pen_input)
    action.pointer_action\
        .move_to(pointer_area)\
        .pointer_down()\
        .move_by(2, 2)\
        .pointer_up()
    action.perform()
            IWebElement pointerArea = driver.FindElement(By.Id("pointerArea"));
            ActionBuilder actionBuilder = new ActionBuilder();
            PointerInputDevice pen = new PointerInputDevice(PointerKind.Pen, "default pen");
            
            actionBuilder.AddAction(pen.CreatePointerMove(pointerArea, 0, 0, TimeSpan.FromMilliseconds(800)));
            actionBuilder.AddAction(pen.CreatePointerDown(MouseButton.Left));
            actionBuilder.AddAction(pen.CreatePointerMove(CoordinateOrigin.Pointer,
                2, 2, TimeSpan.Zero));
            actionBuilder.AddAction(pen.CreatePointerUp(MouseButton.Left));
            ((IActionExecutor)driver).PerformActions(actionBuilder.ToActionSequenceList());
    pointer_area = driver.find_element(id: 'pointerArea')
    driver.action(devices: :pen)
          .move_to(pointer_area)
          .pointer_down
          .move_by(2, 2)
          .pointer_up
          .perform
        val pointerArea = driver.findElement(By.id("pointerArea"))
        Actions(driver)
                .setActivePointer(PointerInput.Kind.PEN, "default pen")
                .moveToElement(pointerArea)
                .clickAndHold()
                .moveByOffset(2, 2)
                .release()
                .perform()

Adding Pointer Event Attributes

        WebElement pointerArea = driver.findElement(By.id("pointerArea"));
        PointerInput pen = new PointerInput(PointerInput.Kind.PEN, "default pen");
        PointerInput.PointerEventProperties eventProperties = PointerInput.eventProperties()
                .setTiltX(-72)
                .setTiltY(9)
                .setTwist(86);
        PointerInput.Origin origin = PointerInput.Origin.fromElement(pointerArea);

        Sequence actionListPen = new Sequence(pen, 0)
                .addAction(pen.createPointerMove(Duration.ZERO, origin, 0, 0))
                .addAction(pen.createPointerDown(0))
                .addAction(pen.createPointerMove(Duration.ZERO, origin, 2, 2, eventProperties))
                .addAction(pen.createPointerUp(0));

        ((RemoteWebDriver) driver).perform(Collections.singletonList(actionListPen));
    pointer_area = driver.find_element(By.ID, "pointerArea")
    pen_input = PointerInput(POINTER_PEN, "default pen")
    action = ActionBuilder(driver, mouse=pen_input)
    action.pointer_action\
        .move_to(pointer_area)\
        .pointer_down()\
        .move_by(2, 2, tilt_x=-72, tilt_y=9, twist=86)\
        .pointer_up(0)
    action.perform()
            IWebElement pointerArea = driver.FindElement(By.Id("pointerArea"));
            ActionBuilder actionBuilder = new ActionBuilder();
            PointerInputDevice pen = new PointerInputDevice(PointerKind.Pen, "default pen");
            PointerInputDevice.PointerEventProperties properties = new PointerInputDevice.PointerEventProperties() {
                TiltX = -72,
                TiltY = 9,
                Twist = 86,
            };            
            actionBuilder.AddAction(pen.CreatePointerMove(pointerArea, 0, 0, TimeSpan.FromMilliseconds(800)));
            actionBuilder.AddAction(pen.CreatePointerDown(MouseButton.Left));
            actionBuilder.AddAction(pen.CreatePointerMove(CoordinateOrigin.Pointer,
                2, 2, TimeSpan.Zero, properties));
            actionBuilder.AddAction(pen.CreatePointerUp(MouseButton.Left));
            ((IActionExecutor)driver).PerformActions(actionBuilder.ToActionSequenceList());
    pointer_area = driver.find_element(id: 'pointerArea')
    driver.action(devices: :pen)
          .move_to(pointer_area)
          .pointer_down
          .move_by(2, 2, tilt_x: -72, tilt_y: 9, twist: 86)
          .pointer_up
          .perform
        val pointerArea = driver.findElement(By.id("pointerArea"))
        val pen = PointerInput(PointerInput.Kind.PEN, "default pen")
        val eventProperties = PointerInput.eventProperties()
                .setTiltX(-72)
                .setTiltY(9)
                .setTwist(86)
        val origin = PointerInput.Origin.fromElement(pointerArea)
        
        val actionListPen = Sequence(pen, 0)
                .addAction(pen.createPointerMove(Duration.ZERO, origin, 0, 0))
                .addAction(pen.createPointerDown(0))
                .addAction(pen.createPointerMove(Duration.ZERO, origin, 2, 2, eventProperties))
                .addAction(pen.createPointerUp(0))

        (driver as RemoteWebDriver).perform(listOf(actionListPen))

2.7.4 - Scroll wheel actions

A representation of a scroll wheel input device for interacting with a web page.

Chromium Only

There are 5 scenarios for scrolling on a page.

Scroll to element

This is the most common scenario. Unlike traditional click and send keys methods, the actions class does not automatically scroll the target element into view, so this method will need to be used if elements are not already inside the viewport.

This method takes a web element as the sole argument.

Regardless of whether the element is above or below the current viewscreen, the viewport will be scrolled so the bottom of the element is at the bottom of the screen.

        WebElement iframe = driver.findElement(By.tagName("iframe"));
        new Actions(driver)
                .scrollToElement(iframe)
                .perform();
    iframe = driver.find_element(By.TAG_NAME, "iframe")
    ActionChains(driver)\
        .scroll_to_element(iframe)\
        .perform()
            IWebElement iframe = driver.FindElement(By.TagName("iframe"));
            new Actions(driver)
                .ScrollToElement(iframe)
                .Perform();
    iframe = driver.find_element(tag_name: 'iframe')
    driver.action
          .scroll_to(iframe)
          .perform
      const iframe = await driver.findElement(By.css("iframe"))

      await driver.actions()
        .scroll(0, 0, 0, 0, iframe)
        .perform()
        val iframe = driver.findElement(By.tagName("iframe"))
        Actions(driver)
                .scrollToElement(iframe)
                .perform()

Scroll by given amount

This is the second most common scenario for scrolling. Pass in an delta x and a delta y value for how much to scroll in the right and down directions. Negative values represent left and up, respectively.

        WebElement footer = driver.findElement(By.tagName("footer"));
        int deltaY = footer.getRect().y;
        new Actions(driver)
                .scrollByAmount(0, deltaY)
                .perform();
    footer = driver.find_element(By.TAG_NAME, "footer")
    delta_y = footer.rect['y']
    ActionChains(driver)\
        .scroll_by_amount(0, delta_y)\
        .perform()
            IWebElement footer = driver.FindElement(By.TagName("footer"));
            int deltaY = footer.Location.Y;
            new Actions(driver)
                .ScrollByAmount(0, deltaY)
                .Perform();
    footer = driver.find_element(tag_name: 'footer')
    delta_y = footer.rect.y
    driver.action
          .scroll_by(0, delta_y)
          .perform
      const footer = await driver.findElement(By.css("footer"))
      const deltaY = (await footer.getRect()).y

      await driver.actions()
        .scroll(0, 0, 0, deltaY)
        .perform()
        val footer = driver.findElement(By.tagName("footer"))
        val deltaY = footer.getRect().y
        Actions(driver)
                .scrollByAmount(0, deltaY)
                .perform()

Scroll from an element by a given amount

This scenario is effectively a combination of the above two methods.

To execute this use the “Scroll From” method, which takes 3 arguments. The first represents the origination point, which we designate as the element, and the second two are the delta x and delta y values.

If the element is out of the viewport, it will be scrolled to the bottom of the screen, then the page will be scrolled by the provided delta x and delta y values.

        WebElement iframe = driver.findElement(By.tagName("iframe"));
        WheelInput.ScrollOrigin scrollOrigin = WheelInput.ScrollOrigin.fromElement(iframe);
        new Actions(driver)
                .scrollFromOrigin(scrollOrigin, 0, 200)
                .perform();
    iframe = driver.find_element(By.TAG_NAME, "iframe")
    scroll_origin = ScrollOrigin.from_element(iframe)
    ActionChains(driver)\
        .scroll_from_origin(scroll_origin, 0, 200)\
        .perform()
            IWebElement iframe = driver.FindElement(By.TagName("iframe"));
            WheelInputDevice.ScrollOrigin scrollOrigin = new WheelInputDevice.ScrollOrigin
            {
                Element = iframe
            };
            new Actions(driver)
                .ScrollFromOrigin(scrollOrigin, 0, 200)
                .Perform();
    iframe = driver.find_element(tag_name: 'iframe')
    scroll_origin = Selenium::WebDriver::WheelActions::ScrollOrigin.element(iframe)
    driver.action
          .scroll_from(scroll_origin, 0, 200)
          .perform
      const iframe = await driver.findElement(By.css("iframe"))

      await driver.actions()
        .scroll(0, 0, 0, 200, iframe)
        .perform()
        val iframe = driver.findElement(By.tagName("iframe"))
        val scrollOrigin = WheelInput.ScrollOrigin.fromElement(iframe)
        Actions(driver)
                .scrollFromOrigin(scrollOrigin, 0, 200)
                .perform()

Scroll from an element with an offset

This scenario is used when you need to scroll only a portion of the screen, and it is outside the viewport. Or is inside the viewport and the portion of the screen that must be scrolled is a known offset away from a specific element.

This uses the “Scroll From” method again, and in addition to specifying the element, an offset is specified to indicate the origin point of the scroll. The offset is calculated from the center of the provided element.

If the element is out of the viewport, it first will be scrolled to the bottom of the screen, then the origin of the scroll will be determined by adding the offset to the coordinates of the center of the element, and finally the page will be scrolled by the provided delta x and delta y values.

Note that if the offset from the center of the element falls outside of the viewport, it will result in an exception.

        WebElement footer = driver.findElement(By.tagName("footer"));
        WheelInput.ScrollOrigin scrollOrigin = WheelInput.ScrollOrigin.fromElement(footer, 0, -50);
        new Actions(driver)
                .scrollFromOrigin(scrollOrigin,0, 200)
                .perform();
    footer = driver.find_element(By.TAG_NAME, "footer")
    scroll_origin = ScrollOrigin.from_element(footer, 0, -50)
    ActionChains(driver)\
        .scroll_from_origin(scroll_origin, 0, 200)\
        .perform()
            IWebElement footer = driver.FindElement(By.TagName("footer"));
            var scrollOrigin = new WheelInputDevice.ScrollOrigin
            {
                Element = footer,
                XOffset = 0,
                YOffset = -50
            };
            new Actions(driver)
                .ScrollFromOrigin(scrollOrigin, 0, 200)
                .Perform();
    footer = driver.find_element(tag_name: 'footer')
    scroll_origin = Selenium::WebDriver::WheelActions::ScrollOrigin.element(footer, 0, -50)
    driver.action
          .scroll_from(scroll_origin, 0, 200)
          .perform
      const footer = await driver.findElement(By.css("footer"))

      await driver.actions()
        .scroll(0, -50, 0, 200, footer)
        .perform()
        val footer = driver.findElement(By.tagName("footer"))
        val scrollOrigin = WheelInput.ScrollOrigin.fromElement(footer, 0, -50)
        Actions(driver)
                .scrollFromOrigin(scrollOrigin,0, 200)
                .perform()

Scroll from a offset of origin (element) by given amount

The final scenario is used when you need to scroll only a portion of the screen, and it is already inside the viewport.

This uses the “Scroll From” method again, but the viewport is designated instead of an element. An offset is specified from the upper left corner of the current viewport. After the origin point is determined, the page will be scrolled by the provided delta x and delta y values.

Note that if the offset from the upper left corner of the viewport falls outside of the screen, it will result in an exception.

        WheelInput.ScrollOrigin scrollOrigin = WheelInput.ScrollOrigin.fromViewport(10, 10);
        new Actions(driver)
                .scrollFromOrigin(scrollOrigin, 0, 200)
                .perform();
    scroll_origin = ScrollOrigin.from_viewport(10, 10)

    ActionChains(driver)\
        .scroll_from_origin(scroll_origin, 0, 200)\
        .perform()
            var scrollOrigin = new WheelInputDevice.ScrollOrigin
            {
                Viewport = true,
                XOffset = 10,
                YOffset = 10
            };
            new Actions(driver)
                .ScrollFromOrigin(scrollOrigin, 0, 200)
                .Perform();
    scroll_origin = Selenium::WebDriver::WheelActions::ScrollOrigin.viewport(10, 10)
    driver.action
          .scroll_from(scroll_origin, 0, 200)
          .perform
      await driver.actions()
        .scroll(10, 10, 0, 200)
        .perform()
        val scrollOrigin = WheelInput.ScrollOrigin.fromViewport(10, 10)
        Actions(driver)
                .scrollFromOrigin(scrollOrigin, 0, 200)
                .perform()

2.8 - BiDirectional Functionality

Page being translated from English to Japanese. Do you speak Japanese? Help us to translate it by sending us pull requests!

Selenium is working with browser vendors to create the WebDriver BiDirectional Protocol as a means to provide a stable, cross-browser API that uses the bidirectional functionality useful for both browser automation generally and testing specifically. Before now, users seeking this functionality have had to rely on with all of its frustrations and limitations.

The traditional WebDriver model of strict request/response commands will be supplemented with the ability to stream events from the user agent to the controlling software via WebSockets, better matching the evented nature of the browser DOM.

As it is not a good idea to tie your tests to a specific version of any browser, the Selenium project recommends using WebDriver BiDi wherever possible.

While the specification is in works, the browser vendors are parallely implementing the WebDriver BiDirectional Protocol. Refer web-platform-tests dashboard to see how far along the browser vendors are. Selenium is trying to keep up with the browser vendors and has started implementing W3C BiDi APIs. The goal is to ensure APIs are W3C compliant and uniform among the different language bindings.

However, until the specification and corresponding Selenium implementation is complete there are many useful things that CDP offers. Selenium offers some useful helper classes that use CDP.

2.8.1 - Chrome DevTools

Many browsers provide “DevTools” – a set of tools that are integrated with the browser that developers can use to debug web apps and explore the performance of their pages. Google Chrome’s DevTools make use of a protocol called the Chrome DevTools Protocol (or “CDP” for short). As the name suggests, this is not designed for testing, nor to have a stable API, so functionality is highly dependent on the version of the browser.

The WebDriver BiDirectional Protocol is the next generation of the W3C WebDriver protocol and aims to provide a stable API implemented by all browsers, but it’s not yet complete. Until it is, Selenium provides access to the CDP for those browsers that implement it (such as Google Chrome, or Microsoft Edge, and Firefox), allowing you to enhance your tests in interesting ways. Some examples of what you can do with it are given below.

Ways to Use Chrome DevTools With Selenium

There are three different ways to access Chrome DevTools in Selenium. If you look for other examples online, you will likely see each of these mixed and matched.

  • The CDP Endpoint was the first option available to users. It only works for the most simple things (setting state, getting basic information), and you have to know the “magic strings” for the domain and methods and key value pairs. For basic requirements, this might be simpler than the other options. These methods are only temporarily supported.
  • The CDP API is an improvement on just using the endpoint because you can set do things asynchronously. Instead of a String and a Map, you can access the supported classes, methods and parameters in the code. These methods are also only temporarily supported.
  • The BiDi API option should be used whenever possible because it abstracts away the implementation details entirely and will work with either CDP or WebDriver-BiDi when Selenium moves away from CDP.

Examples With Limited Value

There are a number of commonly cited examples for using CDP that are of limited practical value.

  • Geo Location — almost all sites use the IP address to determine physical location, so setting an emulated geolocation rarely has the desired effect.
  • Overriding Device Metrics — Chrome provides a great API for setting Mobile Emulation in the Options classes, which is generally superior to attempting to do this with CDP.

Check out the examples in these documents for ways to do additional useful things:

2.8.1.1 - Chrome DevTools Protocol Endpoint

Google provides a /cdp/execute endpoint that can be accessed directly. Each Selenium binding provides a method that allows you to pass the CDP domain as a String, and the required parameters as a simple Map.

These methods will eventually be removed. It is recommended to use the WebDriver-BiDi or WebDriver Bidi APIs methods where possible to ensure future compatibility.

Usage

Generally you should prefer the use of the CDP API over this approach, but sometimes the syntax is cleaner or significantly more simple.

Limitations include:

  • It only works for use cases that are limited to setting or getting information; any actual asynchronous interactions require another implementation
  • You have to know the exactly correct “magic strings” for domains and keys
  • It is possible that an update to Chrome will change the required parameters

Examples

An alternate implementation can be found at CDP API Set Cookie

    Map<String, Object> cookie = new HashMap<>();
    cookie.put("name", "cheese");
    cookie.put("value", "gouda");
    cookie.put("domain", "www.selenium.dev");
    cookie.put("secure", true);

    ((HasCdp) driver).executeCdpCommand("Network.setCookie", cookie);
    cookie = {'name': 'cheese',
              'value': 'gouda',
              'domain': 'www.selenium.dev',
              'secure': True}

    driver.execute_cdp_cmd('Network.setCookie', cookie)
            var cookie = new Dictionary<string, object>
            {
                { "name", "cheese" },
                { "value", "gouda" },
                { "domain", "www.selenium.dev" },
                { "secure", true }
            };

            ((ChromeDriver)driver).ExecuteCdpCommand("Network.setCookie", cookie);

The CDP API Set Cookie implementation should be preferred

    cookie = {name: 'cheese',
              value: 'gouda',
              domain: 'www.selenium.dev',
              secure: true}

    driver.execute_cdp('Network.setCookie', **cookie)

Performance Metrics

An alternate implementation can be found at CDP API Performance Metrics

The CDP API Performance Metrics implementation should be preferred

    ((HasCdp) driver).executeCdpCommand("Performance.enable", new HashMap<>());

    Map<String, Object> response =
        ((HasCdp) driver).executeCdpCommand("Performance.getMetrics", new HashMap<>());
    driver.execute_cdp_cmd('Performance.enable', {})

    metric_list = driver.execute_cdp_cmd('Performance.getMetrics', {})["metrics"]
            ((ChromeDriver)driver).ExecuteCdpCommand("Performance.enable", emptyDictionary);

            Dictionary<string, object> response = (Dictionary<string, object>)((ChromeDriver)driver)
                .ExecuteCdpCommand("Performance.getMetrics", emptyDictionary);

The CDP API Performance Metrics implementation should be preferred

    driver.execute_cdp('Performance.enable')

    metric_list = driver.execute_cdp('Performance.getMetrics')['metrics']

Basic authentication

Alternate implementations can be found at CDP API Basic Authentication and BiDi API Basic Authentication

The BiDi API Basic Authentication implementation should be preferred

    ((HasCdp) driver).executeCdpCommand("Network.enable", new HashMap<>());

    String encodedAuth = Base64.getEncoder().encodeToString("admin:admin".getBytes());
    Map<String, Object> headers =
        ImmutableMap.of("headers", ImmutableMap.of("authorization", "Basic " + encodedAuth));

    ((HasCdp) driver).executeCdpCommand("Network.setExtraHTTPHeaders", headers);
    driver.execute_cdp_cmd("Network.enable", {})

    credentials = base64.b64encode("admin:admin".encode()).decode()
    headers = {'headers': {'authorization': 'Basic ' + credentials}}

    driver.execute_cdp_cmd('Network.setExtraHTTPHeaders', headers)
            ((ChromeDriver)driver).ExecuteCdpCommand("Network.enable", emptyDictionary);
            
            string encodedAuth = Convert.ToBase64String(Encoding.Default.GetBytes("admin:admin"));
            var headers = new Dictionary<string, object>
            {
                { "headers", new Dictionary<string, string> { { "authorization", "Basic " + encodedAuth } } }
            };

            ((ChromeDriver)driver).ExecuteCdpCommand("Network.setExtraHTTPHeaders", headers);

The BiDi API Basic Authentication implementation should be preferred

    driver.execute_cdp('Network.enable')

    credentials = Base64.strict_encode64('admin:admin')
    headers = {authorization: "Basic #{credentials}"}

    driver.execute_cdp('Network.setExtraHTTPHeaders', headers: headers)

2.8.1.2 - Chrome DevTools Protocol API

Each of the Selenium bindings dynamically generates classes and methods for the various CDP domains and features; these are tied to specific versions of Chrome.

While Selenium 4 provides direct access to the Chrome DevTools Protocol (CDP), these methods will eventually be removed. It is recommended to use the WebDriver Bidi APIs methods where possible to ensure future compatibility.

Usage

If your use case has been implemented by WebDriver Bidi or the BiDi API, you should use those implementations instead of this one. Generally you should prefer this approach over executing with the CDP Endpoint, especially in Ruby.

Examples

An alternate implementation can be found at CDP Endpoint Set Cookie

Because Java requires using all the parameters example, the Map approach used in CDP Endpoint Set Cookie might be more simple.

    devTools = ((HasDevTools) driver).getDevTools();
    devTools.createSession();

    devTools.send(
        Network.setCookie(
            "cheese",
            "gouda",
            Optional.empty(),
            Optional.of("www.selenium.dev"),
            Optional.empty(),
            Optional.of(true),
            Optional.empty(),
            Optional.empty(),
            Optional.empty(),
            Optional.empty(),
            Optional.empty(),
            Optional.empty(),
            Optional.empty(),
            Optional.empty()));

Because Python requires using async methods for this example, the synchronous approach found in CDP Endpoint Set Cookie might be easier.

    async with driver.bidi_connection() as connection:
        execution = connection.devtools.network.set_cookie(
            name="cheese",
            value="gouda",
            domain="www.selenium.dev",
            secure=True
        )

        await connection.session.execute(execution)

Due to the added complexity in .NET of obtaining the domains and executing with awaits, the CDP Endpoint Set Cookie might be easier.

            var session = ((IDevTools)driver).GetDevToolsSession();
            var domains = session.GetVersionSpecificDomains<OpenQA.Selenium.DevTools.V118.DevToolsSessionDomains>();
            await domains.Network.Enable(new OpenQA.Selenium.DevTools.V118.Network.EnableCommandSettings());

            var cookieCommandSettings = new SetCookieCommandSettings
            {
                Name = "cheese",
                Value = "gouda",
                Domain = "www.selenium.dev",
                Secure = true
            };

            await domains.Network.SetCookie(cookieCommandSettings);
    driver.devtools.network.set_cookie(name: 'cheese',
                                       value: 'gouda',
                                       domain: 'www.selenium.dev',
                                       secure: true)

Performance Metrics

An alternate implementation can be found at CDP Endpoint Performance Metrics

    devTools = ((HasDevTools) driver).getDevTools();
    devTools.createSession();
    devTools.send(Performance.enable(Optional.empty()));

    List<Metric> metricList = devTools.send(Performance.getMetrics());

Because Python requires using async methods for this example, the synchronous approach found in CDP Endpoint Performance Metrics might be easier.

    async with driver.bidi_connection() as connection:
        await connection.session.execute(connection.devtools.performance.enable())

        metric_list = await connection.session.execute(connection.devtools.performance.get_metrics())

Due to the added complexity in .NET of obtaining the domains and executing with awaits, the CDP Endpoint Performance Metrics might be easier.

            var session = ((IDevTools)driver).GetDevToolsSession();
            var domains = session.GetVersionSpecificDomains<OpenQA.Selenium.DevTools.V118.DevToolsSessionDomains>();
            await domains.Performance.Enable(new OpenQA.Selenium.DevTools.V118.Performance.EnableCommandSettings());

            var metricsResponse =
                await session.SendCommand<GetMetricsCommandSettings, GetMetricsCommandResponse>(
                    new GetMetricsCommandSettings()
                );
    driver.devtools.performance.enable

    metric_list = driver.devtools.performance.get_metrics.dig('result', 'metrics')

Basic authentication

Alternate implementations can be found at CDP Endpoint Basic Authentication and BiDi API Basic Authentication

The BiDi API Basic Authentication implementation should be preferred

    devTools = ((HasDevTools) driver).getDevTools();
    devTools.createSession();
    devTools.send(Network.enable(Optional.of(100000), Optional.of(100000), Optional.of(100000)));

    String encodedAuth = Base64.getEncoder().encodeToString("admin:admin".getBytes());
    Map<String, Object> headers = ImmutableMap.of("Authorization", "Basic " + encodedAuth);

    devTools.send(Network.setExtraHTTPHeaders(new Headers(headers)));

Because Python requires using async methods for this example, the synchronous approach found in CDP Endpoint Basic Authentication might be easier.

    async with driver.bidi_connection() as connection:
        await connection.session.execute(connection.devtools.network.enable())

        credentials = base64.b64encode("admin:admin".encode()).decode()
        auth = {'authorization': 'Basic ' + credentials}

        await connection.session.execute(connection.devtools.network.set_extra_http_headers(Headers(auth)))

Due to the added complexity in .NET of obtaining the domains and executing with awaits, the CDP Endpoint Basic Authentication might be easier.

            var session = ((IDevTools)driver).GetDevToolsSession();
            var domains = session.GetVersionSpecificDomains<OpenQA.Selenium.DevTools.V118.DevToolsSessionDomains>();
            await domains.Network.Enable(new OpenQA.Selenium.DevTools.V118.Network.EnableCommandSettings());

            var encodedAuth = Convert.ToBase64String(Encoding.Default.GetBytes("admin:admin"));
            var headerSettings = new SetExtraHTTPHeadersCommandSettings
            {
                Headers = new Headers()
                {
                    { "authorization", "Basic " + encodedAuth }
                }
            };

            await domains.Network.SetExtraHTTPHeaders(headerSettings);

The BiDi API Basic Authentication implementation should be preferred

    driver.devtools.network.enable

    credentials = Base64.strict_encode64('admin:admin')

    driver.devtools.network.set_extra_http_headers(headers: {authorization: "Basic #{credentials}"})

Console logs

Because reading console logs requires setting an event listener, this cannot be done with a CDP Endpoint implementation Alternate implementations can be found at BiDi API Console logs and errors and WebDriver BiDi Console logs

Use the WebDriver BiDi Console logs implementation

    DevTools devTools = ((HasDevTools) driver).getDevTools();
    devTools.createSession();
    devTools.send(Runtime.enable());

    CopyOnWriteArrayList<String> logs = new CopyOnWriteArrayList<>();
    devTools.addListener(
        Runtime.consoleAPICalled(),
        event -> logs.add((String) event.getArgs().get(0).getValue().orElse("")));

The BiDi API Console logs and errors implementation should be preferred

    driver.devtools.runtime.enable

    logs = []
    driver.devtools.runtime.on(:console_api_called) do |params|
      logs << params['args'].first['value']
    end

JavaScript exceptions

Similar to console logs, but this listens for actual javascript exceptions not just logged errors Alternate implementations can be found at BiDi API JavaScript exceptions and WebDriver BiDi JavaScript exceptions

Use the WebDriver BiDi JavaScript exceptions implementation

    DevTools devTools = ((HasDevTools) driver).getDevTools();
    devTools.createSession();
    devTools.send(Runtime.enable());

    CopyOnWriteArrayList<JavascriptException> errors = new CopyOnWriteArrayList<>();
    devTools.getDomains().events().addJavascriptExceptionListener(errors::add);

Download complete

Wait for a download to finish before continuing. Because getting download status requires setting a listener, this cannot be done with a CDP Endpoint implementation.

    devTools = ((HasDevTools) driver).getDevTools();
    devTools.createSession();
    devTools.send(
        Browser.setDownloadBehavior(
            Browser.SetDownloadBehaviorBehavior.ALLOWANDNAME,
            Optional.empty(),
            Optional.of(""),
            Optional.of(true)));

    AtomicBoolean completed = new AtomicBoolean(false);
    devTools.addListener(
        Browser.downloadProgress(),
        e -> completed.set(Objects.equals(e.getState().toString(), "completed")));
    driver.devtools.browser.set_download_behavior(behavior: 'allow',
                                                  download_path: '',
                                                  events_enabled: true)

    driver.devtools.browser.on(:download_progress) do |progress|
      @completed = progress['state'] == 'completed'
    end

2.8.1.3 - Chrome Devtools Protocol with BiDi API

These examples are currently implemented with CDP, but the same code should work when the functionality is re-implemented with WebDriver-BiDi.

Usage

The following list of APIs will be growing as the Selenium project works through supporting real world use cases. If there is additional functionality you’d like to see, please raise a feature request.

As these examples are re-implemented with the WebDriver-Bidi protocol, they will be moved to the WebDriver Bidi pages.

Examples

Basic authentication

Some applications make use of browser authentication to secure pages. It used to be common to handle them in the URL, but browser stopped supporting this. With BiDi, you can now provide the credentials when necessary

Alternate implementations can be found at CDP Endpoint Basic Authentication and CDP API Basic Authentication

    Predicate<URI> uriPredicate = uri -> uri.toString().contains("herokuapp.com");
    Supplier<Credentials> authentication = UsernameAndPassword.of("admin", "admin");

    ((HasAuthentication) driver).register(uriPredicate, authentication);

An alternate implementation may be found at CDP Endpoint Basic Authentication

Implementation Missing

            var handler = new NetworkAuthenticationHandler()
            {
                UriMatcher = uri => uri.AbsoluteUri.Contains("herokuapp"),
                Credentials = new PasswordCredentials("admin", "admin")
            };

            var networkInterceptor = driver.Manage().Network;
            networkInterceptor.AddAuthenticationHandler(handler);

            await networkInterceptor.StartMonitoring();
    driver.register(username: 'admin',
                    password: 'admin',
                    uri: /herokuapp/)

Move Code

const {Builder} = require('selenium-webdriver');

(async function example() {
  try {
    let driver = await new Builder()
      .forBrowser('chrome')
      .build();

    const pageCdpConnection = await driver.createCDPConnection('page');
    await driver.register('username', 'password', pageCdpConnection);
    await driver.get('https://the-internet.herokuapp.com/basic_auth');
    await driver.quit();
  }catch (e){
    console.log(e)
  }
}())

Move Code

val uriPredicate = Predicate { uri: URI ->
        uri.host.contains("your-domain.com")
    }
(driver as HasAuthentication).register(uriPredicate, UsernameAndPassword.of("admin", "password"))
driver.get("https://your-domain.com/login")

Pin scripts

This can be especially useful when executing on a remote server. For example, whenever you check the visibility of an element, or whenever you use the classic get attribute method, Selenium is sending the contents of a js file to the script execution endpoint. These files are each about 50kB, which adds up.

            var key = await new JavaScriptEngine(driver).PinScript("return arguments;");

            var arguments = ((WebDriver)driver).ExecuteScript(key, 1, true, element);
    key = driver.pin_script('return arguments;')
    arguments = driver.execute_script(key, 1, true, element)

Mutation observation

Mutation Observation is the ability to capture events via WebDriver BiDi when there are DOM mutations on a specific element in the DOM.

    CopyOnWriteArrayList<WebElement> mutations = new CopyOnWriteArrayList<>();
    ((HasLogEvents) driver).onLogEvent(domMutation(e -> mutations.add(e.getElement())));
    async with driver.bidi_connection() as session:
        log = Log(driver, session)
            var mutations = new List<IWebElement>();
            using IJavaScriptEngine monitor = new JavaScriptEngine(driver);
            monitor.DomMutated += (_, e) =>
            {
                var locator = By.CssSelector($"*[data-__webdriver_id='{e.AttributeData.TargetId}']");
                mutations.Add(driver.FindElement(locator));
            };

            await monitor.StartEventMonitoring();
            await monitor.EnableDomMutationMonitoring();
    mutations = []
    driver.on_log_event(:mutation) { |mutation| mutations << mutation.element }

Move Code

const {Builder, until} = require('selenium-webdriver');
const assert = require("assert");

(async function example() {
  try {
    let driver = await new Builder()
      .forBrowser('chrome')
      .build();

    const cdpConnection = await driver.createCDPConnection('page');
    await driver.logMutationEvents(cdpConnection, event => {
      assert.deepStrictEqual(event['attribute_name'], 'style');
      assert.deepStrictEqual(event['current_value'], "");
      assert.deepStrictEqual(event['old_value'], "display:none;");
    });

    await driver.get('dynamic.html');
    await driver.findElement({id: 'reveal'}).click();
    let revealed = driver.findElement({id: 'revealed'});
    await driver.wait(until.elementIsVisible(revealed), 5000);
    await driver.quit();
  }catch (e){
    console.log(e)
  }
}())

Console logs and errors

Listen to the console.log events and register callbacks to process the event.

CDP API Console logs and WebDriver BiDi Console logs

Use the WebDriver BiDi Console logs implementation. HasLogEvents will likely end up deprecated because it does not implement Closeable.

    CopyOnWriteArrayList<String> messages = new CopyOnWriteArrayList<>();
    ((HasLogEvents) driver).onLogEvent(consoleEvent(e -> messages.add(e.getMessages().get(0))));
    async with driver.bidi_connection() as session:
        log = Log(driver, session)

        async with log.add_listener(Console.ALL) as messages:
            using IJavaScriptEngine monitor = new JavaScriptEngine(driver);
            var messages = new List<string>();
            monitor.JavaScriptConsoleApiCalled += (_, e) =>
            {
                messages.Add(e.MessageContent);
            };

            await monitor.StartEventMonitoring();
    logs = []
    driver.on_log_event(:console) { |log| logs << log.args.first }

Move Code

const {Builder} = require('selenium-webdriver');
(async () => {
  try {
    let driver = new Builder()
      .forBrowser('chrome')
      .build();

    const cdpConnection = await driver.createCDPConnection('page');
    await driver.onLogEvent(cdpConnection, function (event) {
      console.log(event['args'][0]['value']);
    });
    await driver.executeScript('console.log("here")');
    await driver.quit();
  }catch (e){
    console.log(e);
  }
})()

Move Code

fun kotlinConsoleLogExample() {
    val driver = ChromeDriver()
    val devTools = driver.devTools
    devTools.createSession()

    val logConsole = { c: ConsoleEvent -> print("Console log message is: " + c.messages)}
    devTools.domains.events().addConsoleListener(logConsole)

    driver.get("https://www.google.com")

    val executor = driver as JavascriptExecutor
    executor.executeScript("console.log('Hello World')")

    val input = driver.findElement(By.name("q"))
    input.sendKeys("Selenium 4")
    input.sendKeys(Keys.RETURN)
    driver.quit()
}

JavaScript exceptions

Listen to the JS Exceptions and register callbacks to process the exception details.

    async with driver.bidi_connection() as session:
        log = Log(driver, session)

        async with log.add_js_error_listener() as messages:
            using IJavaScriptEngine monitor = new JavaScriptEngine(driver);
            var messages = new List<string>();
            monitor.JavaScriptExceptionThrown += (_, e) =>
            {
                messages.Add(e.Message);
            };

            await monitor.StartEventMonitoring();
    exceptions = []
    driver.on_log_event(:exception) { |exception| exceptions << exception }

Network Interception

Both requests and responses can be recorded or transformed.

Response information

    CopyOnWriteArrayList<String> contentType = new CopyOnWriteArrayList<>();

    try (NetworkInterceptor ignored =
        new NetworkInterceptor(
            driver,
            (Filter)
                next ->
                    req -> {
                      HttpResponse res = next.execute(req);
                      contentType.add(res.getHeader("Content-Type"));
                      return res;
                    })) {
            var contentType = new List<string>();

            INetwork networkInterceptor = driver.Manage().Network;
            networkInterceptor.NetworkResponseReceived += (_, e)  =>
            {
                contentType.Add(e.ResponseHeaders["content-type"]);
            };

            await networkInterceptor.StartMonitoring();
    content_type = []
    driver.intercept do |request, &continue|
      continue.call(request) do |response|
        content_type << response.headers['content-type']
      end
    end

Response transformation

    try (NetworkInterceptor ignored =
        new NetworkInterceptor(
            driver,
            Route.matching(req -> true)
                .to(
                    () ->
                        req ->
                            new HttpResponse()
                                .setStatus(200)
                                .addHeader("Content-Type", MediaType.HTML_UTF_8.toString())
                                .setContent(Contents.utf8String("Creamy, delicious cheese!"))))) {
            var handler = new NetworkResponseHandler()
            {
                ResponseMatcher = _ => true,
                ResponseTransformer = _ => new HttpResponseData
                {
                    StatusCode = 200,
                    Body = "Creamy, delicious cheese!"
                }
            };

            INetwork networkInterceptor = driver.Manage().Network;
            networkInterceptor.AddResponseHandler(handler);

            await networkInterceptor.StartMonitoring();
    driver.intercept do |request, &continue|
      continue.call(request) do |response|
        response.body = 'Creamy, delicious cheese!' if request.url.include?('blank')
      end
    end

Move Code

const connection = await driver.createCDPConnection('page')
let url = fileServer.whereIs("/cheese")
let httpResponse = new HttpResponse(url)
httpResponse.addHeaders("Content-Type", "UTF-8")
httpResponse.body = "sausages"
await driver.onIntercept(connection, httpResponse, async function () {
  let body = await driver.getPageSource()
  assert.strictEqual(body.includes("sausages"), true, `Body contains: ${body}`)
})
driver.get(url)

Move Code

val driver = ChromeDriver()
val interceptor = new NetworkInterceptor(
      driver,
      Route.matching(req -> true)
        .to(() -> req -> new HttpResponse()
          .setStatus(200)
          .addHeader("Content-Type", MediaType.HTML_UTF_8.toString())
          .setContent(utf8String("Creamy, delicious cheese!"))))

    driver.get(appServer.whereIs("/cheese"))

    String source = driver.getPageSource()

Request interception

            var handler = new NetworkRequestHandler
            {
                RequestMatcher = request => request.Url.Contains("one.js"),
                RequestTransformer = request =>
                {
                    request.Url = request.Url.Replace("one", "two");

                    return request;
                }
            };

            INetwork networkInterceptor = driver.Manage().Network;
            networkInterceptor.AddRequestHandler(handler);

            await networkInterceptor.StartMonitoring();
    driver.intercept do |request, &continue|
      uri = URI(request.url)
      request.url = uri.to_s.gsub('one', 'two') if uri.path&.end_with?('one.js')
      continue.call(request)
    end

2.8.2 - BiDirectional API (W3C compliant)

Page being translated from English to Japanese. Do you speak Japanese? Help us to translate it by sending us pull requests!

The following list of APIs will be growing as the WebDriver BiDirectional Protocol grows and browser vendors implement the same. Additionally, Selenium will try to support real-world use cases that internally use a combination of W3C BiDi protocol APIs.

If there is additional functionality you’d like to see, please raise a feature request.

2.8.2.1 - Browsing Context

Page being translated from English to Japanese. Do you speak Japanese? Help us to translate it by sending us pull requests!

This section contains the APIs related to browsing context commands.

Open a new window

Creates a new browsing context in a new window.

        BrowsingContext browsingContext = new BrowsingContext(driver, WindowType.WINDOW);

Open a new tab

Creates a new browsing context in a new tab.

        BrowsingContext browsingContext = new BrowsingContext(driver, WindowType.TAB);

Use existing window handle

Creates a browsing context for the existing tab/window to run commands.

        String id = driver.getWindowHandle();
        BrowsingContext browsingContext = new BrowsingContext(driver, id);

Open a window with a reference browsing context

A reference browsing context is a top-level browsing context. The API allows to pass the reference browsing context, which is used to create a new window. The implementation is operating system specific.

        BrowsingContext
                browsingContext =
                new BrowsingContext(driver, WindowType.WINDOW, driver.getWindowHandle());

Open a tab with a reference browsing context

A reference browsing context is a top-level browsing context. The API allows to pass the reference browsing context, which is used to create a new tab. The implementation is operating system specific.

        BrowsingContext
                browsingContext =
                new BrowsingContext(driver, WindowType.TAB, driver.getWindowHandle());
        BrowsingContext browsingContext = new BrowsingContext(driver, WindowType.TAB);

        NavigationResult info = browsingContext.navigate("https://www.selenium.dev/selenium/web/bidi/logEntryAdded.html");
        BrowsingContext browsingContext = new BrowsingContext(driver, WindowType.TAB);

        NavigationResult info = browsingContext.navigate("https://www.selenium.dev/selenium/web/bidi/logEntryAdded.html",
                ReadinessState.COMPLETE);

Get browsing context tree

Provides a tree of all browsing contexts descending from the parent browsing context, including the parent browsing context.

        String referenceContextId = driver.getWindowHandle();
        BrowsingContext parentWindow = new BrowsingContext(driver, referenceContextId);

        parentWindow.navigate("https://www.selenium.dev/selenium/web/iframes.html", ReadinessState.COMPLETE);

        List<BrowsingContextInfo> contextInfoList = parentWindow.getTree();

Get browsing context tree with depth

Provides a tree of all browsing contexts descending from the parent browsing context, including the parent browsing context upto the depth value passed.

        String referenceContextId = driver.getWindowHandle();
        BrowsingContext parentWindow = new BrowsingContext(driver, referenceContextId);

        parentWindow.navigate("https://www.selenium.dev/selenium/web/iframes.html", ReadinessState.COMPLETE);

Get All Top level browsing contexts

        BrowsingContext window1 = new BrowsingContext(driver, driver.getWindowHandle());
        BrowsingContext window2 = new BrowsingContext(driver, WindowType.WINDOW);

        List<BrowsingContextInfo> contextInfoList = window1.getTopLevelContexts();

Close a tab/window

        BrowsingContext window1 = new BrowsingContext(driver, WindowType.WINDOW);
        BrowsingContext window2 = new BrowsingContext(driver, WindowType.WINDOW);

        window2.close();

2.8.2.2 - BiDirectional API (W3C compliant)

Page being translated from English to Japanese. Do you speak Japanese? Help us to translate it by sending us pull requests!

This section contains the APIs related to logging.

Console logs

Listen to the console.log events and register callbacks to process the event.

    public void jsErrors() {
        CopyOnWriteArrayList<ConsoleLogEntry> logs = new CopyOnWriteArrayList<>();

        try (LogInspector logInspector = new LogInspector(driver)) {
            logInspector.onConsoleEntry(logs::add);
        }

        driver.get("https://www.selenium.dev/selenium/web/bidi/logEntryAdded.html");
            const inspector = await LogInspector(driver)
            await inspector.onConsoleEntry(function (log) {
              logEntry = log
            })
    
            await driver.get('https://www.selenium.dev/selenium/web/bidi/logEntryAdded.html')
            await driver.findElement({ id: 'consoleLog' }).click()
            
            assert.equal(logEntry.text, 'Hello, world!')
            assert.equal(logEntry.realm, null)
            assert.equal(logEntry.type, 'console')
            assert.equal(logEntry.level, 'info')
            assert.equal(logEntry.method, 'log')
            assert.equal(logEntry.stackTrace, null)
            assert.equal(logEntry.args.length, 1)

JavaScript exceptions

Listen to the JS Exceptions and register callbacks to process the exception details.

            logInspector.onJavaScriptLog(future::complete);

            driver.get("https://www.selenium.dev/selenium/web/bidi/logEntryAdded.html");
            driver.findElement(By.id("jsException")).click();

            JavascriptLogEntry logEntry = future.get(5, TimeUnit.SECONDS);

            Assertions.assertEquals("Error: Not working", logEntry.getText());
        const inspector = await LogInspector(driver)
        await inspector.onJavascriptException(function (log) {
            logEntry = log
        })

        await driver.get('https://www.selenium.dev/selenium/web/bidi/logEntryAdded.html')
        await driver.findElement({ id: 'jsException' }).click()

        assert.equal(logEntry.text, 'Error: Not working')
        assert.equal(logEntry.type, 'javascript')
        assert.equal(logEntry.level, 'error')

Listen to JS Logs

Listen to all JS logs at all levels and register callbacks to process the log.

            driver.findElement(By.id("consoleLog")).click();

            ConsoleLogEntry logEntry = future.get(5, TimeUnit.SECONDS);

            Assertions.assertEquals("Hello, world!", logEntry.getText());
            Assertions.assertNull(logEntry.getRealm());
            Assertions.assertEquals(1, logEntry.getArgs().size());
            Assertions.assertEquals("console", logEntry.getType());

2.9 - Support features

Support classes provide optional higher level features.

The core libraries of Selenium try to be low level and non-opinionated. The Support classes in each language provide opinionated wrappers for common interactions that may be used to simplify some behaviors.

2.9.1 - Waiting with Expected Conditions

These are classes used to describe what needs to be waited for.

Expected Conditions are used with Explicit Waits. Instead of defining the block of code to be executed with a lambda, an expected conditions method can be created to represent common things that get waited on. Some methods take locators as arguments, others take elements as arguments.

These methods can include conditions such as:

  • element exists
  • element is stale
  • element is visible
  • text is visible
  • title contains specified value
[Expected Conditions Documentation](https://www.selenium.dev/selenium/docs/api/py/webdriver_support/selenium.webdriver.support.expected_conditions.html)

Add Example

.NET stopped supporting Expected Conditions in Selenium 4 to minimize maintenance hassle and redundancy.
Ruby makes frequent use of blocks, procs and lambdas and does not need Expected Conditions classes

2.9.2 - Command Listeners

These allow you to execute custom actions in every time specific Selenium commands are sent

2.9.3 - 色を扱う

テストの一部として何かの色を検証したい場合があります。 問題は、ウェブ上の色の定義が一定ではないことです。 色のHEX表現を色のRGB表現と比較する簡単な方法、または色のRGBA表現を色のHSLA表現と比較する簡単な方法があったらいいのではないでしょうか?

心配しないでください。解決策があります。: Color クラスです!

まず、クラスをインポートする必要があります。

import org.openqa.selenium.support.Color;
  
from selenium.webdriver.support.color import Color
  
// This feature is not implemented - Help us by sending a pr to implement this feature
  
include Selenium::WebDriver::Support
  
// This feature is not implemented - Help us by sending a pr to implement this feature
  
import org.openqa.selenium.support.Color

これで、カラーオブジェクトの作成を開始できます。 すべての色オブジェクトは、色の文字列表現から作成する必要があります。 サポートされている色表現は、以下のとおりです。

private final Color HEX_COLOUR = Color.fromString("#2F7ED8");
private final Color RGB_COLOUR = Color.fromString("rgb(255, 255, 255)");
private final Color RGB_COLOUR = Color.fromString("rgb(40%, 20%, 40%)");
private final Color RGBA_COLOUR = Color.fromString("rgba(255, 255, 255, 0.5)");
private final Color RGBA_COLOUR = Color.fromString("rgba(40%, 20%, 40%, 0.5)");
private final Color HSL_COLOUR = Color.fromString("hsl(100, 0%, 50%)");
private final Color HSLA_COLOUR = Color.fromString("hsla(100, 0%, 50%, 0.5)");
  
HEX_COLOUR = Color.from_string('#2F7ED8')
RGB_COLOUR = Color.from_string('rgb(255, 255, 255)')
RGB_COLOUR = Color.from_string('rgb(40%, 20%, 40%)')
RGBA_COLOUR = Color.from_string('rgba(255, 255, 255, 0.5)')
RGBA_COLOUR = Color.from_string('rgba(40%, 20%, 40%, 0.5)')
HSL_COLOUR = Color.from_string('hsl(100, 0%, 50%)')
HSLA_COLOUR = Color.from_string('hsla(100, 0%, 50%, 0.5)')
  
// This feature is not implemented - Help us by sending a pr to implement this feature
  
private val HEX_COLOUR = Color.fromString("#2F7ED8")
private val RGB_COLOUR = Color.fromString("rgb(255, 255, 255)")
private val RGB_COLOUR_PERCENT = Color.fromString("rgb(40%, 20%, 40%)")
private val RGBA_COLOUR = Color.fromString("rgba(255, 255, 255, 0.5)")
private val RGBA_COLOUR_PERCENT = Color.fromString("rgba(40%, 20%, 40%, 0.5)")
private val HSL_COLOUR = Color.fromString("hsl(100, 0%, 50%)")
private val HSLA_COLOUR = Color.fromString("hsla(100, 0%, 50%, 0.5)")
  

Colorクラスは、 http://www.w3.org/TR/css3-color/#html4 で指定されているすべての基本色定義もサポートしています。

private final Color BLACK = Color.fromString("black");
private final Color CHOCOLATE = Color.fromString("chocolate");
private final Color HOTPINK = Color.fromString("hotpink");
  
BLACK = Color.from_string('black')
CHOCOLATE = Color.from_string('chocolate')
HOTPINK = Color.from_string('hotpink')
  
// This feature is not implemented - Help us by sending a pr to implement this feature
  
BLACK = Color.from_string('black')
CHOCOLATE = Color.from_string('chocolate')
HOTPINK = Color.from_string('hotpink')
  
// This feature is not implemented - Help us by sending a pr to implement this feature
  
private val BLACK = Color.fromString("black")
private val CHOCOLATE = Color.fromString("chocolate")
private val HOTPINK = Color.fromString("hotpink")
  

要素に色が設定されていない場合、ブラウザは “透明” の色の値を返すことがあります。 Colorクラスもこれをサポートしています。

private final Color TRANSPARENT = Color.fromString("transparent");
  
TRANSPARENT = Color.from_string('transparent')
  
// This feature is not implemented - Help us by sending a pr to implement this feature
  
TRANSPARENT = Color.from_string('transparent')
  
// This feature is not implemented - Help us by sending a pr to implement this feature
  
private val TRANSPARENT = Color.fromString("transparent")
  

レスポンスが正しく解析され、有効なColorオブジェクトに変換されることを認識して、要素を安全にクエリしてその色/背景色を取得できるようになりました。

Color loginButtonColour = Color.fromString(driver.findElement(By.id("login")).getCssValue("color"));

Color loginButtonBackgroundColour = Color.fromString(driver.findElement(By.id("login")).getCssValue("background-color"));
  
login_button_colour = Color.from_string(driver.find_element(By.ID,'login').value_of_css_property('color'))

login_button_background_colour = Color.from_string(driver.find_element(By.ID,'login').value_of_css_property('background-color'))
  
// This feature is not implemented - Help us by sending a pr to implement this feature
  
login_button_colour = Color.from_string(driver.find_element(id: 'login').css_value('color'))

login_button_background_colour = Color.from_string(driver.find_element(id: 'login').css_value('background-color'))
  
// This feature is not implemented - Help us by sending a pr to implement this feature
  
val loginButtonColour = Color.fromString(driver.findElement(By.id("login")).getCssValue("color"))

val loginButtonBackgroundColour = Color.fromString(driver.findElement(By.id("login")).getCssValue("background-color"))
  

そして、色オブジェクトを直接比較できます。

assert loginButtonBackgroundColour.equals(HOTPINK);
  
assert login_button_background_colour == HOTPINK
  
// This feature is not implemented - Help us by sending a pr to implement this feature
  
assert(login_button_background_colour == HOTPINK)
  
// This feature is not implemented - Help us by sending a pr to implement this feature
  
assert(loginButtonBackgroundColour.equals(HOTPINK))
  

または、色を次の形式のいずれかに変換し、静的に検証することができます。

assert loginButtonBackgroundColour.asHex().equals("#ff69b4");
assert loginButtonBackgroundColour.asRgba().equals("rgba(255, 105, 180, 1)");
assert loginButtonBackgroundColour.asRgb().equals("rgb(255, 105, 180)");
  
assert login_button_background_colour.hex == '#ff69b4'
assert login_button_background_colour.rgba == 'rgba(255, 105, 180, 1)'
assert login_button_background_colour.rgb == 'rgb(255, 105, 180)'
  
// This feature is not implemented - Help us by sending a pr to implement this feature
  
assert(login_button_background_colour.hex == '#ff69b4')
assert(login_button_background_colour.rgba == 'rgba(255, 105, 180, 1)')
assert(login_button_background_colour.rgb == 'rgb(255, 105, 180)')
  
// This feature is not implemented - Help us by sending a pr to implement this feature
  
assert(loginButtonBackgroundColour.asHex().equals("#ff69b4"))
assert(loginButtonBackgroundColour.asRgba().equals("rgba(255, 105, 180, 1)"))
assert(loginButtonBackgroundColour.asRgb().equals("rgb(255, 105, 180)"))
  

色はもはや問題ではありません。

2.9.4 - 選択要素の操作

選択リストには、他の要素と比較して特別な動作があります。

The Select object will now give you a series of commands that allow you to interact with a <select> element.

If you are using Java or .NET make sure that you’ve properly required the support package in your code. See the full code from GitHub in any of the examples below.

Note that this class only works for HTML elements select and option. It is possible to design drop-downs with JavaScript overlays using div or li, and this class will not work for those.

Types

Select methods may behave differently depending on which type of <select> element is being worked with.

Single select

This is the standard drop-down object where one and only one option may be selected.

<select name="selectomatic">
    <option selected="selected" id="non_multi_option" value="one">One</option>
    <option value="two">Two</option>
    <option value="four">Four</option>
    <option value="still learning how to count, apparently">Still learning how to count, apparently</option>
</select>

Multiple select

This select list allows selecting and deselecting more than one option at a time. This only applies to <select> elements with the multiple attribute.

<select name="multi" id="multi" multiple="multiple">
    <option selected="selected" value="eggs">Eggs</option>
    <option value="ham">Ham</option>
    <option selected="selected" value="sausages">Sausages</option>
    <option value="onion gravy">Onion gravy</option>
</select>

Create class

First locate a <select> element, then use it to initialize a Select object. Note that as of Selenium 4.5, you can’t create a Select object if the <select> element is disabled.

        WebElement selectElement = driver.findElement(By.name("selectomatic"));
        Select select = new Select(selectElement);
    select_element = driver.find_element(By.NAME, 'selectomatic')
    select = Select(select_element)
            var selectElement = driver.FindElement(By.Name("selectomatic"));
            var select = new SelectElement(selectElement);
    select_element = driver.find_element(name: 'selectomatic')
    select = Selenium::WebDriver::Support::Select.new(select_element)
      const selectElement = await driver.findElement(By.name('selectomatic'))
      const select = new Select(selectElement)
    val selectElement = driver.findElement(By.name("selectomatic"))
    val select = Select(selectElement)

List options

There are two lists that can be obtained:

All options

Get a list of all options in the <select> element:

        List<WebElement> optionList = select.getOptions();
    option_list = select.options
            IList<IWebElement> optionList = select.Options;
    option_list = select.options
      const optionList = await select.getOptions()
    val optionList = select.getOptions()

Selected options

Get a list of selected options in the <select> element. For a standard select list this will only be a list with one element, for a multiple select list it can contain zero or many elements.

        List<WebElement> selectedOptionList = select.getAllSelectedOptions();
    selected_option_list = select.all_selected_options
            IList<IWebElement> selectedOptionList = select.AllSelectedOptions;
    selected_option_list = select.selected_options
      const selectedOptionList = await select.getAllSelectedOptions()
    val selectedOptionList = select.getAllSelectedOptions()

Select option

The Select class provides three ways to select an option. Note that for multiple select type Select lists, you can repeat these methods for each element you want to select.

Text

Select the option based on its visible text

        select.selectByVisibleText("Four");
    select.select_by_visible_text('Four')
            select.SelectByText("Four");
    select.select_by(:text, 'Four')
      await select.selectByVisibleText('Four')
    select.selectByVisibleText("Four")

Value

Select the option based on its value attribute

        select.selectByValue("two");
    select.select_by_value('two')
            select.SelectByValue("two");
    select.select_by(:value, 'two')
      await select.selectByValue('two')
    select.selectByValue("two")

Index

Select the option based on its position in the list

        select.selectByIndex(3);
    select.select_by_index(3)
            select.SelectByIndex(3);
    select.select_by(:index, 3)
      await select.selectByIndex(3)
    select.selectByIndex(3)

Disabled options

Options with a disabled attribute may not be selected.

    <select name="single_disabled">
      <option id="sinlge_disabled_1" value="enabled">Enabled</option>
      <option id="sinlge_disabled_2" value="disabled" disabled="disabled">Disabled</option>
    </select>
        Assertions.assertThrows(UnsupportedOperationException.class, () -> {
            select.selectByValue("disabled");
        });
    with pytest.raises(NotImplementedError):
        select.select_by_value('disabled')
            Assert.ThrowsException<InvalidOperationException>(() => select.SelectByValue("disabled"));
    expect {
      select.select_by(:value, 'disabled')
    }.to raise_exception(Selenium::WebDriver::Error::UnsupportedOperationError)
      await assert.rejects(async () => {
        await select.selectByValue("disabled")
      }, {
        name: 'UnsupportedOperationError',
    Assertions.assertThrows(UnsupportedOperationException::class.java) {
      select.selectByValue("disabled")
    }

De-select option

Only multiple select type select lists can have options de-selected. You can repeat these methods for each element you want to select.

        select.deselectByValue("eggs");
    select.deselect_by_value('eggs')
            select.DeselectByValue("eggs");
    select.deselect_by(:value, 'eggs')
      await select.deselectByValue('eggs')
    select.deselectByValue("eggs")

2.9.5 - ThreadGuard

このクラスは、Javaバインディングでのみ使用可能です。

ThreadGuardは、ドライバーが、それを作成した同じスレッドからのみ呼び出されることを確認します。 特に並行してテストを実行する場合のスレッドの問題は、不可解でエラーの診断が難しい場合があります。 このラッパーを使用すると、このカテゴリのエラーが防止され、発生時に例外が発生します。

次の例は、スレッドの衝突をシミュレートします。

public class DriverClash {
  //thread main (id 1) created this driver
  private WebDriver protectedDriver = ThreadGuard.protect(new ChromeDriver());

  static {
    System.setProperty("webdriver.chrome.driver", "<Set path to your Chromedriver>");
  }

  //Thread-1 (id 24) is calling the same driver causing the clash to happen
  Runnable r1 = () -> {protectedDriver.get("https://selenium.dev");};
  Thread thr1 = new Thread(r1);

  void runThreads(){
    thr1.start();
  }

  public static void main(String[] args) {
    new DriverClash().runThreads();
  }
}

結果は以下のとおりです。

Exception in thread "Thread-1" org.openqa.selenium.WebDriverException:
Thread safety error; this instance of WebDriver was constructed
on thread main (id 1)and is being accessed by thread Thread-1 (id 24)
This is not permitted and *will* cause undefined behaviour

下記例を参照してください。

  • protectedDriver はメインスレッドで作成されます
  • Java Runnableを使用して新しいプロセスを起動し、新しいスレッドを使用してプロセスを実行します
  • メインスレッドのメモリにprotectedDriverがないため、両方のスレッドが衝突します。
  • ThreadGuard.protectは例外をスローします。

注意:

これは、並列実行時にドライバーを管理するために ThreadLocalを使用する必要性を置き換えるものではありません。

2.10 - Troubleshooting Assistance

How to get manage WebDriver problems.

It is not always obvious the root cause of errors in Selenium.

  1. The most common Selenium-related error is a result of poor synchronization. Read about Waiting Strategies. If you aren’t sure if it is a synchronization strategy you can try temporarily hard coding a large sleep where you see the issue, and you’ll know if adding an explicit wait can help.

  2. Note that many errors that get reported to the project are actually caused by issues in the underlying drivers that Selenium sends the commands to. You can rule out a driver problem by executing the command in multiple browsers.

  3. If you have questions about how to do things, check out the Support options for ways get assistance.

  4. If you think you’ve found a problem with Selenium code, go ahead and file a Bug Report on GitHub.

2.10.1 - Understanding Common Errors

How to get deal with various problems in your Selenium code.

Invalid Selector Exception

CSS and XPath Selectors are sometimes difficult to get correct.

Likely Cause

The CSS or XPath selector you are trying to use has invalid characters or an invalid query.

Possible Solutions

Run your selector through a validator service:

Or use a browser extension to get a known good value:

No Such Element Exception

The element can not be found at the exact moment you attempted to locate it.

Likely Cause

  • You are looking for the element in the wrong place (perhaps a previous action was unsuccessful).
  • You are looking for the element at the wrong time (the element has not shown up in the DOM, yet)
  • The locator has changed since you wrote the code

Possible Solutions

  • Make sure you are on the page you expect to be on, and that previous actions in your code completed correctly
  • Make sure you are using a proper Waiting Strategy
  • Update the locator with the browser’s devtools console or use a browser extension like:

Stale Element Reference Exception

An element goes stale when it was previously located, but can not be currently accessed. Elements do not get relocated automatically; the driver creates a reference ID for the element and has a particular place it expects to find it in the DOM. If it can not find the element in the current DOM, any action using that element will result in this exception.

Common Causes

This can happen when:

  • You have refreshed the page, or the DOM of the page has dynamically changed.
  • You have navigated to a different page.
  • You have switched to another window or into or out of a frame or iframe.

Common Solutions

The DOM has changed

When the page is refreshed or items on the page have moved around, there is still an element with the desired locator on the page, it is just no longer accessible by the element object being used, and the element must be relocated before it can be used again. This is often done in one of two ways:

  • Always relocate the element every time you go to use it. The likelihood of the element going stale in the microseconds between locating and using the element is small, though possible. The downside is that this is not the most efficient approach, especially when running on a remote grid.

  • Wrap the Web Element with another object that stores the locator, and caches the located Selenium element. When taking actions with this wrapped object, you can attempt to use the cached object if previously located, and if it is stale, exception can be caught, the element relocated with the stored locator, and the method re-tried. This is more efficient, but it can cause problems if the locator you’re using references a different element (and not the one you want) after the page has changed.

The Context has changed

Element objects are stored for a given context, so if you move to a different context — like a different window or a different frame or iframe — the element reference will still be valid, but will be temporarily inaccessible. In this scenario, it won’t help to relocate the element, because it doesn’t exist in the current context. To fix this, you need to make sure to switch back to the correct context before using the element.

The Page has changed

This scenario is when you haven’t just changed contexts, you have navigated to another page and have destroyed the context in which the element was located. You can’t just relocate it from the current context, and you can’t switch back to an active context where it is valid. If this is the reason for your error, you must both navigate back to the correct location and relocate it.

2.10.1.1 - Unable to Locate Driver Error

Troubleshooting missing path to driver executable.

Historically, this is the most common error beginning Selenium users get when trying to run code for the first time:

The path to the driver executable must be set by the webdriver.chrome.driver system property; for more information, see https://chromedriver.chromium.org/. The latest version can be downloaded from https://chromedriver.chromium.org/downloads
The executable chromedriver needs to be available in the path.
The file geckodriver does not exist. The driver can be downloaded at https://github.com/mozilla/geckodriver/releases"
Unable to locate the chromedriver executable;

Likely cause

Through WebDriver, Selenium supports all major browsers. In order to drive the requested browser, Selenium needs to send commands to it via an executable driver. This error means the necessary driver could not be found by any of the means Selenium attempts to use.

Possible solutions

There are several ways to ensure Selenium gets the driver it needs.

Use the latest version of Selenium

As of Selenium 4.6, Selenium downloads the correct driver for you. You shouldn’t need to do anything. If you are using the latest version of Selenium and you are getting an error, please turn on logging and file a bug report with that information.

If you want to read more information about how Selenium manages driver downloads for you, you can read about the Selenium Manager.

Use the PATH environment variable

This option first requires manually downloading the driver.

This is a flexible option to change location of drivers without having to update your code, and will work on multiple machines without requiring that each machine put the drivers in the same place.

You can either place the drivers in a directory that is already listed in PATH, or you can place them in a directory and add it to PATH.

To see what directories are already on PATH, open a Terminal and execute:

echo $PATH

If the location to your driver is not already in a directory listed, you can add a new directory to PATH:

echo 'export PATH=$PATH:/path/to/driver' >> ~/.bash_profile
source ~/.bash_profile

You can test if it has been added correctly by checking the version of the driver:

chromedriver --version

To see what directories are already on PATH, open a Terminal and execute:

echo $PATH

If the location to your driver is not already in a directory listed, you can add a new directory to PATH:

echo 'export PATH=$PATH:/path/to/driver' >> ~/.zshenv
source ~/.zshenv

You can test if it has been added correctly by checking the version of the driver:

chromedriver --version

To see what directories are already on PATH, open a Command Prompt and execute:

echo %PATH%

If the location to your driver is not already in a directory listed, you can add a new directory to PATH:

setx PATH "%PATH%;C:\WebDriver\bin"

You can test if it has been added correctly by checking the version of the driver:

chromedriver.exe --version

Specify the location of the driver

If you cannot upgrade to the latest version of Selenium, you do not want Selenium to download drivers for you, and you can’t figure out the environment variables, you can specify the location of the driver in the Service object.

You first need to download the desired driver, then create an instance of the applicable Service class and set the path.

Specifying the location in the code itself has the advantage of not needing to figure out Environment Variables on your system, but has the drawback of making the code less flexible.

Driver management libraries

Before Selenium managed drivers itself, other projects were created to do so for you.

If you can’t use Selenium Manager because you are using an older version of Selenium (please upgrade), or need an advanced feature not yet implemented by Selenium Manager, you might try one of these tools to keep your drivers automatically updated:

Download the driver

ブラウザーサポートするOS維持管理機関ダウンロードイシュートラッカー
Chromium/ChromeWindows/macOS/LinuxGoogleDownloadsIssues
FirefoxWindows/macOS/LinuxMozillaDownloadsIssues
EdgeWindows/macOS/LinuxMicrosoftDownloadsIssues
Internet ExplorerWindowsSelenium ProjectDownloadsIssues
SafarimacOS High Sierra and newerAppleBuilt inIssues

Note: The Opera driver no longer works with the latest functionality of Selenium and is currently officially unsupported.

2.10.2 - Logging Selenium commands

Getting information about Selenium execution.

Turning on logging is a valuable way to get extra information that might help you determine why you might be having a problem.

Getting a logger

Java logs are typically created per class. You can work with the default logger to work with all loggers. To filter out specific classes, see Filtering

Get the root logger:

        Logger logger = Logger.getLogger("");

Java Logging is not exactly straightforward, and if you are just looking for an easy way to look at the important Selenium logs, take a look at the Selenium Logger project

Python logs are typically created per module. You can match all submodules by referencing the top level module. So to work with all loggers in selenium module, you can do this:

    logger = logging.getLogger('selenium')
.NET does not currently have a Logging implementation

If you want to see as much debugging as possible in all the classes, you can turn on debugging globally in Ruby by setting $DEBUG = true.

For more fine-tuned control, Ruby Selenium created its own Logger class to wrap the default Logger class. This implementation provides some interesting additional features. Obtain the logger directly from the #loggerclass method on the Selenium::WebDriver module:

    logger = Selenium::WebDriver.logger
const logging = require('selenium-webdriver/lib/logging')
logger = logging.getLogger('webdriver')

Logger level

Logger level helps to filter out logs based on their severity.

Java has 7 logger levels: SEVERE, WARNING, INFO, CONFIG, FINE, FINER, and FINEST. The default is INFO.

You have to change both the level of the logger and the level of the handlers on the root logger:

        logger.setLevel(Level.FINE);
        Arrays.stream(logger.getHandlers()).forEach(handler -> {
            handler.setLevel(Level.FINE);
        });

Python has 6 logger levels: CRITICAL, ERROR, WARNING, INFO, DEBUG, and NOTSET. The default is WARNING

To change the level of the logger:

    logger.setLevel(logging.DEBUG)

Things get complicated when you use PyTest, though. By default, PyTest hides logging unless the test fails. You need to set 3 things to get PyTest to display logs on passing tests.

To always output logs with PyTest you need to run with additional arguments. First, -s to prevent PyTest from capturing the console. Second, -p no:logging, which allows you to override the default PyTest logging settings so logs can be displayed regardless of errors.

So you need to set these flags in your IDE, or run PyTest on command line like:

pytest -s -p no:logging

Finally, since you turned off logging in the arguments above, you now need to add configuration to turn it back on:

logging.basicConfig(level=logging.WARN)
.NET does not currently have a Logging implementation

Ruby logger has 5 logger levels: :debug, :info, :warn, :error, :fatal. As of Selenium v4.9.1, The default is :info.

To change the level of the logger:

    logger.level = :debug

JavaScript has 9 logger levels: OFF, SEVERE, WARNING, INFO, DEBUG, FINE, FINER, FINEST, ALL. The default is OFF.

To change the level of the logger:

logger.setLevel(logging.Level.INFO)

Actionable items

Things are logged as warnings if they are something the user needs to take action on. This is often used for deprecations. For various reasons, Selenium project does not follow standard Semantic Versioning practices. Our policy is to mark things as deprecated for 3 releases and then remove them, so deprecations may be logged as warnings.

Java logs actionable content at logger level WARN

Example:

May 08, 2023 9:23:38 PM dev.selenium.troubleshooting.LoggingTest logging
WARNING: this is a warning

Python logs actionable content at logger level — WARNING Details about deprecations are logged at this level.

Example:

WARNING  selenium:test_logging.py:23 this is a warning
.NET does not currently have a Logging implementation

Ruby logs actionable content at logger level — :warn. Details about deprecations are logged at this level.

For example:

2023-05-08 20:53:13 WARN Selenium [:example_id] this is a warning 

Because these items can get annoying, we’ve provided an easy way to turn them off, see filtering section below.

Useful information

This is the default level where Selenium logs things that users should be aware of but do not need to take actions on. This might reference a new method or direct users to more information about something

Java logs useful information at logger level INFO

Example:

May 08, 2023 9:23:38 PM dev.selenium.troubleshooting.LoggingTest logging
INFO: this is useful information

Python logs useful information at logger level — INFO

Example:

INFO     selenium:test_logging.py:22 this is useful information
.NET does not currently have a Logging implementation

Ruby logs useful information at logger level — :info.

Example:

2023-05-08 20:53:13 INFO Selenium [:example_id] this is useful information 

Logs useful information at level: INFO

Debugging Details

The debug log level is used for information that may be needed for diagnosing issues and troubleshooting problems.

Java logs most debug content at logger level FINE

Example:

May 08, 2023 9:23:38 PM dev.selenium.troubleshooting.LoggingTest logging
FINE: this is detailed debug information

Python logs debugging details at logger level — DEBUG

Example:

DEBUG    selenium:test_logging.py:24 this is detailed debug information
.NET does not currently have a Logging implementation

Ruby only provides one level for debugging, so all details are at logger level — :debug.

Example:

2023-05-08 20:53:13 DEBUG Selenium [:example_id] this is detailed debug information 

Logs debugging details at level: FINER and FINEST

Logger output

Logs can be displayed in the console or stored in a file. Different languages have different defaults.

By default all logs are sent to System.err. To direct output to a file, you need to add a handler:

        Handler handler = new FileHandler("selenium.xml");
        logger.addHandler(handler);

By default all logs are sent to sys.stderr. To direct output somewhere else, you need to add a handler with either a StreamHandler or a FileHandler:

    handler = logging.FileHandler(log_path)
    logger.addHandler(handler)
.NET does not currently have a Logging implementation

By default, logs are sent to the console in stdout.
To store the logs in a file:

    logger.output = file_name

JavaScript does not currently support sending output to a file.

To send logs to console output:

logging.installConsoleHandler()

Logger filtering

Java logging is managed on a per class level, so instead of using the root logger (Logger.getLogger("")), set the level you want to use on a per-class basis:

        Logger.getLogger(RemoteWebDriver.class.getName()).setLevel(Level.FINEST);
        Logger.getLogger(SeleniumManager.class.getName()).setLevel(Level.SEVERE);
Because logging is managed by module, instead of working with just "selenium", you can specify different levels for different modules:
    logging.getLogger('selenium.webdriver.remote').setLevel(logging.WARN)
    logging.getLogger('selenium.webdriver.common').setLevel(logging.DEBUG)
.NET does not currently have a Logging implementation

Ruby’s logger allows you to opt in (“allow”) or opt out (“ignore”) of log messages based on their IDs. Everything that Selenium logs includes an ID. You can also turn on or off all deprecation notices by using :deprecations.

These methods accept one or more symbols or an array of symbols:

    logger.ignore(:jwp_caps, :logger_info)

or

    logger.allow(%i[selenium_manager example_id])

2.10.3 - Selenium4にアップグレードする方法

Selenium 4に興味がありますか? 最新リリースへのアップグレードに役立つこのガイドを確認してください。

公式にサポートされている言語(Ruby、JavaScript、C#、Python、およびJava)のいずれかを使用している場合、 Selenium4へのアップグレードは簡単なプロセスです。 いくつかの問題が発生する可能性がある場合があるかもしれません。このガイドは、それらを整理するのに役立ちます。 プロジェクトの依存関係をアップグレードする手順を実行し、バージョンのアップグレードによってもたらされる主な非推奨と変更を理解します。

これが、Selenium4にアップグレードするために実行する手順です。

  • テストコードの準備
  • 依存関係のアップグレード
  • 潜在的なエラーと非推奨メッセージ

注:Selenium 3.xバージョンの開発中に、W3CWebDriver標準のサポートが実装されました。 この新しいプロトコルと従来のJSONワイヤープロトコルの両方がサポートされました。 バージョン3.11の前後で、SeleniumコードはレベルW3C1仕様に準拠するようになりました。 Selenium 3の最新バージョンのW3C準拠のコードは、Selenium4で期待どおりに機能します。

テストコードの準備

Selenium 4は、レガシープロトコルのサポートを削除し、内部でデフォルトでW3CWebDriver標準を使用します。 ほとんどの場合、この実装はエンドユーザーに影響を与えません。 主な例外は、Capabilitiesアクション クラスです。

Capabilities

テスト機能がW3Cに準拠するように構成されていない場合、セッションが開始されない可能性があります。 W3CWebDriverの標準機能のリストは次のとおりです。

  • browserName
  • browserVersion (version に変更)
  • platformName (platform に変更)
  • acceptInsecureCerts
  • pageLoadStrategy
  • proxy
  • timeouts
  • unhandledPromptBehavior

標準Capabilitiesの最新リストは、 W3C WebDriver にあります。

上記のリストに含まれていないCapabilitiesには、ベンダープレフィックスを含める必要があります。 これは、ブラウザ固有のCapabilitiesとクラウドベンダー固有のCapabilitiesに適用されます。 たとえば、クラウドベンダーがテストに build Capabilities と name Capabilitiesを使用している場合は、 それらを cloud:options ブロックでラップする必要があります(適切なプレフィックスについては、クラウドベンダーに確認してください)。

Before

DesiredCapabilities caps = DesiredCapabilities.firefox();
caps.setCapability("platform", "Windows 10");
caps.setCapability("version", "92");
caps.setCapability("build", myTestBuild);
caps.setCapability("name", myTestName);
WebDriver driver = new RemoteWebDriver(new URL(cloudUrl), caps);
caps = {};
caps['browserName'] = 'Firefox';
caps['platform'] = 'Windows 10';
caps['version'] = '92';
caps['build'] = myTestBuild;
caps['name'] = myTestName;
DesiredCapabilities caps = new DesiredCapabilities();
caps.SetCapability("browserName", "firefox");
caps.SetCapability("platform", "Windows 10");
caps.SetCapability("version", "92");
caps.SetCapability("build", myTestBuild);
caps.SetCapability("name", myTestName);
var driver = new RemoteWebDriver(new Uri(CloudURL), caps);
caps = Selenium::WebDriver::Remote::Capabilities.firefox
caps[:platform] = 'Windows 10'
caps[:version] = '92'
caps[:build] = my_test_build
caps[:name] = my_test_name
driver = Selenium::WebDriver.for :remote, url: cloud_url, desired_capabilities: caps
caps = {}
caps['browserName'] = 'firefox'
caps['platform'] = 'Windows 10'
caps['version'] = '92'
caps['build'] = my_test_build
caps['name'] = my_test_name
driver = webdriver.Remote(cloud_url, desired_capabilities=caps)

After

FirefoxOptions browserOptions = new FirefoxOptions();
browserOptions.setPlatformName("Windows 10");
browserOptions.setBrowserVersion("92");
Map<String, Object> cloudOptions = new HashMap<>();
cloudOptions.put("build", myTestBuild);
cloudOptions.put("name", myTestName);
browserOptions.setCapability("cloud:options", cloudOptions);
WebDriver driver = new RemoteWebDriver(new URL(cloudUrl), browserOptions);
capabilities = {
  browserName: 'firefox',
  browserVersion: '92',
  platformName: 'Windows 10',
  'cloud:options': {
     build: myTestBuild,
     name: myTestName,
  }
}
var browserOptions = new FirefoxOptions();
browserOptions.PlatformName = "Windows 10";
browserOptions.BrowserVersion = "92";
var cloudOptions = new Dictionary<string, object>();
cloudOptions.Add("build", myTestBuild);
cloudOptions.Add("name", myTestName);
browserOptions.AddAdditionalOption("cloud:options", cloudOptions);
var driver = new RemoteWebDriver(new Uri(CloudURL), browserOptions);
options = Selenium::WebDriver::Options.firefox
options.browser_version = 'latest'
options.platform_name = 'Windows 10'
cloud_options = {}
cloud_options[:build] = my_test_build
cloud_options[:name] = my_test_name
options.add_option('cloud:options', cloud_options)
driver = Selenium::WebDriver.for :remote, url: cloud_url, capabilities: options
from selenium.webdriver.firefox.options import Options as FirefoxOptions
options = FirefoxOptions()
options.browser_version = '92'
options.platform_name = 'Windows 10'
cloud_options = {}
cloud_options['build'] = my_test_build
cloud_options['name'] = my_test_name
options.set_capability('cloud:options', cloud_options)
driver = webdriver.Remote(cloud_url, options=options)

Javaで要素ユーティリティメソッドを検索する

Javaバインディング(FindsBy インターフェイス)の要素を検索するユーティリティメソッドは、内部使用のみを目的としていたため、削除されました。 次のコードサンプルは、これを分かりやすく説明しています。

findElement * で単一の要素を検索する。

Before

driver.findElementByClassName("className");
driver.findElementByCssSelector(".className");
driver.findElementById("elementId");
driver.findElementByLinkText("linkText");
driver.findElementByName("elementName");
driver.findElementByPartialLinkText("partialText");
driver.findElementByTagName("elementTagName");
driver.findElementByXPath("xPath");
After

driver.findElement(By.className("className"));
driver.findElement(By.cssSelector(".className"));
driver.findElement(By.id("elementId"));
driver.findElement(By.linkText("linkText"));
driver.findElement(By.name("elementName"));
driver.findElement(By.partialLinkText("partialText"));
driver.findElement(By.tagName("elementTagName"));
driver.findElement(By.xpath("xPath"));

findElements * で複数の要素を検索する。

Before

driver.findElementsByClassName("className");
driver.findElementsByCssSelector(".className");
driver.findElementsById("elementId");
driver.findElementsByLinkText("linkText");
driver.findElementsByName("elementName");
driver.findElementsByPartialLinkText("partialText");
driver.findElementsByTagName("elementTagName");
driver.findElementsByXPath("xPath");
After

driver.findElements(By.className("className"));
driver.findElements(By.cssSelector(".className"));
driver.findElements(By.id("elementId"));
driver.findElements(By.linkText("linkText"));
driver.findElements(By.name("elementName"));
driver.findElements(By.partialLinkText("partialText"));
driver.findElements(By.tagName("elementTagName"));
driver.findElements(By.xpath("xPath"));

依存関係のアップグレード

以下のサブセクションを確認してSelenium4をインストールし、プロジェクトの依存関係をアップグレードしてください。

Java

Seleniumをアップグレードするプロセスは、使用されているビルドツールによって異なります。 Javaで最も一般的なものであるMavenGradleについて説明します。 必要なJavaの最小バージョンはまだ8です。

Maven

Before

<dependencies>
  <!-- more dependencies ... -->
  <dependency>
    <groupId>org.seleniumhq.selenium</groupId>
    <artifactId>selenium-java</artifactId>
    <version>3.141.59</version>
  </dependency>
  <!-- more dependencies ... -->
</dependencies>
After

<dependencies>
    <!-- more dependencies ... -->
    <dependency>
        <groupId>org.seleniumhq.selenium</groupId>
        <artifactId>selenium-java</artifactId>
        <version>4.4.0</version>
    </dependency>
    <!-- more dependencies ... -->
</dependencies>

変更を加えた後、pom.xml ファイルと同じディレクトリで mvn clean compile を実行できます。

Gradle

Before

plugins {
    id 'java'
}
group 'org.example'
version '1.0-SNAPSHOT'
repositories {
    mavenCentral()
}
dependencies {
    testImplementation 'org.junit.jupiter:junit-jupiter-api:5.7.0'
    testRuntimeOnly 'org.junit.jupiter:junit-jupiter-engine:5.7.0'
    implementation group: 'org.seleniumhq.selenium', name: 'selenium-java', version: '3.141.59'
}
test {
    useJUnitPlatform()
}
After

plugins {
    id 'java'
}
group 'org.example'
version '1.0-SNAPSHOT'
repositories {
    mavenCentral()
}
dependencies {
    testImplementation 'org.junit.jupiter:junit-jupiter-api:5.7.0'
    testRuntimeOnly 'org.junit.jupiter:junit-jupiter-engine:5.7.0'
    implementation group: 'org.seleniumhq.selenium', name: 'selenium-java', version: '4.4.0'
}
test {
    useJUnitPlatform()
}

変更を加えた後、 build.gradle ファイルと同じディレクトリで ./gradlew cleanbuild を実行できます。

すべてのJavaリリースを確認するには、 MVNRepository にアクセスしてください。

C#

C#でSelenium4の更新を取得する場所は NuGet です。 Selenium.WebDriver パッケージの下で、最新バージョンに更新するための手順を入手できます。 Visual Studio内では、NuGetパッケージマネージャーを使用して次の操作を実行できます。

PM> Install-Package Selenium.WebDriver -Version 4.4.0

Python

Pythonを使用するための最も重要な変更は、最低限必要なバージョンです。 Selenium 4には、Python3.7以降が必要です。 詳細については、Python Package Indexを参照してください。 コマンドラインからアップグレードするには、次のコマンドを実行できます。

pip install selenium==4.4.3

Ruby

Selenium 4の更新の詳細は、RubyGemsのselenium-webdriverで確認できます。 最新バージョンをインストールするには、次のコマンドを実行できます。

gem install selenium-webdriver

Gemfileには下記のように追加します。

gem 'selenium-webdriver', '~> 4.4.0'

JavaScript

selenium-webdriverパッケージは、Nodeパッケージマネージャーのnpmjsにあります。 Selenium4はhereにあります。 これをインストールするには、次のいずれかを実行します。

npm install selenium-webdriver

または、package.jsonを更新して、 npm install を実行します。

{
  "name": "selenium-tests",
  "version": "1.0.0",
  "dependencies": {
    "selenium-webdriver": "^4.4.0"
  }
}

潜在的なエラーと非推奨メッセージ

これは、Selenium4にアップグレードした後に発生する可能性のある非推奨メッセージを克服するのに役立つ一連のコード例です。

Java

待機とタイムアウト

タイムアウトで受信するパラメーターは、期待値 (long time, TimeUnit unit) から期待値 (Duration duration) に替わりました。

Before

driver.manage().timeouts().implicitlyWait(10, TimeUnit.SECONDS);
driver.manage().timeouts().setScriptTimeout(2, TimeUnit.MINUTES);
driver.manage().timeouts().pageLoadTimeout(10, TimeUnit.SECONDS);
After

driver.manage().timeouts().implicitlyWait(Duration.ofSeconds(10));
driver.manage().timeouts().scriptTimeout(Duration.ofMinutes(2));
driver.manage().timeouts().pageLoadTimeout(Duration.ofSeconds(10));

現在、待機も異なるパラメーターを期待しています。 WebDriverWaitは、秒とミリ秒単位のタイムアウトに、 long ではなくDurationを期待するようになりました。 FluentWaitwithTimeout および pollingEvery ユーティリティメソッドは、期待値 (long time, TimeUnit unit) から (Duration duration) に替わりました。

Before

new WebDriverWait(driver, 3)
.until(ExpectedConditions.elementToBeClickable(By.cssSelector("#id")));

Wait<WebDriver> wait = new FluentWait<WebDriver>(driver)
  .withTimeout(30, TimeUnit.SECONDS)
  .pollingEvery(5, TimeUnit.SECONDS)
  .ignoring(NoSuchElementException.class);
After

new WebDriverWait(driver, Duration.ofSeconds(3))
  .until(ExpectedConditions.elementToBeClickable(By.cssSelector("#id")));

  Wait<WebDriver> wait = new FluentWait<WebDriver>(driver)
  .withTimeout(Duration.ofSeconds(30))
  .pollingEvery(Duration.ofSeconds(5))
  .ignoring(NoSuchElementException.class);

マージCapabilitiesは、もはや呼び出し元のオブジェクトを変更しなくなりました

以前は、別のCapabilitiesセットを別のセットにマージすることが可能であり、呼び出し元のオブジェクトを変更していました。 今は、ここで、マージ操作の結果を割り当てる必要があります。

Before

MutableCapabilities capabilities = new MutableCapabilities();
capabilities.setCapability("platformVersion", "Windows 10");
FirefoxOptions options = new FirefoxOptions();
options.setHeadless(true);
options.merge(capabilities);
As a result, the `options` object was getting modified.
After

MutableCapabilities capabilities = new MutableCapabilities();
capabilities.setCapability("platformVersion", "Windows 10");
FirefoxOptions options = new FirefoxOptions();
options.setHeadless(true);
options = options.merge(capabilities);
The result of the `merge` call needs to be assigned to an object.

古いFirefox

GeckoDriverが登場する前は、SeleniumプロジェクトにはFirefoxを自動化するためのドライバー実装がありました(バージョン<48)。 ただし、この実装は最近のバージョンのFirefoxでは機能しないため、もう必要ありません。 Selenium 4にアップグレードする際の大きな問題を回避するために、setLegacy オプションは非推奨として表示されます。 古い実装の使用をやめ、GeckoDriverのみに依存することをお勧めします。 次のコードは、アップグレード後に非推奨になったsetLegacy 行を示しています。

FirefoxOptions options = new FirefoxOptions();
options.setLegacy(true);

BrowserType

BrowserType インターフェースは長い間使用されてきましたが、新しい Browser インターフェースを優先して非推奨になります。

Before

MutableCapabilities capabilities = new MutableCapabilities();
capabilities.setCapability("browserVersion", "92");
capabilities.setCapability("browserName", BrowserType.FIREFOX);
After

MutableCapabilities capabilities = new MutableCapabilities();
capabilities.setCapability("browserVersion", "92");
capabilities.setCapability("browserName", Browser.FIREFOX);

C#

AddAdditionalCapability は非推奨になりました

その代わりに、 AddAdditionalOption をお勧めします。 これを示す例を次に示します。

Before

var browserOptions = new ChromeOptions();
browserOptions.PlatformName = "Windows 10";
browserOptions.BrowserVersion = "latest";
var cloudOptions = new Dictionary<string, object>();
browserOptions.AddAdditionalCapability("cloud:options", cloudOptions, true);
After

var browserOptions = new ChromeOptions();
browserOptions.PlatformName = "Windows 10";
browserOptions.BrowserVersion = "latest";
var cloudOptions = new Dictionary<string, object>();
browserOptions.AddAdditionalOption("cloud:options", cloudOptions);

Python

execute_pathは非推奨になりました。Serviceオブジェクトを渡してください

Selenium 4では、非推奨の警告を防ぐために、Serviceオブジェクトからドライバーの executable_path を設定する必要があります。 (または、PATHを設定せず、代わりに必要なドライバーがシステムPATH上にあることを確認してください。)

Before

from selenium import webdriver
options = webdriver.ChromeOptions()
driver = webdriver.Chrome(
    executable_path=CHROMEDRIVER_PATH, 
    options=options
)
After

from selenium import webdriver
from selenium.webdriver.chrome.service import Service as ChromeService
options = webdriver.ChromeOptions()
service = ChromeService(executable_path=CHROMEDRIVER_PATH)
driver = webdriver.Chrome(service=service, options=options)

まとめ

Selenium 4にアップグレードする際に考慮すべき主な変更点を確認しました。 アップグレードのためにテストコードを準備する際にカバーするさまざまな側面について説明します。 これには、新しいバージョンのSeleniumを使用する時に発生する可能性のある潜在的な問題を防ぐ方法の提案も含まれます。 最後に、アップグレード後に発生する可能性のある一連の問題についても説明し、それらの問題に対する潜在的な修正を共有しました。

これは元々は https://saucelabs.com/resources/articles/how-to-upgrade-to-selenium-4 に投稿されました

3 - Grid

複数のマシンで並行してテストを実行したいですか? Grid が手助けします。

Selenium Grid を利用して、クライアントからリモートブラウザーインスタンスにコマンドを ルーティングし、リモートマシン上で WebDriver スクリプトを実行することができます。

Grid の目標は、

  • 複数のマシンでの並行したテスト実行を、簡単な方法で提供する
  • 異なるバージョンのブラウザでのテストを可能にする
  • クロスプラットフォームテストを可能にする

興味がありますか? Grid の仕組みと設定方法が知りたければ以下のセクションを読んでください。

3.1 - Gridを始める

Selenium Gridの導入方法

クイックスタート

  1. 事前条件

  2. Grid の起動

    • java -jar selenium-server-<version>.jar standalone
  3. あなたの WebDriver テストの対象を http://localhost:4444 に向ける

  4. (必要があれば) ブラウザでhttp://localhost:4444を開いて実行中のテストや利用可能な capabilities を確認する。

さらにオプションを知りたい場合は以降のセクションに進んでください。

Grid コンポーネントロール

Grid は 6 つの異なるコンポーネントで構成され、様々な方法でデプロイすることができます。

必要に応じて、それぞれ個別に起動する(分散)か、ハブ&ノードのグループに分けるか、 全てを一つのマシンで起動する(スタンドアロン)かを選べます。

スタンドアロン

スタンドアロンは全ての Gridコンポーネントを 1 つに連結します。 スタンドアロンモードはシングルプロセスで動き、Grid の全機能を利用することができます。 スタンドアロンは単一のマシン上でのみ動かすことができます。

スタンドアロンは Selenium Grid を起動する最も簡単な方法でもあります。 デフォルトではサーバーはhttp://localhost:4444RemoteWebDriver リクエストをリッスンします。 サーバーはデフォルトでシステムパス上の利用可能なドライバーを検出します。

java -jar selenium-server-<version>.jar standalone

スタンドアロンで Grid のを起動したら、WebDriver テストの対象をhttp://localhost:4444に向けてください。

スタンドアロンの一般的なユースケースは:

  • RemoteWebDriver を使用したローカルでの開発やデバッグ
  • コードをプッシュする前の簡易なテスト実行
  • CI/CD 向けの Grid のセットアップ(GitHub Actions, Jenkins など)

ハブ&ノード

ハブ&ノードは最も利用されているロールです。その理由は:

  • 様々なマシンを Grid に統合できます
    • 様々な OS やブラウザーバージョンを持つマシンなど
  • WebDriver テストのエントリーポイントを持っています
  • Grid を停止せずにキャパシティのスケールアップ・ダウンが可能です

ハブ

ハブは以下のコンポーネントで構成されています。 ルーター、ディストリビューター、セッションマップ、新規セッションキュー、イベントバス。

java -jar selenium-server-<version>.jar hub

デフォルトでは、サーバーはhttp://localhost:4444にて RemoteWebDriver リクエストを待ち受けます。

ノード

ノードは起動時にシステムのパス が通っている利用可能なドライバーを検出します。

次のコマンドはノードハブと同じマシン上で動作していることを前提としています。

java -jar selenium-server-<version>.jar node
同一マシン上での複数ノード

ノード 1

java -jar selenium-server-<version>.jar node --port 5555

ノード 2

java -jar selenium-server-<version>.jar node --port 6666
異なるマシンでノードとハブを動かす

ハブノードは HTTP とイベントバスを介して通信します (イベントバスハブの一部として存在します)。 ノードイベントバスを通じてメッセージを送信し、登録処理を開始します。 ハブがメッセージを受け取り、ノードの存在を確かめるため HTTP を使ってノードにアクセスします。

ハブがデフォルトのポートを使用していれば、 --hub フラグでノードを登録することができます。

java -jar selenium-server-<version>.jar node --hub http://<hub-ip>:4444

ハブがデフォルトのポートを使用していない場合、--publish-events--subscribe-events のフラグが必要です。

例えばハブ8886 8887 8888 ポートを利用している場合、

java -jar selenium-server-<version>.jar hub --publish-events tcp://<hub-ip>:8886 --subscribe-events tcp://<hub-ip>:8887 --port 8888

ノードはこれらのポートを登録する際に使用します。

java -jar selenium-server-<version>.jar node --publish-events tcp://<hub-ip>:8886 --subscribe-events tcp://<hub-ip>:8887

分散

分散 Grid を利用すると、各コンポーネントは別々に起動され異なるマシン上で動作します。

  1. イベントバスは Grid コンポーネント間での内部通信を可能にします。

デフォルトポートは 4442, 4443, 5557 です。

java -jar selenium-server-<version>.jar event-bus --publish-events tcp://<event-bus-ip>:4442 --subscribe-events tcp://<event-bus-ip>:4443 --port 5557
  1. 新規セッションキューは新規セッションリクエストをキューに積み、ディストリビューターがリクエストを取得できるようにします。

デフォルトポートは 5559 です。

java -jar selenium-server-<version>.jar sessionqueue --port 5559
  1. セッションマップはセッション ID とそのセッションが実行中のノードのマップを持ちます。

デフォルトのセッションマップのポートは 5556 です。 セッションマップイベントバスと通信します。

java -jar selenium-server-<version>.jar sessions --publish-events tcp://<event-bus-ip>:4442 --subscribe-events tcp://<event-bus-ip>:4443 --port 5556
  1. ディストリビューター新規セッションキューに新規セッションリクエストを問い合わせ、 capabilities がマッチするノードにアサインします。ノードは、ハブ&ノード構成の Grid におけるハブの登録と同じように、ディストリビューターに登録します。

デフォルトのディストリビューターのポートは 5553 です。 ディストリビューター新規セッションキューセッションマップイベントバスノードと通信します。

java -jar selenium-server-<version>.jar distributor --publish-events tcp://<event-bus-ip>:4442 --subscribe-events tcp://<event-bus-ip>:4443 --sessions http://<sessions-ip>:5556 --sessionqueue http://<new-session-queue-ip>:5559 --port 5553 --bind-bus false
  1. ルーター新規セッションリクエストをキューに、既存セッションのリクエストをそのセッションが実行中のノードに転送します。

デフォルトのルーターのポートは 4444 です。 ルーター新規セッションキューセッションマップディストリビューターと通信します。

java -jar selenium-server-<version>.jar router --sessions http://<sessions-ip>:5556 --distributor http://<distributor-ip>:5553 --sessionqueue http://<new-session-queue-ip>:5559 --port 4444
  1. ノード

デフォルトのノードのポートは 5555 です。

java -jar selenium-server-<version>.jar node --publish-events tcp://<event-bus-ip>:4442 --subscribe-events tcp://<event-bus-ip>:4443

テストメタデータ

テストにメタデータを追加して、GraphQL 経由で使用するか、Selenium Grid UI 経由でその一部( se:name など) を可視化します。

メタデータは capability にse:プリフィックスをつけることで追加できます。 Java での簡単な例を紹介します。

ChromeOptions chromeOptions = new ChromeOptions();
chromeOptions.setCapability("browserVersion", "100");
chromeOptions.setCapability("platformName", "Windows");
// Showing a test name instead of the session id in the Grid UI
chromeOptions.setCapability("se:name", "My simple test");
// Other type of metadata can be seen in the Grid UI by clicking on the
// session info or via GraphQL
chromeOptions.setCapability("se:sampleMetadata", "Sample metadata value");
WebDriver driver = new RemoteWebDriver(new URL("http://gridUrl:4444"), chromeOptions);
driver.get("http://www.google.com");
driver.quit();

Selenium Grid のクエリ

Grid 起動後、ステータスを問い合わせる方法は、 Grid UI と API 呼び出しの主に 2 通りあります。

Grid UI は、お好みのブラウザでhttp://localhost:4444 にアクセスすることで見られます。

API 呼び出しはhttp://localhost:4444/statusのエンドポイントか、 GraphQLが利用できます。

このページで紹介するコマンドの例は、わかりやすくするために コンポーネントがローカルで動作していると仮定しています。 より詳細な例と使用方法はコンポーネントの章を参照してください。

Java 11 の HTTP クライアントを利用する

デフォルトでは Grid はAsyncHttpClientを使用します。 AsyncHttpClient は Netty を使ったオープンソースのライブラリで、非同期での HTTP リクエストを実現します。 さらに WebSocket をサポートするため Grid に適しています。

しかし、AsyncHttpClient は 2021 年からあまり活発にメンテナンスされていません。 そして Java 11+ではビルトインの HTTP と WebSocket のクライアントを提供しています。 現在 Selenium はサポートする最小バージョンを Java11 にアップグレードする計画をしていますが、 それにはかなりの労力が必要です。メジャーリリースに合わせることはユーザー体験にとって重要です。

Java11 のクライアントを利用するにはselenium-http-jdk-clientjar ファイルをダウンロードし、 --extフラグで Grid の jar のクラスパスに通す必要があります。

jar ファイルはrepo1.maven.orgから直接ダウンロードできます。 Grid を起動する方法は以下の通りです:

java -Dwebdriver.http.factory=jdk-http-client -jar selenium-server-<version>.jar --ext selenium-http-jdk-client-<version>.jar standalone

selenium-http-jdk-clientをダウンロードする別の方法としてCoursierを使う方法があります。

java -Dwebdriver.http.factory=jdk-http-client -jar selenium-server-<version>.jar --ext $(coursier fetch -p org.seleniumhq.selenium:selenium-http-jdk-client:<version>) standalone

ハブ&ノードか分散モードで動かす場合、-Dwebdriver.http.factory=jdk-http-client--extフラグの設定が各コンポーネントに必要になります。

Grid サイズ

Grid ロールの選択は、どのような OS やブラウザをサポートする必要があるかによって決まります。 どの OS、ブラウザをサポートするか、どのくらいの並列セッションを実行するか、マシンの数とそれらの性能(CPU、RAM)に依存します。

セッションを並列で作成するのは、ディストリビューターが利用可能なプロセッサーに依存します。たとえば、 マシンに 4 つの CPU がある場合、ディストリビューターは同時に最大 4 つのセッションしか作成できません。

デフォルトでは、ノードがサポートする同時セッションの最大数は、利用可能な CPU の数によって制限されます。 たとえば、ノードのマシンに 8CPU がある場合、同時に最大 8 つのブラウザセッションを実行できます(ただし、Safari は常に 1 つです)。 また各ブラウザセッションは約 1GB の RAM を使用することが期待されます。

一般的にノードはできるだけ小さくすることが推奨されます。32CPU と 32GB の RAM を持つマシンで 32 の同時ブラウザセッションを実行するよりも、 32 の小さな プロセスをよりよく分離するために、 32 の小さなノードを持つことが推奨されます。これによって、もしノードに障害が発生しても、分離されて処理されます。 Docker はこの方法を実現するための優れたツールです。

デフォルト値(ブラウザあたり 1CPU/1GB RAM)は推奨値であり、あなたの用途に沿わない可能性があることに注意してください。 この値は参考値としての推奨であり、継続的にパフォーマンスを測定することで、あなたの環境にとって理想的な値を見つけることができるでしょう。

Grid のサイズは、サポートされる同時セッションの数と、ノードの数に関連しており、 万能なサイズというものはありません。以下のサイズは概算で、環境が違えば変わる可能性があります。 例えば、120 台のノードを持つハブ&ノードの場合、ハブが十分なリソースを持っていればうまく機能するかもしれません。 また、この数値は確定したものではありません。フィードバックをお待ちしています。

Small

5 台以下のノードで、スタンドアロンハブ&ノード

Middle

6〜60 台のノードで、ハブ&ノード

Large

60〜100 台のノードで、ハブ&ノード、あるいは 100 台以上のノード分散

警告

Grid を保護しないと、以下のような問題が発生する可能性があります。

  • Grid インフラストラクチャへのオープンアクセスを許容してしまう。
  • サードパーティが内部 Web アプリケーションやファイルにアクセスすることを許可してしまう。
  • サードパーティにカスタムバイナリの実行を許可してしまう。

Detectify のブログで公開されてしまった Grid が どのように悪用されるかを紹介しています: Don’t Leave your Grid Wide Open

参考文献

3.2 - いつGridを使用すべきか

Gridがあなたにとって最適なツールでしょうか?

Grid をいつ使うべきでしょうか?

  • 複数のブラウザー、異なるタイプまたは異なるバージョンのブラウザー、あるいは異なる OS 上でで実行されているブラウザーに対して並列でテストを実行したい場合
  • テストスイートの実行時間を減らしたい場合

Selenium Grid はノードと呼ばれる複数のマシンを使用して並列でテストスイートを実行します。 大規模な長時間実行されるテストでは数分から数時間、あるいは数日単位での短縮が可能です。 つまり、あなたのテスト対象のアプリケーションのテスト結果を得るまでの時間を短縮します。

Grid は複数の異なるブラウザーに対してテストを実行でき、また同じブラウザーインスタンスに対して複数のテストを実行することも可能です。 たとえば 6 つのノードで構成された Grid があるとします。 最初のマシンは FireFox の最新バージョン、2 つめは FireFox の最新から一つ前のバージョン、 3 つめは 最新の Chrome、そして残りは Mac Mini で最新の Safari を使って 3 つのテストを並行して実行することができます。

実行時間は簡単な式で表すことができます:

テストの数 * 平均テスト時間 / ノード数 = 合計実行時間

   15      *       45s        /        1        =      11m 15s   // Grid なし
   15      *       45s        /        5        =      2m 15s    // 5 ノードの Grid
   15      *       45s        /        15       =      45s       // 15 ノードの Grid
  100      *       120s       /        15       =      13m 20s   // Grid なしの場合3時間以上かかります

テストスイートが実行されると Grid はテストで設定されたブラウザに対して実行するテストを割り当てます。

このような設定により、大規模な Selenium テストスイートであっても実行時間を大幅に短縮することができます。

Selenium Grid は Selenium プロジェクトの一部であり、 Selenium コアの開発コミッターと同じチームによってメンテナンスされています。 テストの実行速度の重要性を認識し、Grid は Selenium プロジェクトの初期段階から重要な役割を担っています。

3.3 - Serenium Grid のコンポーネント

Grid コンポーネントの使い方について

Selenium Grid 4 は以前のバージョンから一新し、全面的に作り直されました。 全体的なパフォーマンスの改善と標準の準拠に加え、より現代的なコンピューティングとソフトウェア開発 に適応するために機能ごとに分割されました。 コンテナ化とクラウド上での分散スケーラビリティのために構築された、現代に適した全く新しいソリューションです。

Selenium Grid 4 Components

ルーター

これは Grid のエントリポイントであり、すべての外部リクエストを受信し正しいコンポーネントへルーティングします。

ルーター新規セッションリクエストを受信すると、新規セッションキューに転送します。

リクエストが既存のセッションのものである場合、ルーターセッションマップに、 セッションが実行されている ノード ID の取得を要求します。そしてノードにリクエストを直接転送します。

ルーターは、リクエストをより処理能力の高いコンポーネントに負荷を分散させます。 この負荷分散処理自体もコンポーネントに不必要に負荷をかけることはありません。

ディストリビューター

ディストリビューターの主な責務は 2 つあります:

すべてのノードとその capabilities を登録し追跡します

イベントバスを通じてノード登録イベントを贈ることでノードディストリビューターに登録します。 ディストリビューターはそのイベントを受けてノードの存在を HTTP リクエストで確認します。 リクエストが成功した場合、ディストリビューターノードを登録し、Grid モデルを通じて追跡を開始します。

保留中の新規セッションリクエストを処理する

新規セッションリクエストがルーターに送信されると、リクエストは新規セッションキューに転送されます。 ディストリビューター新規セッションキューをポーリングし、保留中の新規セッションリクエストを見つけると、 セッションが作成可能なノードを探します。 セッションが作成されるとディストリビューターは セッション ID とセッションが実行されるノードの紐付けをセッションマップに保存します。

セッションマップ

セッションマップはセッション ID とセッションが実行されているノードの紐付けを保存します。 これによりルーターがリクエストをノードに転送できるようにします。 ルーターセッションマップにセッション ID に紐づくノードを問い合わせます。

新規セッションキュー

新規セッションキューはすべての新規セッションリクエストを FIFO 順で保持します。 リクエストのタイムアウトとリトライ間隔の設定が可能です。

ルーターは新規セッションリクエストを新規セッションキューに追加し、レスポンスを待ちます。 新規セッションキューは定期的にキュー内のリクエストがタイムアウトしていないかをチェックし、 タイムアウトしたリクエストがあればリクエストを拒否しキューから取り除きます。

ディストリビューターはスロットに空きがあるかを定期的にチェックします。 もし空きがあれば、新規セッションキューから最初にマッチするリクエストを取り出し、 新規セッションの作成を試みます。

リクエストされた capabilities にマッチする空きノードスロットがあれば、 ディストリビューターは空きスロットの確保を試みます。全てのスロットがビジーだった場合、 ディストリビューターはリクエストをキューに戻します。 リトライ中やキューに戻す最中にリクエストがタイムアウトした場合リクエストは拒否されます。

セッションの作成に成功すると、ディストリビューターはセッションの情報を新規セッションキューに送信し、 これがルーターへのレスポンスとして送信され、最終的にクライアントに返ります。

ノード

Grid は複数のノードを持つことができます。 ノードは、各ノードが実行されているマシン上の利用可能なブラウザのスロットを管理します。

ノードは、イベントバスを介して自身をディストリビューターに登録します。 構成情報は登録メッセージの一部として送信されます。

デフォルトでは、ノードはマシンのパス上に存在する全てのブラウザドライバーを自動で登録します。 また FireFox と Chromium ベースブラウザの場合、CPU1 つにつき 1 スロットを作成します。 Safari の場合は 1 つのスロットのみ作成します。 特定の設定によってセッションを Docker コンテナで実行したり、コマンドを中継したりすることも可能です。

ノードは受信したコマンドを実行するだけで、コマンドの評価・判断や、フロー制御以外の制御は行いません。 ノードが実行されているマシンは、他のコンポーネントと同じ OS を持つ必要はありません。 たとえば、Windows ノードには IE Mode on Edge をブラウザーオプションとして提供する機能がありますが、 これは Linux または Mac では不可能です。 Grid は 複数の Windows, Mac, Linux ノードで構成することが可能です。

イベントバス

イベントバスノードディストリビューター、セッションキュー、セッションマップ間の通信経路として機能します。 Grid は内部通信のほとんどをメッセージで行うことで、負荷の高い HTTP 呼び出しを避けています。 分散モードで Grid を起動する場合、イベントバスは最初に起動されるべきコンポーネントです。

3.4 - コンポーネントの構成

ここでは、各コンポーネントを、共通の設定とコンポーネント固有の設定で個別に設定する方法を確認できます。

3.4.1 - 構成ヘルプ

Gridの設定に利用可能なオプション

ヘルプコマンドは、現在のコード実装に基づいて情報を表示します。 したがって、ドキュメントが更新されない場合に備えて、正確な情報を提供します。 それは、新しいバージョンのグリッド 4 の構成について学習する最も簡単な方法です。

Info コマンド

info コマンドは、次のトピックに関する詳細なドキュメントを提供します。

  • Selenium の構成
  • セキュリティ
  • セッションマップの設定
  • トレース

構成ヘルプ

クイック設定のヘルプと概要は、以下を実行することで提供されます。

java -jar selenium-server-<version>.jar info config

セキュリティ

安全な通信とノード登録のためのグリッドサーバーの設定の詳細を取得するには、以下を実行します。

java -jar selenium-server-<version>.jar info security

セッションマップの設定

デフォルトでは、グリッドはローカルセッションマップを使用してセッション情報を保存します。 グリッドは、Redis や JDBC-SQL がサポートするデータベースなどの追加のストレージオプションをサポートしています。 別のセッションストレージをセットアップするには、次のコマンドを使用してセットアップ手順を取得します。

java -jar selenium-server-<version>.jar info sessionmap

OpenTelemetry と Jaeger を使用したトレースの設定

デフォルトでは、トレースは有効になっています。 トレースをエクスポートして Jaeger 経由で視覚化するには、次のコマンドを使用して手順を実行します。

java -jar selenium-server-<version>.jar info tracing

SeleniumGrid コマンドを一覧表示する

java -jar selenium-server-<version>.jar --config-help

使用可能なすべてのコマンドとそれぞれの説明が表示されます。

コンポーネントヘルプコマンド

Selenium ロールの後に–help config オプションを渡して、コンポーネント固有の構成情報を取得します。

スタンドアロン

java -jar selenium-server-<version>.jar standalone --help

ハブ

java -jar selenium-server-<version>.jar hub --help

セッション

java -jar selenium-server-<version>.jar sessions --help

新規セッションキュー

java -jar selenium-server-<version>.jar sessionqueue --help

ディストリビューター

java -jar selenium-server-<version>.jar distributor --help

ルーター

java -jar selenium-server-<version>.jar router --help

ノード

java -jar selenium-server-<version>.jar node --help

3.4.2 - Selenium GridのCLI オプション

全てのGridコンポーネントのCLIオプション詳細

Grid の設定には、さまざまなセクションが用意されています。 各セクションには、コマンドライン引数で設定可能なオプションがあります。コマンドライン引数で設定できます。

コンポーネントとセクションの対応は以下の通りです。

オプションが変更、または追加されたが文書化されていない場合、 このドキュメントは古くなる可能性があることに注意してください。 もしそのような状況を見つけたら、“構成ヘルプ”を確認し、 ドキュメントを更新するプルリクエストを気軽に送ってください。

セクション

スタンドアロンハブノードディストリビュータールーターセッション新規セッションキュー
Distributor
Docker
Events
Logging
Network
Node
Router
Relay
Server
SessionQueue
Sessions

Distributor

オプション値/例概要
--healthcheck-intervalint120全てのノードに対してヘルスチェックを実行する頻度(秒)を指定します。これにより、サーバーは全てのノードに対して正常に ping を送信できるようになります。
--distributorurihttp://localhost:5553ディストリビューターの URL。
--distributor-hoststringlocalhostディストリビューターがリッスンするホスト名。
--distributor-implementationstringorg.openqa.selenium.grid.distributor.local.LocalDistributorデフォルトでないディストリビューター実装の完全なクラス名。
--distributor-portint5553ディストリビューターがリッスンするポート番号。
--reject-unsupported-capsbooleanfalseGrid がサポートしていない capabilities をリクエストされた時、ディストリビューターがリクエストを即座に今日できるようにします。これはオンデマンドでノードを立ち上げをしない Grid の設定に適しています。
--slot-matcherstringorg.openqa.selenium.grid.data.DefaultSlotMatcherデフォルト以外で使用するスロットマッチャーの完全なクラス名。これはノードが特定のセッションをサポートできるかを判断するために使用されます。
--slot-selectorstringorg.openqa.selenium.grid.distributor.selector.DefaultSlotSelectorデフォルト以外のスロットセレクターの完全なクラス名。これは、ノードがマッチした後ノード内のスロットを選択するために使用されます。

Docker

オプション値/例概要
--docker-assets-pathstring/opt/selenium/assetsアセットが保存される絶対パス。
--docker-string[]selenium/standalone-firefox:latest '{"browserName": "firefox"}'イメージとステレオタイプの capabilities を対応付ける Docker 設定 (例 `-D selenium/standalone-firefox:latest ‘{“browserName”: “firefox”}’)
--docker-devicesstring[]/dev/kvm:/dev/kvmコンテナに対してデバイスを公開します。各デバイスマッピングは、ホストとコンテナの両方のデバイスへのパスを、コロンで区切って保つ必要があります。例: /device/path/in/host:/device/path/in/container
--docker-hoststringlocalhostDocker デーモンが動作しているホスト名。
--docker-portint2375Docker デーモンが動作しているポート名。
--docker-urlstringhttp://localhost:2375Docker デーモンに接続するための URL。
--docker-video-imagestringselenium/video:latestビデオレコーディングが有効になっているときに利用される Docker イメージ。

Events

オプション値/例概要
--bind-busbooleanfalse接続をバインドするかコネクトするかを指定します。
true の場合、コンポーネントはイベントバスにバインドされます(イベントバスもコンポーネントによって起動されます、通常はディストリビューターとハブによって起動されます)。
false の場合、コンポーネントがイベントバスにコネクトします。
--events-implementationstringorg.openqa.selenium.events.zeromq.ZeroMqEventBusデフォルトでないイベントバス実装の完全なクラス名。
--publish-eventsstringtcp://*:4442イベントをイベントバスに配信するための接続文字列。
--subscribe-eventsstringtcp://*:4443イベントをイベントバスから購読するための接続文字列。

Logging

オプション値/例概要
--http-logsbooleanfalsehttp ログを有効にします。http ログを記録するには、トレースを有効にする必要があります。
--log-encodingstringUTF-8ログのエンコーディング。
--logstringWindows パスの例:
'\path\to\file\gridlog.log'
or
'C:\path\path\to\file\gridlog.log'

Linux/Unix/MacOS パスの例:
'/path/to/file/gridlog.log'
ログを出力するファイル。OS のファイルパスと互換性があることを確認してください。
--log-levelstring“INFO”ログレベル。デフォルトは INFO です。 ログレベルはこちらを参照してください。 https://docs.oracle.com/javase/7/docs/api/java/util/logging/Level.html
--plain-logsbooleantrueプレーンなログを使用します。
--structured-logsbooleanfalse構造化ログを使用します。
--tracingbooleantrueトレースを有効にします。
--log-timestamp-formatstringHH:mm:ss.SSSログのタイムスタンプ形式を設定できます。

Network

オプション値/例概要
--relax-checksbooleanfalse受信リクエストのオリジンヘッダーとコンテンツタイプに対する、厳格な W3C 準拠の検証をを緩和します。

Node

オプション値/例概要
--detect-driversbooleantrue現在のシステム上で利用可能なドライバーを自動で検出してノードに追加します。
--driver-configurationstring[]display-name="Firefox Nightly" max-sessions=2 webdriver-path="/usr/local/bin/geckodriver" stereotype='{"browserName": "firefox", "browserVersion": "86", "moz:firefoxOptions": {"binary":"/Applications/Firefox Nightly.app/Contents/MacOS/firefox-bin"}}'ノードがサポートするドライバーの一覧。可読性向上のため TOML ファイルで設定することを推奨します。
--driver-factorystring[]org.openqa.selenium.example.LynxDriverFactory '{"browserName": "lynx"}'完全修飾クラス名と、そのクラスが対応するブラウザの設定とのマッピング。
--driver-implementationstring[]"firefox"チェックされるドライバー。指定された場合、自動設定はスキップされます。
--node-implementationstring"org.openqa.selenium.grid.node.local.LocalNodeFactory"デフォルトでないノード実装の完全なクラス名。これはセッションのライフサイクルを管理するために使用されます。
--grid-urlstringhttps://grid.example.comGrid 全体のパブリックな URL (通常ハブかルーターのアドレスです)。
--heartbeat-periodint60ノードが生存していることを知らせるため、ノードがディストリビューターに送るハードビートを、どのくらいの頻度(秒)で送るか。
--max-sessionsint8最大同時接続セッション数。デフォルトは利用可能なプロセッサーの数です。
--override-max-sessionsbooleanfalse利用可能なプロセッサーの数は、推奨される最大セッション数(プロセッサーごとに 1 つのブラウザセッション)です。このフラグを true に設定すると、推奨される最大値を上書きすることができます。セッションの安定性と信頼性が損なわれ、ホストがリソースを使い果たす可能性があります。
--register-cycleint10ノードがディストリビューターに初回登録を試みる頻度(秒)。
--register-periodint120ノードが初めてディストリビューターに初回登録を試みるのにかかる時間(秒)。この時間が経過すると、ノードは再登録を試みない。
--session-timeoutint300X をセッションタイムアウト(秒)としたとき、 ノード は、過去 X 秒間に何の活動もなかったセッションを自動的に終了させます。 これにより他のテストが利用できるようスロットを解放します。
--vnc-env-varstringSTART_XVFBVNC ストリームが利用可能かどうかを判断するために利用する環境変数。
--no-vnc-portint7900VNC が利用可能な場合、ローカルの noVNC ストリームを取得できるポートを設定します。
--drain-after-session-countint1X 個のセッションが実行された後に、ノードをドレインしてシャットダウンします。 Kubernetes のような環境で有用です。 0 より大きい値を指定すると、この機能が有効になります。
--hubstringhttp://localhost:4444ハブ・ノード構成におけるハブのアドレスを指定します。ホスト名か IP アドレスが指定できます。この場合、ハブは http://hostname:4444 とみなされ、 --grid-url は同じものになります。 --publish-eventstcp://hostname:4442--subscribe-eventstcp://hostname:4443 となります。 hostname にポート番号が含まれている場合は、それが --grid-url に使用されますが、イベントバスの URI は変更されません。これらのデフォルト値は、適切なフラグを設定することでオーバーライドすることができます。ホスト名にプロトコル(httpsのような)が含まれる場合もそれが利用されます。
--enable-cdpbooleantrueGrid 内で CDP プロキシーを有効にします。もしネットワークが web socket を許可していない場合、Grid 管理者は CDP を無効にできます。デフォルトは true です。
--enable-managed-downloadsbooleanfalseThis causes the Node to auto manage files downloaded for a given session on the Node.
--selenium-managerbooleanfalseWhen drivers are not available on the current system, use Selenium Manager. False by default.

Relay

オプション値/例概要
--service-urlstringhttp://localhost:4723Appium サーバーやクラウドサービスなど、WebDriver コマンドをサポートするサービスに接続するための URL です。
--service-hoststringlocalhostWebDriver コマンドをサポートしてるサービスが稼働しているホスト名。
--service-portint4723WebDriver コマンドをサポートしてるサービスが稼働しているポート番号。
--service-status-endpointstring/statusWebDriver サービスの状態を問い合わせるエンドポイント、オプショナルです。HTTP 200 レスポンスが期待されます。
--service-configurationstring[]max-sessions=2 stereotype='{"browserName": "safari", "platformName": "iOS", "appium:platformVersion": "14.5"}}'呼び出しの中継先となるサービスの設定。可読性向上のため、TOML ファイルで設定することを推奨します。

Router

オプション値/例概要
--passwordstringmyStrongPasswordクライアントがサーバーに接続する際に使用するパスワード。このパスワードとユーザー名の両方が設定されていないと使用できません。
--usernamestringadminクライアントがサーバーに接続する際に使用するユーザー名。このユーザー名とパスワードの両方が設定されていないと使用できません。
--sub-pathstringmy_company/selenium_gridA sub-path that should be considered for all user facing routes on the Hub/Router/Standalone.

Server

オプション値/例概要
--allow-corsbooleantrueSelenium サーバーが任意のホストからのウェブブラウザ接続を許可するかどうか。
--hoststringlocalhostサーバーの IP もしくはホスト名、通常自動的に決定されます。
--bind-hostbooleantrueサーバがホストアドレス/ホスト名にバインドするか、あるいは到達可能な URL を知らせるためだけに使用するかを指定します。複雑なネットワーク構成で、サーバが現在の IP やホスト名ではなく、 外部の IP やホスト名で自分自身を公開する場合に有用です (例: Docker コンテナ内)。
--https-certificatepath/path/to/cert.pemHTTPS のためのサーバー証明書。詳細は “java -jar selenium-server.jar info security” を実行してください。
--https-private-keypath/path/to/key.pkcs8HTTPS のための秘密鍵。 詳細は “java -jar selenium-server.jar info security” を実行してください。
--max-threadsint24リスナースレッドの最大数。デフォルトは、有効なプロセッサーの * 3 です。
--portint4444リッスンポート。このパラメータは異なるコンポーネントによって使用されるため、デフォルトはありません。例えば、ルータ/ハブ/スタンドアロンは 4444 を使用し、ノードは 5555 を使用します。

SessionQueue

オプション値/例概要
--sessionqueueurihttp://localhost:1237新規セッションキューサーバーのアドレス。
-sessionqueue-hoststringlocalhost新規セッションキューがリッスンするホスト。
--sessionqueue-portint1234新規セッションキューがリッスンするポート
--session-request-timeoutint300タイムアウト(秒)。 新規セッションリクエストはキューに追加され、設定された時間以上キューに残っているリクエストはタイムアウトします。
--session-retry-intervalint5リトライ間隔(秒)。すべてのスロットがビジーな場合、 新規セッションリクエストはこの時間の間隔をおいてからリトライされます。

Sessions

オプション値/例概要
--sessionsurihttp://localhost:1234セッションマップサーバーのアドレス。
--sessions-hoststringlocalhostセッションマップサーバーがリッスンするホスト。
--sessions-portint1234セッションマップサーバーがリッスンするポート。

設定例

上記のオプションはすべて、Grid コンポーネントを起動する際に使用することができます。 Grid の適切な設定を模索するのに利用してください。

TOML ファイル を使用して Grid を設定することをおすすめします。 設定ファイルは読みやすく、コード管理できます。

必要に応じて TOML ファイルと CLI オプションを併用することができます。

コマンドラインフラグ

コマンドラインフラグとしてオプションを渡すには、適切なコンポーネントを特定し以下のテンプレートのようにします。

java -jar selenium-server-<version>.jar <component> --<option> value

スタドアロン、最大セッションとメインポートを設定する

java -jar selenium-server-<version>.jar standalone --max-sessions 4 --port 4444

ハブ、新規セッションリクエストのタイムアウト、メインポートを設定し、トレースを無効にする

java -jar selenium-server-<version>.jar hub --session-request-timeout 500 --port 3333 --tracing false

ノード、最大 4 セッション、デバッグログ、ポート 7777, FireFox と Edge のみ

java -jar selenium-server-<version>.jar node --max-sessions 4 --log-level "fine" --port 7777 --driver-implementation "firefox" --driver-implementation "edge"

ディストリビューター、セッションマップ・新規セッションキューの URL を指定、バスを無効にする

java -jar selenium-server-<version>.jar distributor --sessions http://localhost:5556 --sessionqueue http://localhost:5559 --bind-bus false

特定ノードにカスタム capabilities を設定する

重要: カスタム capabilities は全てのノードに設定される必要があります。 また全てのセッションリクエストに含まれなければいけません。

ハブの起動
java -jar selenium-server-<version>.jar hub
customcap に true をセットしてノード A を起動する
java -jar selenium-server-<version>.jar node --detect-drivers false --driver-configuration display-name="Chrome (custom capability true)" max-sessions=1 stereotype='{"browserName":"chrome","gsg:customcap":true}' --port 6161
customcap に false をセットしてノード B を起動する
java -jar selenium-server-<version>.jar node --detect-drivers false --driver-configuration display-name="Chrome (custom capability true)" max-sessions=1 stereotype='{"browserName":"chrome","gsg:customcap":false}' --port 6262
ノード A とマッチ
ChromeOptions options = new ChromeOptions();
options.setCapability("gsg:customcap", true);
WebDriver driver = new RemoteWebDriver(new URL("http://localhost:4444"), options);
driver.get("https://selenium.dev");
driver.quit();

ノード B とマッチさせるにはカスタム capability を false に設定します。

Enabling Managed downloads by the Node

At times a test may need to access files that were downloaded by it on the Node. To retrieve such files, following can be done.

Start the Hub
java -jar selenium-server-<version>.jar hub
Start the Node with manage downloads enabled
java -jar selenium-server-<version>.jar node --enable-managed-downloads true
Set the capability at the test level

Tests that want to use this feature should set the capability "se:downloadsEnabled"to true

options.setCapability("se:downloadsEnabled", true);
How does this work
  • The Grid infrastructure will try to match a session request with "se:downloadsEnabled" against ONLY those nodes which were started with --enable-managed-downloads true
  • If a session is matched, then the Node automatically sets the required capabilities to let the browser know, as to where should a file be downloaded.
  • The Node now allows a user to:
    • List all the files that were downloaded for a specific session and
    • Retrieve a specific file from the list of files.
  • The directory into which files were downloaded for a specific session gets automatically cleaned up when the session ends (or) timesout due to inactivity.

Note: Currently this capability is ONLY supported on:

  • Edge
  • Firefox and
  • Chrome browser
Listing files that can be downloaded for current session:
  • The endpoint to GET from is /session/<sessionId>/se/files.
  • The session needs to be active in order for the command to work.
  • The raw response looks like below:
{
  "value": {
    "names": [
      "Red-blue-green-channel.jpg"
    ]
  }
}

In the response the list of file names appear under the key names.

Dowloading a file:
  • The endpoint to POST from is /session/<sessionId>/se/files with a payload of the form {"name": "fileNameGoesHere}
  • The session needs to be active in order for the command to work.
  • The raw response looks like below:
{
  "value": {
    "filename": "Red-blue-green-channel.jpg",
    "contents": "Base64EncodedStringContentsOfDownloadedFileAsZipGoesHere"
  }
}
  • The response blob contains two keys,
    • filename - The file name that was downloaded.
    • contents - Base64 encoded zipped contents of the file.
  • The file contents are Base64 encoded and they need to be unzipped.
List files that can be downloaded

The below mentioned curl example can be used to list all the files that were downloaded by the current session in the Node, and which can be retrieved locally.

curl -X GET "http://localhost:4444/session/90c0149a-2e75-424d-857a-e78734943d4c/se/files"

A sample response would look like below:

{
  "value": {
    "names": [
      "Red-blue-green-channel.jpg"
    ]
  }
}
Retrieve a downloaded file

Assuming the downloaded file is named Red-blue-green-channel.jpg, and using curl, the file could be downloaded with the following command:

curl -H "Accept: application/json" \
-H "Content-Type: application/json; charset=utf-8" \
-X POST -d '{"name":"Red-blue-green-channel.jpg"}' \
"http://localhost:4444/session/18033434-fa4f-4d11-a7df-9e6d75920e19/se/files"

A sample response would look like below:

{
  "value": {
    "filename": "Red-blue-green-channel.jpg",
    "contents": "UEsDBBQACAgIAJpagVYAAAAAAAAAAAAAAAAaAAAAUmVkLWJsAAAAAAAAAAAAUmVkLWJsdWUtZ3JlZW4tY2hhbm5lbC5qcGdQSwUGAAAAAAEAAQBIAAAAcNkAAAAA"
  }
}
Complete sample code in Java

Below is an example in Java that does the following:

  • Sets the capability to indicate that the test requires automatic managing of downloaded files.
  • Triggers a file download via a browser.
  • Lists the files that are available for retrieval from the remote node (These are essentially files that were downloaded in the current session)
  • Picks one file and downloads the file from the remote node to the local machine.
import com.google.common.collect.ImmutableMap;

import org.openqa.selenium.By;
import org.openqa.selenium.io.Zip;
import org.openqa.selenium.json.Json;
import org.openqa.selenium.remote.RemoteWebDriver;
import org.openqa.selenium.remote.http.HttpClient;
import org.openqa.selenium.remote.http.HttpRequest;
import org.openqa.selenium.remote.http.HttpResponse;

import java.io.File;
import java.net.URL;
import java.nio.file.Files;
import java.util.List;
import java.util.Map;
import java.util.Optional;
import java.util.concurrent.TimeUnit;

import static org.openqa.selenium.remote.http.Contents.asJson;
import static org.openqa.selenium.remote.http.Contents.string;
import static org.openqa.selenium.remote.http.HttpMethod.GET;
import static org.openqa.selenium.remote.http.HttpMethod.POST;

public class DownloadsSample {

  public static void main(String[] args) throws Exception {
    // Assuming the Grid is running locally.
    URL gridUrl = new URL("http://localhost:4444");
    ChromeOptions options = new ChromeOptions();
    options.setCapability("se:downloadsEnabled", true);
    RemoteWebDriver driver = new RemoteWebDriver(gridUrl, options);
    try {
      demoFileDownloads(driver, gridUrl);
    } finally {
      driver.quit();
    }
  }

	private static void demoFileDownloads(RemoteWebDriver driver, URL gridUrl) throws Exception {
		driver.get("https://www.selenium.dev/selenium/web/downloads/download.html");
		// Download the two available files on the page
		driver.findElement(By.id("file-1")).click();
		driver.findElement(By.id("file-2")).click();

		// The download happens in a remote Node, which makes it difficult to know when the file
		// has been completely downloaded. For demonstration purposes, this example uses a
		// 10-second sleep which should be enough time for a file to be downloaded.
		// We strongly recommend to avoid hardcoded sleeps, and ideally, to modify your
		// application under test, so it offers a way to know when the file has been completely
		// downloaded.
		TimeUnit.SECONDS.sleep(10);

		//This is the endpoint which will provide us with list of files to download and also to
		//let us download a specific file.
		String downloadsEndpoint = String.format("/session/%s/se/files", driver.getSessionId());

		String fileToDownload;

		try (HttpClient client = HttpClient.Factory.createDefault().createClient(gridUrl)) {
			// To list all files that are were downloaded on the remote node for the current session
			// we trigger GET request.
			HttpRequest request = new HttpRequest(GET, downloadsEndpoint);
			HttpResponse response = client.execute(request);
			Map<String, Object> jsonResponse = new Json().toType(string(response), Json.MAP_TYPE);
			@SuppressWarnings("unchecked")
			Map<String, Object> value = (Map<String, Object>) jsonResponse.get("value");
			@SuppressWarnings("unchecked")
			List<String> names = (List<String>) value.get("names");
			// Let's say there were "n" files downloaded for the current session, we would like
			// to retrieve ONLY the first file.
			fileToDownload = names.get(0);
		}

		// Now, let's download the file
		try (HttpClient client = HttpClient.Factory.createDefault().createClient(gridUrl)) {
			// To retrieve a specific file from one or more files that were downloaded by the current session
			// on a remote node, we use a POST request.
			HttpRequest request = new HttpRequest(POST, downloadsEndpoint);
			request.setContent(asJson(ImmutableMap.of("name", fileToDownload)));
			HttpResponse response = client.execute(request);
			Map<String, Object> jsonResponse = new Json().toType(string(response), Json.MAP_TYPE);
			@SuppressWarnings("unchecked")
			Map<String, Object> value = (Map<String, Object>) jsonResponse.get("value");
			// The returned map would contain 2 keys,
			// filename - This represents the name of the file (same as what was provided by the test)
			// contents - Base64 encoded String which contains the zipped file.
			String zippedContents = value.get("contents").toString();
			// The file contents would always be a zip file and has to be unzipped.
			File downloadDir = Zip.unzipToTempDir(zippedContents, "download", "");
			// Read the file contents
			File downloadedFile = Optional.ofNullable(downloadDir.listFiles()).orElse(new File[]{})[0];
			String fileContent = String.join("", Files.readAllLines(downloadedFile.toPath()));
			System.out.println("The file which was "
					+ "downloaded in the node is now available in the directory: "
					+ downloadDir.getAbsolutePath() + " and has the contents: " + fileContent);
		}
	}


}

3.4.3 - Toml オプション

Tomlファイルを使用したGridの設定例.

CLI オプション に記載されている全てのオプションは TOML ファイルでも設定ができます。 このページでは異なる Grid コンポーネントの設定例を紹介します。

オプションが変更、または追加されたが文書化されていない場合、 このドキュメントは古くなる可能性があることに注意してください。 もしそのような状況を見つけたら、“構成ヘルプ”を確認し、 ドキュメントを更新するプルリクエストを気軽に送ってください。

概要

Selenium Grid はTOMLフォーマットの設定ファイルを使用します。 設定ファイルはセクションで構成され、各セクションはオプションとその値が設定されています。

詳しい使い方はTOML ドキュメントを参照してください。 パースエラーに遭遇した場合、TOML リンターを使って検証してください。

一般的な設定の構成は以下のパターンです:

[section1]
option1="value"

[section2]
option2=["value1","value2"]
option3=true

TOML ファイルで設定された Grid コンポーネントを起動するには以下のように起動できます:

java -jar selenium-server-<version>.jar <component> --config /path/to/file/<file-name>.toml

スタンドアロン

ポート 4449 で動作し、新規セッションリクエストのタイムアウトが 500 秒のスタンドアロンサーバー。

[server]
port = 4449

[sessionqueue]
session-request-timeout = 500

特定のブラウザとセッションの上限

Firefox と Chrome のみがデフォルトで有効になっているスタンドアロンサーバー、またはノード

[node]
drivers = ["chrome", "firefox"]
max-sessions = 3

ドライバーのカスタマイズと設定

Firefox Beta や Nightly のような、異なるブラウザのバージョンを持つことができるカスタマイズされた ドライバを用いた、スタンドアロン、またはノード。

[node]
detect-drivers = false
[[node.driver-configuration]]
max-sessions = 100
display-name = "Firefox Nightly"
stereotype = "{\"browserName\": \"firefox\", \"browserVersion\": \"93\", \"platformName\": \"MAC\", \"moz:firefoxOptions\": {\"binary\": \"/Applications/Firefox Nightly.app/Contents/MacOS/firefox-bin\"}}"
[[node.driver-configuration]]
display-name = "Chrome Beta"
stereotype = "{\"browserName\": \"chrome\", \"browserVersion\": \"94\", \"platformName\": \"MAC\", \"goog:chromeOptions\": {\"binary\": \"/Applications/Google Chrome Beta.app/Contents/MacOS/Google Chrome Beta\"}}"
[[node.driver-configuration]]
display-name = "Chrome Dev"
stereotype = "{\"browserName\": \"chrome\", \"browserVersion\": \"95\", \"platformName\": \"MAC\", \"goog:chromeOptions\": {\"binary\": \"/Applications/Google Chrome Dev.app/Contents/MacOS/Google Chrome Dev\"}}"
webdriver-executable = '/path/to/chromedriver/95/chromedriver'

Docker を利用したスタンドアロン、またはノード

Docker コンテナでセッションを実行できるスタンドアロン、またはノードサーバー。 ドライバを検出を無効にし、最大 2 つの同時セッションを持ちます。 ステレオタイプは、Docker イメージにマッピングされる必要があり、 Docker デーモンが http/tcp で公開されている必要があります。 また、devicesプロパティを用いて、ホスト上でアクセス可能なデバイスファイルを、コンテナで利用できるようにすることも可能です。 Docker デバイスをマッピングする詳しい方法はdocker を参照してください。

[node]
detect-drivers = false
max-sessions = 2

[docker]
configs = [
    "selenium/standalone-chrome:93.0", "{\"browserName\": \"chrome\", \"browserVersion\": \"91\"}",
    "selenium/standalone-firefox:92.0", "{\"browserName\": \"firefox\", \"browserVersion\": \"92\"}"
]
#Optionally define all device files that should be mapped to docker containers
#devices = [
#    "/dev/kvm:/dev/kvm"
#]
url = "http://localhost:2375"
video-image = "selenium/video:latest"

WebDriver をサポートするサービスエンドポイントへのコマンド中継

WebDriver をサポートする外部サービスを Selenium Grid に接続すると便利です。 例えばクラウドプロバイダーや Appium サーバーなどです。 Grid はローカルに存在しないプラットフォームやバージョンなどを幅広くカバーできるようになります。

以下は Appium サーバーを Grid に接続する例です。

[node]
detect-drivers = false

[relay]
# Default Appium/Cloud server endpoint
url = "http://localhost:4723/wd/hub"
status-endpoint = "/status"
# Stereotypes supported by the service. The initial number is "max-sessions", and will allocate
# that many test slots to that particular configuration
configs = [
  "5", "{\"browserName\": \"chrome\", \"platformName\": \"android\", \"appium:platformVersion\": \"11\"}"
]

Basic 認証の有効化

ルーター、ハブ、スタンドアロンにユーザー名とパスワードを設定することで、 Basic 認証で Grid を保護することができます。 このユーザーとパスワードは、Grid UI を読み込む時や 新しいセッションを開始する時に必要になります。

[router]
username = "admin"
password = "myStrongPassword"

Java でユーザーとパスワードを使ってセッションを開始する方法の例です。

URL gridUrl = new URL("http://admin:myStrongPassword@localhost:4444");
RemoteWebDriver webDriver = new RemoteWebDriver(gridUrl, new ChromeOptions());

特定のノードにマッチするカスタム capabilities の設定

重要: カスタム capabilities は全てのノードで設定する必要があります。 また全てのセッションリクエストで常に含まれる必要があります。

[node]
detect-drivers = false

[[node.driver-configuration]]
display-name = "firefox"
stereotype = '{"browserName": "firefox", "platformName": "macOS", "browserVersion":"96", "networkname:applicationName":"node_1", "nodename:applicationName":"app_1" }'
max-sessions = 5

Java でノードにマッチさせる方法の例です。

FirefoxOptions options = new FirefoxOptions();
options.setCapability("networkname:applicationName", "node_1");
options.setCapability("nodename:applicationName", "app_1");
options.setBrowserVersion("96");
options.setPlatformName("macOS");
WebDriver driver = new RemoteWebDriver(new URL("http://localhost:4444"), options);
driver.get("https://selenium.dev");
driver.quit();

Enabling Managed downloads by the Node.

The Node can be instructed to manage downloads automatically. This will cause the Node to save all files that were downloaded for a particular session into a temp directory, which can later be retrieved from the node. To turn this capability on, use the below configuration:

[node]
enable-managed-downloads = true

Refer to the CLI section for a complete example.

3.5 - Grid アーキテクチャ

Grid は、Grid を運用するためのコンポーネントの集合体として設計されています。 非常に複雑に見えるかもしれませんが、 このドキュメントが混乱を解消する手助けとなることを期待します。

キーとなるコンポーネント

主要な Grid のコンポーネント:

イベントバス
他のコンポーネント間で非同期で受信される可能性のあるメッセージを送信します。
新規セッションキュー
まだディストリビューターによってノードに割り当てられていない 受信セッションの一覧を管理します。
ディストリビューター
Grid内でWebDriverセッション を実行する場所("スロット"と呼ぶ)を管理し、 新しいセッションリクエストを受け取りスロットに割り当てる役割を担います。
ノード
WebDriverセッション を実行します。各セッションはスロットに割り当てられ、 各ノードは1つ以上のスロットを持っています。
セッションマップ
セッションID とセッションが実行されているノードのアドレスのマップを管理します。
ルーター
Gridのフロントエンドとして動作します。 Gridの中で唯一ウェブに公開してもよい部分です(ただし、公開しないことを強く推奨します)。 受け取ったリクエストを新規セッションキューかセッションが実行されているノードどちらかに振り分けます。

グリッドについて説明する際に、覚えておくと便利な概念がいくつかあります:

  • スロット はセッションが実行されるところです。
  • 各スロットは ステレオタイプ を持っています。これは ディストリビューターがスロットを所有するノードに 新規セッション リクエストを送信する前に、 リクエストがマッチしなければならない最小限の capabilities のセットです。
  • Grid モデル はディストリビューターが Grid の状態を追跡する方法です。 その名が示すように、これは時々実際と一致しないことがあります (ディストリビューターが開始したばかりだからかもしれません)。 ディストリビューターが新規セッションのリクエストを素早くスロットに割り当てることができるように、 各ノードに問い合わせるより優先して利用されます。

同期呼び出しと非同期呼び出し

Grid 内では主に 2 つの通信メカニズムが使われています。

  1. 同期で “REST 風” な、JSON を用いた HTTP リクエスト
  2. イベントバスによって送信される非同期なイベント

どちらの仕組みを使うべきかどのように決めればよいでしょうか? 結局のところ、Grid 全体をイベントベースにモデリングしたとしても、 うまくいくでしょう。

答えは、もし実行されるアクションが同期である場合(例えばほとんどの WebDriver の呼び出しなど)、 あるいはレスポンスを受け取れなかったときに問題になるような場合、 Grid は同期呼び出しを利用します。かわりにもし、関心のあるコンポーネントに情報を ブロードキャストしたい場合、あるいはレスポンスを受け取れなくても問題にならない場合は イベントバスを使用することが望ましいです。

特筆する点として、非同期呼び出しは同期呼び出しよりも、 よりリスナーが分離されています。

起動シーケンスとコンポーネント間の依存

Grid はコンポーネントを任意の順番で起動できるように設計されていますが、 概念的にはコンポーネントが起動する順番は:

  1. イベントバスとセッションマップが最初に起動します。これらは 他のコンポーネントへの依存もお互いの依存もないため、 並列に開始しても安全です。
  2. 次に 新規セッションキューが起動します。
  3. ここでディストリビューターが起動できるようになります。これは 定期的に 新規セッションキューに接続し、ジョブをポーリングします。 このポーリングはイベント(新規セッションがキューに追加された)あるいは 定期的な間隔によって行われる可能性があります。
  4. ルーターを起動できます。新しいセッションのリクエストは 新規セッションキューに送られ、ディストリビューターはセッションを実行する スロットを探そうとします。
  5. これでノードを起動することができます。ノードが Grid に登録されるまでの 流れは後述します。登録が完了すると、Grid はトラフィックを提供することが できるようになります。

コンポーネント間の依存関係を以下のよう表すことができます。 “✅” は同期的な依存関係があることを示しています。

イベントバスディストリビューターノードルーターセッションマップ新規セッションキュー
イベントバスX
ディストリビューターX
ノードX
ルーターX
セッションマップX
新規セッションキューX

ノードの登録

Grid に新しいノードを登録するプロセスは軽量です。

  1. ノードは開始する時 “ハートビート” イベントを発信する必要があります。 このハートビートはNode Statusを含んでいます.
  2. ディストリビューターはハートビートイベントを受け取ります。 受け取ったら、ノードの /status エンドポイントに GET リクエストを試みます。 この情報をもとに Grid が設定されます。

ディストリビューターは同じ /status エンドポイントを使用して、定期的にノードをチェックしますが、 ノードは起動した後もハートビートを送り続けなければなりません。 これにより、ディストリビューターは Grid の状態を永続化しませんが、 再起動しても Grid を(最終的に)最新の状態にすることができます。

Node Status オブジェクト

Node Status は以下のフィールドを持つ JSON オブジェクトです:

名前概要
availabilitystringup, draining, down のいずれかの文字列です。重要なのは draining で、これはノードに新しいセッションを送らないことを示し、最後のセッションが終了するとノードは終了、または再起動します。
externalUrlstringGrid 内の他のコンポーネントが接続するための URI。
lastSessionCreatedintegerこのノードで最後にセッションが作成された時間のエポックタイムスタンプです。ディストリビューターは、他の条件がすべて同じであれば、最も長くアイドルであったノードに新しいセッションを送信しようとします。
maxSessionCountintegerセッション数は利用可能なスロット数をカウントすることで推測できますが、この値はノードが「満杯」とみなされるまでに、ノード上で同時に実行されるセッションの最大数を決定するために使用されます。
nodeIdstringノード ID を識別する UUID です。
osInfoobjectarch, name, version フィールドを持つオブジェクトです。Grid UI と GraphQL クエリーで利用されます。
slotsarraySlot オブジェクト(以下を参照)の配列。
versionstringノードのバージョン(Selenium では、これは Selenium のバージョンと同じです)。

すべてのフィールドの値を設定することが推奨されます。

Slot オブジェクト

Slot オブジェクトは 1 ノードでの 1 スロットを表します。 1 スロットにつき 1 セッションを実行することができます。 1 つのノードが同時に実行できる数よりも多くのスロットを持つことができます。 例えばあるノードが 10 セッションまで同時に実行でき、 それらのセッションは Chrome, Edge, Firefox のどの組み合わせでも良い時、 ノードは ‘max session count’ を 10 として、 10 の Chrome スロット、10 の Edge スロット、10 の Firefox スロットを持ちます。

名前概要
idstringスロット ID。
lastStartedstringスロットが最後にセッションを開始した時間。ISO-8601 フォーマット。
stereotypeobjectこのスロットがマッチする最小限のcapabilities のセット。 最小の例: {"browserName": "firefox"}
sessionobjectSession オブジェクト(以下を参照)。

Session オブジェクト

スロットで実行中のセッションを表します。

名前概要
capabilitiesobjectセッションが持つ実際の capabilities。 The actual capabilities provided by the session. 新規セッションコマンドの戻り値と同じです。
startTimestringセッションが開始した時間。ISO-8601 フォーマット。
stereotypeobjectこのスロットがマッチする最小限のcapabilities のセット。 最小の例: {"browserName": "firefox"}
uristringノードがセッションに接続するための URI。

3.6 - 高度な機能

高度な機能のすべての詳細を取得し、それがどのように機能するか、および独自の設定方法を理解するには、次のセクションを参照してください。

3.6.1 - 可観測性

目次

Selenium Grid

Grid は、さまざまなブラウザとオペレーティングシステムの組み合わせでテストを実行することにより、テストのスケーリングと分散を支援します。

可観測性

可観測性(Observability) には、トレース、メトリクス、ログの 3 つの柱があります。 Selenium Grid 4 は完全分散型に設計されているため、可観測性を確保することで内部を理解し、デバッグすることが容易になります。

分散トレーシング

1 つのリクエストやトランザクションは、複数のサービスやコンポーネントにまたがります。 トレースは、各サービスがリクエストを実行する際に、リクエストのライフサイクルをトラックします。これは、エラーシナリオのデバッグに有用です。 トレースで使用される用語は次のとおりです:

トレース トレースでは、複数のサービスを通じてリクエストの出発点から最終地点までを追跡することができます。 このリクエストの旅は、デバッグ、エンドツーエンドフローの監視、障害の特定に役立ちます。 トレースは、エンドツーエンドのリクエストフローを描きます。 各トレースは識別子としてユニークな ID を持っています。

スパン

各トレースは、スパンと呼ばれる時間で区切られたオペレーションで構成されています。 スパンには開始時刻と終了時刻があり、サービスによって実行される操作を表します。 スパンの粒度は実装方法に依存します。各スパンは一意の識別子を持ちます。 トレース内のすべてのスパンは、同じトレース ID を持ちます。

スパン属性 スパン属性は各スパンの付加的な情報を提供するキーと値のペアです。

イベント イベントは、スパン内のタイムスタンプ付きログです。 既存のスパンに追加のコンテキストを提供します。 イベントには、イベント属性としてキーと値のペアも含まれます。

イベントロギング

アプリケーションのデバッグには、ロギングが欠かせません。 ログの記録は多くの場合、人間が読める形式で行われます。 しかし、機械がログを検索・分析するためには、明確に定義されたフォーマットである必要があります。 構造化ロギングは、固定フォーマットで一貫してログを記録する一般的な方法です。 一般的には次のようなフィールドが含まれます。

  • タイムスタンプ
  • ログレベル
  • ロガークラス
  • ログメッセージ (これはさらに、ログが記録された操作に関するフィールドに分解されます)

ログとイベントは密接に関連しています。 イベントは、1 つの処理を行うための情報を全てカプセル化します。 ログは基本的にイベントのサブセットです。 重要なのは、どちらもデバッグを支援することです。 詳細については、以下のリソースを参照してください。

  1. https://www.honeycomb.io/blog/how-are-structured-logs-different-from-events/
  2. https://charity.wtf/2019/02/05/logs-vs-structured-events/

Grid の可観測性

Selenium サーバーは OpenTelemetry を使ってトレースできるようになっています。 サーバへのすべてのリクエストは、最初から最後までトレースされます。 各トレースは、リクエストがサーバ内で実行されるときの一連のスパンから構成されます。 Selenium サーバのスパンのほとんどは、2 つのイベントから構成されています。

  1. 通常イベント- 単一の処理に関するすべての情報を記録し、処理が正常に完了したことを知らせます。
  2. エラーイベント- エラーが発生するまでのすべての情報を記録し、エラー情報を記録します。例外イベントをマークします。

Selenium サーバーを起動する:

  1. スタンドアロン
  2. ハブ・ノード
  3. 完全分散モード
  4. Docker

トレースの可視化

すべてのスパン、イベント、およびそれぞれの属性がトレースの一部となります。 トレースは、上記のすべてのモードでサーバを実行している間動作します。 トレースはデフォルトで Selenium サーバで有効になっています。

Selenium サーバーは、2 つのエクスポーター経由でトレースをエクスポートします。

  1. コンソール - すべてのトレースと、それに含まれるスパンを FINE レベルでログに出力します。デフォルトでは、Selenium サーバーは INFO レベル以上のログを出力します。 log-level フラグを使うと、Selenium Grid jar を実行する際に任意のログレベルを指定することができます。
java -jar selenium-server-4.0.0-<selenium-version>.jar standalone --log-level FINE
  1. Jaeger UI - OpenTelemetry は、コード内のトレースを計測するための API と SDK を提供します。一方、Jaeger はトレースのバックエンドで、トレースのテレメトリデータを収集し、データのクエリ、フィルタリング、ビジュアライズの機能を提供します。

Jaeger UI を用いたトレースの可視化の詳細な手順を確認するには、次のコマンドを実行してください:

java -jar selenium-server-4.0.0-<selenium-version>.jar info tracing

非常に参考になる例と、Jaeger にトレースを送信するスクリプトです

イベントログの活用

トレースを可視化しない場合でも、イベントロギングではトレースを有効にする必要があります。 デフォルトでは、トレースは有効です。コンソールでログを見るために、追加のパラメータを渡す必要はありません。 スパン内のすべてのイベントは FINE レベルでログに記録されます。エラーイベントは、WARN レベルでログに記録されます。

全てのイベントは次のフィールドを持ちます:

フィールドフィールド名概要
イベント時刻eventIdイベントのタイムスタンプ(エポックナノ秒)。
トレース IDtracedId各トレースはトレース ID で一意に識別されます。
スパン IDspanIdトレース内の各スパンは、スパン ID により一意に識別されます。
スパン種別spanKindスパン種別は、スパンの種類を示すスパンのプロパティです。スパンの処理の性質を識別するのに役立ちます。
イベント名eventNameログメッセージにマッピングされます。
イベント属性eventAttributesイベントログの核となるもので、実行された操作に基づいて JSON フォーマットのキーと値のペアが用意されています。また、ロガークラスを表示するために、ハンドラークラスアトリビュートも含まれます。

サンプルログ

FINE [LoggingOptions$1.lambda$export$1] - {
  "traceId": "fc8aef1d44b3cc8bc09eb8e581c4a8eb",
  "spanId": "b7d3b9865d3ddd45",
  "spanKind": "INTERNAL",
  "eventTime": 1597819675128886121,
  "eventName": "Session request execution complete",
  "attributes": {
    "http.status_code": 200,
    "http.handler_class": "org.openqa.selenium.grid.router.HandleSession",
    "http.url": "\u002fsession\u002fdd35257f104bb43fdfb06242953f4c85",
    "http.method": "DELETE",
    "session.id": "dd35257f104bb43fdfb06242953f4c85"
  }
}

上記のフィールドに加えて、OpenTelemetry の仕様に基づきエラーログは以下のフィールドで構成されます:

フィールドフィールド名概要
例外タイプexception.type例外クラス名。
例外メッセージexception.message例外の原因。
スタックトレースexception.stacktrace例外が発生した時点のコールスタックを表示します。 例外の発生源を把握するのに役立ちます。

サンプルエラーログ

WARN [LoggingOptions$1.lambda$export$1] - {
  "traceId": "7efa5ea57e02f89cdf8de586fe09f564",
  "spanId": "914df6bc9a1f6e2b",
  "spanKind": "INTERNAL",
  "eventTime": 1597820253450580272,
  "eventName": "exception",
  "attributes": {
    "exception.type": "org.openqa.selenium.ScriptTimeoutException",
    "exception.message": "Unable to execute request: java.sql.SQLSyntaxErrorException: Table 'mysql.sessions_mappa' doesn't exist ..." (full message will be printed),
    "exception.stacktrace": "org.openqa.selenium.ScriptTimeoutException: java.sql.SQLSyntaxErrorException: Table 'mysql.sessions_mappa' doesn't exist\nBuild info: version: '4.0.0-alpha-7', revision: 'Unknown'\nSystem info: host: 'XYZ-MacBook-Pro.local', ip: 'fe80:0:0:0:10d5:b63a:bdc6:1aff%en0', os.name: 'Mac OS X', os.arch: 'x86_64', os.version: '10.13.6', java.version: '11.0.7'\nDriver info: driver.version: unknown ...." (full stack will be printed),
    "http.handler_class": "org.openqa.selenium.grid.distributor.remote.RemoteDistributor",
    "http.url": "\u002fsession",
    "http.method": "POST"
  }
}

注: ログは読みやすさのためプリティプリントされています。Selenimu サーバーではぷるティプリントはオフになっています。

以上がトレースとログをセットアップするための手順です。

参考

  1. Understanding Tracing
  2. OpenTelemetry Tracing API Specification
  3. Selenium Wiki
  4. Structured logs vs events
  5. Jaeger framework

3.6.2 - GraphQLクエリのサポート

GraphQLは、APIのクエリ言語であり、既存のデータでこれらのクエリを実行するためのランタイムです。 これにより、ユーザーは必要なものだけを正確に要求することができます。

列挙型(Enum)

列挙型は、フィールドの可能な値のセットを表します。

たとえば、 Node オブジェクトには status というフィールドがあります。 UPDRAINING 、または UNAVAILABLE の可能性があるため、状態は、 列挙型(具体的には、Status タイプ)です。

スカラー

スカラーはプリミティブ値です: IntFloatStringBoolean 、または ID

GraphQL APIを呼び出すときは、スカラーのみを返すまでネストされたサブフィールドを指定する必要があります。

スキーマの構造

グリッドスキーマの構造は次のとおりです。

{
    session(id: "<session-id>") : {
        id,
        capabilities,
        startTime,
        uri,
        nodeId,
        nodeUri,
        sessionDurationMillis
        slot : {
            id,
            stereotype,
            lastStarted
        }
    }
    grid: {
        uri,
        totalSlots,
        nodeCount,
        maxSession,
        sessionCount,
        version,
        sessionQueueSize
    }
    sessionsInfo: {
        sessionQueueRequests,
        sessions: [
            {
                id,
                capabilities,
                startTime,
                uri,
                nodeId,
                nodeUri,
                sessionDurationMillis
                slot : {
                    id,
                    stereotype,
                    lastStarted
                }
            }
        ]
    }
    nodesInfo: {
        nodes : [
            {
                id,
                uri,
                status,
                maxSession,
                slotCount,
                sessions: [
                    {
                        id,
                        capabilities,
                        startTime,
                        uri,
                        nodeId,
                        nodeUri,
                        sessionDurationMillis
                        slot : {
                            id,
                            stereotype,
                            lastStarted
                        }
                    }
                ],
                sessionCount,
                stereotypes,
                version,
                osInfo: {
                    arch,
                    name,
                    version
                }
            }
        ]
    }
}

GraphQLで照会する

GraphQLをクエリする最良の方法は、 curl リクエストを使用することです。 GraphQLを使用すると、必要なデータのみをフェッチできます。それ以上でもそれ以下でもありません。

GraphQLクエリの例のいくつかを以下に示します。 必要に応じて独自のクエリを作成できます。

グリッド内の maxSession sessionCountの数を照会する

curl -X POST -H "Content-Type: application/json" --data '{"query": "{ grid { maxSession, sessionCount } }"}' -s <LINK_TO_GRAPHQL_ENDPOINT>

通常、ローカルマシンでは、 <LINK_TO_GRAPHQL_ENDPOINT>http://localhost:4444/graphql になります。

セッション、ノード、グリッドのすべての詳細を照会する

curl -X POST -H "Content-Type: application/json" --data '{"query":"{ grid { uri, maxSession, sessionCount }, nodesInfo { nodes { id, uri, status, sessions { id, capabilities, startTime, uri, nodeId, nodeUri, sessionDurationMillis, slot { id, stereotype, lastStarted } }, slotCount, sessionCount }} }"}' -s <LINK_TO_GRAPHQL_ENDPOINT>

グリッドで現在のセッション数を取得するためのクエリ

curl -X POST -H "Content-Type: application/json" --data '{"query":"{ grid { sessionCount } }"}' -s <LINK_TO_GRAPHQL_ENDPOINT>

グリッドで最大セッション数を取得するためのクエリ

curl -X POST -H "Content-Type: application/json" --data '{"query":"{ grid { maxSession } }"}' -s <LINK_TO_GRAPHQL_ENDPOINT>

グリッド内のすべてのノードのすべてのセッションの詳細を取得するためのクエリ

curl -X POST -H "Content-Type: application/json" --data '{"query":"{ sessionsInfo { sessions { id, capabilities, startTime, uri, nodeId, nodeId, sessionDurationMillis } } }"}' -s <LINK_TO_GRAPHQL_ENDPOINT>

グリッド内の各ノードのすべてのセッションのスロット情報を取得するためのクエリ

curl -X POST -H "Content-Type: application/json" --data '{"query":"{ sessionsInfo { sessions { id, slot { id, stereotype, lastStarted } } } }"}' -s <LINK_TO_GRAPHQL_ENDPOINT>

特定のセッションのセッション情報を取得するためのクエリ

curl -X POST -H "Content-Type: application/json" --data '{"query":"{ session (id: \"<session-id>\") { id, capabilities, startTime, uri, nodeId, nodeUri, sessionDurationMillis, slot { id, stereotype, lastStarted } } } "}' -s <LINK_TO_GRAPHQL_ENDPOINT>

グリッド内の各ノードのcapabilityを照会する

curl -X POST -H "Content-Type: application/json" --data '{"query": "{ nodesInfo { nodes { stereotypes } } }"}' -s <LINK_TO_GRAPHQL_ENDPOINT>

グリッド内の各ノードのステータスを照会する

curl -X POST -H "Content-Type: application/json" --data '{"query": "{ nodesInfo { nodes { status } } }"}' -s <LINK_TO_GRAPHQL_ENDPOINT>

各ノードとグリッドのURIを照会する

curl -X POST -H "Content-Type: application/json" --data '{"query": "{ nodesInfo { nodes { uri } } }"}' -s <LINK_TO_GRAPHQL_ENDPOINT>

新しいセッションキューで現在のリクエストを取得するためのクエリ

curl -X POST -H "Content-Type: application/json" --data '{"query":"{ sessionsInfo { sessionQueueRequests } }"}' -s <LINK_TO_GRAPHQL_ENDPOINT>

新しいセッションキューのサイズを取得するためのクエリ

curl -X POST -H "Content-Type: application/json" --data '{"query":"{ grid { sessionQueueSize } }"}' -s <LINK_TO_GRAPHQL_ENDPOINT>

3.6.3 - Grid エンドポイント

Grid

Grid ステータス

Grid ステータスは Grid の現在の状態を提供します。 登録されている全てのノードの詳細で構成されます。 各ノードのステータスには、ノードの稼働状況、セッション、およびスロットに関する情報が含まれます。

cURL GET 'http://localhost:4444/status'

スタンドアロンモードでは、Grid URL は スタンドアロンサーバーのアドレスになります。

ハブ&ノードモードでは、Grid URL は ハブのアドレスになります。

完全分散モードでは、Grid URL は ルーターのアドレスになります。

上記すべてのモードのデフォルトの URL は http://localhost:4444 です。

ディストリビューター

ノード削除

ノードを Grid から削除するには、以下の cURL コマンドを使用します。 このコマンドは、そのノード上で実行中のセッションを停止させるものではありません。 ノードは明示的に強制終了されない限り、そのまま動作し続けます。 ディストリビューターはそのノードを認識しなくなるため、マッチする新しいセッションのリクエストは はその Node に転送されません。

スタンドアロンモードでは、ディストリビューターの URL はスタンドアロンサーバーのアドレスとなります。

ハブ&ノードモードでは、ディストリビューターの URL は ハブのアドレスになります。

cURL --request DELETE 'http://localhost:4444/se/grid/distributor/node/<node-id>' --header 'X-REGISTRATION-SECRET: <secret> '

完全分散モードでは、ディストリビューター URL は ディストリビューターのアドレスになります。

cURL --request DELETE 'http://localhost:5553/se/grid/distributor/node/<node-id>' --header 'X-REGISTRATION-SECRET: <secret>'

Grid の設定時に登録用の secret を設定していない場合は次のようにします:

cURL --request DELETE 'http://<Distributor-URL>/se/grid/distributor/node/<node-id>' --header 'X-REGISTRATION-SECRET;'

ノードのドレイン

ノードドレインコマンドはノードをグレースフルシャットダウンするために利用します。 ドレインは実行中のセッションがすべて完了した後にノードを停止します。 新規のセッションは受け付けません。

スタンドアロンモードでは、ディストリビューターの URL はスタンドアロンサーバーのアドレスとなります。

ハブ&ノードモードでは、ディストリビューターの URL は ハブのアドレスになります。

cURL --request POST 'http://localhost:4444/se/grid/distributor/node/<node-id>/drain' --header 'X-REGISTRATION-SECRET: <secret> '

完全分散モードでは、ディストリビューター URL は ディストリビューターのアドレスになります。

cURL --request POST 'http://localhost:5553/se/grid/distributor/node/<node-id>/drain' --header 'X-REGISTRATION-SECRET: <secret>'

Grid の設定時に登録用の secret を設定していない場合は次のようにします:

cURL --request POST 'http://<Distributor-URL>/se/grid/distributor/node/<node-id>/drain' --header 'X-REGISTRATION-SECRET;'

ノード

この節でのエンドポイントは、ハブ&ノードモードとノードが独立して動作する完全分散型 Grid モードに適用されます。 ノードが 1 つの場合、デフォルトのノード URL は http://localhost:5555 です。 複数のノードがある場合は、Grid ステータス を使ってすべてのノードの詳細とノードアドレスを取得してください。

ステータス

ノードステータスは基本的にノードのヘルスチェックのためのものです。 ディストリビューターは定期的にノードの状態を ping で取得し、それに応じて Grid モデルを更新します。 ステータスには稼働状況、セッション、およびスロットに関する情報が含まれます。

cURL --request GET 'http://localhost:5555/status'

ドレイン

ディストリビューターは ドレインコマンドを適切なノードに渡します。 ノードを直接ドレインするには以下の cURL コマンドを使います。 どちらのエンドポイントも有効であり、同じ結果になります。 ドレインは、ノードを停止する前に進行中のセッションを終了させます。

cURL --request POST 'http://localhost:5555/se/grid/node/drain' --header 'X-REGISTRATION-SECRET: <secret>'

Grid の設定時に登録用の secret を設定していない場合は次のようにします:

cURL --request POST 'http://<node-URL>/se/grid/node/drain' --header 'X-REGISTRATION-SECRET;'

セッションオーナーのチェック

あるセッションがノードに属しているかどうかをチェックするには、以下の cURL コマンドを使います。

cURL --request GET 'http://localhost:5555/se/grid/node/owner/<session-id>' --header 'X-REGISTRATION-SECRET: <secret>'

Grid の設定時に登録用の secret を設定していない場合は次のようにします:

cURL --request GET 'http://<node-URL>/se/grid/node/owner/<session-id>' --header 'X-REGISTRATION-SECRET;'

もしセッションがノードに属していたら true を返し、そうでなければ false が返ります。

セッションの削除

セッションを削除すると、WebDriver セッションが終了し、ドライバがアクティブなセッションマップから削除されます。 削除されたセッション ID を使用するリクエストや、ドライバのインスタンスを再利用しようとすると、エラーとなります。

cURL --request DELETE 'http://localhost:5555/se/grid/node/session/<session-id>' --header 'X-REGISTRATION-SECRET: <secret>'

Grid の設定時に登録用の secret を設定していない場合は次のようにします:

cURL --request DELETE 'http://<node-URL>/se/grid/node/session/<session-id>' --header 'X-REGISTRATION-SECRET;'

新規セッションキュー

新規セッションキューのクリア

新規セッションキューには、新規セッションリクエストが格納されます。 キューをクリアするには、以下に挙げる cURL コマンドを使用します。 キューを消去すると、キューにあるすべてのリクエストを拒否します。 サーバーは各リクエストのそれぞれのクライアントにエラーレスポンスを返します。 クリアコマンドの結果は、削除されたリクエストの数です。

スタンドアロンモードでは、キューの URL はスタンドアロンサーバーのアドレスとなります。

ハブ&ノードモードでは、キューの URL は ハブのアドレスになります。

cURL --request DELETE 'http://localhost:4444/se/grid/newsessionqueue/queue' --header 'X-REGISTRATION-SECRET: <secret>'

完全分散モードでは、キューの URL は 新規セッションキューのアドレスになります。

cURL --request DELETE 'http://localhost:5559/se/grid/newsessionqueue/queue' --header 'X-REGISTRATION-SECRET: <secret>'

Grid の設定時に登録用の secret を設定していない場合は次のようにします:

cURL --request DELETE 'http://<URL>/se/grid/newsessionqueue/queue' --header 'X-REGISTRATION-SECRET;'

新規セッションリクエストの取得

新規セッションキューには、新規セッションリクエストが格納されます。 キューにある現在のリクエストを取得するには、以下に挙げる cURL コマンドを使用します。 レスポンスはキュー内のリクエストの数とリクエストのペイロードを返します。

スタンドアロンモードでは、キューの URL はスタンドアロンサーバーのアドレスとなります。

ハブ&ノードモードでは、キューの URL は ハブのアドレスになります。

cURL --request GET 'http://localhost:4444/se/grid/newsessionqueue/queue'

完全分散モードでは、キューの URL は 新規セッションキューのアドレスになります。

cURL --request GET 'http://localhost:5559/se/grid/newsessionqueue/queue'

3.6.4 - Customizing a Node

Page being translated from English to Japanese. Do you speak Japanese? Help us to translate it by sending us pull requests!

How to customize a Node

There are times when we would like a Node to be customized to our needs.

For e.g., we may like to do some additional setup before a session begins execution and some clean-up after a session runs to completion.

Following steps can be followed for this:

  • Create a class that extends org.openqa.selenium.grid.node.Node

  • Add a static method (this will be our factory method) to the newly created class whose signature looks like this:

    public static Node create(Config config). Here:

    • Node is of type org.openqa.selenium.grid.node.Node
    • Config is of type org.openqa.selenium.grid.config.Config
  • Within this factory method, include logic for creating your new Class.

  • To wire in this new customized logic into the hub, start the node and pass in the fully qualified class name of the above class to the argument --node-implementation

Let’s see an example of all this:

Custom Node as an uber jar

  1. Create a sample project using your favourite build tool (Maven|Gradle).
  2. Add the below dependency to your sample project.
  3. Add your customized Node to the project.
  4. Build an uber jar to be able to start the Node using java -jar command.
  5. Now start the Node using the command:
java -jar custom_node-server.jar node \
--node-implementation org.seleniumhq.samples.DecoratedLoggingNode

Note: If you are using Maven as a build tool, please prefer using maven-shade-plugin instead of maven-assembly-plugin because maven-assembly plugin seems to have issues with being able to merge multiple Service Provider Interface files (META-INF/services)

Custom Node as a regular jar

  1. Create a sample project using your favourite build tool (Maven|Gradle).
  2. Add the below dependency to your sample project.
  3. Add your customized Node to the project.
  4. Build a jar of your project using your build tool.
  5. Now start the Node using the command:
java -jar selenium-server-4.6.0.jar \
--ext custom_node-1.0-SNAPSHOT.jar node \
--node-implementation org.seleniumhq.samples.DecoratedLoggingNode

Below is a sample that just prints some messages on to the console whenever there’s an activity of interest (session created, session deleted, a webdriver command executed etc.,) on the Node.

Sample customized node
package org.seleniumhq.samples;

import java.net.URI;
import java.util.UUID;
import org.openqa.selenium.Capabilities;
import org.openqa.selenium.NoSuchSessionException;
import org.openqa.selenium.WebDriverException;
import org.openqa.selenium.grid.config.Config;
import org.openqa.selenium.grid.data.CreateSessionRequest;
import org.openqa.selenium.grid.data.CreateSessionResponse;
import org.openqa.selenium.grid.data.NodeId;
import org.openqa.selenium.grid.data.NodeStatus;
import org.openqa.selenium.grid.data.Session;
import org.openqa.selenium.grid.log.LoggingOptions;
import org.openqa.selenium.grid.node.HealthCheck;
import org.openqa.selenium.grid.node.Node;
import org.openqa.selenium.grid.node.local.LocalNodeFactory;
import org.openqa.selenium.grid.security.Secret;
import org.openqa.selenium.grid.security.SecretOptions;
import org.openqa.selenium.grid.server.BaseServerOptions;
import org.openqa.selenium.internal.Either;
import org.openqa.selenium.remote.SessionId;
import org.openqa.selenium.remote.http.HttpRequest;
import org.openqa.selenium.remote.http.HttpResponse;
import org.openqa.selenium.remote.tracing.Tracer;

public class DecoratedLoggingNode extends Node {

  private Node node;

  protected DecoratedLoggingNode(Tracer tracer, URI uri, Secret registrationSecret) {
    super(tracer, new NodeId(UUID.randomUUID()), uri, registrationSecret);
  }

  public static Node create(Config config) {
    LoggingOptions loggingOptions = new LoggingOptions(config);
    BaseServerOptions serverOptions = new BaseServerOptions(config);
    URI uri = serverOptions.getExternalUri();
    SecretOptions secretOptions = new SecretOptions(config);

    // Refer to the foot notes for additional context on this line.
    Node node = LocalNodeFactory.create(config);

    DecoratedLoggingNode wrapper = new DecoratedLoggingNode(loggingOptions.getTracer(),
        uri, secretOptions.getRegistrationSecret());
    wrapper.node = node;
    return wrapper;
  }

  @Override
  public Either<WebDriverException, CreateSessionResponse> newSession(
      CreateSessionRequest sessionRequest) {
    System.out.println("Before newSession()");
    try {
      return this.node.newSession(sessionRequest);
    } finally {
      System.out.println("After newSession()");
    }
  }

  @Override
  public HttpResponse executeWebDriverCommand(HttpRequest req) {
    try {
      System.out.println("Before executeWebDriverCommand(): " + req.getUri());
      return node.executeWebDriverCommand(req);
    } finally {
      System.out.println("After executeWebDriverCommand()");
    }
  }

  @Override
  public Session getSession(SessionId id) throws NoSuchSessionException {
    try {
      System.out.println("Before getSession()");
      return node.getSession(id);
    } finally {
      System.out.println("After getSession()");
    }
  }

  @Override
  public HttpResponse uploadFile(HttpRequest req, SessionId id) {
    try {
      System.out.println("Before uploadFile()");
      return node.uploadFile(req, id);
    } finally {
      System.out.println("After uploadFile()");
    }
  }

  @Override
  public void stop(SessionId id) throws NoSuchSessionException {
    try {
      System.out.println("Before stop()");
      node.stop(id);
    } finally {
      System.out.println("After stop()");
    }
  }

  @Override
  public boolean isSessionOwner(SessionId id) {
    try {
      System.out.println("Before isSessionOwner()");
      return node.isSessionOwner(id);
    } finally {
      System.out.println("After isSessionOwner()");
    }
  }

  @Override
  public boolean isSupporting(Capabilities capabilities) {
    try {
      System.out.println("Before isSupporting");
      return node.isSupporting(capabilities);
    } finally {
      System.out.println("After isSupporting()");
    }
  }

  @Override
  public NodeStatus getStatus() {
    try {
      System.out.println("Before getStatus()");
      return node.getStatus();
    } finally {
      System.out.println("After getStatus()");
    }
  }

  @Override
  public HealthCheck getHealthCheck() {
    try {
      System.out.println("Before getHealthCheck()");
      return node.getHealthCheck();
    } finally {
      System.out.println("After getHealthCheck()");
    }
  }

  @Override
  public void drain() {
    try {
      System.out.println("Before drain()");
      node.drain();
    } finally {
      System.out.println("After drain()");
    }

  }

  @Override
  public boolean isReady() {
    try {
      System.out.println("Before isReady()");
      return node.isReady();
    } finally {
      System.out.println("After isReady()");
    }
  }
}

Foot Notes:

In the above example, the line Node node = LocalNodeFactory.create(config); explicitly creates a LocalNode.

There are basically 2 types of user facing implementations of org.openqa.selenium.grid.node.Node available.

These classes are good starting points to learn how to build a custom Node and also to learn the internals of a Node.

  • org.openqa.selenium.grid.node.local.LocalNode - Used to represent a long running Node and is the default implementation that gets wired in when you start a node.
    • It can be created by calling LocalNodeFactory.create(config);, where:
      • LocalNodeFactory belongs to org.openqa.selenium.grid.node.local
      • Config belongs to org.openqa.selenium.grid.config
  • org.openqa.selenium.grid.node.k8s.OneShotNode - This is a special reference implementation wherein the Node gracefully shuts itself down after servicing one test session. This class is currently not available as part of any pre-built maven artifact.
    • You can refer to the source code here to understand its internals.
    • To build it locally refer here.
    • It can be created by calling OneShotNode.create(config), where:
      • OneShotNode belongs to org.openqa.selenium.grid.node.k8s
      • Config belongs to org.openqa.selenium.grid.config

3.6.5 - External datastore

Page being translated from English to Japanese. Do you speak Japanese? Help us to translate it by sending us pull requests!

Table of Contents

Introduction

Selenium Grid allows you to persist information related to currently running sessions into an external data store. The external data store could be backed by your favourite database (or) Redis Cache system.

Setup

  • Coursier - As a dependency resolver, so that we can download maven artifacts on the fly and make them available in our classpath
  • Docker - To manage our PostGreSQL/Redis docker containers.

Database backed Session Map

For the sake of this illustration, we are going to work with PostGreSQL database.

We will spin off a PostGreSQL database as a docker container using a docker compose file.

Steps

You can skip this step if you already have a PostGreSQL database instance available at your disposal.

  • Create a sql file named init.sql with the below contents:
CREATE TABLE IF NOT EXISTS sessions_map(
    session_ids varchar(256),
    session_caps text,
    session_uri varchar(256),
    session_stereotype text,
    session_start varchar(256)
 );
  • In the same directory as the init.sql, create a file named docker-compose.yml with its contents as below:
version: '3.8'
services:
  db:
    image: postgres:9.6-bullseye
    restart: always
    environment:
      - POSTGRES_USER=seluser
      - POSTGRES_PASSWORD=seluser
      - POSTGRES_DB=selenium_sessions
    ports:
      - "5432:5432"
    volumes:
    - ./init.sql:/docker-entrypoint-initdb.d/init.sql

We can now start our database container by running:

docker-compose up -d

Our database name is selenium_sessions with its username and password set to seluser

If you are working with an already running PostGreSQL DB instance, then you just need to create a database named selenium_sessions and the table sessions_map using the above mentioned SQL statement.

  • Create a Selenium Grid configuration file named sessions.toml with the below contents:
[sessions]
implementation = "org.openqa.selenium.grid.sessionmap.jdbc.JdbcBackedSessionMap"
jdbc-url = "jdbc:postgresql://localhost:5432/selenium_sessions"
jdbc-user = "seluser"
jdbc-password = "seluser"

Note: If you plan to use an existing PostGreSQL DB instance, then replace localhost:5432 with the actual host and port number of your instance.

  • Below is a simple shell script (let’s call it distributed.sh) that we will use to bring up our distributed Grid.
SE_VERSION=<current_selenium_version>
JAR_NAME=selenium-server-${SE_VERSION}.jar
PUBLISH="--publish-events tcp://localhost:4442"
SUBSCRIBE="--subscribe-events tcp://localhost:4443"
SESSIONS="--sessions http://localhost:5556"
SESSIONS_QUEUE="--sessionqueue http://localhost:5559"
echo 'Starting Event Bus'
java -jar $JAR_NAME event-bus $PUBLISH $SUBSCRIBE --port 5557 &
echo 'Starting New Session Queue'
java -jar $JAR_NAME sessionqueue --port 5559 &
echo 'Starting Sessions Map'
java -jar $JAR_NAME \
--ext $(coursier fetch -p org.seleniumhq.selenium:selenium-session-map-jdbc:${SE_VERSION} org.postgresql:postgresql:42.3.1) \
sessions $PUBLISH $SUBSCRIBE --port 5556 --config sessions.toml &
echo 'Starting Distributor'
java -jar $JAR_NAME  distributor $PUBLISH $SUBSCRIBE $SESSIONS $SESSIONS_QUEUE --port 5553 --bind-bus false &
echo 'Starting Router'
java -jar $JAR_NAME router $SESSIONS --distributor http://localhost:5553 $SESSIONS_QUEUE --port 4444 &
echo 'Starting Node'
java -jar $JAR_NAME node $PUBLISH $SUBSCRIBE &
  • At this point the current directory should contain the following files:

    • docker-compose.yml
    • init.sql
    • sessions.toml
    • distributed.sh
  • You can now spawn the Grid by running distributed.sh shell script and quickly run a test. You will notice that the Grid now stores session information into the PostGreSQL database.

In the line which spawns a SessionMap on a machine:

export SE_VERSION=<current_selenium_version>
java -jar selenium-server-${SE_VERSION}.jar \
--ext $(coursier fetch -p org.seleniumhq.selenium:selenium-session-map-jdbc:${SE_VERSION} org.postgresql:postgresql:42.3.1) \
sessions --publish-events tcp://localhost:4442 \
--subscribe-events tcp://localhost:4443 \
--port 5556 --config sessions.toml 
  • The variable names from the above script have been replaced with their actual values for clarity.
  • Remember to substitute localhost with the actual hostname of the machine where your Event-Bus is running.
  • The arguments being passed to coursier are basically the GAV (Group Artifact Version) Maven co-ordinates of:
  • sessions.toml is the configuration file that we created earlier.

Redis backed Session Map

We will spin off a Redis Cache docker container using a docker compose file.

Steps

You can skip this step if you already have a Redis Cache instance available at your disposal.

  • Create a file named docker-compose.yml with its contents as below:
version: '3.8'
services:
  redis:
    image: redis:bullseye
    restart: always
    ports:
      - "6379:6379"

We can now start our Redis container by running:

docker-compose up -d
  • Create a Selenium Grid configuration file named sessions.toml with the below contents:
[sessions]
scheme = "redis"
implementation = "org.openqa.selenium.grid.sessionmap.redis.RedisBackedSessionMap"
hostname = "localhost"
port = 6379

Note: If you plan to use an existing Redis Cache instance, then replace localhost and 6379 with the actual host and port number of your instance.

  • Below is a simple shell script (let’s call it distributed.sh) that we will use to bring up our distributed grid.
SE_VERSION=<current_selenium_version>
JAR_NAME=selenium-server-${SE_VERSION}.jar
PUBLISH="--publish-events tcp://localhost:4442"
SUBSCRIBE="--subscribe-events tcp://localhost:4443"
SESSIONS="--sessions http://localhost:5556"
SESSIONS_QUEUE="--sessionqueue http://localhost:5559"
echo 'Starting Event Bus'
java -jar $JAR_NAME event-bus $PUBLISH $SUBSCRIBE --port 5557 &
echo 'Starting New Session Queue'
java -jar $JAR_NAME sessionqueue --port 5559 &
echo 'Starting Session Map'
java -jar $JAR_NAME \
--ext $(coursier fetch -p org.seleniumhq.selenium:selenium-session-map-redis:${SE_VERSION}) \
sessions $PUBLISH $SUBSCRIBE --port 5556 --config sessions.toml &
echo 'Starting Distributor'
java -jar $JAR_NAME  distributor $PUBLISH $SUBSCRIBE $SESSIONS $SESSIONS_QUEUE --port 5553 --bind-bus false &
echo 'Starting Router'
java -jar $JAR_NAME router $SESSIONS --distributor http://localhost:5553 $SESSIONS_QUEUE --port 4444 &
echo 'Starting Node'
java -jar $JAR_NAME node $PUBLISH $SUBSCRIBE &
  • At this point the current directory should contain the following files:

    • docker-compose.yml
    • sessions.toml
    • distributed.sh
  • You can now spawn the Grid by running distributed.sh shell script and quickly run a test. You will notice that the Grid now stores session information into the Redis instance. You can perhaps make use of a Redis GUI such as TablePlus to see them (Make sure that you have setup a debug point in your test, because the values will get deleted as soon as the test runs to completion).

In the line which spawns a SessionMap on a machine:

export SE_VERSION=<current_selenium_version>
java -jar selenium-server-${SE_VERSION}.jar \
--ext $(coursier fetch -p org.seleniumhq.selenium:selenium-session-map-redis:${SE_VERSION}) \
sessions --publish-events tcp://localhost:4442 \
--subscribe-events tcp://localhost:4443 \
--port 5556 --config sessions.toml 
  • The variable names from the above script have been replaced with their actual values for clarity.
  • Remember to substitute localhost with the actual hostname of the machine where your Event-Bus is running.
  • The arguments being passed to coursier are basically the GAV (Group Artifact Version) Maven co-ordinates of:
  • sessions.toml is the configuration file that we created earlier.

4 - IE Driver サーバー

Internet Explorer Driverは、WebDriverの仕様を実装するスタンドアロンサーバーです。

This documentation previously located on the wiki

InternetExplorerDriver は、WebDriverのワイヤプロトコルを実装するスタンドアロンサーバーです。 このドライバーは、IE11およびWindows10でテストされています。 古いバージョンのIEおよびWindowsで動作する可能性がありますが、これはサポートされていません。

ドライバーは、32ビットおよび64ビットバージョンのブラウザーの実行をサポートします。 ブラウザの起動に使用する"ビット数"を決定する方法の選択は、起動するIEDriverServer.exeのバージョンによって異なります。 32ビットバージョンの IEDriverServer.exe を起動すると、32ビットバージョンのIEが起動します。 同様に、64ビットバージョンのIEDriverServer.exeを起動すると、64ビットバージョンのIEが起動します。

インストール

InternetExplorerDriverを使用する前にインストーラーを実行する必要はありませんが、いくつかの設定が必要になります。 スタンドアロンサーバーの実行可能ファイルは、ダウンロード ページからダウンロードして、 PATHに配置する必要があります。

長所

  • 実際のブラウザで実行され、JavaScriptをサポートします。

短所

  • 明らかに、InternetExplorerDriverはWindowsでのみ動作します!
  • 比較的遅い(それでもかなりてきぱきしているが:)

コマンドラインスイッチ

スタンドアロンの実行可能ファイルとして、IEドライバーの動作はさまざまなコマンドライン引数を使用して変更できます。 これらのコマンドライン引数の値を設定するには、使用している言語バインディングのドキュメントを参照する必要があります。 サポートされているコマンドラインスイッチについて、以下の表で説明します。 すべての-<switch>、–<switch>、および /<switch> がサポートされています。

Switch意味
–port=<portNumber>IEドライバーのHTTPサーバーが言語バインディングからのコマンドをリッスンするポートを指定します。 デフォルトは5555です。
–host=<hostAdapterIPAddress>IEドライバーのHTTPサーバーが言語バインディングからのコマンドをリッスンするホストアダプターのIPアドレスを指定します。 デフォルトは127.0.0.1です。
–log-level=<logLevel>ロギングメッセージを出力するレベルを指定します。 有効な値は、FATAL、ERROR、WARN、INFO、DEBUG、およびTRACEです。 デフォルトはFATALです。
–log-file=<logFile>ログファイルのフルパスとファイル名を指定します。 デフォルトはstdoutです。
–extract-path=<path>サーバーが使用するサポートファイルの抽出に使用されるディレクトリへのフルパスを指定します。 指定しない場合、デフォルトでTEMPディレクトリになります。
–silentサーバーの起動時に診断出力を抑制します。

重要なシステムプロパティ

次のシステムプロパティ(Javaコードで System.getProperty() を使用して読み取り、 System.setProperty() または “-DpropertyName=value” コマンドラインフラグを使用して設定)は、 InternetExplorerDriver によって利用されます。

プロパティ意味
webdriver.ie.driverIEドライバーバイナリの場所
webdriver.ie.driver.hostIEドライバーがリッスンするホストアダプターのIPアドレスを指定します。
webdriver.ie.driver.loglevelロギングメッセージを出力するレベルを指定します。 有効な値は、FATAL、ERROR、WARN、INFO、DEBUG、およびTRACEです。 デフォルトはFATALです。
webdriver.ie.driver.logfileログファイルのフルパスとファイル名を指定します。
webdriver.ie.driver.silentIEドライバーの起動時に診断出力を抑制します。
webdriver.ie.driver.extractpathサーバーが使用するサポートファイルの抽出に使用されるディレクトリへのフルパスを指定します。 指定しない場合、デフォルトでTEMPディレクトリになります。

必要な構成

  • IEDriverServer 実行可能ファイルをダウンロードして、PATHに配置する必要があります。
  • Windows Vista、Windows 7、またはWindows10のIE7以降では、各ゾーンの保護モード設定を同じ値に設定する必要があります。 値は、すべてのゾーンで同じである限り、オンまたはオフにすることができます。 プロテクトモードの設定を行うには、「ツール」メニューから"インターネットオプション…“を選択し、「セキュリティ」タブをクリックします。 ゾーンごとに、“保護モードを有効にする"というラベルの付いたタブの下部にチェックボックスがあります。
  • さらに、IE 10以降では、“拡張保護モード” を無効にする必要があります。 このオプションは、「インターネットオプション」ダイアログの「詳細設定」タブにあります。
  • ネイティブマウスイベントを正しい座標に設定できるように、ブラウザのズームレベルを100%に設定する必要があります。
  • Windows 10の場合は、ディスプレイの設定で"テキスト、アプリ、その他の項目のサイズを変更する"も100%に設定する必要があります。
  • IE 11の場合 のみ 、ドライバーが作成したInternet Explorerのインスタンスへの接続を維持できるように、ターゲットコンピューターにレジストリエントリを設定する必要があります。 32ビットWindowsインストールの場合、レジストリエディタで調べる必要のあるキーは HKEY_LOCAL_MACHINE\SOFTWARE\Microsoft\Internet Explorer\Main\FeatureControl\FEATURE_BFCACHE です。 64ビットWindowsインストールの場合、キーはHKEY_LOCAL_MACHINE\SOFTWARE\Wow6432Node\Microsoft\Internet Explorer\Main\FeatureControl\FEATURE_BFCACHEです。 FEATURE_BFCACHE サブキーは存在する場合と存在しない場合があり、存在しない場合は作成する必要があることに注意してください。
    重要: このキーの中に、値0の iexplore.exe という名前のDWORD値を作成します。

ネイティブイベントとInternetExplorer

InternetExplorerDriver はWindows専用であるため、いわゆる"ネイティブ"またはOSレベルのイベントを使用して、ブラウザーでマウスとキーボードの操作を実行しようとします。 これは、同じ操作でシミュレートされたJavaScriptイベントを使用するのとは対照的です。 ネイティブイベントを使用する利点は、JavaScriptサンドボックスに依存せず、ブラウザー内での適切なJavaScriptイベントの伝播を保証することです。 ただし、現在、IEブラウザウィンドウにフォーカスがない場合や、要素にカーソルを合わせようとした場合のマウスイベントにはいくつかの問題があります。

ブラウザフォーカス

課題は、ウィンドウにフォーカスがない場合、IE自体がIEブラウザウィンドウ( WM\_MOUSEDOWN および WM\_MOUSEUP )に送信するWindowsメッセージを完全に尊重していないように見えることです。 具体的には、クリックされている要素はその周りにフォーカスウィンドウを受け取りますが、クリックは要素によって処理されません。 間違いなく、メッセージを送信するべきではありません。 むしろ、 SendInput() APIを使用する必要がありますが、そのAPIでは、ウィンドウにフォーカスを設定する必要があります。 WebDriverプロジェクトには2つの相反する目標があります。

まず、ユーザーを可能な限りエミュレートするよう努めます。 これは、JavaScriptを使用してイベントをシミュレートするのではなく、ネイティブイベントを使用することを意味します。

次に、自動化されているブラウザウィンドウのフォーカスを必要としないようにします。 これは、ブラウザウィンドウをフォアグラウンドに強制するだけでは最適ではないことを意味します。

さらに考慮しないといけないのは、複数のWebDriverインスタンスで実行される複数のIEインスタンスがある可能性です。 つまり、このような"ウィンドウをフォアグラウンドにする"ソリューションは、IEドライバーのC++コード内のある種の同期構造(mutex?)でラップする必要があります。 それでも、たとえば、ドライバーがIEをフォアグラウンドに移動してからネイティブイベントを実行する間に、ユーザーが別のウィンドウをフォアグラウンドに移動した場合、このコードは競合状態の影響を受けます。

ドライバーの要件と、これら2つの相反する目標に優先順位を付ける方法についての議論が進行中です。 現在の一般的な知恵は、後者よりも前者を優先し、IEドライバーを使用するときにマシンが他のタスクに使用できないことを文書化することです。 ただし、その決定はまだ確定しておらず、それを実装するためのコードはかなり複雑になる可能性があります。

要素にカーソルを合わせる

要素にカーソルを合わせようとしたときに、物理的なマウスカーソルがIEブラウザーウィンドウの境界内にある場合、ホバーは機能しません。 より具体的には、ホバーはほんの一瞬だけ機能しているように見え、その後、要素は前の状態に戻ります。 これが発生する一般的な理論は、IEがイベントループ中に何らかのヒットテストを実行しているため、物理カーソルがウィンドウの境界内にあるときに物理マウスの位置に応答するというものです。 WebDriver開発チームは、IEのこの動作の回避策を見つけることができませんでした。

<option> 要素をクリックするか、フォームを送信して alert()

IEドライバーがネイティブイベントを使用して要素と対話しない場所は2つあります。 これは、 <select> 要素内の <option> 要素をクリックする場合です。 通常の状況では、IEドライバーは、要素の位置とサイズに基づいてクリックする場所を計算します。 通常は、JavaScriptのgetBoundingClientRect() メソッドによって返されます。 ただし、 <option> 要素の場合、 getBoundingClientRect() は、位置とサイズがゼロの長方形を返します。 IEドライバーは、 click() Automation Atomを使用してこの1つのシナリオを処理します。 これは、基本的に要素の .selected プロパティを設定し、JavaScriptでonChangeイベントをシミュレートします。 ただし、これは、 <select> 要素のonChangeイベントに alert()confirm() 、または prompt()を呼び出すJavaScriptコードが含まれている場合、モーダルダイアログが手動で閉じられるまでWebElementの click() メソッドの呼び出しがハングすることを意味します。 WebDriverコードのみを使用したこの動作の既知の回避策はありません。

同様に、WebElementの submit() メソッドを介してHTMLフォームを送信すると、同じ効果が得られるシナリオがいくつかあります。 これは、ドライバーがフォームでJavaScriptの submit() 関数を呼び出し、 JavaScriptの alert()confirm() 、または prompt() 関数を呼び出す onSubmit イベントハンドラーがある場合に発生する可能性があります。

この制限は、issue 3508(Google Code)として登録されています。

InternetExplorerDriver の複数のインスタンス

IEDriverServer.exe を作成すると、 InternetExplorerDriver の複数のインスタンスを同時に作成して使用できるようになります。 ただし、この機能はほとんどテストされておらず、Cookieやウィンドウフォーカスなどに問題がある可能性があります。 IEドライバーの複数のインスタンスを使用しようとして、そのような問題が発生した場合は、RemoteWebDriver と仮想マシンの使用を検討してください。

InternetExplorerの複数のインスタンス間で共有されるCookie(および別のセッションアイテム)の問題には、2つの解決策があります。

1つ目は、InternetExplorerをプライベートモードで起動することです。 その後、InternetExplorerはクリーンなセッションデータで開始され、終了時に変更されたセッションデータを保存しません。 これを行うには、2つの特定の機能をドライバーに渡す必要があります。 つまり、 true 値を持つ ie.forceCreateProcessApi-private 値を持つ ie.browserCommandLineSwitches です。 InternetExplorer 8以降でのみ機能することに注意してください。 また、Windowsレジストリ HKLM_CURRENT_USER\\Software\\Microsoft\\Internet Explorer\\Main パスには、値が 0 のキーTabProcGrowth が含まれている必要があります。

2つ目は、InternetExplorerの起動中にセッションをクリーンアップすることです。 このためには、 true の値を持つ特定の ie.ensureCleanSession capabilityをドライバーに渡す必要があります。 これにより、手動で開始されたものを含め、InternetExplorerの実行中のすべてのインスタンスのキャッシュがクリアされます。

IEDriverServer.exe をリモートで実行する

IEDriverServer.exe によって起動されたHTTPサーバーは、ローカルマシンからの接続のみを受け入れるようにアクセス制御リストを設定し、リモートマシンからの着信接続を禁止します。 現在、これはソースコードを IEDriverServer.exe に変更せずに変更することはできません。 リモートマシンでInternetExplorerドライバーを実行するには、Javaスタンドアロンリモートサーバーを、言語バインディングに相当するRemoteWebDriverと組み合わせて使用します。

Windowsサービスで IEDriverServer.exe を実行する

IEDriverServer.exeをWindowsサービスアプリケーションの一部として使用しようとすることは、明示的にサポートされていません。 サービスプロセス、およびそれらによって生成されるプロセスには、通常のユーザーコンテキストで実行されるプロセスとは大きく異なる要件があります。 IEDriverServer.exe は、その環境では明示的にテストされておらず、サービスプロセスでの使用が禁止されていることが文書化されているWindowsAPI呼び出しが含まれています。 サービスプロセスの下で実行しているときにIEドライバーを動作させることは可能かもしれませんが、その環境で問題が発生したユーザーは、独自の解決策を探す必要があります。

4.1 - Internet Explorer Driver Internals

More detailed information on the IE Driver.

Client Code Into the Driver

We use the W3C WebDriver protocol to communicate with a local instance of an HTTP server. This greatly simplifies the implementation of the language-specific code, and minimzes the number of entry points into the C++ DLL that must be called using a native-code interop technology such as JNA, ctypes, pinvoke or DL.

Memory Management

The IE driver utilizes the Active Template Library (ATL) to take advantage of its implementation of smart pointers to COM objects. This makes reference counting and cleanup of COM objects much easier.

Why Do We Require Protected Mode Settings Changes?

IE 7 on Windows Vista introduced the concept of Protected Mode, which allows for some measure of protection to the underlying Windows OS when browsing. The problem is that when you manipulate an instance of IE via COM, and you navigate to a page that would cause a transition into or out of Protected Mode, IE requires that another browser session be created. This will orphan the COM object of the previous session, not allowing you to control it any longer.

In IE 7, this will usually manifest itself as a new top-level browser window; in IE 8, a new IExplore.exe process will be created, but it will usually (not always!) seamlessly attach it to the existing IE top-level frame window. Any browser automation framework that drives IE externally (as opposed to using a WebBrowser control) will run into these problems.

In order to work around that problem, we dictate that to work with IE, all zones must have the same Protected Mode setting. As long as it’s on for all zones, or off for all zones, we can prevent the transistions to different Protected Mode zones that would invalidate our browser object. It also allows users to continue to run with UAC turned on, and to run securely in the browser if they set Protected Mode “on” for all zones.

In earlier releases of the IE driver, if the user’s Protected Mode settings were not correctly set, we would launch IE, and the process would simply hang until the HTTP request timed out. This was suboptimal, as it gave no indication what needed to be set. Erring on the side of caution, we do not modify the user’s Protected Mode settings. Current versions, however check that the Protected Mode settings are properly set, and will return an error response if they are not.

Keyboard and Mouse Input

Key files: interactions.cpp

There are two ways that we could simulate keyboard and mouse input. The first way, which is used in parts of webdriver, is to synthesize events on the DOM. This has a number of drawbacks, since each browser (and version of a browser) has its own unique quirks; to model each of these is a demanding task, and impossible to get completely right (for example, it’s hard to tell what window.selection should be and this is a read-only property on some browsers) The alternative approach is to synthesize keyboard and mouse input at the OS level, ideally without stealing focus from the user (who tends to be doing other things on their computer as long-running webdriver tests run)

The code for doing this is in interactions.cpp The key thing to note here is that we use PostMessages to push window events on to the message queue of the IE instance. Typing, in particular, is interesting: we only send the “keydown” and “keyup” messages. The “keypress” event is created if necessary by IE’s internal event processing. Because the key press event is not always generated (for example, not every character is printable, and if the default event bubbling is cancelled, listeners don’t see the key press event) we send a “probe” event in after the key down. Once we see that this has been processed, we know that the key press event is on the stack of events to be processed, and that it is safe to send the key up event. If this was not done, it is possible for events to fire in the wrong order, which is definitely sub-optimal.

Working On the InternetExplorerDriver

Currently, there are tests that will run for the InternetExplorerDriver in all languages (Java, C#, Python, and Ruby), so you should be able to test your changes to the native code no matter what language you’re comfortable working in from the client side. For working on the C++ code, you’ll need Visual Studio 2010 Professional or higher. Unfortunately, the C++ code of the driver uses ATL to ease the pain of working with COM objects, and ATL is not supplied with Visual C++ 2010 Express Edition. If you’re using Eclipse, the process for making and testing modifications is:

  1. Edit the C++ code in VS.
  2. Build the code to ensure that it compiles
  3. Do a complete rebuild when you are ready to run a test. This will cause the created DLL to be copied to the right place to allow its use in Eclipse
  4. Load Eclipse (or some other IDE, such as Idea)
  5. Edit the SingleTestSuite so that it is usingDriver(IE)
  6. Create a JUnit run configuration that uses the “webdriver-internet-explorer” project. If you don’t do this, the test won’t work at all, and there will be a somewhat cryptic error message on the console.

Once the basic setup is done, you can start working on the code pretty quickly. You can attach to the process you execute your code from using Visual Studio (from the Debug menu, select Attach to Process…).

5 - Selenium IDE

Selenium IDEは、ユーザーのアクションを記録および再生するブラウザー拡張機能です。

Seleniumの統合開発環境(Selenium IDE)は、 各要素のコンテキストによって定義されたパラメーターを使用して、 既存のSeleniumコマンドを使用してブラウザーでのユーザーのアクションを記録する、使いやすいブラウザー拡張機能です。 これは、Seleniumの構文を学習するための優れた方法を提供します。 Google Chrome、Mozilla Firefox、およびMicrosoftEdgeで利用できます。

詳細については、充実しているSelenium IDE ドキュメントをご覧ください。

6 - Selenium Manager (Beta)

Selenium Manager is a command-line tool implemented in Rust that provides automated driver and browser management for Selenium. Selenium bindings use this tool by default, so you do not need to download it or add anything to your code or do anything else to use it.

Motivation

TL;DR: Selenium Manager is the official driver manager of the Selenium project, and it is shipped out of the box with every Selenium release.

Selenium uses the native support implemented by each browser to carry out the automation process. For this reason, Selenium users need to place a component called driver (chromedriver, geckodriver, msedgedriver, etc.) between the script using the Selenium API and the browser. For many years, managing these drivers was a manual process for Selenium users. This way, they had to download the required driver for a browser (chromedriver for Chrome, geckodriver for Firefox, etc.) and place it in the PATH or export the driver path as a system property (Java, JavaScript, etc.). But this process was cumbersome and led to maintainability issues.

Let’s consider an example. Imagine you manually downloaded the required chromedriver for driving your Chrome with Selenium. When you did this process, the stable version of Chrome was 113, so you downloaded chromedriver 113 and put it in your PATH. At that moment, your Selenium script executed correctly. But the problem is that Chrome is evergreen. This name refers to Chrome’s ability to upgrade automatically and silently to the next stable version when available. This feature is excellent for end-users but potentially dangerous for browser automation. Let’s go back to the example to discover it. Your local Chrome eventually updates to version 115. And that moment, your Selenium script is broken due to the incompatibility between the manually downloaded driver (113) and the Chrome version (115). Thus, your Selenium script fails with the following error message: “session not created: This version of ChromeDriver only supports Chrome version 113”.

This problem is the primary reason for the existence of the so-called driver managers (such as WebDriverManager for Java, webdriver-manager for Python, webdriver-manager for JavaScript, WebDriverManager.Net for C#, and webdrivers for Ruby). All these projects were an inspiration and a clear sign that the community needed this feature to be built in Selenium. Thus, the Selenium project has created Selenium Manager, the official driver manager for Selenium, shipped out of the box with each Selenium release as of version 4.6.

Usage

TL;DR: Selenium Manager is used by the Selenium bindings when the drivers (chromedriver, geckodriver, etc.) are unavailable.

Driver management through Selenium Manager is opt-in for the Selenium bindings. Thus, users can continue managing their drivers manually (putting the driver in the PATH or using system properties) or rely on a third-party driver manager to do it automatically. Selenium Manager only operates as a fallback: if no driver is provided, Selenium Manager will come to the rescue.

Selenium Manager is a CLI (command line interface) tool implemented in Rust to allow cross-platform execution and compiled for Windows, Linux, and macOS. The Selenium Manager binaries are shipped with each Selenium release. This way, each Selenium binding language invokes Selenium Manager to carry out the automated driver and browser management explained in the following sections.

Automated driver management

TL;DR: Selenium Manager automatically discovers, downloads, and caches the drivers required by Selenium when these drivers are unavailable.

The primary feature of Selenium Manager is called automated driver management. Let’s consider an example to understand it. Suppose we want to driver Chrome with Selenium (see the doc about how to start a session with Selenium). Before the session begins, and when the driver is unavailable, Selenium Manager manages chromedriver for us. We use the term management for this feature (and not just download) since this process is broader and implies different steps:

  1. Browser version discovery. Selenium Manager discovers the browser version (e.g., Chrome, Firefox, Edge) installed in the machine that executes Selenium. This step uses shell commands (e.g., google-chrome --version).
  2. Driver version discovery. With the discovered browser version, the proper driver version is resolved. For this step, the online metadata/endpoints maintained by the browser vendors (e.g., chromedriver, geckodriver, or msedgedriver) are used.
  3. Driver download. The driver URL is obtained with the resolved driver version; with that URL, the driver artifact is downloaded, uncompressed, and stored locally.
  4. Driver cache. Uncompressed driver binaries are stored in a local cache folder (~/.cache/selenium). The next time the same driver is required, it will be used from there if the driver is already in the cache.

Automated browser management

TL;DR: Selenium Manager automatically discovers, downloads, and caches the browsers driven with Selenium (Chrome, Firefox, and Edge) when these browsers are not installed in the local system.

As of Selenium 4.11.0, Selenium Manager also implements automated browser management. With this feature, Selenium Manager allows us to discover, download, and cache the different browser releases, making them seamlessly available for Selenium. Internally, Selenium Manager uses an equivalent management procedure explained in the section before, but this time, for browser releases.

The browser automatically managed by Selenium Manager are:

Let’s consider again the typical example of driving Chrome with Selenium. And this time, suppose Chrome is not installed on the local machine when starting a new session). In that case, the current stable CfT release will be discovered, downloaded, and cached (in ~/.cache/selenium/chrome) by Selenium Manager.

But there is more. In addition to the stable browser version, Selenium Manager also allows downloading older browser versions (in the case of CfT, starting in version 113, the first version published as CfT). To set a browser version with Selenium, we use a browser option called browserVersion.

Let’s consider another simple example. Suppose we set browserVersion to 114 using Chrome options. In this case, Selenium Manager will check if Chrome 114 is already installed. If it is, it will be used. If not, Selenium Manager will manage (i.e., discover, download, and cache) CfT 114. And in either case, the chromedriver is also managed. Finally, Selenium will start Chrome to be driven programmatically, as usual.

But there is even more. In addition to fixed browser versions (e.g., 113, 114, 115, etc.), we can use the following labels for browserVersion:

  • stable: Current CfT version.
  • beta: Next version to stable.
  • dev: Version in development at this moment.
  • canary: Nightly build for developers.
  • esr: Extended Support Release (only for Firefox).

When these labels are specified, Selenium Manager first checks if a given browser is already installed (beta, dev, etc.), and when it is not detected, the browser is automatically managed.

Edge in Windows

Automated Edge management by Selenium Manager in Windows is different from other browsers. Both Chrome and Firefox (and Edge in macOS and Linux) are downloaded automatically to the local cache (~/.cache/selenium) by Selenium Manager. Nevertheless, the same cannot be done for Edge in Windows. The reason is that the Edge installer for Windows is distributed as a Microsoft Installer (MSI) file, designed to be executed with administrator rights. This way, when Edge is attempted to be installed with Selenium Manager in Windows with a non-administrator session, a warning message will be displayed by Selenium Manager as follows:

edge can only be installed in Windows with administrator permissions

Therefore, administrator permissions are required to install Edge in Windows automatically through Selenium Manager, and Edge is eventually installed in the usual program files folder (e.g., C:\Program Files (x86)\Microsoft\Edge).

Configuration

TL;DR: Selenium Manager should work silently and transparently for most users. Nevertheless, there are scenarios (e.g., to specify a custom cache path or setup globally a proxy) where custom configuration can be required.

Selenium Manager is a CLI tool. Therefore, under the hood, the Selenium bindings call Selenium Manager by invoking shell commands. Like any other CLI tool, arguments can be used to specify specific capabilities in Selenium Manager. The different arguments supported by Selenium Manager can be checked by running the following command:

$ ./selenium-manager --help

In addition to CLI arguments, Selenium Manager allows two additional mechanisms for configuration:

  • Configuration file. Selenium Manager uses a file called se-config.toml located in the Selenium cache (by default, at ~/.cache/selenium) for custom configuration values. This TOML file contains a key-value collection used for custom configuration.
  • Environmental variables. Each configuration key has its equivalence in environmental variables by converting each key name to uppercase, replacing the dash symbol (-) with an underscore (_), and adding the prefix SE_.

The configuration file is honored by Selenium Manager when it is present, and the corresponding CLI parameter is not specified. Besides, the environmental variables are used when neither of the previous options (CLI arguments and configuration file) is specified. In other words, the order of preference for Selenium Manager custom configuration is as follows:

  1. CLI arguments.
  2. Configuration file.
  3. Environment variables.

Notice that the Selenium bindings use the CLI arguments to specify configuration values, which in turn, are defined in each binding using browser options.

The following table summarizes all the supported arguments supported by Selenium Manager and their correspondence key in the configuration file and environment variables.

CLI argumentConfiguration fileEnv variableDescription
--browser BROWSERbrowser = "BROWSER"SE_BROWSER=BROWSERBrowser name: chrome, firefox, edge, iexplorer, safari, safaritp, or webview2
--driver <DRIVER>driver = "DRIVER"SE_DRIVER=DRIVERDriver name: chromedriver, geckodriver, msedgedriver, IEDriverServer, or safaridriver
--browser-version <BROWSER_VERSION>browser-version = "BROWSER_VERSION"SE_BROWSER_VERSION=BROWSER_VERSIONMajor browser version (e.g., 105, 106, etc. Also: beta, dev, canary -or nightly-, and esr -in Firefox- are accepted)
--driver-version <DRIVER_VERSION>driver-version = "DRIVER_VERSION"SE_DRIVER_VERSION=DRIVER_VERSIONDriver version (e.g., 106.0.5249.61, 0.31.0, etc.)
--browser-path <BROWSER_PATH>browser-path = "BROWSER_PATH"SE_BROWSER_PATH=BROWSER_PATHBrowser path (absolute) for browser version detection (e.g., /usr/bin/google-chrome, /Applications/Google Chrome.app/Contents/MacOS/Google Chrome, C:\Program Files\Google\Chrome\Application\chrome.exe)
--driver-mirror-url <DRIVER_MIRROR_URL>driver-mirror-url = "DRIVER_MIRROR_URL"SE_DRIVER_MIRROR_URL=DRIVER_MIRROR_URLMirror URL for driver repositories
--browser-mirror-url <BROWSER_MIRROR_URL>browser-mirror-url = "BROWSER_MIRROR_URL"SE_BROWSER_MIRROR_URL=BROWSER_MIRROR_URLMirror URL for browser repositories
--output <OUTPUT>output = "OUTPUT"SE_OUTPUT=OUTPUTOutput type: LOGGER (using INFO, WARN, etc.), JSON (custom JSON notation), or SHELL (Unix-like). Default: LOGGER
--os <OS>os = "OS"SE_OS=OSOperating system for drivers and browsers (i.e., windows, linux, or macos)
--arch <ARCH>arch = "ARCH"SE_ARCH=ARCHSystem architecture for drivers and browsers (i.e., x32, x64, or arm64)
--proxy <PROXY>proxy = "PROXY"SE_PROXY=PROXYHTTP proxy for network connection (e.g., myproxy:port, myuser:mypass@myproxy:port)
--timeout <TIMEOUT>timeout = TIMEOUTSE_TIMEOUT=TIMEOUTTimeout for network requests (in seconds). Default: 300
--offlineoffline = trueSE_OFFLINE=trueOffline mode (i.e., disabling network requests and downloads)
--force-browser-downloadforce-browser-download = trueSE_FORCE_BROWSER_DOWNLOAD=trueForce to download browser, e.g., when a browser is already installed in the system, but you want Selenium Manager to download and use it
--avoid-browser-downloadavoid-browser-download = trueSE_AVOID_BROWSER_DOWNLOAD=trueAvoid to download browser, e.g., when a browser is supposed to be downloaded by Selenium Manager, but you prefer to avoid it
--debugdebug = trueSE_DEBUG=trueDisplay DEBUG messages
--tracetrace = trueSE_TRACE=trueDisplay TRACE messages
--cache-path <CACHE_PATH>cache-path="CACHE_PATH"SE_CACHE_PATH=CACHE_PATHLocal folder used to store downloaded assets (drivers and browsers), local metadata, and configuration file. See next section for details. Default: ~/.cache/selenium. For Windows paths in the TOML configuration file, double backslashes are required (e.g., C:\\custom\\cache).
--ttl <TTL>ttl = TTLSE_TTL=TTLTime-to-live in seconds. See next section for details. Default: 3600 (1 hour)

In addition to the configuration keys specified in the table before, there are some special cases, namely:

  • Browser version. In addition to browser-version, we can use the specific configuration keys to specify custom versions per supported browser. This way, the keys chrome-version, firefox-version, edge-version, etc., are supported. The same applies to environment variables (i.e., SE_CHROME_VERSION, SE_FIREFOX_VERSION, SE_EDGE_VERSION, etc.).
  • Driver version. Following the same pattern, we can use chromedriver-version, geckodriver-version, msedgedriver-version, etc. (in the configuration file), and SE_CHROMEDRIVER_VERSION, SE_GECKODRIVER_VERSION, SE_MSEDGEDRIVER_VERSION, etc. (as environment variables).
  • Browser path. Following the same pattern, we can use chrome-path, firefox-path, edge-path, etc. (in the configuration file), and SE_CHROME_PATH, SE_FIREFOX_PATH, SE_EDGE_PATH, etc. (as environment variables). The Selenium bindings also allow to specify a custom location of the browser path using options, namely: Chrome), Edge, or Firefox.
  • Driver mirror. Following the same pattern, we can use chromedriver-mirror-url, geckodriver-mirror-url, msedgedriver-mirror-url, etc. (in the configuration file), and SE_CHROMEDRIVER_MIRROR_URL, SE_GECKODRIVER_MIRROR_URL, SE_MSEDGEDRIVER_MIRROR_URL, etc. (as environment variables).
  • Browser mirror. Following the same pattern, we can use chrome-mirror-url, firefox-mirror-url, edge-mirror-url, etc. (in the configuration file), and SE_CHROME_MIRROR_URL, SE_FIREFOX_MIRROR_URL, SE_EDGE_MIRROR_URL, etc. (as environment variables).

Caching

TL;DR: The drivers and browsers managed by Selenium Manager are stored in a local folder (~/.cache/selenium).

The cache in Selenium Manager is a local folder (~/.cache/selenium by default) in which the downloaded assets (drivers and browsers) are stored. For the sake of performance, when a driver or browser is already in the cache (i.e., there is a cache hint), Selenium Manager uses it from there.

In addition to the downloaded drivers and browsers, two additional files live in the cache’s root:

  • Configuration file (se-config.toml). This file is optional and, as explained in the previous section, allows to store custom configuration values for Selenium Manager. This file is maintained by the end-user and read by Selenium Manager.
  • Metadata file (se-metadata.json). This file contains versions discovered by Selenium Manger making network requests (e.g., using the CfT JSON endpoints) and the time-to-live (TTL) in which they are valid. Selenium Manager automatically maintains this file.

The TTL in Selenium Manager is inspired by the TTL for DNS, a well-known mechanism that refers to how long some values are cached before they are automatically refreshed. In the case of Selenium Manager, these values are the versions found by making network requests for driver and browser version discovery. By default, the TTL is 3600 seconds (i.e., 1 hour) and can be tuned using configuration values or disabled by setting this configuration value to 0.

The TTL mechanism is a way to improve the overall performance of Selenium. It is based on the fact that the discovered driver and browser versions (e.g., the proper chromedriver version for Chrome 115 is 115.0.5790.170) will likely remain the same in the short term. Therefore, the discovered versions are written in the metadata file and read from there instead of making the same consecutive network request. This way, during the driver version discovery (step 2 of the automated driver management process previously introduced), Selenium Manager first reads the file metadata. When a fresh resolution (i.e., a driver/browser version valid during a TTL) is found, that version is used (saving some time in making a new network request). If not found or the TTL has expired, a network request is made, and the result is stored in the metadata file.

Let’s consider an example. A Selenium binding asks Selenium Manager to resolve chromedriver. Selenium Manager detects that Chrome 115 is installed, so it makes a network request to the CfT endpoints to discover the proper chromedriver version (115.0.5790.170, at that moment). This version is stored in the metadata file and considered valid during the next hour (TTL). If Selenium Manager is asked to resolve chromedriver during that time (which is likely to happen in the execution of a test suite), the chromedriver version is discovered by reading the metadata file instead of making a new request to the CfT endpoints. After one hour, the chromedriver version stored in the cache will be considered as stale, and Selenium Manager will refresh it by making a new network request to the corresponding endpoint.

Selenium Manager includes two additional arguments two handle the cache, namely:

  • --clear-cache: To remove the cache folder.
  • --clear-metadata: To remove the metadata file.

Versioning

Selenium Manager follows the same versioning schema as Selenium. Nevertheless, we use the major version 0 for Selenium Manager releases because it is still in beta. For example, the Selenium Manager binaries shipped with Selenium 4.12.0 corresponds to version 0.4.12.

Getting Selenium Manager

For most users, direct interaction with Selenium Manager is not required since the Selenium bindings use it internally. Nevertheless, if you want to play with Selenium Manager or use it for your use case involving driver or browser management, you can get the Selenium Manager binaries in different ways:

  • From the Selenium repository. The Selenium Manager source code is stored in the main Selenium repo under the folder rust. Moreover, you can find the compiled versions for Windows, Linux, and macOS in the common folder of this repo.
  • From the build workflow. Selenium Manager is compiled using a GitHub Actions workflow. This workflow creates binaries for Windows, Linux, and macOS. You can download these binaries from these workflow executions.
  • From the cache. As of version 4.15.0 of the Selenium Java bindings, the Selenium Manager binary is extracted and copied to the cache folder. For instance, the Selenium Manager binary shipped with Selenium 4.15.0 is stored in the folder ~/.cache/selenium/manager/0.4.15).

Examples

Let’s consider a typical example: we want to manage chromedriver automatically. For that, we invoke Selenium Manager as follows (notice that the flag --debug is optional, but it helps us to understand what Selenium Manager is doing):

$ ./selenium-manager --browser chrome --debug
DEBUG   chromedriver not found in PATH
DEBUG   chrome detected at C:\Program Files\Google\Chrome\Application\chrome.exe
DEBUG   Running command: wmic datafile where name='C:\\Program Files\\Google\\Chrome\\Application\\chrome.exe' get Version /value
DEBUG   Output: "\r\r\n\r\r\nVersion=116.0.5845.111\r\r\n\r\r\n\r\r\n\r"
DEBUG   Detected browser: chrome 116.0.5845.111
DEBUG   Discovering versions from https://googlechromelabs.github.io/chrome-for-testing/known-good-versions-with-downloads.json
DEBUG   Required driver: chromedriver 116.0.5845.96
DEBUG   Downloading chromedriver 116.0.5845.96 from https://edgedl.me.gvt1.com/edgedl/chrome/chrome-for-testing/116.0.5845.96/win64/chromedriver-win64.zip
INFO    Driver path: C:\Users\boni\.cache\selenium\chromedriver\win64\116.0.5845.96\chromedriver.exe
INFO    Browser path: C:\Program Files\Google\Chrome\Application\chrome.exe

In this case, the local Chrome (in Windows) is detected by Selenium Manager. Then, using its version and the CfT endpoints, the proper chromedriver version (115, in this example) is downloaded to the local cache. Finally, Selenium Manager provides two results: i) the driver path (downloaded) and ii) the browser path (local).

Let’s consider another example. Now we want to use Chrome beta. Therefore, we invoke Selenium Manager specifying that version label as follows (notice that the CfT beta is discovered, downloaded, and stored in the local cache):

$ ./selenium-manager --browser chrome --browser-version beta --debug
DEBUG   chromedriver not found in PATH
DEBUG   chrome not found in PATH
DEBUG   chrome beta not found in the system
DEBUG   Discovering versions from https://googlechromelabs.github.io/chrome-for-testing/last-known-good-versions-with-downloads.json
DEBUG   Required browser: chrome 117.0.5938.22
DEBUG   Downloading chrome 117.0.5938.22 from https://edgedl.me.gvt1.com/edgedl/chrome/chrome-for-testing/117.0.5938.22/win64/chrome-win64.zip
DEBUG   chrome 117.0.5938.22 has been downloaded at C:\Users\boni\.cache\selenium\chrome\win64\117.0.5938.22\chrome.exe
DEBUG   Discovering versions from https://googlechromelabs.github.io/chrome-for-testing/known-good-versions-with-downloads.json
DEBUG   Required driver: chromedriver 117.0.5938.22
DEBUG   Downloading chromedriver 117.0.5938.22 from https://edgedl.me.gvt1.com/edgedl/chrome/chrome-for-testing/117.0.5938.22/win64/chromedriver-win64.zip
INFO    Driver path: C:\Users\boni\.cache\selenium\chromedriver\win64\117.0.5938.22\chromedriver.exe
INFO    Browser path: C:\Users\boni\.cache\selenium\chrome\win64\117.0.5938.22\chrome.exe

Selenium Grid

Selenium Manager allows you to configure the drivers automatically when setting up Selenium Grid. To that aim, you need to include the argument --selenium-manager true in the command to start Selenium Grid. For more details, visit the Selenium Grid starting page.

Moreover, Selenium Manager also allows managing Selenium Grid releases automatically. For that, the argument --grid is used as follows:

$ ./selenium-manager --grid

After this command, Selenium Manager discovers the latest version of Selenium Grid, storing the selenium-server.jar in the local cache.

Optionally, the argument --grid allows to specify a Selenium Grid version (--grid <GRID_VERSION>).

Known Limitations

Connectivity issues

Selenium Manager requests remote endpoints (like Chrome for Testing (CfT), among others) to discover and download drivers and browsers from online repositories. When this operation is done in a corporate environment with a proxy or firewall, it might lead to connectivity problems like the following:

error sending request for url (https://googlechromelabs.github.io/chrome-for-testing/known-good-versions-with-downloads.json)
error trying to connect: dns error: failed to lookup address information
error trying to connect: An existing connection was forcibly closed by the remote host. (os error 10054)

When that happens, consider the following solutions:

  • Use the proxy capabilities of Selenium (see documentation). Alternatively, use the environment variable SE_PROXY to set the proxy URL or use the configuration file (see configuration).
  • Review your network setup to enable the remote requests and downloads required by Selenium Manager.

Custom package managers

If you are using a Linux package manager (Anaconda, snap, etc) that requires a specific driver be used for your browsers, you’ll need to either specify the driver location, the browser location, or both, depending on the requirements.

Alternative architectures

Selenium supports all five architectures managed by Google’s Chrome for Testing, and all six drivers provided for Microsoft Edge.

Each release of the Selenium bindings comes with three separate Selenium Manager binaries — one for Linux, Windows, and Mac.

  • The Mac version supports both x64 and aarch64 (Intel and Apple).
  • The Windows version should work for both x86 and x64 (32-bit and 64-bit OS).
  • The Linux version has only been verified to work for x64.

Reasons for not supporting more architectures:

  1. Neither Chrome for Testing nor Microsoft Edge supports additional architectures, so Selenium Manager would need to manage something unofficial for it to work.
  2. We currently build the binaries from existing GitHub actions runners, which do not support these architectures
  3. Any additional architectures would get distributed with all Selenium releases, increasing the total build size

If you are running Linux on arm64/aarch64, 32-bit architecture, or a Raspberry Pi, Selenium Manager will not work for you. The biggest issue for people is that they used to get custom-built drivers and put them on PATH and have them work. Now that Selenium Manager is responsible for locating drivers on PATH, this approach no longer works, and users need to use a Service class and set the location directly. There are a number of advantages to having Selenium Manager look for drivers on PATH instead of managing that logic in each of the bindings, so that’s currently a trade-off we are comfortable with.

However, as of Selenium 4.13.0, the Selenium bindings allow locating the Selenium Manager binary using an environment variable called SE_MANAGER_PATH. If this variable is set, the bindings will use its value as the Selenium Manager path in the local filesystem. This feature will allow users to provide a custom compilation of Selenium Manager, for instance, if the default binaries (compiled for Windows, Linux, and macOS) are incompatible with a given system (e.g., ARM64 in Linux).

Browser dependencies

When automatically managing browsers in Linux, Selenium Manager relies on the releases published by the browser vendors (i.e., Chrome, Firefox, and Edge). These releases are portable in most cases. Nevertheless, there might be cases in which existing libraries are required. In Linux, this problem might be experienced when trying to run Firefox, e.g., as follows:

libdbus-glib-1.so.2: cannot open shared object file: No such file or directory
Couldn't load XPCOM.

If that happens, the solution is to install that library, for instance, as follows:

sudo apt-get install libdbus-glib-1-2

A similar issue might happen when trying to execute Chrome for Testing in Linux:

error while loading shared libraries: libatk-1.0.so.0: cannot open shared object file: No such file or directory

In this case, the library to be installed is the following:

sudo apt-get install libatk-bridge2.0-0

Roadmap

You can trace the work in progress in the Selenium Manager project dashboard. Moreover, you can check the new features shipped with each Selenium Manager release in its changelog file.

7 - テストの実践

Seleniumプロジェクトからのテストに関するいくつかのガイドラインと推奨事項

「ベストプラクティス」に関するメモ:このドキュメントでは、“ベストプラクティス"というフレーズを意図的に避けています。 すべての状況に有効なアプローチはありません。 “ガイドラインとレコメンデーション"というアイデアを好みます。 これらを一通り読み、特定の環境でどのアプローチが効果的かを慎重に決定することをお勧めします。

機能テストは、多くの理由で適切に行うのが困難です。 まるでアプリケーションの状態、複雑さ、および依存関係が、テストを十分に難しくしないと思えるほど、ブラウザ(特にクロスブラウザの非互換性)を扱うのは、良いテストの作成を難しくします。

Seleniumは、機能的なユーザーインタラクションを簡単にするツールを提供しますが、適切に設計されたテストスイートの作成には役立ちません。 この章では、機能的なWebページの自動化に取り組む方法に関するアドバイス、ガイドライン、および推奨事項を提供します。

この章では、長年にわたって成功を収めてきたSeleniumの多くのユーザーの間で人気のあるソフトウェア設計パターンを記録します。

7.1 - デザインパターンと開発戦略

(以前の場所: https://github.com/SeleniumHQ/selenium/wiki/Bot-Style-Tests)

概要

時間の経過とともに、プロジェクトは多数のテストが積み上がる傾向があります。 テストの総数が増えると、コードベースに変更を加えることが難しくなります。 アプリケーションが正常に機能していても、1回の"単純な"変更で多数のテストが失敗する可能性があります。 これらの問題が避けられない場合もありますが、問題が発生した場合は、できるだけ早く稼働を再開する必要があります。 次のデザインパターンと戦略は、テストの作成と保守を容易にするためにWebDriverで以前に使用されています。 それらもあなたにとって役に立つかもしれません。

DomainDrivenDesign:アプリのエンドユーザーの言語でテストを表現します。
PageObjects:WebアプリのUIの単純な抽象化
LoadableComponent:PageObjectsをコンポーネントとしてモデリングします。
BotStyleTests:PageObjectsが推奨するオブジェクトベースのアプローチではなく、コマンドベースのアプローチを使用してテストを自動化します。

ロード可能なコンポーネント

それは何ですか?

LoadableComponentは、PageObjectsの作成の負担を軽減することを目的としたベースクラスです。 これは、ページがロードされることを保証する標準的な方法を提供し、ページのロードの失敗のデバッグを容易にするフックを提供することによってこれを行います。 これを使用して、テストの定型コードの量を減らすことができます。これにより、テストの保守が面倒になります。

現在、Selenium 2の一部として出荷されるJavaの実装がありますが、使用されるアプローチは、どの言語でも実装できるほど単純です。

簡単な使用方法

モデル化するUIの例として、新しいissueのページをご覧ください。 テスト作成者の観点から、これは新しい問題を提出できるサービスを提供します。 基本的なページオブジェクトは次のようになります。

package com.example.webdriver;

import org.openqa.selenium.By;
import org.openqa.selenium.WebDriver;
import org.openqa.selenium.WebElement;

public class EditIssue {

  private final WebDriver driver;

  public EditIssue(WebDriver driver) {
    this.driver = driver;
  }

  public void setSummary(String summary) {
    WebElement field = driver.findElement(By.name("summary"));
    clearAndType(field, summary);
  }

  public void enterDescription(String description) {
    WebElement field = driver.findElement(By.name("comment"));
    clearAndType(field, description);
  }

  public IssueList submit() {
    driver.findElement(By.id("submit")).click();
    return new IssueList(driver);
  }

  private void clearAndType(WebElement field, String text) {
    field.clear();
    field.sendKeys(text);
  }
}

これをLoadableComponentに変換するには、これを基本型として設定するだけです。

public class EditIssue extends LoadableComponent<EditIssue> {
  // rest of class ignored for now
}

この署名は少し変わっているように見えますが、それは、このクラスがEditIssueページをロードするLoadableComponentを表すことを意味します。

このベースクラスを拡張することにより、2つの新しいメソッドを実装する必要があります。

  @Override
  protected void load() {
    driver.get("https://github.com/SeleniumHQ/selenium/issues/new");
  }

  @Override
  protected void isLoaded() throws Error {
    String url = driver.getCurrentUrl();
    assertTrue("Not on the issue entry page: " + url, url.endsWith("/new"));
  }

load メソッドはページに移動するために使用され、 isLoaded メソッドは正しいページにいるかどうかを判断するために使用されます。 このメソッドはブール値を返す必要があるように見えますが、代わりにJUnitのAssertクラスを使用して一連のアサーションを実行します。 アサーションは好きなだけ少なくても多くてもかまいません。 これらのアサーションを使用することで、クラスのユーザーにテストのデバッグに使用できる明確な情報を提供することができます。

少し手直しすると、PageObjectは次のようになります。

package com.example.webdriver;
import org.openqa.selenium.By;
import org.openqa.selenium.WebDriver;
import org.openqa.selenium.WebElement;
import org.openqa.selenium.support.FindBy;
import org.openqa.selenium.support.PageFactory;

import static junit.framework.Assert.assertTrue;

public class EditIssue extends LoadableComponent<EditIssue> {

  private final WebDriver driver;
  
  // By default the PageFactory will locate elements with the same name or id
  // as the field. Since the summary element has a name attribute of "summary"
  // we don't need any additional annotations.
  private WebElement summary;
  
  // Same with the submit element, which has the ID "submit"
  private WebElement submit;
  
  // But we'd prefer a different name in our code than "comment", so we use the
  // FindBy annotation to tell the PageFactory how to locate the element.
  @FindBy(name = "comment") private WebElement description;
  
  public EditIssue(WebDriver driver) {
    this.driver = driver;
    
    // This call sets the WebElement fields.
    PageFactory.initElements(driver, this);
  }

  @Override
  protected void load() {
    driver.get("https://github.com/SeleniumHQ/selenium/issues/new");
  }

  @Override
  protected void isLoaded() throws Error {
    String url = driver.getCurrentUrl();
    assertTrue("Not on the issue entry page: " + url, url.endsWith("/new"));
  }
  
  public void setSummary(String issueSummary) {
    clearAndType(summary, issueSummary);
  }

  public void enterDescription(String issueDescription) {
    clearAndType(description, issueDescription);
  }

  public IssueList submit() {
    submit.click();
    return new IssueList(driver);
  }

  private void clearAndType(WebElement field, String text) {
    field.clear();
    field.sendKeys(text);
  }
}

それは私たちをあまり信じられなかったようですよね? これまでに行ったことの1つは、ページに移動する方法に関する情報をページ自体にカプセル化することです。 つまり、この情報はコードベース全体に散らばっていません。 これは、テストで下記を実行できることも意味します。

EditIssue page = new EditIssue(driver).get();

この呼び出しにより、ドライバーは必要に応じてページに移動します。

ネストされたコンポーネント

LoadableComponentsは、他のLoadableComponentsと組み合わせて使用すると、より便利になります。 この例を使用すると、 “edit issue” ページをプロジェクトのWebサイト内のコンポーネントとして表示できます(結局のところ、そのサイトのタブからアクセスします)。 また、issue を報告するにはログインする必要があります。 これをネストされたコンポーネントのツリーとしてモデル化できます。

 + ProjectPage
 +---+ SecuredPage
     +---+ EditIssue

これはコードではどのように見えますか? まず、各論理コンポーネントには独自のクラスがあります。 それぞれの “load” メソッドは、親クラスを “get” します。 上記のEditIssueクラスに加えて、最終結果は次のようになります。

ProjectPage.java:

package com.example.webdriver;

import org.openqa.selenium.WebDriver;

import static org.junit.Assert.assertTrue;

public class ProjectPage extends LoadableComponent<ProjectPage> {

  private final WebDriver driver;
  private final String projectName;

  public ProjectPage(WebDriver driver, String projectName) {
    this.driver = driver;
    this.projectName = projectName;
  }

  @Override
  protected void load() {
    driver.get("http://" + projectName + ".googlecode.com/");
  }

  @Override
  protected void isLoaded() throws Error {
    String url = driver.getCurrentUrl();

    assertTrue(url.contains(projectName));
  }
}

and SecuredPage.java:

package com.example.webdriver;

import org.openqa.selenium.By;
import org.openqa.selenium.NoSuchElementException;
import org.openqa.selenium.WebDriver;
import org.openqa.selenium.WebElement;

import static org.junit.Assert.fail;

public class SecuredPage extends LoadableComponent<SecuredPage> {

  private final WebDriver driver;
  private final LoadableComponent<?> parent;
  private final String username;
  private final String password;

  public SecuredPage(WebDriver driver, LoadableComponent<?> parent, String username, String password) {
    this.driver = driver;
    this.parent = parent;
    this.username = username;
    this.password = password;
  }

  @Override
  protected void load() {
    parent.get();

    String originalUrl = driver.getCurrentUrl();

    // Sign in
    driver.get("https://www.google.com/accounts/ServiceLogin?service=code");
    driver.findElement(By.name("Email")).sendKeys(username);
    WebElement passwordField = driver.findElement(By.name("Passwd"));
    passwordField.sendKeys(password);
    passwordField.submit();

    // Now return to the original URL
    driver.get(originalUrl);
  }

  @Override
  protected void isLoaded() throws Error {
    // If you're signed in, you have the option of picking a different login.
    // Let's check for the presence of that.

    try {
      WebElement div = driver.findElement(By.id("multilogin-dropdown"));
    } catch (NoSuchElementException e) {
      fail("Cannot locate user name link");
    }
  }
}

EditIssueの “load” メソッドは次のようになります。

  @Override
  protected void load() {
    securedPage.get();

    driver.get("https://github.com/SeleniumHQ/selenium/issues/new");
  }

これは、コンポーネントがすべて相互に “ネストされている” ことを示しています。 EditIssueで get() を呼び出すと、そのすべての依存関係も読み込まれます。 使用例:

public class FooTest {
  private EditIssue editIssue;

  @Before
  public void prepareComponents() {
    WebDriver driver = new FirefoxDriver();

    ProjectPage project = new ProjectPage(driver, "selenium");
    SecuredPage securedPage = new SecuredPage(driver, project, "example", "top secret");
    editIssue = new EditIssue(driver, securedPage);
  }

  @Test
  public void demonstrateNestedLoadableComponents() {
    editIssue.get();

    editIssue.setSummary("Summary");
    editIssue.enterDescription("This is an example");
  }
}

テストで Guiceberry などのライブラリを使用している場合は、PageObjectsの設定の前文を省略して、わかりやすく読みやすいテストを作成できます。

ボットパターン

(以前の場所: https://github.com/SeleniumHQ/selenium/wiki/Bot-Style-Tests)

PageObjectsは、テストでの重複を減らすための便利な方法ですが、チームが快適にフォローできるパターンであるとは限りません。 別のアプローチは、より “コマンドのような” スタイルのテストに従うことです。

“ボット” は、生のSeleniumAPIに対するアクション指向の抽象化です。 つまり、コマンドがアプリに対して正しいことをしていないことがわかった場合、コマンドを簡単に変更できます。 例として:

public class ActionBot {
  private final WebDriver driver;

  public ActionBot(WebDriver driver) {
    this.driver = driver;
  }

  public void click(By locator) {
    driver.findElement(locator).click();
  }

  public void submit(By locator) {
    driver.findElement(locator).submit();
  }

  /** 
   * Type something into an input field. WebDriver doesn't normally clear these
   * before typing, so this method does that first. It also sends a return key
   * to move the focus out of the element.
   */
  public void type(By locator, String text) { 
    WebElement element = driver.findElement(locator);
    element.clear();
    element.sendKeys(text + "\n");
  }
}

これらの抽象化が構築され、テストでの重複が特定されると、ボットの上にPageObjectsを階層化することができます。

7.2 - テスト自動化について

まず、本当にブラウザを使用する必要があるかどうかを自問することから始めます。 ある時点で複雑なWebアプリケーションで作業している場合、おそらくブラウザを開いて実際にテストする必要があるでしょう。

ただし、Seleniumテストなどの機能的なエンドユーザーテストの実行には費用がかかります。 さらに、それらは通常、効果的に実行するために適切なインフラストラクチャを配置する必要があります。 単体テストなどのより軽量なテストアプローチを使用して、または下位レベルのアプローチを使用して、テストすることを実行できるかどうかを常に自問するのは良いルールです。

Webブラウザーのテストビジネスに参加していることを確認し、Selenium環境でテストの記述を開始できるようになったら、通常は3つのステップを組み合わせて実行します。

  • データを設定する
  • 個別の一連のアクションを実行する
  • 結果を評価する

これらの手順はできるだけ短くしてください。 ほとんどの場合、1つまたは2つの操作で十分です。 ブラウザの自動化は"不安定"であるという評判がありますが、実際には、ユーザーが頻繁に多くを求めることが多いためです。 後の章では、特にブラウザーとWebDriver間の競合状態を克服する方法に関する、テストでの断続的な問題を軽減するために使用できる手法に戻ります。

テストを短くして、代替手段がまったくない場合にのみWebブラウザーを使用することで、不安定さを最小限にして多くのテストを実行できます。

Seleniumテストの明確な利点は、ユーザーの観点から、バックエンドからフロントエンドまで、アプリケーションのすべてのコンポーネントをテストする固有の機能です。 つまり、機能テストは実行に費用がかかる可能性がありますが、同時にビジネスに不可欠な大規模な部分も含まれます。

テスト要件

前述のように、Seleniumテストの実行には費用がかかる場合があります。 どの程度までテストを実行しているブラウザーに依存しますが、歴史的にブラウザーの動作は非常に多様であるため、多くの場合、複数のブラウザーに対するクロステストの目標として述べられてきました。

Seleniumを使用すると、複数のオペレーティングシステム上の複数のブラウザーに対して同じ命令を実行できますが、すべての可能なブラウザー、それらの異なるバージョン、およびそれらが実行される多くのオペレーティングシステムの列挙はすぐに重要な作業になります。

例から始めましょう

ラリーは、ユーザーがカスタムユニコーンを注文できるWebサイトを作成しました。

一般的なワークフロー(“ハッピーパス"と呼ぶ)は次のようなものです。

  • アカウントを作成する
  • ユニコーンを設定する
  • ショッピングカートにユニコーンを追加します
  • チェックアウトしてお支払い
  • ユニコーンについてフィードバックを送る

これらのすべての操作を実行するために1つの壮大なSeleniumスクリプトを作成するのは魅力的です。 その誘惑に抵抗しましょう! そうすると、
a)時間がかかる
b)ページレンダリングのタイミングの問題に関する一般的な問題が発生する
c)失敗した場合、簡潔で"一目瞭然"にならない、何がうまくいかなかったかを診断する方法がない
というテストになります。

このシナリオをテストするための好ましい戦略は、一連の独立した迅速なテストに分割することです。 各テストには、1つの"理由"が存在します。

2番目のステップであるユニコーンの構成をテストしたいと思います。 次のアクションを実行します。

  • アカウントを作成する
  • ユニコーンを設定する

これらの手順の残りをスキップしていることに注意してください。 この手順を完了した後、他の小さな個別のテストケースで残りのワークフローをテストします。

開始するには、アカウントを作成する必要があります。 ここには、いくつかの選択があります。

  • 既存のアカウントを使用しますか?
  • 新しいアカウントを作成しますか?
  • 設定を開始する前に考慮する必要があるそのようなユーザーの特別なプロパティはありますか?

この質問への回答方法に関係なく、テストの"データのセットアップ"部分の一部にすると解決します。 ラリーが、ユーザー(またはだれでも)がユーザーアカウントを作成および更新できるAPIを公開している場合は、それを使用してこの質問に回答してください。 可能であれば、資格情報を使用してログインできるユーザーが"手元に"いる場合にのみブラウザを起動します。

各ワークフローの各テストがユーザーアカウントの作成から始まる場合、各テストの実行に何秒も追加されます。 APIの呼び出しとデータベースとの対話は、ブラウザを開いたり、適切なページに移動したり、フォームをクリックして送信されるのを待つなどの高価なプロセスを必要としない、迅速な"ヘッドレス"操作です。

理想的には、1行のコードでこのセットアップフェーズに対処できます。 これは、ブラウザーが起動する前に実行されます。

// Create a user who has read-only permissions--they can configure a unicorn,
// but they do not have payment information set up, nor do they have
// administrative privileges. At the time the user is created, its email
// address and password are randomly generated--you don't even need to
// know them.
User user = UserFactory.createCommonUser(); //This method is defined elsewhere.

// Log in as this user.
// Logging in on this site takes you to your personal "My Account" page, so the
// AccountPage object is returned by the loginAs method, allowing you to then
// perform actions from the AccountPage.
AccountPage accountPage = loginAs(user.getEmail(), user.getPassword());
  
# Create a user who has read-only permissions--they can configure a unicorn,
# but they do not have payment information set up, nor do they have
# administrative privileges. At the time the user is created, its email
# address and password are randomly generated--you don't even need to
# know them.
user = user_factory.create_common_user() #This method is defined elsewhere.

# Log in as this user.
# Logging in on this site takes you to your personal "My Account" page, so the
# AccountPage object is returned by the loginAs method, allowing you to then
# perform actions from the AccountPage.
account_page = login_as(user.get_email(), user.get_password())
  
// Create a user who has read-only permissions--they can configure a unicorn,
// but they do not have payment information set up, nor do they have
// administrative privileges. At the time the user is created, its email
// address and password are randomly generated--you don't even need to
// know them.
User user = UserFactory.CreateCommonUser(); //This method is defined elsewhere.

// Log in as this user.
// Logging in on this site takes you to your personal "My Account" page, so the
// AccountPage object is returned by the loginAs method, allowing you to then
// perform actions from the AccountPage.
AccountPage accountPage = LoginAs(user.Email, user.Password);
  
# Create a user who has read-only permissions--they can configure a unicorn,
# but they do not have payment information set up, nor do they have
# administrative privileges. At the time the user is created, its email
# address and password are randomly generated--you don't even need to
# know them.
user = UserFactory.create_common_user #This method is defined elsewhere.

# Log in as this user.
# Logging in on this site takes you to your personal "My Account" page, so the
# AccountPage object is returned by the loginAs method, allowing you to then
# perform actions from the AccountPage.
account_page = login_as(user.email, user.password)
  
// Create a user who has read-only permissions--they can configure a unicorn,
// but they do not have payment information set up, nor do they have
// administrative privileges. At the time the user is created, its email
// address and password are randomly generated--you don't even need to
// know them.
var user = userFactory.createCommonUser(); //This method is defined elsewhere.

// Log in as this user.
// Logging in on this site takes you to your personal "My Account" page, so the
// AccountPage object is returned by the loginAs method, allowing you to then
// perform actions from the AccountPage.
var accountPage = loginAs(user.email, user.password);
  
// Create a user who has read-only permissions--they can configure a unicorn,
// but they do not have payment information set up, nor do they have
// administrative privileges. At the time the user is created, its email
// address and password are randomly generated--you don't even need to
// know them.
val user = UserFactory.createCommonUser() //This method is defined elsewhere.

// Log in as this user.
// Logging in on this site takes you to your personal "My Account" page, so the
// AccountPage object is returned by the loginAs method, allowing you to then
// perform actions from the AccountPage.
val accountPage = loginAs(user.getEmail(), user.getPassword())
  

ご想像のとおり、 UserFactory を拡張して createAdminUser()createUserWithPayment() などのメソッドを提供できます。 重要なのは、これらの2行のコードは、このテストの最終目的であるユニコーンの構成からあなたをそらすものではないということです。

ページオブジェクトモデルの込み入った事柄については、後の章で説明しますが、ここで概念を紹介します。

テストは、サイトのページのコンテキスト内で、ユーザーの観点から実行されるアクションで構成される必要があります。 これらのページはオブジェクトとして保存され、Webページがどのように構成され、アクションがどのように実行されるかに関する特定の情報が含まれます。

どんなユニコーンが欲しいですか? ピンクが必要かもしれませんが、必ずしもそうではありません。 紫は最近非常に人気があります。 彼女はサングラスが必要ですか? スタータトゥー? これらの選択は困難ですが、テスターとしての最大の関心事です。 発送センターが適切なユニコーンを適切な人に送信することを確認する必要があります。

この段落では、ボタン、フィールド、ドロップダウン、ラジオボタン、またはWebフォームについては説明していません。 また、テストするべきではありません! ユーザーが問題を解決しようとしているようにコードを書きたいと思います。 これを実行する1つの方法を次に示します(前の例から継続)

// The Unicorn is a top-level Object--it has attributes, which are set here. 
// This only stores the values; it does not fill out any web forms or interact
// with the browser in any way.
Unicorn sparkles = new Unicorn("Sparkles", UnicornColors.PURPLE, UnicornAccessories.SUNGLASSES, UnicornAdornments.STAR_TATTOOS);

// Since we are already "on" the account page, we have to use it to get to the
// actual place where you configure unicorns. Calling the "Add Unicorn" method
// takes us there.
AddUnicornPage addUnicornPage = accountPage.addUnicorn();

// Now that we're on the AddUnicornPage, we will pass the "sparkles" object to
// its createUnicorn() method. This method will take Sparkles' attributes,
// fill out the form, and click submit.
UnicornConfirmationPage unicornConfirmationPage = addUnicornPage.createUnicorn(sparkles);
  
# The Unicorn is a top-level Object--it has attributes, which are set here.
# This only stores the values; it does not fill out any web forms or interact
# with the browser in any way.
sparkles = Unicorn("Sparkles", UnicornColors.PURPLE, UnicornAccessories.SUNGLASSES, UnicornAdornments.STAR_TATTOOS)

# Since we're already "on" the account page, we have to use it to get to the
# actual place where you configure unicorns. Calling the "Add Unicorn" method
# takes us there.
add_unicorn_page = account_page.add_unicorn()

# Now that we're on the AddUnicornPage, we will pass the "sparkles" object to
# its createUnicorn() method. This method will take Sparkles' attributes,
# fill out the form, and click submit.
unicorn_confirmation_page = add_unicorn_page.create_unicorn(sparkles)
  
// The Unicorn is a top-level Object--it has attributes, which are set here. 
// This only stores the values; it does not fill out any web forms or interact
// with the browser in any way.
Unicorn sparkles = new Unicorn("Sparkles", UnicornColors.Purple, UnicornAccessories.Sunglasses, UnicornAdornments.StarTattoos);

// Since we are already "on" the account page, we have to use it to get to the
// actual place where you configure unicorns. Calling the "Add Unicorn" method
// takes us there.
AddUnicornPage addUnicornPage = accountPage.AddUnicorn();

// Now that we're on the AddUnicornPage, we will pass the "sparkles" object to
// its createUnicorn() method. This method will take Sparkles' attributes,
// fill out the form, and click submit.
UnicornConfirmationPage unicornConfirmationPage = addUnicornPage.CreateUnicorn(sparkles);
  
# The Unicorn is a top-level Object--it has attributes, which are set here.
# This only stores the values; it does not fill out any web forms or interact
# with the browser in any way.
sparkles = Unicorn.new('Sparkles', UnicornColors.PURPLE, UnicornAccessories.SUNGLASSES, UnicornAdornments.STAR_TATTOOS)

# Since we're already "on" the account page, we have to use it to get to the
# actual place where you configure unicorns. Calling the "Add Unicorn" method
# takes us there.
add_unicorn_page = account_page.add_unicorn

# Now that we're on the AddUnicornPage, we will pass the "sparkles" object to
# its createUnicorn() method. This method will take Sparkles' attributes,
# fill out the form, and click submit.
unicorn_confirmation_page = add_unicorn_page.create_unicorn(sparkles)
  
// The Unicorn is a top-level Object--it has attributes, which are set here.
// This only stores the values; it does not fill out any web forms or interact
// with the browser in any way.
var sparkles = new Unicorn("Sparkles", UnicornColors.PURPLE, UnicornAccessories.SUNGLASSES, UnicornAdornments.STAR_TATTOOS);

// Since we are already "on" the account page, we have to use it to get to the
// actual place where you configure unicorns. Calling the "Add Unicorn" method
// takes us there.

var addUnicornPage = accountPage.addUnicorn();

// Now that we're on the AddUnicornPage, we will pass the "sparkles" object to
// its createUnicorn() method. This method will take Sparkles' attributes,
// fill out the form, and click submit.
var unicornConfirmationPage = addUnicornPage.createUnicorn(sparkles);

  
// The Unicorn is a top-level Object--it has attributes, which are set here. 
// This only stores the values; it does not fill out any web forms or interact
// with the browser in any way.
val sparkles = Unicorn("Sparkles", UnicornColors.PURPLE, UnicornAccessories.SUNGLASSES, UnicornAdornments.STAR_TATTOOS)

// Since we are already "on" the account page, we have to use it to get to the
// actual place where you configure unicorns. Calling the "Add Unicorn" method
// takes us there.
val addUnicornPage = accountPage.addUnicorn()

// Now that we're on the AddUnicornPage, we will pass the "sparkles" object to
// its createUnicorn() method. This method will take Sparkles' attributes,
// fill out the form, and click submit.
unicornConfirmationPage = addUnicornPage.createUnicorn(sparkles)


ユニコーンの設定が完了したら、ステップ3に進んで、ユニコーンが実際に機能することを確認する必要があります。

// The exists() method from UnicornConfirmationPage will take the Sparkles 
// object--a specification of the attributes you want to see, and compare
// them with the fields on the page.
Assert.assertTrue("Sparkles should have been created, with all attributes intact", unicornConfirmationPage.exists(sparkles));
  
# The exists() method from UnicornConfirmationPage will take the Sparkles
# object--a specification of the attributes you want to see, and compare
# them with the fields on the page.
assert unicorn_confirmation_page.exists(sparkles), "Sparkles should have been created, with all attributes intact"
  
// The exists() method from UnicornConfirmationPage will take the Sparkles 
// object--a specification of the attributes you want to see, and compare
// them with the fields on the page.
Assert.True(unicornConfirmationPage.Exists(sparkles), "Sparkles should have been created, with all attributes intact");
  
# The exists() method from UnicornConfirmationPage will take the Sparkles
# object--a specification of the attributes you want to see, and compare
# them with the fields on the page.
expect(unicorn_confirmation_page.exists?(sparkles)).to be, 'Sparkles should have been created, with all attributes intact'
  
// The exists() method from UnicornConfirmationPage will take the Sparkles
// object--a specification of the attributes you want to see, and compare
// them with the fields on the page.
assert(unicornConfirmationPage.exists(sparkles), "Sparkles should have been created, with all attributes intact");

  
// The exists() method from UnicornConfirmationPage will take the Sparkles 
// object--a specification of the attributes you want to see, and compare
// them with the fields on the page.
assertTrue("Sparkles should have been created, with all attributes intact", unicornConfirmationPage.exists(sparkles))
  

テスターはまだこのコードでユニコーンについて話しているだけです。 ボタンもロケーターもブラウザーコントロールもありません。 ラリーが来週、Ruby-on-Railsが好きではなくなったと判断し、Fortranフロントエンドを使用して最新のHaskellバインディングでサイト全体を再実装することを決めた場合でも、アプリケーションを モデル化する この方法により、これらのテストレベルのコマンドを所定の位置に変えずに維持できます。

ページオブジェクトは、サイトの再設計に準拠するために若干のメンテナンスが必要になりますが、これらのテストは同じままです。 この基本的な設計を採用することで、可能な限りブラウザに面した最小限の手順でワークフローを進めていきたいと思うでしょう。 次のワークフローでは、ユニコーンをショッピングカートに追加します。 カートの状態が適切に維持されていることを確認するために、おそらくこのテストを何度も繰り返す必要があります。 開始する前に、カートに複数のユニコーンがありますか? ショッピングカートには何個収容できますか? 同じ名前や機能で複数作成すると、壊れますか? 既存のものを保持するだけですか、それとも別のものを追加しますか?

ワークフローを移動するたびに、アカウントを作成し、ユーザーとしてログインし、ユニコーンを設定する必要を避けたいと考えています。 理想的には、APIまたはデータベースを介してアカウントを作成し、ユニコーンを事前設定できるようになります。 その後、ユーザーとしてログインし、きらめきを見つけてカートに追加するだけです。

自動化するかしないか

自動化は常に有利ですか? テストケースの自動化をいつ決定する必要がありますか?

テストケースを自動化することは必ずしも有利ではありません。 手動テストがより適切な場合があります。 たとえば、近い将来にアプリケーションのユーザーインターフェースが大幅に変更される場合は、自動化を書き換える必要があるかもしれません。 また、テストの自動化を構築する時間が足りない場合もあります。 短期的には、手動テストの方が効果的です。 アプリケーションの期限が非常に厳しい場合、現在利用できるテストの自動化はなく、その期間内にテストを実施することが不可欠です。 手動テストが最適なソリューションです。

7.3 - テストの種類

受け入れテスト

このタイプのテストは、機能またはシステムが顧客の期待と要件を満たしているかどうかを判断するために行われます。 このタイプのテストには通常、顧客の協力またはフィードバックが関与します。 下記質問に答えることで確認することができます。

正しい 製品を作っていますか?

Webアプリケーションの場合、ユーザーの予想される動作をシミュレートすることで、 このテストの自動化をSeleniumで直接実行できます。 このシミュレーションは、このドキュメントで説明されているように、記録/再生によって、 またはサポートされているさまざまな言語によって実行できます。 注:受け入れテストは 機能テスト のサブタイプであり、一部の人はこれにも言及する場合があります。

機能テスト

このタイプのテストは、機能またはシステムが問題なく正常に機能するかどうかを判断するために行われます。 システムをさまざまなレベルでチェックして、すべてのシナリオがカバーされていること、 およびシステムが実行すべきことを実行していることを確認します。 下記質問に答えることで確認することができます。

製品を 正しく 作っていますか?

これは通常以下を含みます。 テストがエラーなし(404、例外…)、使用可能な方法(正しいリダイレクト)で機能する、 利用しやすく、仕様に一致します(上記の 受け入れテスト を参照)。

Webアプリケーションの場合、期待されるリターンをシミュレートすることにより、このテストの自動化をSeleniumで直接実行できます。 このシミュレーションは、このドキュメントで説明されているように、記録/再生またはサポートされているさまざまな言語で実行できます。

パフォーマンステスト

その名前が示すように、パフォーマンステストは、アプリケーションのパフォーマンスを測定するために行われます。

パフォーマンステストには2つの主なサブタイプがあります。

ロードテスト

ロードテストは、定義されたさまざまな負荷(通常、特定の数のユーザーが同時に接続されている場合)でアプリケーションがどの程度機能するかを確認するために行われます。

ストレステスト

ストレステストは、ストレス下(またはサポートされている最大負荷以上)でアプリケーションがどの程度機能するかを確認するために行われます。

一般に、パフォーマンステストは、Seleniumで書かれたテストを実行して、さまざまなユーザーがWebアプリの特定の機能を押して、意味のある測定値を取得することをシミュレートして実行されます。

これは通常、メトリックを取得する他のツールによって行われます。 そのようなツールの1つが JMeter です。

Webアプリケーションの場合、測定する詳細には、スループット、待ち時間、データ損失、個々のコンポーネントの読み込み時間などが含まれます…

注1:すべてのブラウザには、開発者のツールセクションにパフォーマンスタブがあります(F12キーを押すとアクセス可能)

注2:これは一般に機能/機能ごとではなくシステムごとに測定されるため、 非機能テスト のサブタイプです。

回帰テスト

このテストは通常、変更、修正、または機能の追加後に行われます。

変更によって既存の機能が破壊されないようにするために、すでに実行されたいくつかのテストが再度実行されます。

再実行されるテストのセットは、完全または部分的なものにすることができ、アプリケーションおよび開発チームに応じて、いくつかの異なるタイプを含めることができます。

テスト駆動開発 (TDD)

テストタイプそのものではなく、TDDはテストが機能の設計を推進する反復的な開発方法論です。

各サイクルは、機能がパスする単体テストのセットを作成することから始まります(最初に実行すると失敗します)。

この後、テストに合格するための開発が行われます。 別のサイクルを開始してテストが再度実行され、すべてのテストに合格するまでこのプロセスが続行されます。

これは、欠陥が発見されるほどコストが安くなるという事実に基づいて、アプリケーションの開発をスピードアップすることを目的としています。

ビヘイビア駆動開発 (BDD)

BDDは、上記に基づいた反復開発方法論(TDD)でもあり、その目的は、アプリケーションの開発にすべての関係者を関与させることです。

各サイクルは、いくつかの仕様を作成することから始まります(これは失敗するはずです)。 次に、失敗する単体テスト(これも失敗するはずです)を作成し、開発を作成します。

このサイクルは、すべてのタイプのテストに合格するまで繰り返されます。

そのためには、仕様言語が使用されます。 すべての関係者が理解でき、単純で、標準的かつ明示的でなければなりません。 ほとんどのツールは、この言語として Gherkin を使用します。

目標は、潜在的な受入エラーも対象とすることでTDDよりも多くのエラーを検出し、当事者間のコミュニケーションを円滑にすることです。

現在、仕様を記述し、 CucumberSpecFlow などのコード関数と一致させるための一連のツールが利用可能です。

Selenium上に一連のツールが構築されており、BDD仕様を実行可能コードに直接変換することにより、このプロセスをさらに高速化しています。 これらのいくつかは、 JBehave、Capybara、およびRobot Framework です。

7.4 - 推奨された行動

Seleniumプロジェクトからのテストに関するいくつかのガイドラインと推奨事項

「ベストプラクティス」に関するメモ:このドキュメントでは、“ベストプラクティス"というフレーズを意図的に避けています。 すべての状況に有効なアプローチはありません。 “ガイドラインとレコメンデーション"というアイデアを好みます。 これらを一通り読み、特定の環境でどのアプローチが効果的かを慎重に決定することをお勧めします。

機能テストは、多くの理由で適切に行うのが困難です。 まるでアプリケーションの状態、複雑さ、および依存関係が、テストを十分に難しくしないと思えるほど、ブラウザ(特にクロスブラウザの非互換性)を扱うのは、良いテストの作成を難しくします。

Seleniumは、機能的なユーザーインタラクションを簡単にするツールを提供しますが、適切に設計されたテストスイートの作成には役立ちません。 この章では、機能的なWebページの自動化に取り組む方法に関するアドバイス、ガイドライン、および推奨事項を提供します。

この章では、長年にわたって成功を収めてきたSeleniumの多くのユーザーの間で人気のあるソフトウェア設計パターンを記録します。

7.4.1 - ページオブジェクトモデル

Note: this page has merged contents from multiple sources, including the Selenium wiki

Overview

Within your web app’s UI, there are areas where your tests interact with. A Page Object only models these as objects within the test code. This reduces the amount of duplicated code and means that if the UI changes, the fix needs only to be applied in one place.

Page Object is a Design Pattern that has become popular in test automation for enhancing test maintenance and reducing code duplication. A page object is an object-oriented class that serves as an interface to a page of your AUT. The tests then use the methods of this page object class whenever they need to interact with the UI of that page. The benefit is that if the UI changes for the page, the tests themselves don’t need to change, only the code within the page object needs to change. Subsequently, all changes to support that new UI are located in one place.

Advantages

  • There is a clean separation between the test code and page-specific code, such as locators (or their use if you’re using a UI Map) and layout.
  • There is a single repository for the services or operations the page offers rather than having these services scattered throughout the tests.

In both cases, this allows any modifications required due to UI changes to all be made in one place. Helpful information on this technique can be found on numerous blogs as this ‘test design pattern’ is becoming widely used. We encourage readers who wish to know more to search the internet for blogs on this subject. Many have written on this design pattern and can provide helpful tips beyond the scope of this user guide. To get you started, we’ll illustrate page objects with a simple example.

Examples

First, consider an example, typical of test automation, that does not use a page object:

/***
 * Tests login feature
 */
public class Login {

  public void testLogin() {
    // fill login data on sign-in page
    driver.findElement(By.name("user_name")).sendKeys("userName");
    driver.findElement(By.name("password")).sendKeys("my supersecret password");
    driver.findElement(By.name("sign-in")).click();

    // verify h1 tag is "Hello userName" after login
    driver.findElement(By.tagName("h1")).isDisplayed();
    assertThat(driver.findElement(By.tagName("h1")).getText(), is("Hello userName"));
  }
}

There are two problems with this approach.

  • There is no separation between the test method and the AUT’s locators (IDs in this example); both are intertwined in a single method. If the AUT’s UI changes its identifiers, layout, or how a login is input and processed, the test itself must change.
  • The ID-locators would be spread in multiple tests, in all tests that had to use this login page.

Applying the page object techniques, this example could be rewritten like this in the following example of a page object for a Sign-in page.

import org.openqa.selenium.By;
import org.openqa.selenium.WebDriver;

/**
 * Page Object encapsulates the Sign-in page.
 */
public class SignInPage {
  protected WebDriver driver;

  // <input name="user_name" type="text" value="">
  private By usernameBy = By.name("user_name");
  // <input name="password" type="password" value="">
  private By passwordBy = By.name("password");
  // <input name="sign_in" type="submit" value="SignIn">
  private By signinBy = By.name("sign_in");

  public SignInPage(WebDriver driver){
    this.driver = driver;
     if (!driver.getTitle().equals("Sign In Page")) {
      throw new IllegalStateException("This is not Sign In Page," +
            " current page is: " + driver.getCurrentUrl());
    }
  }

  /**
    * Login as valid user
    *
    * @param userName
    * @param password
    * @return HomePage object
    */
  public HomePage loginValidUser(String userName, String password) {
    driver.findElement(usernameBy).sendKeys(userName);
    driver.findElement(passwordBy).sendKeys(password);
    driver.findElement(signinBy).click();
    return new HomePage(driver);
  }
}

and page object for a Home page could look like this.

import org.openqa.selenium.By;
import org.openqa.selenium.WebDriver;

/**
 * Page Object encapsulates the Home Page
 */
public class HomePage {
  protected WebDriver driver;

  // <h1>Hello userName</h1>
  private By messageBy = By.tagName("h1");

  public HomePage(WebDriver driver){
    this.driver = driver;
    if (!driver.getTitle().equals("Home Page of logged in user")) {
      throw new IllegalStateException("This is not Home Page of logged in user," +
            " current page is: " + driver.getCurrentUrl());
    }
  }

  /**
    * Get message (h1 tag)
    *
    * @return String message text
    */
  public String getMessageText() {
    return driver.findElement(messageBy).getText();
  }

  public HomePage manageProfile() {
    // Page encapsulation to manage profile functionality
    return new HomePage(driver);
  }
  /* More methods offering the services represented by Home Page
  of Logged User. These methods in turn might return more Page Objects
  for example click on Compose mail button could return ComposeMail class object */
}

So now, the login test would use these two page objects as follows.

/***
 * Tests login feature
 */
public class TestLogin {

  @Test
  public void testLogin() {
    SignInPage signInPage = new SignInPage(driver);
    HomePage homePage = signInPage.loginValidUser("userName", "password");
    assertThat(homePage.getMessageText(), is("Hello userName"));
  }

}

There is a lot of flexibility in how the page objects may be designed, but there are a few basic rules for getting the desired maintainability of your test code.

Assertions in Page Objects

Page objects themselves should never make verifications or assertions. This is part of your test and should always be within the test’s code, never in an page object. The page object will contain the representation of the page, and the services the page provides via methods but no code related to what is being tested should be within the page object.

There is one, single, verification which can, and should, be within the page object and that is to verify that the page, and possibly critical elements on the page, were loaded correctly. This verification should be done while instantiating the page object. In the examples above, both the SignInPage and HomePage constructors check that the expected page is available and ready for requests from the test.

Page Component Objects

A page object does not necessarily need to represent all the parts of a page itself. This was noted by Martin Fowler in the early days, while first coining the term “panel objects”.

The same principles used for page objects can be used to create “Page Component Objects”, as it was later called, that represent discrete chunks of the page and can be included in page objects. These component objects can provide references to the elements inside those discrete chunks, and methods to leverage the functionality or behavior provided by them.

For example, a Products page has multiple products.

<!-- Products Page -->
<div class="header_container">
    <span class="title">Products</span>
</div>

<div class="inventory_list">
    <div class="inventory_item">
    </div>
    <div class="inventory_item">
    </div>
    <div class="inventory_item">
    </div>
    <div class="inventory_item">
    </div>
    <div class="inventory_item">
    </div>
    <div class="inventory_item">
    </div>
</div>

Each product is a component of the Products page.

<!-- Inventory Item -->
<div class="inventory_item">
    <div class="inventory_item_name">Backpack</div>
    <div class="pricebar">
        <div class="inventory_item_price">$29.99</div>
        <button id="add-to-cart-backpack">Add to cart</button>
    </div>
</div>

The Products page HAS-A list of products. This object relationship is called Composition. In simpler terms, something is composed of another thing.

public abstract class BasePage {
    protected WebDriver driver;

    public BasePage(WebDriver driver) {
        this.driver = driver;
    }
}

// Page Object
public class ProductsPage extends BasePage {
    public ProductsPage(WebDriver driver) {
        super(driver);
        // No assertions, throws an exception if the element is not loaded
        new WebDriverWait(driver, Duration.ofSeconds(3))
            .until(d -> d.findElement(By.className("header_container")));
    }

    // Returning a list of products is a service of the page
    public List<Product> getProducts() {
        return driver.findElements(By.className("inventory_item"))
            .stream()
            .map(e -> new Product(e)) // Map WebElement to a product component
            .toList();
    }

    // Return a specific product using a boolean-valued function (predicate)
    // This is the behavioral Strategy Pattern from GoF
    public Product getProduct(Predicate<Product> condition) {
        return getProducts()
            .stream()
            .filter(condition) // Filter by product name or price
            .findFirst()
            .orElseThrow();
    }
}

The Product component object is used inside the Products page object.

public abstract class BaseComponent {
    protected WebElement root;

    public BaseComponent(WebElement root) {
        this.root = root;
    }
}

// Page Component Object
public class Product extends BaseComponent {
    // The root element contains the entire component
    public Product(WebElement root) {
        super(root); // inventory_item
    }

    public String getName() {
        // Locating an element begins at the root of the component
        return root.findElement(By.className("inventory_item_name")).getText();
    }

    public BigDecimal getPrice() {
        return new BigDecimal(
                root.findElement(By.className("inventory_item_price"))
                    .getText()
                    .replace("$", "")
            ).setScale(2, RoundingMode.UNNECESSARY); // Sanitation and formatting
    }

    public void addToCart() {
        root.findElement(By.id("add-to-cart-backpack")).click();
    }
}

So now, the products test would use the page object and the page component object as follows.

public class ProductsTest {
    @Test
    public void testProductInventory() {
        var productsPage = new ProductsPage(driver); // page object
        var products = productsPage.getProducts();
        assertEquals(6, products.size()); // expected, actual
    }
    
    @Test
    public void testProductPrices() {
        var productsPage = new ProductsPage(driver);

        // Pass a lambda expression (predicate) to filter the list of products
        // The predicate or "strategy" is the behavior passed as parameter
        var backpack = productsPage.getProduct(p -> p.getName().equals("Backpack")); // page component object
        var bikeLight = productsPage.getProduct(p -> p.getName().equals("Bike Light"));

        assertEquals(new BigDecimal("29.99"), backpack.getPrice());
        assertEquals(new BigDecimal("9.99"), bikeLight.getPrice());
    }
}

The page and component are represented by their own objects. Both objects only have methods for the services they offer, which matches the real-world application in object-oriented programming.

You can even nest component objects inside other component objects for more complex pages. If a page in the AUT has multiple components, or common components used throughout the site (e.g. a navigation bar), then it may improve maintainability and reduce code duplication.

Other Design Patterns Used in Testing

There are other design patterns that also may be used in testing. Discussing all of these is beyond the scope of this user guide. Here, we merely want to introduce the concepts to make the reader aware of some of the things that can be done. As was mentioned earlier, many have blogged on this topic and we encourage the reader to search for blogs on these topics.

Implementation Notes

PageObjects can be thought of as facing in two directions simultaneously. Facing toward the developer of a test, they represent the services offered by a particular page. Facing away from the developer, they should be the only thing that has a deep knowledge of the structure of the HTML of a page (or part of a page) It’s simplest to think of the methods on a Page Object as offering the “services” that a page offers rather than exposing the details and mechanics of the page. As an example, think of the inbox of any web-based email system. Amongst the services it offers are the ability to compose a new email, choose to read a single email, and list the subject lines of the emails in the inbox. How these are implemented shouldn’t matter to the test.

Because we’re encouraging the developer of a test to try and think about the services they’re interacting with rather than the implementation, PageObjects should seldom expose the underlying WebDriver instance. To facilitate this, methods on the PageObject should return other PageObjects. This means we can effectively model the user’s journey through our application. It also means that should the way that pages relate to one another change (like when the login page asks the user to change their password the first time they log into a service when it previously didn’t do that), simply changing the appropriate method’s signature will cause the tests to fail to compile. Put another way; we can tell which tests would fail without needing to run them when we change the relationship between pages and reflect this in the PageObjects.

One consequence of this approach is that it may be necessary to model (for example) both a successful and unsuccessful login; or a click could have a different result depending on the app’s state. When this happens, it is common to have multiple methods on the PageObject:

public class LoginPage {
    public HomePage loginAs(String username, String password) {
        // ... clever magic happens here
    }
    
    public LoginPage loginAsExpectingError(String username, String password) {
        //  ... failed login here, maybe because one or both of the username and password are wrong
    }
    
    public String getErrorMessage() {
        // So we can verify that the correct error is shown
    }
}

The code presented above shows an important point: the tests, not the PageObjects, should be responsible for making assertions about the state of a page. For example:

public void testMessagesAreReadOrUnread() {
    Inbox inbox = new Inbox(driver);
    inbox.assertMessageWithSubjectIsUnread("I like cheese");
    inbox.assertMessageWithSubjectIsNotUnread("I'm not fond of tofu");
}

could be re-written as:

public void testMessagesAreReadOrUnread() {
    Inbox inbox = new Inbox(driver);
    assertTrue(inbox.isMessageWithSubjectIsUnread("I like cheese"));
    assertFalse(inbox.isMessageWithSubjectIsUnread("I'm not fond of tofu"));
}

Of course, as with every guideline, there are exceptions, and one that is commonly seen with PageObjects is to check that the WebDriver is on the correct page when we instantiate the PageObject. This is done in the example below.

Finally, a PageObject need not represent an entire page. It may represent a section that appears frequently within a site or page, such as site navigation. The essential principle is that there is only one place in your test suite with knowledge of the structure of the HTML of a particular (part of a) page.

Summary

  • The public methods represent the services that the page offers
  • Try not to expose the internals of the page
  • Generally don’t make assertions
  • Methods return other PageObjects
  • Need not represent an entire page
  • Different results for the same action are modelled as different methods

Example

public class LoginPage {
    private final WebDriver driver;

    public LoginPage(WebDriver driver) {
        this.driver = driver;

        // Check that we're on the right page.
        if (!"Login".equals(driver.getTitle())) {
            // Alternatively, we could navigate to the login page, perhaps logging out first
            throw new IllegalStateException("This is not the login page");
        }
    }

    // The login page contains several HTML elements that will be represented as WebElements.
    // The locators for these elements should only be defined once.
        By usernameLocator = By.id("username");
        By passwordLocator = By.id("passwd");
        By loginButtonLocator = By.id("login");

    // The login page allows the user to type their username into the username field
    public LoginPage typeUsername(String username) {
        // This is the only place that "knows" how to enter a username
        driver.findElement(usernameLocator).sendKeys(username);

        // Return the current page object as this action doesn't navigate to a page represented by another PageObject
        return this;	
    }

    // The login page allows the user to type their password into the password field
    public LoginPage typePassword(String password) {
        // This is the only place that "knows" how to enter a password
        driver.findElement(passwordLocator).sendKeys(password);

        // Return the current page object as this action doesn't navigate to a page represented by another PageObject
        return this;	
    }

    // The login page allows the user to submit the login form
    public HomePage submitLogin() {
        // This is the only place that submits the login form and expects the destination to be the home page.
        // A seperate method should be created for the instance of clicking login whilst expecting a login failure. 
        driver.findElement(loginButtonLocator).submit();

        // Return a new page object representing the destination. Should the login page ever
        // go somewhere else (for example, a legal disclaimer) then changing the method signature
        // for this method will mean that all tests that rely on this behaviour won't compile.
        return new HomePage(driver);	
    }

    // The login page allows the user to submit the login form knowing that an invalid username and / or password were entered
    public LoginPage submitLoginExpectingFailure() {
        // This is the only place that submits the login form and expects the destination to be the login page due to login failure.
        driver.findElement(loginButtonLocator).submit();

        // Return a new page object representing the destination. Should the user ever be navigated to the home page after submiting a login with credentials 
        // expected to fail login, the script will fail when it attempts to instantiate the LoginPage PageObject.
        return new LoginPage(driver);	
    }

    // Conceptually, the login page offers the user the service of being able to "log into"
    // the application using a user name and password. 
    public HomePage loginAs(String username, String password) {
        // The PageObject methods that enter username, password & submit login have already defined and should not be repeated here.
        typeUsername(username);
        typePassword(password);
        return submitLogin();
    }
}

7.4.2 - ドメイン固有言語(DSL)

ドメイン固有言語(DSL)は、問題を解決するための表現手段をユーザーに提供するシステムです。 それによって、ユーザーは、プログラマーの言葉でなく、自分の言葉でシステムとやりとりすることができます。

通常、ユーザーはサイトの外観を気にしません。 装飾、アニメーション、グラフィックスは気にしません。 彼らはあなたのシステムを使用して、新しい従業員を最小限の難しさでプロセスに押し込みたいと考えています。 彼らはアラスカへの旅行を予約したい。 ユニコーンを設定して割引価格で購入したいのです。 テスターとしてのあなたの仕事は、この考え方を"とらえる"ことにできるだけ近づくことです。 それを念頭に置いて、テストスクリプト(ユーザーの唯一のプレリリースの代理人)がユーザーを"代弁し"、表現するように、作業中のアプリケーションの"モデリング"に取り掛かります。

Seleniumでは、DSLは通常、APIをシンプルで読みやすいように記述したメソッドで表されます。 開発者と利害関係者(ユーザー、製品所有者、ビジネスインテリジェンススペシャリストなど)との伝達が可能になります。

利点

  • Readable: ビジネス関係者はそれを理解できます。
  • Writable: 書きやすく、不要な重複を避けます。
  • Extensible: 機能は(合理的に)契約と既存の機能を壊すことなく追加できます。
  • Maintainable: 実装の詳細をテストケースから除外することにより、AUT* の変更に対して十分に隔離されます。

Java

Javaの妥当なDSLメソッドの例を次に示します。 簡潔にするために、driverオブジェクトが事前に定義されており、メソッドで使用可能であることを前提としています。

/**
 * Takes a username and password, fills out the fields, and clicks "login".
 * @return An instance of the AccountPage
 */
public AccountPage loginAsUser(String username, String password) {
  WebElement loginField = driver.findElement(By.id("loginField"));
  loginField.clear();
  loginField.sendKeys(username);

  // Fill out the password field. The locator we're using is "By.id", and we should
  // have it defined elsewhere in the class.
  WebElement passwordField = driver.findElement(By.id("password"));
  passwordField.clear();
  passwordField.sendKeys(password);

  // Click the login button, which happens to have the id "submit".
  driver.findElement(By.id("submit")).click();

  // Create and return a new instance of the AccountPage (via the built-in Selenium
  // PageFactory).
  return PageFactory.newInstance(AccountPage.class);
}

このメソッドは、テストコードから入力フィールド、ボタン、クリック、さらにはページの概念を完全に抽象化します。 このアプローチを使用すると、テスターはこのメソッドを呼び出すだけで済みます。 これにより、メンテナンスの利点が得られます。 ログインフィールドが変更された場合、テストではなく、このメソッドを変更するだけで済みます。

public void loginTest() {
    loginAsUser("cbrown", "cl0wn3");

    // Now that we're logged in, do some other stuff--since we used a DSL to support
    // our testers, it's as easy as choosing from available methods.
    do.something();
    do.somethingElse();
    Assert.assertTrue("Something should have been done!", something.wasDone());

    // Note that we still haven't referred to a button or web control anywhere in this
    // script...
}

繰り返しになります。 主な目標の1つは、 テストが UIの問題ではなく、手元の問題 に対処できるAPIを作成することです。 UIはユーザーにとって二次的な関心事です。ユーザーはUIを気にせず、ただ仕事をやりたいだけです。 テストスクリプトは、ユーザーがやりたいことと知りたいことの長々としたリストのように読む必要があります。 テストでは、UIがどのようにそれを実行するように要求するかについて、気にするべきではありません。

*AUT: Application under test(テスト対象アプリケーション)

7.4.3 - アプリケーション状態の生成

Seleniumはテストケースの準備に使用しないでください。 テストケースのすべての反復アクションと準備は、他の方法で行う必要があります。 たとえば、ほとんどのWeb UIには認証があります(ログインフォームなど)。 すべてのテストの前にWebブラウザーからのログインをなくすことで、テストの速度と安定性の両方が向上します。 AUT* にアクセスするためのメソッドを作成する必要があります(APIを使用してログインし、Cookieを設定するなど)。 また、テスト用にデータをプリロードするメソッドの作成は、Seleniumを使用して実行しないほうがいいです。 前述のように、AUT* のデータを作成するには、既存のAPIを活用する必要があります。

*AUT: Application under test(テスト対象アプリケーション)

7.4.4 - モック外部サービス

外部サービスへの依存を排除すると、テストの速度と安定性が大幅に向上します。

7.4.5 - 改善されたレポート

Seleniumは、実行されたテストケースのステータスをレポートするようには設計されていません。 単体テストフレームワークの組み込みのレポート機能を利用することは、良いスタートです。 ほとんどの単体テストフレームワークには、xUnitまたはHTML形式のレポートを生成できるレポートがあります。 xUnitレポートは、Jenkins、Travis、Bambooなどの継続的インテグレーション(CI)サーバーに結果をインポートするのに人気があります。 いくつかの言語のレポート出力に関する詳細情報へのリンクがあります。

NUnit 3 Console Runner

NUnit 3 Console Command Line

xUnit getting test results in TeamCity

xUnit getting test results in CruiseControl.NET

xUnit getting test results in Azure DevOps

7.4.6 - ロケータをうまく扱うTips

どのロケータを指定すべきか、コード内でロケータをどう管理すると良いか。

サポートしているロケータについては 要素を探すを参照してください。

一般に、HTMLのid属性が利用可能でユニークかつ一貫している場合、ページで要素を探す方法として適しています。 idは動作がとても速い傾向があり、複雑なDOMトラバースに伴う処理を省略できます。

ユニークなidが使えない場合、きれいに書かれたCSSセレクタが要素を探す方法として適しています。 XPathはCSSセレクタと同様に動作しますが、シンタックスは複雑で大抵の場合デバッグが困難です。 XPathはとても柔軟ですが、ブラウザベンダは性能テストを通常行っておらず、非常に動作が遅い傾向があります。

link textセレクタとpartial linkText セレクタはa要素でしか動作しないという欠点があります。 加えて、これらはWebDriverの内部でquerySelectorAllの呼び出しに置き換えられます。

タグ名によるロケータは危険な方法になり得ます。 大抵の場合ページ上には同じタグ名の要素が複数あります。タグ名は要素のコレクションを返す findElements(By) メソッドを使う時にもっとも役に立ちます。

ロケータは可能な限り簡潔に、読みやすい状態を保つことを推奨します。 WebDriverでDOM構造のトラバースを行うのは重い処理となります。 検索の範囲を狭めた方がより良い結果を得られます。

7.4.7 - 状態を共有しない

いくつかの場所で言及されていますが、再度言及する価値があります。 テストが互いに分離されていることを確認してください。

  • テストデータを共有しないでください。 アクションを実行する1つを選択する前に、それぞれが有効な注文をデータベースに照会するいくつかのテストを想像してください。 2つのテストで同じ順序を選択すると、予期しない動作が発生する可能性があります。

  • 別のテストで取得される可能性のあるアプリケーション内の古いデータを削除します。 例: 無効な注文レコード

  • テストごとに新しいWebDriverインスタンスを作成します。 これにより、テストの分離が保証され、並列化がより簡単になります。

7.4.8 - テストの独立性

各テストを独自のユニットとして記述します。 他のテストに依存しない方法でテストを記述してください。

公開後にモジュールとしてWebサイトに表示されるカスタムコンテンツを作成できるコンテンツ管理システム(CMS)があり、CMSとアプリケーション間の同期に時間がかかる場合があるとします。

モジュールをテストする間違った方法は、1つのテストでコンテンツが作成および公開され、別のテストでモジュールをチェックすることです。 コンテンツは公開後、他のテストですぐに利用できない可能性があるため、この方法はふさわしくありません。

代わりに、影響を受けるテスト内でオン/オフできるスタブコンテンツを作成し、それをモジュールの検証に使用できます。 ただし、コンテンツの作成については、別のテストを行うことができます。

7.4.9 - Fluent APIの使用を検討する

マーチン・ファウラーは“Fluent API”という用語を作り出しました。 Seleniumは既に、FluentWaitクラスでこのようなものを実装しています。 これは、標準のWaitクラスの代替としてのものです。 ページオブジェクトでFluent APIデザインパターンを有効にしてから、次のようなコードスニペットを使用してGoogle検索ページを照会できます。

driver.get( "http://www.google.com/webhp?hl=en&amp;tab=ww" );
GoogleSearchPage gsp = new GoogleSearchPage(driver);
gsp.setSearchString().clickSearchButton();

この流暢な動作を持つGoogleページオブジェクトクラスは次のようになります。

public abstract class BasePage {
    protected WebDriver driver;

    public BasePage(WebDriver driver) {
        this.driver = driver;
    }
}

public class GoogleSearchPage extends BasePage {
    public GoogleSearchPage(WebDriver driver) {
        super(driver);
        // Generally do not assert within pages or components.
        // Effectively throws an exception if the lambda condition is not met.
        new WebDriverWait(driver, Duration.ofSeconds(3)).until(d -> d.findElement(By.id("logo")));
    }

    public GoogleSearchPage setSearchString(String sstr) {
        driver.findElement(By.id("gbqfq")).sendKeys(sstr);
        return this;
    }

    public void clickSearchButton() {
        driver.findElement(By.id("gbqfb")).click();
    }
}

7.4.10 - テストごとに新しいブラウザを起動する

クリーンな既知の状態から各テストを開始します。 理想的には、テストごとに新しい仮想マシンを起動します。 新しい仮想マシンの起動が実用的でない場合は、少なくともテストごとに新しいWebDriverを起動してください。 Firefoxの場合、既知のプロファイルでWebDriverを起動します。 Most browser drivers like GeckoDriver and ChromeDriver will start with a clean known state with a new user profile, by default.

WebDriver driver = new FirefoxDriver();

7.5 - 推奨されない行動

Seleniumでブラウザを自動化するときに避けるべきこと。

7.5.1 - CAPTCHA(キャプチャ)

CAPTCHA(キャプチャ)は、 Completely Automated Public Turing test to tell Computers and Humans Apart (コンピューターと人間を区別するための完全に自動化された公開チューリングテスト)の略で、自動化を防ぐように明示的に設計されているため、試さないでください! CAPTCHAチェックを回避するための2つの主要な戦略があります。

  • テスト環境でCAPTCHAを無効にします
  • テストがCAPTCHAをバイパスできるようにするフックを追加します

7.5.2 - ファイルダウンロード

Seleniumの管理下にあるブラウザーでリンクをクリックしてダウンロードを開始することは可能ですが、APIはダウンロードの進行状況を公開しないため、ダウンロードしたファイルのテストには理想的ではありません。 これは、ファイルのダウンロードは、Webプラットフォームとのユーザーインタラクションをエミュレートする重要な側面とは見なされないためです。 代わりに、Selenium(および必要なCookie)を使用してリンクを見つけ、 libcurl などのHTTPリクエストライブラリに渡します。

HtmlUnitドライバーは、 AttachmentHandler インターフェイスを実装することで、 入力ストリームとして添付ファイルにアクセスすることによって、添付ファイルをダウンロードできます。 AttachmentHandlerは、HtmlUnit に追加できます。

7.5.3 - HTTPレスポンスコード

Selenium RCの一部のブラウザー構成では、Seleniumはブラウザーと自動化されているサイトの間のプロキシとして機能しました。 これは、Seleniumを通過したすべてのブラウザートラフィックをキャプチャまたは操作できることを意味していました。 captureNetworkTraffic() メソッドは、HTTPレスポンスコードを含むブラウザーと自動化されているサイト間のすべてのネットワークトラフィックをキャプチャすることを目的としています。

Selenium WebDriverは、ブラウザーの自動化に対するまったく異なるアプローチであり、ユーザーのように振る舞うことを好むため、WebDriverを使用してテストを記述する方法で表現します。 自動化された機能テストでは、ステータスコードの確認はテストの失敗の特に重要な詳細ではありません。 それに先行する手順がより重要です。

ブラウザーは常にHTTPステータスコードを表します。たとえば、404または500エラーページを想像してください。 これらのエラーページの1つに遭遇したときに"早く失敗"する簡単な方法は、ページが読み込まれるたびにページタイトルまたは信頼できるポイント(たとえば <h1> タグ)のコンテンツをチェックすることです。 ページオブジェクトモデルを使用している場合、このチェックをクラスコンストラクターまたはページの読み込みが予想される同様のポイントに含めることができます。 場合によっては、HTTPコードがブラウザーのエラーページに表示されることもあります。 WebDriverを使用してこれを読み取り、デバッグ出力を改善できます。

Webページ自体を確認することは、WebDriverの理想的なプラクティスに沿っており、WebDriverのユーザーのWebサイトの見え方を表現し、主張します。

HTTPステータスコードをキャプチャするための高度なソリューションは、プロキシを使用してSelenium RCの動作を複製することです。 WebDriver APIは、ブラウザーのプロキシを設定する機能を提供します。 Webサーバーとの間で送受信されるリクエストのコンテンツをプログラムで操作できるプロキシがいくつかあります。 プロキシを使用すると、リダイレクトレスポンスコードへの応答方法を決めることができます。 さらに、すべてのブラウザーがWebDriverでレスポンスコードを利用できるようにするわけではないため、プロキシを使用することを選択すると、すべてのブラウザーで機能するソリューションが得られます。

7.5.4 - Gmail、Eメール、Facebookログイン

複数の理由から、WebDriverを使用してGmailやFacebookなどのサイトにログインすることはお勧めしません。 これらのサイトの使用条件(アカウントがシャットダウンされるリスクがある)に違反することは別として、それは遅く、信頼性がありません。

理想的なプラクティスは、メールプロバイダーが提供するAPIを使用すること、またはFacebookの場合、テストアカウントや友人などを作成するためのAPIを公開する開発者ツールサービスを使用することです。 APIの使用は少し大変な作業のように思えるかもしれませんが、速度、信頼性、および安定性に見返りがあります。 また、APIが変更されることはほとんどありませんが、WebページとHTMLロケーターは頻繁に変更され、テストフレームワークを更新する必要があります。

テストの任意の時点でWebDriverを使用してサードパーティのサイトにログインすると、テストが長くなるため、テストが失敗するリスクが高くなります。 一般的な経験則として、テストが長くなるほど脆弱で信頼性が低くなります。

W3C準拠 のWebDriver実装は、サービス拒否攻撃を軽減できるように、navigatorオブジェクトにWebDriverプロパティで注釈を付けます。

7.5.5 - テストの依存関係

自動テストに関する一般的な考え方と誤解は、特定のテスト順序に関するものです。 テストは 任意 の順序で実行でき、成功するために完了するために他のテストに依存してはなりません。

7.5.6 - パフォーマンステスト

通常、SeleniumとWebDriverを使用したパフォーマンステストはお勧めしません。 それができないからではなく、ジョブに最適化されておらず、良い結果が得られないからです。

ユーザーのコンテキストでパフォーマンステストを行うのが理想的なように思えるかもしれませんが、WebDriverテストスイートは、外部および内部の脆弱性の多くのポイントにさらされます。 たとえば、ブラウザの起動速度、HTTPサーバーの速度、JavaScriptまたはCSSをホストするサードパーティサーバーの応答、およびWebDriver実装自体の計測ペナルティ。 これらのポイントが変わることで、結果が変わります。 Webサイトのパフォーマンスと外部リソースのパフォーマンスの違いを区別することは困難です。また、ブラウザでWebDriverを使用すること、特にスクリプトを挿入する場合のパフォーマンスの低下を把握することも困難です。

他の潜在的な魅力は “時間の節約” です。 機能テストとパフォーマンステストを同時に実行します。 ただし、機能テストとパフォーマンステストには反対の目的があります。 機能をテストするために、テスターは忍耐強くロードを待つ必要があるかもしれませんが、これはパフォーマンステスト結果を曖昧にし、その逆もまた同様です。

Webサイトのパフォーマンスを改善するには、改善すべき点を知るために、環境の違いに関係なく全体的なパフォーマンスを分析し、貧弱なコードプラクティス、個々のリソース(例えば、CSSまたはJavaScript)のパフォーマンスの内訳を特定できる必要があります。 このジョブを実行できるパフォーマンステストツールが既にあり、それらは改善を提案できるレポートと分析を提供します。

使用する(オープンソース)パッケージの例は次のとおりです。: JMeter

7.5.7 - リンクスパイダー

WebDriverを使用してリンクをスパイダーすることは、実行できないためではなく、最も理想的なツールではないため明らかに推奨される方法ではありません。 WebDriverの起動には時間が必要であり、テストの記述方法によっては、ページに到達してDOMを通過するために数秒から1分かかる場合があります。

このためにWebDriverを使用する代わりに、curl コマンドを実行するか、BeautifulSoupなどのライブラリを使用することにより、これらの方法はブラウザーの作成やページへの移動に依存しないため、時間を大幅に節約できます。 このタスクにWebDriverを使用しないことで、時間を大幅に節約できます。

7.5.8 - 二要素認証

2FA として知られている2要素認証は、“Google Authenticator” 、 “Microsoft Authenticator” などの"Authenticator" モバイルアプリを使用して、 またはSMS、電子メールで認証することにより、 ワンタイムパスワード(OTP)を生成する認証メカニズムです。 これをシームレスかつ一貫して自動化することは、Seleniumの大きな課題です。 このプロセスを自動化する方法はいくつかあります。 しかし、これはSeleniumテストの上にある別のレイヤーであり、また安全でもありません。 したがって、2FAの自動化を回避したほうがいいです。

2FAチェックを回避するいくつかの選択肢があります。

  • テスト環境で特定のユーザーの2FAを無効にして、 それらのユーザー資格情報を自動化で使用できるようにします。
  • テスト環境で2FAを無効にします。
  • 特定のIPからログインする場合は、2FAを無効にします。 そうすれば、テストマシンのIPを設定してこれを回避できます。

8 - このドキュメントについて

これらのドキュメントは、コード自体と同様に、Seleniumコミュニティ内のボランティアによって100%維持されます。 当初から多くの人が使用してきましたが、多くの人が短期間しか使用しておらず、新しいユーザーのオンボーディングエクスペリエンスの改善に時間を割いてきました。

ドキュメントに問題がある場合、知りたいです! 問題を伝える最良の方法は、https://github.com/seleniumhq/seleniumhq.github.io/issuesにアクセスし、問題が既に報告されているかどうかを検索することです。 そうでない場合は、自由に開いてください!

コミュニティの多くのメンバーは、Libera.chat#selenium Liberaチャンネルに頻繁にアクセスします。 気軽に立ち寄って質問してください。 これらのドキュメントで役立つと思われるヘルプを受け取った場合は、必ず貢献を追加してください。 これらのドキュメントを更新することはできますが、通常のコミッター以外から投稿を受け取ると、誰にとってもずっと簡単になります。

8.1 - 著作権と帰属

Copyright, contributions and all attributions for the different projects under the Selenium umbrella.

Page being translated from English to Japanese. Do you speak Japanese? Help us to translate it by sending us pull requests!

Seleniumのドキュメント

このドキュメントをできるだけ完全かつ正確にするためにあらゆる努力が払われましたが、 保証または適合性は暗示されていません。 提供される情報は「現状のまま」です。 著者および出版社は、本書に含まれる情報から生じる損失または損害に関して、 いかなる個人または団体に対しても責任も責任も負わないものとします。 ここに含まれる情報の使用に関して、特許責任は一切負いません。

帰属

Thanks to:

Selenium メイン Repository

5151 commits
3352 commits
2459 commits
1464 commits
1299 commits
1212 commits
1175 commits
1162 commits
1051 commits
970 commits
599 commits
523 commits
473 commits
326 commits
303 commits
289 commits
225 commits
205 commits
200 commits
191 commits
179 commits
171 commits
167 commits
138 commits
137 commits
133 commits
115 commits
109 commits
108 commits
94 commits
91 commits
90 commits
66 commits
63 commits
49 commits
48 commits
46 commits
44 commits
42 commits
41 commits
40 commits
37 commits
36 commits
34 commits
32 commits
30 commits
28 commits
26 commits
26 commits
25 commits
24 commits
22 commits
21 commits
20 commits
20 commits
20 commits
19 commits
16 commits
15 commits
14 commits
13 commits
12 commits
12 commits
12 commits
12 commits
11 commits
10 commits
10 commits
9 commits
9 commits
9 commits
9 commits
8 commits
7 commits
7 commits
7 commits
7 commits
7 commits
7 commits
7 commits
7 commits
6 commits
6 commits
6 commits
6 commits
5 commits
5 commits
5 commits
5 commits
5 commits
5 commits
5 commits
5 commits
5 commits
4 commits
4 commits
4 commits
4 commits
4 commits
4 commits

Selenium IDE

2445 commits
176 commits
88 commits
57 commits
51 commits
36 commits
36 commits
34 commits
24 commits
15 commits
15 commits
12 commits
12 commits
6 commits
4 commits
3 commits
3 commits
3 commits
3 commits
2 commits
2 commits
2 commits
2 commits
2 commits
2 commits
1 commits
1 commits
1 commits
1 commits
1 commits
1 commits
1 commits
1 commits
1 commits
1 commits
1 commits
1 commits
1 commits
1 commits
1 commits

Docker Selenium

516 commits
134 commits
107 commits
53 commits
50 commits
27 commits
24 commits
12 commits
9 commits
8 commits
7 commits
5 commits
5 commits
4 commits
4 commits
4 commits
4 commits
4 commits
4 commits
4 commits
4 commits
3 commits
3 commits
3 commits
3 commits
3 commits
3 commits
2 commits
2 commits
2 commits
2 commits
2 commits
2 commits
2 commits
2 commits
2 commits
2 commits
2 commits
2 commits
2 commits
2 commits
2 commits
2 commits
2 commits
2 commits
2 commits
2 commits
2 commits
1 commits
1 commits
1 commits
1 commits
1 commits
1 commits
1 commits
1 commits
1 commits
1 commits
1 commits
1 commits
1 commits
1 commits
1 commits
1 commits
1 commits
1 commits
1 commits
1 commits
1 commits
1 commits
1 commits
1 commits
1 commits
1 commits
1 commits
1 commits
1 commits
1 commits
1 commits
1 commits
1 commits
1 commits
1 commits
1 commits
1 commits
1 commits
1 commits
1 commits
1 commits
1 commits
1 commits
1 commits
1 commits
1 commits
1 commits
1 commits
1 commits
1 commits

Selenium Website & Docs

654 commits
592 commits
323 commits
134 commits
101 commits
47 commits
39 commits
32 commits
28 commits
25 commits
21 commits
18 commits
18 commits
17 commits
15 commits
15 commits
12 commits
12 commits
11 commits
10 commits
8 commits
8 commits
7 commits
7 commits
7 commits
6 commits
6 commits
6 commits
6 commits
5 commits
5 commits
5 commits
5 commits
5 commits
5 commits
5 commits
5 commits
4 commits
4 commits
4 commits
4 commits
4 commits
4 commits
4 commits
4 commits
3 commits
3 commits
3 commits
3 commits
3 commits
3 commits
3 commits
3 commits
3 commits
3 commits
3 commits
3 commits
3 commits
3 commits
3 commits
3 commits
3 commits
2 commits
2 commits
2 commits
2 commits
2 commits
2 commits
2 commits
2 commits
2 commits
2 commits
2 commits
2 commits
2 commits
2 commits
2 commits
2 commits
2 commits
2 commits
2 commits
2 commits
2 commits
2 commits
2 commits
2 commits
2 commits
1 commits
1 commits
1 commits
1 commits
1 commits
1 commits
1 commits
1 commits
1 commits

Previous Selenium Website

417 commits
87 commits
79 commits
63 commits
59 commits
40 commits
40 commits
36 commits
26 commits
24 commits
22 commits
21 commits
21 commits
19 commits
17 commits
14 commits
12 commits
11 commits
11 commits
10 commits
7 commits
6 commits
5 commits
5 commits
5 commits
5 commits
5 commits
5 commits
3 commits
2 commits
2 commits
2 commits
2 commits
2 commits
2 commits
2 commits
2 commits
2 commits
2 commits
2 commits
1 commits
1 commits
1 commits
1 commits
1 commits
1 commits
1 commits
1 commits
1 commits
1 commits
1 commits
1 commits
1 commits
1 commits
1 commits
1 commits
1 commits
1 commits
1 commits
1 commits
1 commits
1 commits
1 commits
1 commits
1 commits
1 commits
1 commits
1 commits
1 commits
1 commits
1 commits
1 commits
1 commits
1 commits
1 commits
1 commits
1 commits
1 commits
1 commits
1 commits
1 commits
1 commits

Previous Documentation Rewrite Project

197 commits
105 commits
54 commits
30 commits
27 commits
25 commits
21 commits
17 commits
16 commits
12 commits
12 commits
12 commits
12 commits
8 commits
7 commits
6 commits
6 commits
6 commits
6 commits
5 commits
5 commits
5 commits
4 commits
4 commits
4 commits
4 commits
3 commits
3 commits
3 commits
2 commits
2 commits
2 commits
2 commits
2 commits
2 commits
2 commits
2 commits
2 commits
2 commits
1 commits
1 commits
1 commits
1 commits
1 commits
1 commits
1 commits
1 commits
1 commits
1 commits
1 commits
1 commits
1 commits
1 commits
1 commits
1 commits
1 commits
1 commits
1 commits
1 commits
1 commits
1 commits
1 commits
1 commits
1 commits
1 commits
1 commits
1 commits
1 commits
1 commits
1 commits
1 commits

Seleniumドキュメントプロジェクトで使用されるサードパーティソフトウェア

SoftwareVersionLicense
Hugov0.110.0Apache 2.0
DocsyApache 2.0

ライセンス

Seleniumプロジェクトから作成されたすべてのコードとドキュメントは、 Apache 2.0ライセンスに基づいてライセンスされており、 Software Freedom Conservancy に著作権があります。

ライセンスは便宜上ここに含まれていますが、 Apache FoundationのWebサイトでも見つけることができます。

                                 Apache License
                           Version 2.0, 2004年1月
                        http://www.apache.org/licenses/

   使用、複製、および頒布に関する条項

   1. 定義  

      「ライセンス」とは、このドキュメントの第1項から第9項までで定義している、
      使用、複製、および頒布に関する条項を指します。

      「ライセンサー」とは、著作権所有者、あるいは著作権所有者が
      ライセンス付与対象として認めた者を指します。

      「法人」とは、行為者と、行為者を管理するか行為者により管理されるか
      行為者共通の管理下にある他のすべての者とから成る連合体を指します。
      この定義における「管理」とは、
      (i) 契約またはその他により、直接または間接的にこの法人の指揮・経営を行う権限、または
      (ii) この法人の50%以上の株式の所有権 または
      (iii) 受益所有権を有することを指します。

      「あなた」とは、本ライセンスにより付与される権利を行使する個人または法人を指します。

      「ソース」形式とは、ソフトウェアのソースコード、ドキュメントソース、
      設定ファイルといった、変更を加えるのに好都合な形式を指します。

      「オブジェクト」形式とは、コンパイルされたオブジェクトコード、生成されたドキュメント、
      他のメディアへの変換物といった、ソース形式の機械的な変換により生じる形式を指します。

      「成果物」とは、ソース形式であるとオブジェクト形式であるとを問わず、
      製作物に挿入または添付される(後出の付録に例がある)著作権表示で示された著作物で、
      本ライセンスに基づいて利用が許されるものを指します。

      「派生成果物」とは、編集上の改訂、注解、推敲など、
      成果物を基にしていて全体としてオリジナル著作物と呼べるような製作物全般を指します。
      本ライセンスでは、成果物や派生成果物から分離できる製作物や、
      成果物や派生成果物のインタフェースへの単なるリンク(または名前によるバインド)を、
      派生成果物に含めません。

      「コントリビューション」とは、成果物のオリジナルバージョンならびに成果物
      または派生成果物への変更や追加も含めて、著作権所有者あるいは著作権所有者が認めた
      個人または法人による成果物への組み込みを意図してライセンサーに提出される
      著作物全般を指します。
      この定義における「提出」とは、成果物を論じたり改良するためにライセンサー
      またはその代理者により管理される電子的メーリングリスト、ソースコード管理システム、
      問題追跡システムといった、電子的方法、口頭、または書面で、
      ライセンサーまたはその代理者に情報を送ることを指します。
      ただし、著作権所有者が書面で「コントリビューションでない」と明示したものは除きます。

      「コントリビューター」とは、ライセンサーおよびその代理を務める個人または法人で、
      自分のコントリビューションがライセンサーに受領されて成果物に組み込まれた者を指します。

   2. 著作権ライセンスの付与  
      本ライセンスの条項に従って、各コントリビューターはあなたに対し、
      ソース形式であれオブジェクト形式であれ、成果物および派生成果物を複製したり、
      派生成果物を作成したり、公に表示したり、公に実行したり、サブライセンスしたり、
      頒布したりする、無期限で世界規模で非独占的で使用料無料で取り消し不能な
      著作権ライセンスを付与します。

   3. 特許ライセンスの付与  
      本ライセンスの条項に従って、各コントリビューターはあなたに対し、
      成果物を作成したり、使用したり、販売したり、販売用に提供したり、
      インポートしたり、その他の方法で移転したりする、
      無期限で世界規模で非独占的で使用料無料で取り消し不能な
      (この項で明記したものは除く)特許ライセンスを付与します。
      ただし、このようなライセンスは、コントリビューターによって
      ライセンス可能な特許申請のうち、当該コントリビューターのコントリビューションを
      単独または該当する成果物と組み合わせて用いることで必然的に侵害されるものにのみ
      適用されます。
      あなたが誰かに対し、交差請求や反訴を含めて、
      成果物あるいは成果物に組み込まれたコントリビューションが
      直接または間接的な特許侵害に当たるとして特許訴訟を起こした場合、
      本ライセンスに基づいてあなたに付与された特許ライセンスは、
      そうした訴訟が正式に起こされた時点で終了するものとします。

   4. 再頒布  
      あなたは、ソース形式であれオブジェクト形式であれ、変更の有無に関わらず、
      以下の条件をすべて満たす限りにおいて、成果物またはその派生成果物のコピーを
      複製したり頒布したりすることができます。

      (a) 成果物または派生成果物の他の受領者に本ライセンスのコピーも渡すこと。

      (b) 変更を加えたファイルについては、あなたが変更したということが
      よくわかるような告知を入れること。

      (c) ソース形式の派生成果物を頒布する場合は、ソース形式の成果物に含まれている著作権、
      特許、商標、および帰属についての告知を、派生成果物のどこにも関係しないものは除いて、
      すべて派生成果物に入れること。

      (d) 成果物の一部として「NOTICE」に相当するテキストファイルが含まれている場合は、
      そうしたNOTICEファイルに含まれている帰属告知のコピーを、
      派生成果物のどこにも関係しないものは除いて、頒布する派生成果物に入れること。
      その際、次のうちの少なくとも1箇所に挿入すること。
      (i) 派生成果物の一部として頒布するNOTICEテキストファイル、
      (ii) ソース形式またはドキュメント(派生成果物と共にドキュメントを頒布する場合)、
      (iii) 派生成果物によって生成される表示
      (こうした第三者告知を盛り込むことが標準的なやり方になっている場合)。
      NOTICEファイルの内容はあくまで情報伝達用であって、
      本ライセンスを修正するものであってはなりません。
      あなたは頒布する派生成果物に自分の帰属告知を
      (成果物からのNOTICEテキストに並べて、またはその付録として)追加できますが、
      これはそうした追加の帰属告知が本ライセンスの修正と
      解釈されるおそれがない場合に限られます。

      あなたは自分の修正物に自らの著作権表示を追加することができ、
      自分の修正物の使用、複製、または頒布について、あるいはそうした派生成果物の全体について、
      付加的なライセンス条項または異なるライセンス条項を設けることができます。
      ただし、これは成果物についてのあなたの使用、複製、および頒布が、
      それ以外の点で本ライセンスの条項に従っている場合に限られます。

   5. コントリビューションの提出  
      特に断りがない限り、あなたが成果物への組み込みを意図してライセンサーに
      提出したコントリビューションは、付加的な条項がなければ、
      本ライセンスの条項に従うものとします。
      上述の規定にかかわらず、そうしたコントリビューションに関してあなたがライセンサーと
      結んだかもしれない別のライセンス契約の条項を、ここで無効にしたり
      修正したりすることはありません。

   6. 商標  
      本ライセンスでは、成果物の出所を記述したりNOTICEファイルの内容を複製するときに
      必要になる妥当で慣習的な使い方は別として、ライセンサーの商号、商標、サービスマーク、
      または製品名の使用権を付与しません。

   7. 保証の否認  
      適用される法律または書面での同意によって命じられない限り、
      ライセンサーは成果物を(そしてコントリビューターは各自のコントリビューションを)
      「現状のまま」提供するものとし、明示黙示を問わず、タイトル、非侵害性、
      商業的な使用可能性、および特定の目的に対する適合性を含め、
      いかなる保証も条件も提供しません。
      あなたは成果物の使用や再頒布の適切性を自分で判断する責任を持つと共に、
      本ライセンスにより付与される権利を行使することに伴うすべてのリスクを負うことになります。

   8. 責任の制限  
      いかなる条件および法理論においても、不法行為(過失を含む)、契約、
      またはその他いかなる場合でも、適用される法律または書面での同意によって命じられない限り、
      コントリビューターは本ライセンスまたは成果物の使い方に関連して生じる直接損害、
      間接損害、偶発的な損害、特別損害、懲罰的損害、または結果損害を含め、
      営業権の損失、業務の停止、コンピューター障害または誤作動、
      その他の商業上の損害や損失など、いかなる損害に対しても、
      たとえそうした損害の可能性をたとえ知らされていたとしても、
      あなたに責任を負わないものとします。

   9. 保証または追加的責任の引き受け  
      成果物またはその派生成果物を再頒布する際、あなたはサポート、保証、損害補償、
      またはその他の責任や、本ライセンスに矛盾しない権利を提示し、
      これを有料にすることができます。
      ただし、そうした責任を引き受ける場合、あなたはそれを自分自身のためにだけ
      自己責任として行えるのであって、他のコントリビューターのために行うことはできません。
      また、あなたはそうした保証や追加的責任のせいで他のコントリビューターに
      責任が降りかかったり賠償要求が出されたとしても、それらのコントリビューターに
      損害が及ぶのを防ぐと共に各コントリビューターの損害を補償することに同意しなければなりません。

   使用、複製、および頒布に関する条項の終わり

   付録: Apache Licenseの適用の仕方

      あなたの製作物にApache Licenseを適用するときは、次の定型文を添付してください。
      ただし、"[]"で囲まれている部分は、あなた自身の識別情報に置き換えてください
      (その際、角括弧は取り除きます)。
      また、この文言を該当するファイル形式に合ったコメント構文で囲んでください。
      さらに、第三者アーカイブ内での識別を容易にするため、
      ファイル名またはクラス名ならびに趣旨説明が著作権表示と同じ「印刷ページ」に
      現れるようにすることをお勧めします。

   Copyright [yyyy] [著作権所有者の名前]

   Apache License Version 2.0(「本ライセンス」)に基づいてライセンスされます。
   あなたがこのファイルを使用するためには、本ライセンスに従わなければなりません。
   本ライセンスのコピーは下記の場所から入手できます。

       http://www.apache.org/licenses/LICENSE-2.0

   適用される法律または書面での同意によって命じられない限り、
   本ライセンスに基づいて頒布されるソフトウェアは、明示黙示を問わず、
   いかなる保証も条件もなしに「現状のまま」頒布されます。
   本ライセンスでの権利と制限を規定した文言については、本ライセンスを参照してください。

8.2 - Seleniumのサイトとドキュメントに貢献する

Information on improving documentation and code examples for Selenium

Page being translated from English to Japanese. Do you speak Japanese? Help us to translate it by sending us pull requests!

Seleniumは大きなソフトウェアプロジェクトであり、そのサイトとドキュメントは、物事の仕組みを理解し、その可能性を活用する効果的な方法を学ぶための鍵となります。

このプロジェクトには、Seleniumのサイトとドキュメントの両方が含まれています。これは、Seleniumを効果的に使用する方法、Seleniumに参加する方法、およびSeleniumに貢献する方法に関する最新情報を提供するための継続的な取り組みです(特定のリリースを対象としていません)。

サイトおよびドキュメントへの貢献は、以下のセクションで説明されているプロセスに従います。


Seleniumプロジェクトは、皆様からのコントリビューションを歓迎します。 お手伝いをいただくには、いくつかの方法があります:

イシュー報告

新しい問題を報告したり、既存の問題についてコメントしたりするときは、議論がSeleniumソフトウェア、そのサイトおよび/またはドキュメントに関する具体的な技術問題に関連していることを確認してください。

Seleniumのすべてのコンポーネントは、時間の経過とともに非常に速く変化するため、ドキュメントが古くなる可能性があります。 このようなケースを見つけた場合には、遠慮なくイシューを作成してください。 また、ドキュメントを最新の状態に更新する方法をご存知でしたら、関連する変更を含むプルリクエストを送ってしてください。

見つかったものが問題であるかどうかわからない場合、https://selenium.dev/supportに記載されているコミュニケーション手段にて質問してください。

What to Help With

Creating Examples

Examples that need to be moved are marked with:

Add Example

We want to be able to run all of our code examples in the CI to ensure that people can copy and paste and execute everything on the site. So we put the code where it belongs in the examples directory. Each page in the documentation correlates to a test file in each of the languages, and should follow naming conventions. For instance examples for this page https://www.selenium.dev/documentation/webdriver/browsers/chrome/ get added in these files:

  • "/examples/java/src/test/java/dev/selenium/browsers/ChromeTest.java"
  • "/examples/python/tests/browsers/test_chrome.py"
  • "/examples/dotnet/SeleniumDocs/Browsers/ChromeTest.cs"
  • "/examples/ruby/spec/browsers/chrome_spec.rb"
  • "/examples/javascript/test/browser/chromeSpecificCaps.spec.js"

Each example should get its own test. Ideally each test has an assertion that verifies the code works as intended. Once the code is copied to its own test in the proper file, it needs to be referenced in the markdown file.

For example, the tab in Ruby would look like this:

    {{< tab header="Ruby" >}}
    {{< gh-codeblock path="/examples/ruby/spec/browsers/chrome_spec.rb#L8-L9" >}}
    {{< /tab >}}

The line numbers at the end represent only the line or lines of code that actually represent the item being displayed. If a user wants more context, they can click the link to the GitHub page that will show the full context.

Make sure that if you add a test to the page that all the other line numbers in the markdown file are still correct. Adding a test at the top of a page means updating every single reference in the documentation that has a line number for that file.

Finally, make sure that the tests pass in the CI.

Moving Examples

Examples that need to be moved are marked with:

Move Code

Everything from the Creating Examples section applies, with one addition.

Make sure the tab includes text=true. By default, the tabs get formatted for code, so to use markdown or other shortcode statements (like gh-codeblock) it needs to be declared as text. For most examples, the tabpane declares the text=true, but if some of the tabs have code examples, the tabpane cannot specify it, and it must be specified in the tabs that do not need automatic code formatting.

貢献

Seleniumプロジェクトは新しいコントリビュータを歓迎します。目立った価値ある貢献を継続的に行った個人は コミッター として認められ、プロジェクトへのコミットアクセス件が与えられます。

本ガイドでは、貢献のプロセスについて説明します。

ステップ 1: フォーク

GitHub上のプロジェクトをフォークし、コピーをローカルにチェックアウトしてください。

% git clone git@github.com:seleniumhq/seleniumhq.github.io.git
% cd seleniumhq.github.io

依存関係: Hugo

We use Hugo and the Docsy theme to build and render the site. You will need the “extended” Sass/SCSS version of the Hugo binary to work on this site. We recommend to use Hugo 0.110.0 or higher.

Please follow the Install Hugo instructions from Docsy.

ステップ 2: ブランチの作成

フィーチャーブランチを作成し、ハックを開始します。:

% git checkout -b my-feature-branch

我々はHEADベースの開発を行っています。つまり、全ての変更はtrunkブランチ上に直接適用されます。

ステップ 3: 変更を加える

The repository contains the site and docs. Before jumping into making changes, please initialize the submodules and install the needed dependencies (see commands below). To make changes to the site, work on the website_and_docs directory. To see a live preview of your changes, run hugo server on the site’s root directory.

% git submodule update --init --recursive
% cd website_and_docs
% hugo server

See Style Guide for more information on our conventions for contribution

ステップ 4: コミット

まず、gitがあなたの名前とメールアドレスを知っていることを確認してください:

% git config --global user.name 'Santa Claus'
% git config --global user.email 'santa@example.com'

**適切なコミットメッセージを書くことは重要です。**コミットメッセージには、変更された内容、理由、修正されたイシューへの参照(ある場合)を記述する必要があります。作成するときは、次のガイドラインに従ってください。:

  1. 最初の行は約50文字以下で、変更の簡単な説明を含める必要があります。
  2. 2行目は空白のままにします。
  3. 他のすべての行を72列で折り返します。
  4. Fixes #Nを含めてください。ここでは N がこのコミットで修正したイシュー番号です(存在する場合)。

適切なコミットメッセージは次のようになります:

explain commit normatively in one line

Body of commit message is a few lines of text, explaining things
in more detail, possibly giving some background about the issue
being fixed, etc.

The body of the commit message can be several paragraphs, and
please do proper word-wrap and keep columns shorter than about
72 characters or so. That way `git log` will show things
nicely even when it is indented.

Fixes #141

最初の行はgit shortloggit log --onelineを実行した際に他人が最初に目にするため、意味のあるものでなければなりません。

ステップ 5: リベース

あなたの作業を同期するため、(git mergeではなく)git rebaseを時々実行してください。

% git fetch origin
% git rebase origin/trunk

ステップ 6: テスト

あなたの変更が何も問題を起こしていないことを確認するため、常に忘れずにローカルサーバーの実行を行ってください。

ステップ 7: プッシュ

% git push origin my-feature-branch

https://github.com/yourusername/seleniumhq.github.io.git を開き、_Pull Request_を押し、フォームを入力してください。 CLAに署名したことを示してください (ステップ7を参照)

プルリクエストは通常数日以内にレビューされます。対応すべきコメントがある場合は、新しく(できれば fixupsで)コミットし、同じブランチにプッシュしてください。

ステップ 8: 統合

コードレビューが完了すると、コミッターがPRを取得し、リポジトリのtrunkブランチに統合します。 マスターブランチで履歴を線形に保持するのが好きなので、通常はブランチの履歴をスカッシュしてリベースします。

コミュニケーション

プロジェクトのコントリビューターおよびコミュニティ全体と交流する方法については、全て https://selenium.dev/support で詳細が記載されています。

8.3 - Style guide for Selenium documentation

Conventions for contributions to the Selenium documentation and code examples

Read our contributing documentation for complete instructions on how to add content to this documentation.

Alerts

Alerts have been added to direct potential contributors to where specific content is missing.

{{< alert-content />}}

or

{{< alert-content >}}
Additional information about what specific content is needed
{{< /alert-content >}}

Which gets displayed like this:

Capitalization of titles

Our documentation uses Title Capitalization for linkTitle which should be short and Sentence capitalization for title which can be longer and more descriptive. For example, a linkTitle of Special Heading might have a title of The importance of a special heading in documentation

Line length

When editing the documentation’s source, which is written in plain HTML, limit your line lengths to around 100 characters.

Some of us take this one step further and use what is called semantic linefeeds, which is a technique whereby the HTML source lines, which are not read by the public, are split at ‘natural breaks’ in the prose. In other words, sentences are split at natural breaks between clauses. Instead of fussing with the lines of each paragraph so that they all end near the right margin, linefeeds can be added anywhere that there is a break between ideas.

This can make diffs very easy to read when collaborating through git, but it is not something we enforce contributors to use.

Translations

Selenium now has official translators for each of the supported languages.

  • If you add a code example to the important_documentation.en.md file, also add it to important_documentation.ja.md, important_documentation.pt-br.md, important_documentation.zh-cn.md.
  • If you make text changes in the English version, just make a Pull Request. The new process is for issues to be created and tagged as needs translation based on changes made in a given PR.

Code examples

All references to code should be language independent, and the code itself should be placed inside code tabs.

Default Code Tabs

The Docsy code tabs look like this:

    WebDriver driver = new ChromeDriver();
  
    driver = webdriver.Chrome()
  
    var driver = new ChromeDriver();
  
    driver = Selenium::WebDriver.for :chrome
  
    let driver = await new Builder().forBrowser('chrome').build();
  
    val driver = ChromeDriver()
  

To generate the above tabs, this is what you need to write. Note that the tabpane includes langEqualsHeader=true. This auto-formats the code in each tab to match the header name, and ensures that all tabs on the page with a language are set to the same thing.

{{< tabpane langEqualsHeader=true >}}
  {{< tab header="Java" >}}
    WebDriver driver = new ChromeDriver();
  {{< /tab >}}
  {{< tab header="Python" >}}
    driver = webdriver.Chrome()
  {{< /tab >}}
  {{< tab header="CSharp" >}}
    var driver = new ChromeDriver();
  {{< /tab >}}
  {{< tab header="Ruby" >}}
    driver = Selenium::WebDriver.for :chrome
  {{< /tab >}}
  {{< tab header="JavaScript" >}}
    let driver = await new Builder().forBrowser('chrome').build();
  {{< /tab >}}
  {{< tab header="Kotlin" >}}
    val driver = ChromeDriver()
  {{< /tab >}}
{{< /tabpane >}}

Reference GitHub Examples

To ensure that all code is kept up to date, our goal is to write the code in the repo where it can be executed when Selenium versions are updated to ensure that everything is correct.

All code examples to be in our example directories.

This code can be automatically displayed in the documentation using the gh-codeblock shortcode. The shortcode automatically generates its own html, so we do not want it to auto-format with the language header. If all tabs are using this shortcode, set text=true in the tabpane and remove langEqualsHeader=true. If only some tabs are using this shortcode, keep langEqualsHeader=true in the tabpane and add text=true to the tab. Note that the gh-codeblock line can not be indented at all.

One great thing about using gh-codeblock is that it adds a link to the full example. This means you don’t have to include any additional context code, just the line(s) that are needed, and the user can navigate to the repo to see how to use it.

A basic comparison of code looks like:

{{< tabpane text=true >}}
{{< tab header="Java" >}}
{{< gh-codeblock path="examples/java/src/test/java/dev/selenium/getting_started/FirstScript.java#L46-L47" >}}
{{< /tab >}}
{{< tab header="Python" >}}
{{< gh-codeblock path="examples/python/tests/getting_started/first_script.py#L17-L18" >}}
{{< /tab >}}
{{< tab header="CSharp" >}}
{{< gh-codeblock path="examples/dotnet/SeleniumDocs/GettingStarted/FirstScript.cs#L39-L40" >}}
{{< /tab >}}
{{< tab header="Ruby" >}}
{{< gh-codeblock path="examples/ruby/spec/getting_started/first_script.rb#L16-L17" >}}
{{< /tab >}}
{{< tab header="JavaScript" >}}
{{< gh-codeblock path="examples/javascript/test/getting_started/firstScript.spec.js#L23-L24" >}}
{{< /tab >}}
{{< tab header="Kotlin" >}}
{{< gh-codeblock path="examples/kotlin/src/test/kotlin/dev/selenium/getting_started/FirstScriptTest.kt#L25-L26" >}}
{{< /tab >}}
{{< /tabpane >}}

Which looks like this:


message = driver.find_element(by=By.ID, value="message")

message = driver.find_element(id: 'message')
    let value = await message.getText();
    assert.equal("Received!", value);
        var textBox = driver.findElement(By.name("my-text"))
        val submitButton = driver.findElement(By.cssSelector("button"))

Using Markdown in a Tab

If you want your example to include something other than code (default) or html (from gh-codeblock), you need to first set text=true, then change the Hugo syntax for the tabto use % instead of < and > with curly braces:

{{< tabpane text=true >}}
{{% tab header="Java" %}}
1. Start the driver
{{< gh-codeblock path="examples/java/src/test/java/dev/selenium/getting_started/FirstScript.java#L12" >}}
2. Navigate to a page
{{< gh-codeblock path="examples/java/src/test/java/dev/selenium/getting_started/FirstScript.java#L14" >}}
3. Quit the driver
{{< gh-codeblock path="examples/java/src/test/java/dev/selenium/getting_started/FirstScript.java#L29" >}}
{{% /tab %}}
< ... >
{{< /tabpane >}}

This produces:

  1. Start the driver
        WebDriver driver = new ChromeDriver();
  1. Navigate to a page
        driver.get("https://www.selenium.dev/selenium/web/web-form.html");
  1. Quit the driver
        driver.quit();

This is preferred to writing code comments because those will not be translated. Only include the code that is needed for the documentation, and avoid over-explaining. Finally, remember not to indent plain text or it will rendered as a codeblock.