Selenium é um projeto que abrange uma variedade de ferramentas e bibliotecas
que permitem e suportam a automação de navegadores da web.
Ele fornece extensões para emular a interação do usuário com os navegadores,
um servidor de distribuição para escalonar a alocação do navegador,
e a infraestrutura para implementações da Especificação W3C WebDriver
que permite escrever código intercambiável para todos os principais navegadores da web.
Este projeto é possível graças a colaboradores voluntários
que dedicam milhares de horas de seu próprio tempo,
e disponibilizaram o código-fonte disponível gratuitamente
para qualquer um usar, aproveitar e melhorar.
Selenium reúne criadores de navegadores, engenheiros e entusiastas
para promover uma discussão aberta sobre a automação da plataforma da web.
O projeto organiza uma conferência anual
para ensinar e nutrir a comunidade.
No núcleo do Selenium está WebDriver,
uma interface para escrever conjuntos de instruções que podem ser executados alternadamente em muitos
navegadores. Aqui está uma das instruções mais simples que você pode fazer:
Consulte a Visão Geral para verificar os diferentes componentes do projeto
e decidir se o Selenium é a ferramenta certa para você.
Você deve continuar no Guia de Introdução
para entender como instalar o Selenium e usá-lo com sucesso como uma
ferramenta de automação de teste e dimensionar testes simples como esse para serem executados em ambientes grandes
e distribuídos em vários navegadores e em vários sistemas operacionais diferentes.
1 - Resumo
Será Selenium a ferramenta para você? Veja um resumo dos componentes do projecto.
Selenium não é só uma ferramenta ou API,
mas sim uma composição de várias ferramentas.
WebDriver
Se você está começando com automação de testes de um site de desktop ou site para celular, então
vai usar as APIs WebDriver. O WebDriver
usa APIs de automação de navegador disponibilizadas por fornecedores de navegador para o controlar e
executar testes. É como se um usuário real o estivesse operando. Como o
WebDriver não exige que sua API seja compilada com o código do aplicativo,
não é intrusivo. Portanto, você está testando o
mesmo aplicativo que você envia aos ambientes de produção.
IDE
IDE (Ambiente de Desenvolvimento Integrado, em português)
é a ferramenta que você usa para desenvolver seus casos de teste Selenium. É uma extensão para Chrome
e Firefox fácil de usar e geralmente é a maneira mais eficiente de desenvolver
casos de teste. Ela registra as ações dos usuários no navegador para você, usando
comandos Selenium existentes, com parâmetros definidos pelo contexto daquele
elemento. Isso não é apenas uma economia de tempo, mas também uma maneira excelente
de aprender a sintaxe de script do Selenium.
Grid
Selenium Grid permite que você execute casos de teste em diferentes
máquinas em diferentes plataformas. O controle para
acionar os casos de teste está na extremidade local, e
quando os casos de teste são acionados, eles são automaticamente
executados pela extremidade remota.
Após o desenvolvimento dos testes WebDriver, você pode enfrentar
a necessidade de executar seus testes em vários navegadores e
combinações de sistemas operacionais.
É aqui que o Grid entra em cena.
1.1 - Entendendo os componentes
Construir um conjunto de testes usando WebDriver exigirá que você entenda e
use efetivamente uma série de componentes diferentes. Como com tudo em
software, pessoas diferentes usam termos diferentes para a mesma ideia. Abaixo está
uma análise de como os termos são usados nesta descrição.
Terminologia
API: interface de programação de aplicativo. Este é o conjunto de “comandos” que
você usa para manipular o WebDriver.
Biblioteca: um módulo de código que contém as APIs e o código necessário
para implementá-los. As bibliotecas são específicas para cada linguagem, por exemplo arquivos
.jar para Java, arquivos .dll para .NET, etc.
Driver: responsável por controlar o navegador atual. A maioria dos drivers
são criados pelos próprios fornecedores de navegadores. Os drivers são geralmente
módulos executáveis que são executados no sistema com o próprio navegador,
não no sistema que está executando o conjunto de testes. (Embora esses possam ser
mesmo sistema.) NOTA: Algumas pessoas se referem aos drivers como proxies.
Framework: uma biblioteca adicional usada como suporte para suítes do WebDriver.
Essas estruturas podem ser estruturas de teste, como JUnit ou NUnit.
Eles também podem ser estruturas que suportam recursos de linguagem natural, como
como Cucumber ou Robotium. Frameworks também podem ser escritos e usados para
coisas como manipulação ou configuração do sistema em teste,
criação de dados, oráculos de teste, etc.
As partes e peças
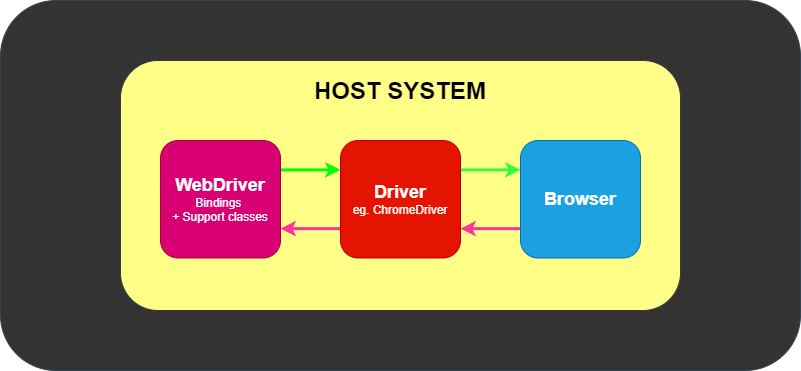
No mínimo, o WebDriver se comunica com um navegador por meio de um driver. Comunicação
é bidirecional: o WebDriver passa comandos para o navegador por meio do driver e
recebe informações de volta pela mesma rota.
O driver é específico para o navegador, como ChromeDriver para Google
Chrome / Chromium, GeckoDriver para Mozilla Firefox, etc. O driver é
executado no mesmo sistema do navegador. Este pode, ou não ser, o mesmo sistema onde
os próprios testes estão sendo executados.
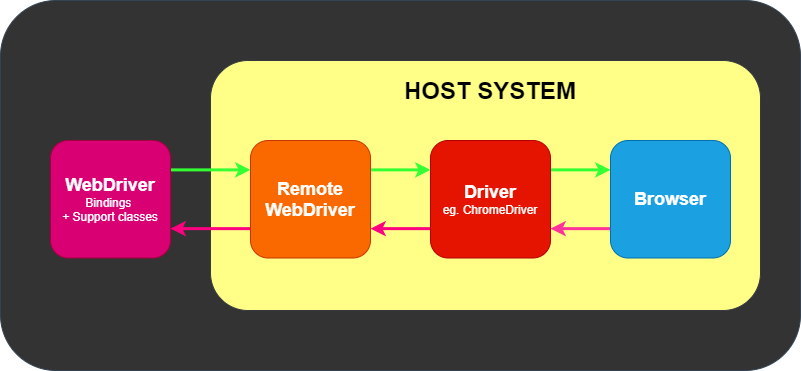
Este exemplo simples acima é comunicação direta. Comunicação para o
navegador também pode ser comunicação remota através do servidor Selenium ou
RemoteWebDriver. RemoteWebDriver roda no mesmo sistema que o driver
e o navegador.
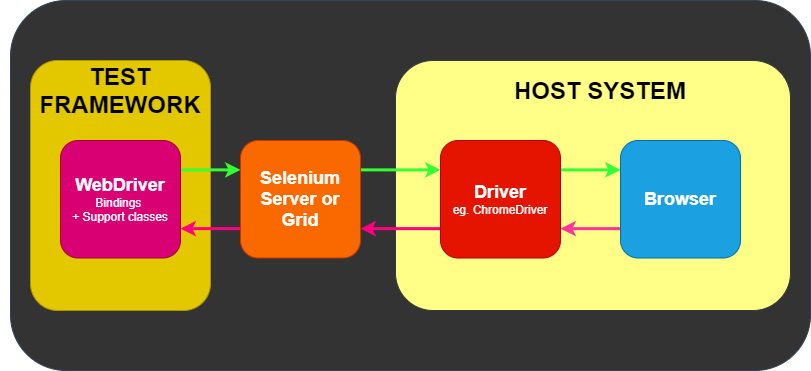
A comunicação remota também pode ocorrer usando Selenium Server ou Selenium
Grid, que, por sua vez, fala com o driver no sistema host
Onde frameworks se encaixam
O WebDriver tem um trabalho e apenas um trabalho: comunicar-se com o navegador por meio de qualquer um
dos métodos acima. O WebDriver não sabe nada sobre testes: ele não
sabe como comparar coisas, afirmar passa ou falha, e certamente não sabe
uma coisa sobre relatórios ou gramática Dado / Quando / Então.
É aqui que vários frameworks entram em cena. No mínimo, você precisará de um framework de
teste que corresponde às linguagens, por exemplo, NUnit para .NET, JUnit
para Java, RSpec para Ruby, etc.
O framework de teste é responsável por rodar e executar seu WebDriver
e etapas relacionadas em seus testes. Como tal, você pode pensar nele parecendo a imagem seguinte.
Frameworks/ferramentas de linguagem natural, como Cucumber, podem existir como parte desse
framework de teste na figura acima, ou eles podem envolver o framework de teste
inteiramente em sua própria implementação.
1.2 - Detalhes
Selenium é um projeto abrangente para uma gama de ferramentas e bibliotecas que permitem e suportam a automação de navegadores da web.
Selenium controla navegadores
Selenium é muitas coisas
mas, em sua essência, é um conjunto de ferramentas para automação de navegador da web
que usa as melhores técnicas disponíveis
para controlar remotamente as instâncias do navegador
e emular a interação do usuário com o navegador.
Ele permite que os usuários simulem atividades comuns realizadas por usuários finais;
inserir texto em campos,
selecionando valores suspensos e caixas de seleção,
e clicar em links em documentos.
Ele também fornece muitos outros controles, como o movimento do mouse,
execução arbitrária de JavaScript e muito mais.
Embora seja usado principalmente para testes de front-end de sites,
Selenium é basicamente uma biblioteca de agente de usuário de navegador.
As interfaces são onipresentes em seus aplicativos,
o que incentiva a composição com outras bibliotecas para atender a sua finalidade.
Uma interface para tudo
Um dos princípios norteadores do projeto
é oferecer suporte a uma interface comum para todas as tecnologias de navegador (principais).
Os navegadores da web são aplicativos incrivelmente complexos e altamente projetados,
realizando suas operações de maneiras completamente diferentes
mas que frequentemente têm a mesma aparência ao fazê-lo.
Mesmo que o texto seja renderizado com as mesmas fontes,
as imagens sejam exibidas no mesmo lugar
e os links levem você ao mesmo destino.
O que está acontecendo por baixo é tão diferente quanto noite e dia.
Selenium “abstrai” essas diferenças,
esconde seus detalhes e complexidades da pessoa que está escrevendo o código.
Isso permite que você escreva várias linhas de código para realizar um fluxo de trabalho complicado,
mas essas mesmas linhas serão executadas no Firefox,
Internet Explorer, Chrome e todos os outros navegadores compatíveis.
Ferramentas e suporte
A abordagem de design minimalista do Selenium lhe dá a
versatilidade para ser incluído como um componente em aplicações maiores.
A infraestrutura circundante fornecida sob o Selenium
dá a você as ferramentas para montar
sua Grid de navegadores
para que os testes possam ser executados em diferentes navegadores e sistemas operacionais
em uma variedade de máquinas.
Imagine um banco de computadores em sua sala de servidores ou data center
todos abrindo navegadores ao mesmo tempo
acessando links, formulários,
e tabelas — testando seu aplicativo 24 horas por dia.
Por meio da interface de programação simples
fornecido para os idiomas mais comuns,
esses testes serão executados incansavelmente em paralelo,
reportando de volta para você quando ocorrerem erros.
É o objetivo de ajudar a tornar isso uma realidade para você,
fornecendo aos usuários ferramentas e documentação não apenas para controlar os navegadores
mas para tornar mais fácil dimensionar e implantar essas grades.
Quem usa Selenium
Muitas das empresas mais importantes do mundo
adotaram o Selenium para seus testes baseados em navegador,
frequentemente substituindo esforços de anos envolvendo outras ferramentas proprietárias.
À medida que sua popularidade cresceu, seus requisitos e desafios se multiplicaram.
Conforme a web se torna mais complicada
e novas tecnologias são adicionadas aos sites,
é a missão deste projeto acompanhá-los sempre que possível.
Sendo um projeto de código aberto,
este apoio é fornecido por meio da generosa doação de tempo de muitos voluntários,
cada um deles tem um “trabalho diurno”.
Outra missão do projeto é incentivar
mais voluntários para participar deste esforço,
e construir uma comunidade forte
para que o projeto possa continuar a acompanhar as tecnologias emergentes
e permanecer uma plataforma dominante para automação de teste funcional.
2 - WebDriver
WebDriver manipula um navegador nativamente, aprenda mais sobre isso.
O WebDriver manipula um navegador nativamente, como um usuário faria, seja localmente
ou em uma máquina remota usando o servidor Selenium,
marca um salto em termos de automação do navegador.
Selenium WebDriver refere-se a ambas as ligações de linguagem
e as implementações do código de controle do navegador individual.
Isso é comumente referido como apenas WebDriver.
WebDriver é projetado como uma interface de programação simples e mais concisa.
WebDriver é uma API compacta orientada a objetos.
Ele manipula o navegador de forma eficaz.
2.1 - Começando
Se você é novo no Selenium, nós temos alguns recursos que podem te ajudar a se atualizar imediatamente.
Selenium suporta automação de todos os principais navegadores do mercado
por meio do uso do WebDriver.
WebDriver é uma API e protocolo que define uma interface de linguagem neutra
para controlar o comportamento dos navegadores da web.
Cada navegador é apoiado por uma implementação WebDriver específica, chamada de driver.
O driver é o componente responsável por delegar ao navegador,
e lida com a comunicação de e para o Selenium e o navegador.
Essa separação é parte de um esforço consciente para que os fornecedores de navegadores
assumam a responsabilidade pela implementação de seus navegadores.
Selenium faz uso desses drivers de terceiros sempre que possível,
mas também fornece seus próprios drivers mantidos pelo projeto
para os casos em que isso não é uma realidade.
A estrutura do Selenium une todas essas peças
por meio de uma interface voltada para o usuário que permite aos diferentes back-ends de navegador
serem usados de forma transparente,
permitindo a automação entre navegadores e plataformas cruzadas.
Selenium setup is quite different from the setup of other commercial tools.
Before you can start writing Selenium code, you have to
install the language bindings libraries for your language of choice, the browser you
want to use, and the driver for that browser.
Follow the links below to get up and going with Selenium WebDriver.
If you wish to start with a low-code/record and playback tool, please check
Selenium IDE
Once you get things working, if you want to scale up your tests, check out the
Selenium Grid.
2.1.1 - Instalando bibliotecas do Selenium
Configurando a biblioteca Selenium para sua linguagem de programação favorita.
Primeiro você precisa instalar as bibliotecas Selenium para seu projeto de automação.
O processo de instalação de bibliotecas depende da linguagem que você escolher usar.
Outras observações para usar o Visual Studio Code (vscode) e C#
Instale a versão compatível do .NET SDK conforme a seção acima.
Instale também as extensões do vscode (Ctrl-Shift-X) para C# e NuGet.
Siga as instruções aqui para criar e rodar o seu projeto de “Hello World” no console usando C#.
Você também pode criar um projeto inicial do NUnit usando a linha de comando dotnet new NUnit.
Certifique-se de que o arquivo %appdata%\NuGet\nuget.config esteja configurado corretamente, pois alguns desenvolvedores relataram que ele estará vazio devido a alguns problemas.
Se o nuget.config estiver vazio ou não estiver configurado corretamente, as compilações .NET falharão para projetos que estiverem usando Selenium.
Adicione a seguinte seção ao arquivo nuget.config se esse estiver vazio:
Para mais informações sobre nuget.configclique aqui.
Você pode ter que customizar nuget.config para atender às suas necessidades.
Agora, volte para o vscode, aperte Ctrl-Shift-P, e digite “NuGet Add Package”, e adicione os pacotes necessários para
o Selenium como o Selenium.WebDriver.
Aperte Enter e selecione a versão.
Agora você pode usar os exemplos da documentação relacionados ao C# com o vscode.
Você pode ver a minima versão suportada do Ruby para cada versão do Selenium em
rubygems.org
O Selenium pode ser instalado de duas formas diferentes.
Instruções passo a passo para programar um script Selenium
Assim que você tiver o Selenium instalado,
você estará pronto para programar códigos Selenium.
Oito Componentes Básicos
Tudo que o Selenium faz é enviar comandos ao navegador de internet para fazer algo ou solicitar informações dele.
A maior parte do que você irá fazer com o Selenium é uma combinação desses comandos básicos.
Click on the link to “View full example on GitHub” to see the code in context.
1. Iniciando uma sessão
Para ter mais detalhes sobre como iniciar uma sessão, leia nossa documentação em driver sessions
3. Solicitando informação do navegador de internet
Existem diversos tipos de informação sobre o navegador de internet que você
pode solicitar, incluindo window handles, tamanho / posição do navegador, cookies, alertas e etc.
Sincronizar o código ao estado atual do navegador é um dos maiores
desafios
quando se trabalha com o Selenium, fazer isso de maneira bem feita é um tópico avançado.
Essencialmente, você quer ter certeza absoluta de que o elemento está na página antes de tentar localizá-lo
e o elemento está em um estado interativo antes de você tentar interagir com ele.
Uma espera implícita raramente é a melhor solução, mas é a mais fácil de demonstrar aqui, então
vamos usá-la como um substituto.
A maioria dos comandos na maior parte das sessões do Selenium são relacionados a elementos e você não pode
interagir
com um sem o primeiro encontrando um elemento
Most Selenium users execute many sessions and need to organize them to minimize duplication and keep the code
more maintainable. Read on to learn about how to put this code into context for your use case with
Using Selenium.
2.1.3 - Organizando e executando o código Selenium
Escalonamento da execução do Selenium com um IDE e uma biblioteca do Test Runner
Se quiser executar mais do que um punhado de scripts pontuais, precisa de
ser capaz de organizar e trabalhar com seu código. Esta página deve dar a você
ideias de como fazer coisas produtivas com seu código Selenium.
Usos comuns
A maioria das pessoas usa o Selenium para executar testes automatizados para aplicações web,
mas o Selenium suporta qualquer caso de uso de automação de navegador.
Tarefas Repetitivas
Talvez seja necessário fazer login em um site e baixar algo ou enviar um formulário.
Você pode criar um script Selenium para ser executado com um serviço em horários pré-definidos.
Web Scrapping
Está a tentar recolher dados de um site que não tem uma API? O Selenium
permitirá que você faça isso, mas certifique-se de estar familiarizado com os termos de serviço do site
termos de serviço do site, pois alguns sites não permitem isso e outros até bloqueiam o Selenium.
Testes
Executar o Selenium para testes requer fazer asserções sobre as ações tomadas pelo Selenium.
Então uma boa biblioteca de asserções é necessária. Características adicionais para prover estrutura para testes
requerem o uso de [Test Runner] (#test-runners).
IDEs
Independentemente de como você usa o código do Selenium,
não será muito eficaz escrevendo ou executando-o sem um bom
ambiente de desenvolvimento integrado. Aqui estão algumas opções comuns…
Mesmo que não esteja a usar o Selenium para testes, se tiver casos de uso avançado, pode fazer
sentido usar um executor de testes para organizar melhor seu código. Ser capaz de usar hooks antes/depois
e executar coisas em grupos ou em paralelo pode ser muito útil.
Escolhendo
Há muitos executores de teste diferentes disponíveis.
Todos os exemplos de código nesta documentação podem ser encontrados em (ou estão sendo movidos para) nossos diretórios
que usam test runners e são executados a cada lançamento para garantir que todo o código esteja correto e atualizado.
Aqui está uma lista de executores de teste com links. O primeiro item é o que é usado por este repositório e o que
que será usado para todos os exemplos nesta página.
JUnit - Uma estrutura de teste amplamente utilizada para testes Selenium baseados em Java.
TestNG - Oferece recursos extras, como execução de testes paralelos e testes parametrizados.
pytest -Uma escolha preferida por muitos, graças à sua simplicidade e aos seus poderosos plugins.
unittest - A estrutura de testes da biblioteca padrão do Python.
NUnit - Um popular framework de teste unitário para .NET.
MS Test - O Framework de testes unitários da Microsoft.
RSpec - A biblioteca de testes mais utilizada para executar testes Selenium em Ruby.
Minitest - Um framework de testes leve que vem com a biblioteca padrão do Ruby.
Jest - Principalmente conhecido como um framework de teste para React, também pode ser utilizado para testes Selenium.
Mocha - A biblioteca JS mais comum para executar testes Selenium.
Instalando
Isto é muito semelhante ao que foi requerido em Install a Selenium Library.
Este código está apenas a mostrar exemplos do que está a ser usado no nosso projeto de Exemplos de Documentação.
Maven
Gradle
Para usá-lo em um projeto, adicione-o ao arquivo requirements.txt:
in the project’s csproj especifique a dependência como PackageReference em ItemGroup:
Add to project’s gemfile
In your project’s package.json, adicionar requisito às dependências:
The primary unique argument for starting a remote driver includes information about where to execute the code.
Read the details in the Remote Driver Section
Esses recursos são compartilhados por todos os navegadores.
Page being translated from English to Portuguese.
Do you speak Portuguese? Help us to translate
it by sending us pull requests!
No Selenium 3, os recursos foram definidos em uma sessão usando classes de recursos desejados.
A partir do Selenium 4, você deve usar as classes de opções do navegador.
Para sessões remotas de driver, uma instância de opções do navegador é necessária, pois determina qual navegador será usado.
Essas opções são descritas na especificação w3c para Capabilities.
Cada navegador tem custom options que podem ser definidas além das definidas na especificação.
browserName
Esta capacidade é usada para definir o browserName para uma determinada sessão.
Se o navegador especificado não estiver instalado no
extremidade remota, a criação da sessão falhará.
browserVersion
Esta capacidade é opcional, é usada para
defina a versão do navegador disponível na extremidade remota.
Por exemplo, se solicitar o Chrome versão 75 em um sistema que
tiver apenas 80 instalados, a criação da sessão falhará.
Três tipos de estratégias de carregamento de página estão disponíveis.
A estratégia de carregamento da página consulta o
document.readyState
conforme descrito na tabela abaixo:
Estratégia
Estado pronto
Notas
normal
completo
Usado por padrão, aguarda o download de todos os recursos
ansioso
interativo
O acesso DOM está pronto, mas outros recursos como imagens ainda podem estar carregando
nenhum
Qualquer
Não bloqueia o WebDriver
A propriedade document.readyState de um documento descreve o estado de carregamento do documento atual.
Ao navegar para uma nova página via URL, por padrão, o WebDriver irá adiar a conclusão de uma navegação
(por exemplo, driver.navigate().get()) até que o estado pronto do documento seja concluído. isso não
significa necessariamente que a página terminou de carregar, especialmente para sites como Single Page Applications
que usam JavaScript para carregar conteúdo dinamicamente depois que o estado Pronto retorna completo. Observe também
que esse comportamento não se aplica à navegação resultante de clicar em um elemento ou enviar um formulário.
Se uma página demorar muito para carregar como resultado do download de ativos (por exemplo, imagens, css, js)
que não são importantes para a automação, você pode mudar do parâmetro padrão de normal para
eager ou none para acelerar a sessão. Esse valor se aplica a toda a sessão, portanto, certifique-se
que sua waiting strategy é suficiente para minimizar
descamação.
normal (default)
WebDriver waits until the load
event fire is returned.
importorg.openqa.selenium.PageLoadStrategy;importorg.openqa.selenium.WebDriver;importorg.openqa.selenium.chrome.ChromeOptions;importorg.openqa.selenium.chrome.ChromeDriver;publicclasspageLoadStrategy{publicstaticvoidmain(String[]args){ChromeOptionschromeOptions=newChromeOptions();chromeOptions.setPageLoadStrategy(PageLoadStrategy.NORMAL);WebDriverdriver=newChromeDriver(chromeOptions);try{// Navigate to Url
driver.get("https://google.com");}finally{driver.quit();}}}
it('Navigate using normal page loading strategy',asyncfunction(){letdriver=awaitenv.builder().setChromeOptions(options.setPageLoadStrategy('normal')).build();awaitdriver.get('https://www.selenium.dev/selenium/web/blank.html');
importorg.openqa.selenium.PageLoadStrategy;importorg.openqa.selenium.WebDriver;importorg.openqa.selenium.chrome.ChromeOptions;importorg.openqa.selenium.chrome.ChromeDriver;publicclasspageLoadStrategy{publicstaticvoidmain(String[]args){ChromeOptionschromeOptions=newChromeOptions();chromeOptions.setPageLoadStrategy(PageLoadStrategy.EAGER);WebDriverdriver=newChromeDriver(chromeOptions);try{// Navigate to Url
driver.get("https://google.com");}finally{driver.quit();}}}
WebDriver only waits until the initial page is downloaded.
importorg.openqa.selenium.PageLoadStrategy;importorg.openqa.selenium.WebDriver;importorg.openqa.selenium.chrome.ChromeOptions;importorg.openqa.selenium.chrome.ChromeDriver;publicclasspageLoadStrategy{publicstaticvoidmain(String[]args){ChromeOptionschromeOptions=newChromeOptions();chromeOptions.setPageLoadStrategy(PageLoadStrategy.NONE);WebDriverdriver=newChromeDriver(chromeOptions);try{// Navigate to Url
driver.get("https://google.com");}finally{driver.quit();}}}
This capability checks whether an expired (or)
invalid TLS Certificate is used while navigating
during a session.
If the capability is set to false, an
insecure certificate error
will be returned as navigation encounters any domain
certificate problems. If set to true, invalid certificate will be
trusted by the browser.
All self-signed certificates will be trusted by this capability by default.
Once set, acceptInsecureCerts capability will have an
effect for the entire session.
A WebDriver session is imposed with a certain session timeout
interval, during which the user can control the behaviour
of executing scripts or retrieving information from the browser.
Each session timeout is configured with
combination of different timeouts as described below:
Script Timeout
Specifies when to interrupt an executing script in
a current browsing context. The default timeout 30,000
is imposed when a new session is created by WebDriver.
Specifies the time interval in which web page
needs to be loaded in a current browsing context.
The default timeout 300,000 is imposed when a
new session is created by WebDriver. If page load limits
a given/default time frame, the script will be stopped by
TimeoutException.
This specifies the time to wait for the
implicit element location strategy when
locating elements. The default timeout 0
is imposed when a new session is created by WebDriver.
Specifies the state of current session’s user prompt handler.
Defaults to dismiss and notify state
User Prompt Handler
This defines what action must take when a
user prompt encounters at the remote-end. This is defined by
unhandledPromptBehavior capability and has the following states:
This new capability indicates if strict interactability checks
should be applied to input type=file elements. As strict interactability
checks are off by default, there is a change in behaviour
when using Element Send Keys with hidden file upload controls.
A proxy server acts as an intermediary for
requests between a client and a server. In simple,
the traffic flows through the proxy server
on its way to the address you requested and back.
A proxy server for automation scripts
with Selenium could be helpful for:
Capture network traffic
Mock backend calls made by the website
Access the required website under complex network
topologies or strict corporate restrictions/policies.
If you are in a corporate environment, and a
browser fails to connect to a URL, this is most
likely because the environment needs a proxy to be accessed.
Selenium WebDriver provides a way to proxy settings:
The Service classes are for managing the starting and stopping of drivers.
They can not be used with a Remote WebDriver session.
Service classes allow you to specify information about the driver,
like location and which port to use.
They also let you specify what arguments get passed
to the command line. Most of the useful arguments are related to logging.
Default Service instance
To start a driver with a default service instance:
Note: If you are using Selenium 4.6 or greater, you shouldn’t need to set a driver location.
If you can not update Selenium or have an advanced use case here is how to specify the driver location:
Logging functionality varies between browsers. Most browsers allow you to
specify location and level of logs. Take a look at the respective browser page:
Page being translated from
English to Portuguese. Do you speak Portuguese? Help us to translate
it by sending us pull requests!
Selenium lets you automate browsers on remote computers if
there is a Selenium Grid running on them. The computer that
executes the code is referred to as the client computer, and the computer with the browser and driver is
referred to as the remote computer or sometimes as an end-node.
To direct Selenium tests to the remote computer, you need to use a Remote WebDriver class
and pass the URL including the port of the grid on that machine. Please see the grid documentation
for all the various ways the grid can be configured.
Basic Example
The driver needs to know where to send commands to and which browser to start on the Remote computer. So an address
and an options instance are both required.
Uploading a file is more complicated for Remote WebDriver sessions because the file you want to
upload is likely on the computer executing the code, but the driver on the
remote computer is looking for the provided path on its local file system.
The solution is to use a Local File Detector. When one is set, Selenium will bundle
the file, and send it to the remote machine, so the driver can see the reference to it.
Some bindings include a basic local file detector by default, and all of them allow
for a custom file detector.
Java does not include a Local File Detector by default, so you must always add one to do uploads.
Chrome, Edge and Firefox each allow you to set the location of the download directory.
When you do this on a remote computer, though, the location is on the remote computer’s local file system.
Selenium allows you to enable downloads to get these files onto the client computer.
Enable Downloads in the Grid
Regardless of the client, when starting the grid in node or standalone mode,
you must add the flag:
--enable-managed-downloads true
Enable Downloads in the Client
The grid uses the se:downloadsEnabled capability to toggle whether to be responsible for managing the browser location.
Each of the bindings have a method in the options class to set this.
Be aware that Selenium is not waiting for files to finish downloading,
so the list is an immediate snapshot of what file names are currently in the directory for the given session.
Each browser has implemented special functionality that is available only to that browser.
Each of the Selenium bindings has implemented a different way to use those features in a Remote Session
Java requires you to use the Augmenter class, which allows it to automatically pull in implementations for
all interfaces that match the capabilities used with the RemoteWebDriver
This feature is only available for Java client binding (Beta onwards). The Remote WebDriver client sends requests to the Selenium Grid server, which passes them to the WebDriver. Tracing should be enabled at the server and client-side to trace the HTTP requests end-to-end. Both ends should have a trace exporter setup pointing to the visualization framework.
By default, tracing is enabled for both client and server.
To set up the visualization framework Jaeger UI and Selenium Grid 4, please refer to Tracing Setup for the desired version.
For client-side setup, follow the steps below.
Add the required dependencies
Installation of external libraries for tracing exporter can be done using Maven.
Add the opentelemetry-exporter-jaeger and grpc-netty dependency in your project pom.xml:
Alguns exemplos de uso com capacidades diferentes:
Argumentos
The args parameter is for a list of command line switches to be used when starting the browser.
There are two excellent resources for investigating these arguments:
Examples for creating a default Service object, and for setting driver location and port
can be found on the Driver Service page.
Log output
Getting driver logs can be helpful for debugging issues. The Service class lets you
direct where the logs will go. Logging output is ignored unless the user directs it somewhere.
File output
To change the logging output to save to a specific file:
Note: Java also allows setting console output by System Property; Property key: ChromeDriverService.CHROME_DRIVER_LOG_PROPERTY Property value: DriverService.LOG_STDOUT or DriverService.LOG_STDERR
There are 6 available log levels: ALL, DEBUG, INFO, WARNING, SEVERE, and OFF.
Note that --verbose is equivalent to --log-level=ALL and --silent is equivalent to --log-level=OFF,
so this example is just setting the log level generically:
Note: Java also allows setting log level by System Property: Property key: ChromeDriverService.CHROME_DRIVER_LOG_LEVEL_PROPERTY Property value: String representation of ChromiumDriverLogLevel enum
There are 2 features that are only available when logging to a file:
append log
readable timestamps
To use them, you need to also explicitly specify the log path and log level.
The log output will be managed by the driver, not the process, so minor differences may be seen.
Note: Java also allows toggling these features by System Property: Property keys: ChromeDriverService.CHROME_DRIVER_APPEND_LOG_PROPERTY and ChromeDriverService.CHROME_DRIVER_READABLE_TIMESTAMP Property value: "true" or "false"
Chromedriver and Chrome browser versions should match, and if they don’t the driver will error.
If you disable the build check, you can force the driver to be used with any version of Chrome.
Note that this is an unsupported feature, and bugs will not be investigated.
Note: Java also allows disabling build checks by System Property: Property key: ChromeDriverService.CHROME_DRIVER_DISABLE_BUILD_CHECK Property value: "true" or "false"
Veja a secção Chrome DevTools para mais informação em como usar Chrome DevTools
2.3.2 - Funcionalidade específica do Edge
Estas capacidades e características são específicas ao navegador Microsoft Edge.
Microsoft Edge foi criado com recurso ao Chromium, cuja versão mais antiga suportada é a v79.
Tal como o Chrome, a versão (maior) do edgedriver deve ser igual à do navegador Edge.
Todas as capacidades e opções encontradas na página Chrome page irão funcionar de igual forma para o Edge.
Opções
Capabilities common to all browsers are described on the Options page.
The args parameter is for a list of command line switches to be used when starting the browser.
There are two excellent resources for investigating these arguments:
The binary parameter takes the path of an alternate location of browser to use. With this parameter you can
use chromedriver to drive various Chromium based browsers.
MSEdgedriver has several default arguments it uses to start the browser.
If you do not want those arguments added, pass them into excludeSwitches.
A common example is to turn the popup blocker back on. A full list of default arguments
can be parsed from the
Chromium Source Code
Examples for creating a default Service object, and for setting driver location and port
can be found on the Driver Service page.
Log output
Getting driver logs can be helpful for debugging issues. The Service class lets you
direct where the logs will go. Logging output is ignored unless the user directs it somewhere.
File output
To change the logging output to save to a specific file:
Note: Java also allows setting console output by System Property; Property key: EdgeDriverService.EDGE_DRIVER_LOG_PROPERTY Property value: DriverService.LOG_STDOUT or DriverService.LOG_STDERR
There are 6 available log levels: ALL, DEBUG, INFO, WARNING, SEVERE, and OFF.
Note that --verbose is equivalent to --log-level=ALL and --silent is equivalent to --log-level=OFF,
so this example is just setting the log level generically:
Note: Java also allows setting log level by System Property: Property key: EdgeDriverService.EDGE_DRIVER_LOG_LEVEL_PROPERTY Property value: String representation of ChromiumDriverLogLevel enum
There are 2 features that are only available when logging to a file:
append log
readable timestamps
To use them, you need to also explicitly specify the log path and log level.
The log output will be managed by the driver, not the process, so minor differences may be seen.
Note: Java also allows toggling these features by System Property: Property keys: EdgeDriverService.EDGE_DRIVER_APPEND_LOG_PROPERTY and EdgeDriverService.EDGE_DRIVER_READABLE_TIMESTAMP Property value: "true" or "false"
Edge browser and msedgedriver versions should match, and if they don’t the driver will error.
If you disable the build check, you can force the driver to be used with any version of Edge.
Note that this is an unsupported feature, and bugs will not be investigated.
Note: Java also allows disabling build checks by System Property: Property key: EdgeDriverService.EDGE_DRIVER_DISABLE_BUILD_CHECK Property value: "true" or "false"
O Microsoft Edge pode ser controlado em modo “compatibilidade Internet Explorer”, são usadas
classes do Internet Explorer Driver em conjunção com o Microsoft Edge.
Leia a página Internet Explorer para mais detalhes.
Special Features
Some browsers have implemented additional features that are unique to them.
Casting
You can drive Chrome Cast devices with Edge, including sharing tabs
Alguns exemplos de uso com capacidades diferentes:
Argumentos
O parametro args é usado para indicar uma lista de opções ao iniciar o navegador.
Opções mais frequentes incluem -headless e "-profile", "/path/to/profile"
O parametro binary é usado contendo o caminho para uma localização específica do navegador.
Como exemplo, pode usar este parametro para indicar ao geckodriver a versão Firefox Nightly ao invés da
versão de produção, quando ambas versões estão presentes no seu computador.
const{Builder}=require("selenium-webdriver");constfirefox=require('selenium-webdriver/firefox');constoptions=newfirefox.Options();letprofile='/path to custom profile';options.setProfile(profile);constdriver=newBuilder().forBrowser('firefox').setFirefoxOptions(options).build();
Service settings common to all browsers are described on the Service page.
Log output
Getting driver logs can be helpful for debugging various issues. The Service class lets you
direct where the logs will go. Logging output is ignored unless the user directs it somewhere.
File output
To change the logging output to save to a specific file:
Note: Java also allows setting console output by System Property; Property key: GeckoDriverService.GECKO_DRIVER_LOG_PROPERTY Property value: DriverService.LOG_STDOUT or DriverService.LOG_STDERR
Note: Java also allows setting log level by System Property: Property key: GeckoDriverService.GECKO_DRIVER_LOG_LEVEL_PROPERTY Property value: String representation of FirefoxDriverLogLevel enum
The driver logs everything that gets sent to it, including string representations of large binaries, so
Firefox truncates lines by default. To turn off truncation:
Note: Java also allows setting log level by System Property: Property key: GeckoDriverService.GECKO_DRIVER_LOG_NO_TRUNCATE Property value: "true" or "false"
The default directory for profiles is the system temporary directory. If you do not have access to that directory,
or want profiles to be created some place specific, you can change the profile root directory:
Quando trabalhar em uma extensão não terminada ou não publicada, provavelmente ela não estará assinada.
Desta forma, só pode ser instalada como “temporária”. Isto pode ser feito passando uma arquivo ZIP ou
uma pasta, este é um exemplo com uma pasta:
Estas capacidades e características são específicas ao navegador Microsoft Internet Explorer.
Desde Junho de 2022, o Projecto Selenium deixou de suportar oficialmente o navegador Internet Explorer.
O driver Internet Explorer continua a suportar a execução do Microsoft Edge no modo “IE Compatibility Mode.”
Considerações especiais
O IE Driver é o único driver mantido directamente pelo Projecto Selenium.
Embora existam binários para as versões de 32 e 64 bits, existem algumas
limitações conhecidas
com o driver de 64 bits. Desta forma, recomenda-se a utilização do driver de 32 bits.
Informação adicional sobre como usar o Internet Explorer pode ser encontrada na
página IE Driver Server
Opções
Este é um exemplo de como iniciar o navegador Microsoft Edge em modo compatibilidade Internet Explorer
usando um conjunto de opções básicas:
Se o IE não estiver presente no sistema (ausente por omissão no Windows 11), não necessita
usar os parametros “attachToEdgeChrome” e “withEdgeExecutablePath”, pois o IE Driver
irá encontrar e usar o Edge automaticamente.
Se o IE e o Edge estiverem ambos presentes no sistema, use o parametro “attachToEdgeChrome”,
o IE Driver irá encontrar e usar o Edge automaticamente.
<p><ahref=/documentation/about/contributing/#moving-examples><spanclass="selenium-badge-code"data-bs-toggle="tooltip"data-bs-placement="right"title="One or more of these examples need to be implemented in the examples directory; click for details in the contribution guide">MoveCode</span></a></p>valoptions=InternetExplorerOptions()valdriver=InternetExplorerDriver(options)
Aqui pode ver alguns exemplos de utilização com capacidades diferentes:
fileUploadDialogTimeout
Em alguns ambientes, o Internet Explorer pode expirar ao abrir a
Caixa de Diálogo de upload de arquivo. O IEDriver tem um tempo limite padrão de 1000 ms, mas você
pode aumentar o tempo limite usando o recurso fileUploadDialogTimeout.
fromseleniumimportwebdriveroptions=webdriver.IeOptions()options.file_upload_dialog_timeout=2000driver=webdriver.Ie(options=options)# Navegar para Urldriver.get("http://www.google.com")driver.quit()
Quando definido como true, este recurso limpa o Cache,
Histórico do navegador e cookies para todas as instâncias em execução
do InternetExplorer, incluindo aquelas iniciadas manualmente
ou pelo driver. Por padrão, é definido como false.
Usar este recurso causará queda de desempenho quando
iniciar o navegador, pois o driver irá esperar até que o cache
seja limpo antes de iniciar o navegador IE.
Esse recurso aceita um valor booleano como parâmetro.
fromseleniumimportwebdriveroptions=webdriver.IeOptions()options.ensure_clean_session=Truedriver=webdriver.Ie(options=options)# Navegar para Urldriver.get("http://www.google.com")driver.quit()
O driver do InternetExplorer espera que o nível de zoom do navegador seja de 100%,
caso contrário, o driver lançará uma exceção. Este comportamento padrão
pode ser desativado definindo ignoreZoomSetting como true.
Esse recurso aceita um valor booleano como parâmetro.
fromseleniumimportwebdriveroptions=webdriver.IeOptions()options.ignore_zoom_level=Truedriver=webdriver.Ie(options=options)# Navegar para Urldriver.get("http://www.google.com")driver.quit()
Se deve ignorar a verificação do Modo protegido durante o lançamento
uma nova sessão do IE.
Se não for definido e as configurações do Modo protegido não forem iguais para
todas as zonas, uma exceção será lançada pelo driver.
Se a capacidade for definida como true, os testes podem
tornar-se instáveis, não responderem ou os navegadores podem travar.
No entanto, esta ainda é de longe a segunda melhor escolha,
e a primeira escolha sempre deve ser
definir as configurações do Modo protegido de cada zona manualmente.
Se um usuário estiver usando esta propriedade,
apenas um “melhor esforço” no suporte será dado.
Esse recurso aceita um valor booleano como parâmetro.
fromseleniumimportwebdriveroptions=webdriver.IeOptions()options.ignore_protected_mode_settings=Truedriver=webdriver.Ie(options=options)# Navegar para Urldriver.get("http://www.google.com")driver.quit()
fromseleniumimportwebdriveroptions=webdriver.IeOptions()options.set_capability("silent",True)driver=webdriver.Ie(options=options)# Navegar para Urldriver.get("http://www.google.com")driver.quit()
O Internet Explorer inclui várias opções de linha de comando
que permitem solucionar problemas e configurar o navegador.
Os seguintes pontos descrevem algumas opções de linha de comando com suporte
-private: Usado para iniciar o IE no modo de navegação privada. Isso funciona para o IE 8 e versões posteriores.
-k: Inicia o Internet Explorer no modo quiosque.
O navegador é aberto em uma janela maximizada que não exibe a barra de endereço, os botões de navegação ou a barra de status.
-extoff: Inicia o IE no modo sem add-on.
Esta opção é usada especificamente para solucionar problemas com complementos do navegador. Funciona no IE 7 e versões posteriores.
Nota: forceCreateProcessApi deve ser habilitado para que os argumentos da linha de comando funcionem.
fromseleniumimportwebdriveroptions=webdriver.IeOptions()options.add_argument('-private')options.force_create_process_api=Truedriver=webdriver.Ie(options=options)# Navegar para Urldriver.get("http://www.google.com")driver.quit()
require'selenium-webdriver'options=Selenium::WebDriver::IE::Options.newoptions.force_create_process_api=trueoptions.add_argument('-k')driver=Selenium::WebDriver.for(:ie,options:options)begin# Navegar para URLdriver.get'https://google.com'puts(driver.capabilities.to_json)ensuredriver.quitend
fromseleniumimportwebdriveroptions=webdriver.IeOptions()options.force_create_process_api=Truedriver=webdriver.Ie(options=options)# Navegar para Urldriver.get("http://www.google.com")driver.quit()
require'selenium-webdriver'options=Selenium::WebDriver::IE::Options.newoptions.force_create_process_api=truedriver=Selenium::WebDriver.for(:ie,options:options)begin# Navegar para Urldriver.get'https://google.com'puts(driver.capabilities.to_json)ensuredriver.quitend
Service settings common to all browsers are described on the Service page.
Log output
Getting driver logs can be helpful for debugging various issues. The Service class lets you
direct where the logs will go. Logging output is ignored unless the user directs it somewhere.
File output
To change the logging output to save to a specific file:
Note: Java also allows setting console output by System Property; Property key: InternetExplorerDriverService.IE_DRIVER_LOGFILE_PROPERTY Property value: DriverService.LOG_STDOUT or DriverService.LOG_STDERR
Note: Java also allows setting log level by System Property: Property key: InternetExplorerDriverService.IE_DRIVER_LOGLEVEL_PROPERTY Property value: String representation of InternetExplorerDriverLogLevel.DEBUG.toString() enum
Estas capacidades e características são específicas ao navegador Apple Safari.
Ao invés dos drivers para Chromium e Firefox, o safaridriver faz parte to sistema Operativo.
Para activar a automação no Safari, execute o seguinte comando no terminal:
safaridriver --enable
Opções
Capacidades comuns a todos os navegadores estão descritas na página Opções.
Capacidades únicas ao Safari podem ser encontradas na página da Apple WebDriver para Safari
Este é um exemplo de como iniciar uma sessão Safari com um conjunto de opções básicas::
Se pretende automatizar Safari em iOS, deve olhar para o Projecto Appium.
Service
Service settings common to all browsers are described on the Service page.
Logging
Unlike other browsers, Safari doesn’t let you choose where logs are output, or change levels. The one option
available is to turn logs off or on. If logs are toggled on, they can be found at:~/Library/Logs/com.apple.WebDriver/.
Note: Java also allows setting console output by System Property; Property key: SafariDriverService.SAFARI_DRIVER_LOGGING Property value: "true" or "false"
Perhaps the most common challenge for browser automation is ensuring
that the web application is in a state to execute a particular
Selenium command as desired. The processes often end up in
a race condition where sometimes the browser gets into the right
state first (things work as intended) and sometimes the Selenium code
executes first (things do not work as intended). This is one of the
primary causes of flaky tests.
All navigation commands wait for a specific readyState value
based on the page load strategy (the
default value to wait for is "complete") before the driver returns control to the code.
The readyState only concerns itself with loading assets defined in the HTML,
but loaded JavaScript assets often result in changes to the site,
and elements that need to be interacted with may not yet be on the page
when the code is ready to execute the next Selenium command.
Similarly, in a lot of single page applications, elements get dynamically
added to a page or change visibility based on a click.
An element must be both present and
displayed on the page
in order for Selenium to interact with it.
Take this page for example: https://www.selenium.dev/selenium/web/dynamic.html
When the “Add a box!” button is clicked, a “div” element that does not exist is created.
When the “Reveal a new input” button is clicked, a hidden text field element is displayed.
In both cases the transition takes a couple seconds.
If the Selenium code is to click one of these buttons and interact with the resulting element,
it will do so before that element is ready and fail.
The first solution many people turn to is adding a sleep statement to
pause the code execution for a set period of time.
Because the code can’t know exactly how long it needs to wait, this
can fail when it doesn’t sleep long enough. Alternately, if the value is set too high
and a sleep statement is added in every place it is needed, the duration of
the session can become prohibitive.
Selenium provides two different mechanisms for synchronization that are better.
Implicit waits
Selenium has a built-in way to automatically wait for elements called an implicit wait.
An implicit wait value can be set either with the timeouts
capability in the browser options, or with a driver method (as shown below).
This is a global setting that applies to every element location call for the entire session.
The default value is 0, which means that if the element is not found, it will
immediately return an error. If an implicit wait is set, the driver will wait for the
duration of the provided value before returning the error. Note that as soon as the
element is located, the driver will return the element reference and the code will continue executing,
so a larger implicit wait value won’t necessarily increase the duration of the session.
Warning:
Do not mix implicit and explicit waits.
Doing so can cause unpredictable wait times.
For example, setting an implicit wait of 10 seconds
and an explicit wait of 15 seconds
could cause a timeout to occur after 20 seconds.
Solving our example with an implicit wait looks like this:
Explicit waits are loops added to the code that poll the application
for a specific condition to evaluate as true before it exits the loop and
continues to the next command in the code. If the condition is not met before a designated timeout value,
the code will give a timeout error. Since there are many ways for the application not to be in the desired state,
so explicit waits are a great choice to specify the exact condition to wait for
in each place it is needed.
Another nice feature is that, by default, the Selenium Wait class automatically waits for the designated element to exist.
This example shows the condition being waited for as a lambda. Java also supports
Expected Conditions
The Wait class can be instantiated with various parameters that will change how the conditions are evaluated.
This can include:
Changing how often the code is evaluated (polling interval)
Specifying which exceptions should be handled automatically
Changing the total timeout length
Customizing the timeout message
For instance, if the element not interactable error is retried by default, then we can
add an action on a method inside the code getting executed (we just need to
make sure that the code returns true when it is successful):
The easiest way to customize Waits in Java is to use the FluentWait class:
A maioria do código que é escrito recorrendo às bibliotecas Selenium envolve trabalhar com elementos.
2.5.1 - File Upload
Como subir arquivos com Selenium
Because Selenium cannot interact with the file upload dialog, it provides a way
to upload files without opening the dialog. If the element is an input element with type file,
you can use the send keys method to send the full path to the file that will be uploaded.
```java
import org.openqa.selenium.By
import org.openqa.selenium.chrome.ChromeDriver
fun main() {
val driver = ChromeDriver()
driver.get("https://the-internet.herokuapp.com/upload")
driver.findElement(By.id("file-upload")).sendKeys("selenium-snapshot.jpg")
driver.findElement(By.id("file-submit")).submit()
if(driver.pageSource.contains("File Uploaded!")) {
println("file uploaded")
}
else{
println("file not uploaded")
}
}
```
2.5.2 - Encontrando Elementos Web
Localizando elementos com base nos valores providenciados pelo localizador.
Um dos aspectos mais fundamentais do uso do Selenium é obter referências de elementos para trabalhar.
O Selenium oferece várias estratégias de localizador para identificar exclusivamente um elemento.
Há muitas maneiras de usar os localizadores em cenários complexos. Para os propósitos desta documentação,
vamos considerar este trecho de HTML:
<olid="vegetables"><liclass="potatoes">…
<liclass="onions">…
<liclass="tomatoes"><span>O tomate é um vegetal</span>…
</ol><ulid="fruits"><liclass="bananas">…
<liclass="apples">…
<liclass="tomatoes"><span>O tomate é uma fruta</span>…
</ul>
Primeiro Elemento correspondente
Muitos localizadores irão corresponder a vários elementos na página.
O método de elemento de localização singular retornará uma referência ao
primeiro elemento encontrado dentro de um determinado contexto.
Avaliando o DOM inteiro
Quando o metodo find element é chamado na instância do driver, ele
retorna uma referência ao primeiro elemento no DOM que corresponde ao localizador fornecido.
Esse valor pode ser guardado e usado para ações futuras do elemento. Em nosso exemplo HTML acima, existem
dois elementos que têm um nome de classe de “tomatoes” então este método retornará o elemento na lista “vegetables”.
Ao em vez de tentar encontrar um localizador unico no DOM inteiro, normalmente é útil restringir a busca ao escopo de outro elemento
já localizado. No exemplo acima existem dois elementos com um nome de classe de “tomatoes” e
é um pouco mais desafiador obter a referência para o segundo.
Uma possível solução seria localizar um elemento com um atributo único que seja um ancestral do elemento desejado e não um
ancestral do elemento indesejado, então invoque o find element nesse objeto:
Java e C# As classes WebDriver, WebElement e ShadowRoot todas implementam o SearchContext interface, que é
considerada uma role-based interface(interface baseada em função). As interfaces baseadas em função permitem determinar se uma determinada
implementação de driver suporta um recurso específico. Essas interfaces são claramente definidas e tentam
aderir a ter apenas um único papel de responsabilidade.
Localizador otimizado
Uma pesquisa aninhada pode não ser a estratégia de localização mais eficaz, pois requer dois
comandos separados a serem emitidos para o navegador.
Existem vários casos de uso para a necessidade de obter referências a todos os elementos que correspondem a um localizador, em vez
do que apenas o primeiro. Os métodos plurais find elements retornam uma coleção de referências de elementos.
Se não houver correspondências, uma lista vazia será retornada. Nesse caso,
referências a todos os itens da lista de frutas e vegetais serão devolvidas em uma coleção.
Muitas vezes você obterá uma coleção de elementos, mas quer trabalhar apenas com um elemento específico, o que significa que você
precisa iterar sobre a coleção e identificar o que você deseja.
fromseleniumimportwebdriverfromselenium.webdriver.common.byimportBydriver=webdriver.Firefox()# Navegar até a URLdriver.get("https://www.example.com")# Obtém todos os elementos disponiveis com o nome da tag 'p'elements=driver.find_elements(By.TAG_NAME,'p')foreinelements:print(e.text)
usingOpenQA.Selenium;usingOpenQA.Selenium.Firefox;usingSystem.Collections.Generic;namespaceFindElementsExample{classFindElementsExample{publicstaticvoidMain(string[]args){IWebDriverdriver=newFirefoxDriver();try{// Navegar até a URLdriver.Navigate().GoToUrl("https://example.com");// Obtém todos os elementos disponiveis com o nome da tag 'p'IList<IWebElement>elements=driver.FindElements(By.TagName("p"));foreach(IWebElementeinelements){System.Console.WriteLine(e.Text);}}finally{driver.Quit();}}}}
require'selenium-webdriver'driver=Selenium::WebDriver.for:firefoxbegin# Navegar até a URLdriver.get'https://www.example.com'# Obtém todos os elementos disponiveis com o nome da tag 'p'elements=driver.find_elements(:tag_name,'p')elements.each{|e|putse.text}ensuredriver.quitend
const{Builder,By}=require('selenium-webdriver');(asyncfunctionexample(){letdriver=awaitnewBuilder().forBrowser('firefox').build();try{// Navegar até a URL
awaitdriver.get('https://www.example.com');// Obtém todos os elementos disponiveis com o nome da tag 'p'
letelements=awaitdriver.findElements(By.css('p'));for(leteofelements){console.log(awaite.getText());}}finally{awaitdriver.quit();}})();
importorg.openqa.selenium.Byimportorg.openqa.selenium.firefox.FirefoxDriverfunmain(){valdriver=FirefoxDriver()try{driver.get("https://example.com")// Obtém todos os elementos disponiveis com o nome da tag 'p'
valelements=driver.findElements(By.tagName("p"))for(elementinelements){println("Paragraph text:"+element.text)}}finally{driver.quit()}}
Localizar Elementos em um Elemento
Ele é usado para localizar a lista de WebElements filhos correspondentes dentro do contexto do elemento pai.
Para realizar isso, o WebElement pai é encadeado com o ‘findElements’ para acessar seus elementos filhos.
importorg.openqa.selenium.By;importorg.openqa.selenium.WebDriver;importorg.openqa.selenium.WebElement;importorg.openqa.selenium.chrome.ChromeDriver;importjava.util.List;publicclassfindElementsFromElement{publicstaticvoidmain(String[]args){WebDriverdriver=newChromeDriver();try{driver.get("https://example.com");// Obtém o elemento com o nome da tag 'div'
WebElementelement=driver.findElement(By.tagName("div"));// Obtém todos os elementos disponiveis com o nome da tag 'p'
List<WebElement>elements=element.findElements(By.tagName("p"));for(WebElemente:elements){System.out.println(e.getText());}}finally{driver.quit();}}}
fromseleniumimportwebdriverfromselenium.webdriver.common.byimportBydriver=webdriver.Chrome()driver.get("https://www.example.com")# Obtém o elemento com o nome da tag 'div'element=driver.find_element(By.TAG_NAME,'div')# Obtém todos os elementos disponíveis com o nome da tag 'p'elements=element.find_elements(By.TAG_NAME,'p')foreinelements:print(e.text)
usingOpenQA.Selenium;usingOpenQA.Selenium.Chrome;usingSystem.Collections.Generic;namespaceFindElementsFromElement{classFindElementsFromElement{publicstaticvoidMain(string[]args){IWebDriverdriver=newChromeDriver();try{driver.Navigate().GoToUrl("https://example.com");// Obtém o elemento com o nome da tag 'div'IWebElementelement=driver.FindElement(By.TagName("div"));// Obtém todos os elementos disponíveis com o nome da tag 'p'IList<IWebElement>elements=element.FindElements(By.TagName("p"));foreach(IWebElementeinelements){System.Console.WriteLine(e.Text);}}finally{driver.Quit();}}}}
require'selenium-webdriver'driver=Selenium::WebDriver.for:chromebegin# Navegar até a URLdriver.get'https://www.example.com'# Obtém o elemento com o nome da tag 'div'element=driver.find_element(:tag_name,'div')# Obtém todos os elementos disponíveis com o nome da tag 'p'elements=element.find_elements(:tag_name,'p')elements.each{|e|putse.text}ensuredriver.quitend
const{Builder,By}=require('selenium-webdriver');(asyncfunctionexample(){letdriver=newBuilder().forBrowser('chrome').build();awaitdriver.get('https://www.example.com');// Obtém o elemento com o nome da tag 'div'
letelement=driver.findElement(By.css("div"));// Obtém todos os elementos disponíveis com o nome da tag 'p'
letelements=awaitelement.findElements(By.css("p"));for(leteofelements){console.log(awaite.getText());}})();
importorg.openqa.selenium.Byimportorg.openqa.selenium.chrome.ChromeDriverfunmain(){valdriver=ChromeDriver()try{driver.get("https://example.com")// Obtém o elemento com o nome da tag 'div'
valelement=driver.findElement(By.tagName("div"))// Obtém todos os elementos disponíveis com o nome da tag 'p'
valelements=element.findElements(By.tagName("p"))for(einelements){println(e.text)}}finally{driver.quit()}}
Obter elemento ativo
Ele é usado para rastrear (ou) encontrar um elemento DOM que tem o foco no contexto de navegação atual.
importorg.openqa.selenium.*;importorg.openqa.selenium.chrome.ChromeDriver;publicclassactiveElementTest{publicstaticvoidmain(String[]args){WebDriverdriver=newChromeDriver();try{driver.get("http://www.google.com");driver.findElement(By.cssSelector("[name='q']")).sendKeys("webElement");// Obter atributo do elemento atualmente ativo
Stringattr=driver.switchTo().activeElement().getAttribute("title");System.out.println(attr);}finally{driver.quit();}}}
fromseleniumimportwebdriverfromselenium.webdriver.common.byimportBydriver=webdriver.Chrome()driver.get("https://www.google.com")driver.find_element(By.CSS_SELECTOR,'[name="q"]').send_keys("webElement")# Obter atributo do elemento atualmente ativoattr=driver.switch_to.active_element.get_attribute("title")print(attr)
usingOpenQA.Selenium;usingOpenQA.Selenium.Chrome;namespaceActiveElement{classActiveElement{publicstaticvoidMain(string[]args){IWebDriverdriver=newChromeDriver();try{// Navegar até a URLdriver.Navigate().GoToUrl("https://www.google.com");driver.FindElement(By.CssSelector("[name='q']")).SendKeys("webElement");// Obter atributo do elemento atualmente ativostringattr=driver.SwitchTo().ActiveElement().GetAttribute("title");System.Console.WriteLine(attr);}finally{driver.Quit();}}}}
require'selenium-webdriver'driver=Selenium::WebDriver.for:chromebegindriver.get'https://www.google.com'driver.find_element(css:'[name="q"]').send_keys('webElement')# Obter atributo do elemento atualmente ativoattr=driver.switch_to.active_element.attribute('title')putsattrensuredriver.quitend
const{Builder,By}=require('selenium-webdriver');(asyncfunctionexample(){letdriver=awaitnewBuilder().forBrowser('chrome').build();awaitdriver.get('https://www.google.com');awaitdriver.findElement(By.css('[name="q"]')).sendKeys("webElement");// Obter atributo do elemento atualmente ativo
letattr=awaitdriver.switchTo().activeElement().getAttribute("title");console.log(`${attr}`)})();
importorg.openqa.selenium.Byimportorg.openqa.selenium.chrome.ChromeDriverfunmain(){valdriver=ChromeDriver()try{driver.get("https://www.google.com")driver.findElement(By.cssSelector("[name='q']")).sendKeys("webElement")// Obter atributo do elemento atualmente ativo
valattr=driver.switchTo().activeElement().getAttribute("title")print(attr)}finally{driver.quit()}}
2.5.3 - Interacting with web elements
A high-level instruction set for manipulating form controls.
There are only 5 basic commands that can be executed on an element:
These methods are designed to closely emulate a user’s experience, so,
unlike the Actions API, it attempts to perform two things
before attempting the specified action.
If it determines the element is outside the viewport, it
scrolls the element into view, specifically
it will align the bottom of the element with the bottom of the viewport.
It ensures the element is interactable
before taking the action. This could mean that the scrolling was unsuccessful, or that the
element is not otherwise displayed. Determining if an element is displayed on a page was too difficult to
define directly in the webdriver specification,
so Selenium sends an execute command with a JavaScript atom that checks for things that would keep
the element from being displayed. If it determines an element is not in the viewport, not displayed, not
keyboard-interactable, or not
pointer-interactable,
it returns an element not interactable error.
driver.get("https://www.selenium.dev/selenium/web/inputs.html");// Click on the element
WebElementcheckInput=driver.findElement(By.name("checkbox_input"));checkInput.click();
# Navigate to urldriver.get("https://www.selenium.dev/selenium/web/inputs.html")# Click on the element driver.find_element(By.NAME,"color_input").click()
// Navigate to Urldriver.Navigate().GoToUrl("https://www.selenium.dev/selenium/web/inputs.html");// Click the elementdriver.FindElement(By.Name("color_input")).Click();
# Navigate to URLdriver.get'https://www.selenium.dev/selenium/web/inputs.html'# Click the elementdriver.find_element(name:'color_input').click
// Navigate to Url
awaitdriver.get('https://www.selenium.dev/selenium/web/inputs.html');// Click the element
awaitdriver.findElement(By.name('color_input')).click();
// Navigate to Url
driver.get("https://www.selenium.dev/selenium/web/inputs.html")// Click the element
driver.findElement(By.name("color_input")).click();
Send keys
The element send keys command
types the provided keys into an editable element.
Typically, this means an element is an input element of a form with a text type or an element
with a content-editable attribute. If it is not editable,
an invalid element state error is returned.
Here is the list of
possible keystrokes that WebDriver Supports.
// Clear field to empty it from any previous data
WebElementemailInput=driver.findElement(By.name("email_input"));emailInput.clear();//Enter Text
Stringemail="admin@localhost.dev";emailInput.sendKeys(email);
# Navigate to urldriver.get("https://www.selenium.dev/selenium/web/inputs.html")# Clear field to empty it from any previous datadriver.find_element(By.NAME,"email_input").clear()# Enter Textdriver.find_element(By.NAME,"email_input").send_keys("admin@localhost.dev")
// Navigate to Urldriver.Navigate().GoToUrl("https://www.selenium.dev/selenium/web/inputs.html");// Clear field to empty it from any previous datadriver.FindElement(By.Name("email_input")).Clear();//Enter Textdriver.FindElement(By.Name("email_input")).SendKeys("admin@localhost.dev");}
# Navigate to URLdriver.get'https://www.selenium.dev/selenium/web/inputs.html'# Clear field to empty it from any previous datadriver.find_element(name:'email_input').clear# Enter Textdriver.find_element(name:'email_input').send_keys'admin@localhost.dev'
// Navigate to Url
awaitdriver.get('https://www.selenium.dev/selenium/web/inputs.html');//Clear field to empty it from any previous data
awaitdriver.findElement(By.name('email_input')).clear();// Enter text
awaitdriver.findElement(By.name('email_input')).sendKeys('admin@localhost.dev');
// Navigate to Url
driver.get("https://www.selenium.dev/selenium/web/inputs.html")//Clear field to empty it from any previous data
driver.findElement(By.name("email_input")).clear()// Enter text
driver.findElement(By.name("email_input")).sendKeys("admin@localhost.dev")
Clear
The element clear command resets the content of an element.
This requires an element to be editable,
and resettable. Typically,
this means an element is an input element of a form with a text type or an element
with acontent-editable attribute. If these conditions are not met,
an invalid element state error is returned.
//Clear Element
// Clear field to empty it from any previous data
emailInput.clear();
# Navigate to urldriver.get("https://www.selenium.dev/selenium/web/inputs.html")# Clear field to empty it from any previous datadriver.find_element(By.NAME,"email_input").clear()
// Navigate to Urldriver.Navigate().GoToUrl("https://www.selenium.dev/selenium/web/inputs.html");// Clear field to empty it from any previous datadriver.FindElement(By.Name("email_input")).Clear();}
# Navigate to URLdriver.get'https://www.selenium.dev/selenium/web/inputs.html'# Clear field to empty it from any previous datadriver.find_element(name:'email_input').clear
// Navigate to Url
awaitdriver.get('https://www.selenium.dev/selenium/web/inputs.html');//Clear field to empty it from any previous data
awaitdriver.findElement(By.name('email_input')).clear();
// Navigate to Url
driver.get("https://www.selenium.dev/selenium/web/inputs.html")//Clear field to empty it from any previous data
driver.findElement(By.name("email_input")).clear()
Submit
In Selenium 4 this is no longer implemented with a separate endpoint and functions by executing a script. As
such, it is recommended not to use this method and to click the applicable form submission button instead.
2.5.4 - Information about web elements
What you can learn about an element.
There are a number of details you can query about a specific element.
Is Displayed
This method is used to check if the connected Element is
displayed on a webpage. Returns a Boolean value,
True if the connected element is displayed in the current
browsing context else returns false.
This functionality is mentioned in, but not defined by
the w3c specification due to the
impossibility of covering all potential conditions.
As such, Selenium cannot expect drivers to implement
this functionality directly, and now relies on
executing a large JavaScript function directly.
This function makes many approximations about an element’s
nature and relationship in the tree to return a value.
// Navigate to the url
driver.get("https://www.selenium.dev/selenium/web/inputs.html");// Get boolean value for is element display
booleanisEmailVisible=driver.findElement(By.name("email_input")).isDisplayed();
# Navigate to the urldriver.get("https://www.selenium.dev/selenium/web/inputs.html")# Get boolean value for is element displayis_email_visible=driver.find_element(By.NAME,"email_input").is_displayed()
//Navigate to the urldriver.Url="https://www.selenium.dev/selenium/web/inputs.html";//Get boolean value for is element displayBooleanis_email_visible=driver.FindElement(By.Name("email_input")).Displayed;
# Navigate to the urldriver.get("https://www.selenium.dev/selenium/web/inputs.html");#fetch display statusval=driver.find_element(name:'email_input').displayed?
// Resolves Promise and returns boolean value
letresult=awaitdriver.findElement(By.name("email_input")).isDisplayed();
//navigates to url
driver.get("https://www.selenium.dev/selenium/web/inputs.html")//returns true if element is displayed else returns false
valflag=driver.findElement(By.name("email_input")).isDisplayed()
Is Enabled
This method is used to check if the connected Element
is enabled or disabled on a webpage.
Returns a boolean value, True if the connected element is
enabled in the current browsing context else returns false.
//navigates to url
driver.get("https://www.selenium.dev/selenium/web/inputs.html");//returns true if element is enabled else returns false
booleanvalue=driver.findElement(By.name("button_input")).isEnabled();
# Navigate to urldriver.get("https://www.selenium.dev/selenium/web/inputs.html")# Returns true if element is enabled else returns falsevalue=driver.find_element(By.NAME,'button_input').is_enabled()
// Navigate to Urldriver.Navigate().GoToUrl("https://www.selenium.dev/selenium/web/inputs.html");// Store the WebElementIWebElementelement=driver.FindElement(By.Name("button_input"));// Prints true if element is enabled else returns falseSystem.Console.WriteLine(element.Enabled);
# Navigate to urldriver.get'https://www.selenium.dev/selenium/web/inputs.html'# Returns true if element is enabled else returns falseele=driver.find_element(name:'button_input').enabled?
// Resolves Promise and returns boolean value
letelement=awaitdriver.findElement(By.name("button_input")).isEnabled();
//navigates to url
driver.get("https://www.selenium.dev/selenium/web/inputs.html")//returns true if element is enabled else returns false
valattr=driver.findElement(By.name("button_input")).isEnabled()
Elemento está selecionado
Este método determina se o elemento referenciado
é Selected ou não. Este método é amplamente utilizado em
caixas de seleção, botões de opção, elementos de entrada e elementos de
opção.
Retorna um valor booleano, true se o elemento referenciado for
selected no contexto de navegação atual, caso contrário, retorna
false.
//navigates to url
driver.get("https://www.selenium.dev/selenium/web/inputs.html");//returns true if element is checked else returns false
booleanvalue=driver.findElement(By.name("checkbox_input")).isSelected();
# Navigate to urldriver.get("https://www.selenium.dev/selenium/web/inputs.html")# Returns true if element is checked else returns falsevalue=driver.find_element(By.NAME,"checkbox_input").is_selected()
// Navigate to Urldriver.Navigate().GoToUrl("https://www.selenium.dev/selenium/web/inputs.html");// Returns true if element ins checked else returns falseboolvalue=driver.FindElement(By.Name("checkbox_input")).Selected;
# Navigate to urldriver.get'https://www.selenium.dev/selenium/web/inputs.html'# Returns true if element is checked else returns falseele=driver.find_element(name:"checkbox_input").selected?
// Returns true if element ins checked else returns false
letisSelected=awaitdriver.findElement(By.name("checkbox_input")).isSelected();
//navigates to url
driver.get("https://www.selenium.dev/selenium/web/inputs.html")//returns true if element is checked else returns false
valattr=driver.findElement(By.name("checkbox_input")).isSelected()
Coletar TagName do elemento
É usado para buscar o TagName
do elemento referenciado que tem o foco no contexto de navegação atual.
//navigates to url
driver.get("https://www.selenium.dev/selenium/web/inputs.html");//returns TagName of the element
Stringvalue=driver.findElement(By.name("email_input")).getTagName();
# Navigate to urldriver.get("https://www.selenium.dev/selenium/web/inputs.html")# Returns TagName of the elementattr=driver.find_element(By.NAME,"email_input").tag_name
// Navigate to Urldriver.Navigate().GoToUrl("https://www.selenium.dev/selenium/web/inputs.html");// Returns TagName of the elementstringattr=driver.FindElement(By.Name("email_input")).TagName;
# Navigate to urldriver.get'https://www.selenium.dev/selenium/web/inputs.html'# Returns TagName of the elementattr=driver.find_element(name:"email_input").tag_name
// Returns TagName of the element
letvalue=awaitdriver.findElement(By.name('email_input')).getTagName();
//navigates to url
driver.get("https://www.selenium.dev/selenium/web/inputs.html")//returns TagName of the element
valattr=driver.findElement(By.name("email_input")).getTagName()
Coletar retângulo do elemento
É usado para buscar as dimensões e coordenadas
do elemento referenciado.
O corpo de dados buscado contém os seguintes detalhes:
Posição do eixo X a partir do canto superior esquerdo do elemento
posição do eixo y a partir do canto superior esquerdo do elemento
Altura do elemento
Largura do elemento
// Navigate to url
driver.get("https://www.selenium.dev/selenium/web/inputs.html");// Returns height, width, x and y coordinates referenced element
Rectangleres=driver.findElement(By.name("range_input")).getRect();// Rectangle class provides getX,getY, getWidth, getHeight methods
System.out.println(res.getX());
# Navigate to urldriver.get("https://www.selenium.dev/selenium/web/inputs.html")# Returns height, width, x and y coordinates referenced elementres=driver.find_element(By.NAME,"range_input").rect
// Navigate to Urldriver.Navigate().GoToUrl("https://www.selenium.dev/selenium/web/inputs.html");varres=driver.FindElement(By.Name("range_input"));// Return x and y coordinates referenced elementSystem.Console.WriteLine(res.Location);// Returns height, widthSystem.Console.WriteLine(res.Size);
# Navigate to urldriver.get'https://www.selenium.dev/selenium/web/inputs.html'# Returns height, width, x and y coordinates referenced elementres=driver.find_element(name:"range_input").rect
// Navigate to url
driver.get("https://www.selenium.dev/selenium/web/inputs.html")// Returns height, width, x and y coordinates referenced element
valres=driver.findElement(By.name("range_input")).rect// Rectangle class provides getX,getY, getWidth, getHeight methods
println(res.getX())
Coletar valor CSS do elemento
Recupera o valor da propriedade de estilo computado especificada
de um elemento no contexto de navegação atual.
// Navigate to Url
driver.get("https://www.selenium.dev/selenium/web/colorPage.html");// Retrieves the computed style property 'color' of linktext
StringcssValue=driver.findElement(By.id("namedColor")).getCssValue("background-color");
# Navigate to Urldriver.get('https://www.selenium.dev/selenium/web/colorPage.html')# Retrieves the computed style property 'color' of linktextcssValue=driver.find_element(By.ID,"namedColor").value_of_css_property('background-color')
// Navigate to Urldriver.Navigate().GoToUrl("https://www.selenium.dev/selenium/web/colorPage.html");// Retrieves the computed style property 'color' of linktextStringcssValue=driver.FindElement(By.Id("namedColor")).GetCssValue("background-color");
# Navigate to Urldriver.get'https://www.selenium.dev/selenium/web/colorPage.html'# Retrieves the computed style property 'color' of linktextcssValue=driver.find_element(:id,'namedColor').css_value('background-color')
awaitdriver.get('https://www.selenium.dev/selenium/web/colorPage.html');// Returns background color of the element
letvalue=awaitdriver.findElement(By.id('namedColor')).getCssValue('background-color');
// Navigate to Url
driver.get("https://www.selenium.dev/selenium/web/colorPage.html")// Retrieves the computed style property 'color' of linktext
valcssValue=driver.findElement(By.id("namedColor")).getCssValue("background-color")
Coletar texto do elemento
Recupera o texto renderizado do elemento especificado.
// Navigate to url
driver.get("https://www.selenium.dev/selenium/web/linked_image.html");// Retrieves the text of the element
Stringtext=driver.findElement(By.id("justanotherlink")).getText();
# Navigate to urldriver.get("https://www.selenium.dev/selenium/web/linked_image.html")# Retrieves the text of the elementtext=driver.find_element(By.ID,"justanotherlink").text
// Navigate to urldriver.Url="https://www.selenium.dev/selenium/web/linked_image.html";// Retrieves the text of the elementStringtext=driver.FindElement(By.Id("justanotherlink")).Text;
# Navigate to urldriver.get'https://www.selenium.dev/selenium/web/linked_image.html'# Retrieves the text of the elementtext=driver.find_element(:id,'justanotherlink').text
awaitdriver.get('https://www.selenium.dev/selenium/web/linked_image.html');// Returns text of the element
lettext=awaitdriver.findElement(By.id('justanotherLink')).getText();
// Navigate to URL
driver.get("https://www.selenium.dev/selenium/web/linked_image.html")// retrieves the text of the element
valtext=driver.findElement(By.id("justanotherlink")).getText()
Fetching Attributes or Properties
Fetches the run time value associated with a
DOM attribute. It returns the data associated
with the DOM attribute or property of the element.
//Navigate to the url
driver.get("https://www.selenium.dev/selenium/web/inputs.html");//identify the email text box
WebElementemailTxt=driver.findElement(By.name(("email_input")));//fetch the value property associated with the textbox
StringvalueInfo=eleSelLink.getAttribute("value");
# Navigate to the urldriver.get("https://www.selenium.dev/selenium/web/inputs.html")# Identify the email text boxemail_txt=driver.find_element(By.NAME,"email_input")# Fetch the value property associated with the textboxvalue_info=email_txt.get_attribute("value")
//Navigate to the urldriver.Url="https://www.selenium.dev/selenium/web/inputs.html";//identify the email text boxIWebElementemailTxt=driver.FindElement(By.Name(("email_input")));//fetch the value property associated with the textboxStringvalueInfo=eleSelLink.GetAttribute("value");
# Navigate to the urldriver.get("https://www.selenium.dev/selenium/web/inputs.html");#identify the email text boxemail_element=driver.find_element(name:'email_input')#fetch the value property associated with the textboxemailVal=email_element.attribute("value");
// identify the email text box
constemailElement=awaitdriver.findElement(By.xpath('//input[@name="email_input"]'));//fetch the attribute "name" associated with the textbox
constnameAttribute=awaitemailElement.getAttribute("name");
// Navigate to URL
driver.get("https://www.selenium.dev/selenium/web/inputs.html")//fetch the value property associated with the textbox
valattr=driver.findElement(By.name("email_input")).getAttribute("value")
2.5.5 - Localizando elementos
Formas de identificar um ou mais elementos no DOM.
Um localizador é uma forma de identificar elementos numa página. São os argumentos passados aos métodos
Finders .
Visite os nossas directrizes e recomendações para dicas sobre
locators, incluindo quais usar e quando,
e também porque é que deve declarar localizadores separadamente dos finders.
Estratégias de seleção de elemento
Existem oito estratégias diferentes de localização de elementos embutidas no WebDriver:
Localizador
Descrição
class name
Localiza elementos cujo nome de classe contém o valor de pesquisa (nomes de classes compostas não são permitidos)
css selector
Localiza elementos que correspondem a um seletor CSS
id
Localiza elementos cujo atributo de ID corresponde ao valor de pesquisa
name
Localiza elementos cujo atributo NAME corresponde ao valor de pesquisa
link text
Localiza elementos âncora cujo texto visível corresponde ao valor de pesquisa
partial link text
Localiza elementos âncora cujo texto visível contém o valor da pesquisa. Se vários elementos forem correspondentes, apenas o primeiro será selecionado.
tag name
Localiza elementos cujo nome de tag corresponde ao valor de pesquisa
xpath
Localiza elementos que correspondem a uma expressão XPath
Creating Locators
To work on a web element using Selenium, we need to first locate it on the web page.
Selenium provides us above mentioned ways, using which we can locate element on the
page. To understand and create locator we will use the following HTML snippet.
<html><body><style>.information{background-color:white;color:black;padding:10px;}</style><h2>Contact Selenium</h2><formaction="/action_page.php"><inputtype="radio"name="gender"value="m"/>Male <inputtype="radio"name="gender"value="f"/>Female <br><br><labelfor="fname">First name:</label><br><inputclass="information"type="text"id="fname"name="fname"value="Jane"><br><br><labelfor="lname">Last name:</label><br><inputclass="information"type="text"id="lname"name="lname"value="Doe"><br><br><labelfor="newsletter">Newsletter:</label><inputtype="checkbox"name="newsletter"value="1"/><br><br><inputtype="submit"value="Submit"></form><p>To know more about Selenium, visit the official page
<ahref ="www.selenium.dev">Selenium Official Page</a></p></body></html>
class name
The HTML page web element can have attribute class. We can see an example in the
above shown HTML snippet. We can identify these elements using the class name locator
available in Selenium.
CSS is the language used to style HTML pages. We can use css selector locator strategy
to identify the element on the page. If the element has an id, we create the locator
as css = #id. Otherwise the format we follow is css =[attribute=value] .
Let us see an example from above HTML snippet. We will create locator for First Name
textbox, using css.
We can use the ID attribute available with element in a web page to locate it.
Generally the ID property should be unique for a element on the web page.
We will identify the Last Name field using it.
We can use the NAME attribute available with element in a web page to locate it.
Generally the NAME property should be unique for a element on the web page.
We will identify the Newsletter checkbox using it.
If the element we want to locate is a link, we can use the link text locator
to identify it on the web page. The link text is the text displayed of the link.
In the HTML snippet shared, we have a link available, lets see how will we locate it.
WebDriverdriver=newChromeDriver();driver.findElement(By.linkText("Selenium Official Page"));
driver=webdriver.Chrome()driver.find_element(By.LINK_TEXT,"Selenium Official Page")
vardriver=newChromeDriver();driver.FindElement(By.LinkText("Selenium Official Page"));
driver=Selenium::WebDriver.for:chromedriver.find_element(link_text:'Selenium Official Page')
letdriver=awaitnewBuilder().forBrowser('chrome').build();constloc=awaitdriver.findElement(By.linkText('Selenium Official Page'));
valdriver=ChromeDriver()valloc:WebElement=driver.findElement(By.linkText("Selenium Official Page"))
partial link text
If the element we want to locate is a link, we can use the partial link text locator
to identify it on the web page. The link text is the text displayed of the link.
We can pass partial text as value.
In the HTML snippet shared, we have a link available, lets see how will we locate it.
We can use the HTML TAG itself as a locator to identify the web element on the page.
From the above HTML snippet shared, lets identify the link, using its html tag “a”.
A HTML document can be considered as a XML document, and then we can use xpath
which will be the path traversed to reach the element of interest to locate the element.
The XPath could be absolute xpath, which is created from the root of the document.
Example - /html/form/input[1]. This will return the male radio button.
Or the xpath could be relative. Example- //input[@name=‘fname’]. This will return the
first name text box. Let us create locator for female radio button using xpath.
Selenium 4 introduces Relative Locators (previously
called as Friendly Locators). These locators are helpful when it is not easy to construct a locator for
the desired element, but easy to describe spatially where the element is in relation to an element that does have
an easily constructed locator.
How it works
Selenium uses the JavaScript function
getBoundingClientRect()
to determine the size and position of elements on the page, and can use this information to locate neighboring elements. find the relative elements.
Relative locator methods can take as the argument for the point of origin, either a previously located element reference,
or another locator. In these examples we’ll be using locators only, but you could swap the locator in the final method with
an element object and it will work the same.
Let us consider the below example for understanding the relative locators.
Available relative locators
Above
If the email text field element is not easily identifiable for some reason, but the password text field element is,
we can locate the text field element using the fact that it is an “input” element “above” the password element.
If the password text field element is not easily identifiable for some reason, but the email text field element is,
we can locate the text field element using the fact that it is an “input” element “below” the email element.
If the cancel button is not easily identifiable for some reason, but the submit button element is,
we can locate the cancel button element using the fact that it is a “button” element to the “left of” the submit element.
If the submit button is not easily identifiable for some reason, but the cancel button element is,
we can locate the submit button element using the fact that it is a “button” element “to the right of” the cancel element.
If the relative positioning is not obvious, or it varies based on window size, you can use the near method to
identify an element that is at most 50px away from the provided locator.
One great use case for this is to work with a form element that doesn’t have an easily constructed locator,
but its associated input label element does.
You can also chain locators if needed. Sometimes the element is most easily identified as being both above/below one element and right/left of another.
Você pode ler o título da página atual no navegador:
driver.getTitle();
driver.title
driver.Title;
driver.title
awaitdriver.getTitle();
driver.title
Coletar a URL atual
Você pode ler a URL atual na barra de endereço do navegador usando:
driver.getCurrentUrl();
driver.current_url
driver.Url;
driver.current_url
awaitdriver.getCurrentUrl();
driver.currentUrl
2.6.1 - Browser navigation
Navegar para
A primeira coisa que você vai querer fazer depois de iniciar um navegador é
abrir o seu site. Isso pode ser feito em uma única linha, utilize o seguinte comando:
//Convenient
driver.get("https://selenium.dev");//Longer way
driver.navigate().to("https://selenium.dev");
//Convenient
driver.get("https://selenium.dev")//Longer way
driver.navigate().to("https://selenium.dev")
Voltar
Pressionando o botão Voltar do navegador:
driver.navigate().back();
driver.back()
driver.Navigate().Back();
driver.navigate.back
awaitdriver.navigate().back();
driver.navigate().back()
Avançar
Pressionando o botão Avançar do navegador:
driver.navigate().forward();
driver.forward()
driver.Navigate().Forward();
driver.navigate.forward
awaitdriver.navigate().forward();
driver.navigate().forward()
Atualizar
Atualizando a página atual:
driver.navigate().refresh();
driver.refresh()
driver.Navigate().Refresh();
driver.navigate.refresh
awaitdriver.navigate().refresh();
driver.navigate().refresh()
2.6.2 - Alertas, prompts e confirmações JavaScript
WebDriver fornece uma API para trabalhar com os três tipos nativos de
mensagens pop-up oferecidas pelo JavaScript. Esses pop-ups são estilizados pelo
navegador e oferecem personalização limitada.
Alertas
O mais simples deles é referido como um alerta, que mostra um
mensagem personalizada e um único botão que dispensa o alerta, rotulado
na maioria dos navegadores como OK. Ele também pode ser dispensado na maioria dos navegadores
pressionando o botão Fechar, mas isso sempre fará a mesma coisa que
o botão OK. Veja um exemplo de alerta .
O WebDriver pode obter o texto do pop-up e aceitar ou dispensar esses
alertas.
//Click the link to activate the alert
driver.findElement(By.linkText("See an example alert")).click();//Wait for the alert to be displayed and store it in a variable
Alertalert=wait.until(ExpectedConditions.alertIsPresent());//Store the alert text in a variable
Stringtext=alert.getText();//Press the OK button
alert.accept();
# Click the link to activate the alertdriver.find_element(By.LINK_TEXT,"See an example alert").click()# Wait for the alert to be displayed and store it in a variablealert=wait.until(expected_conditions.alert_is_present())# Store the alert text in a variabletext=alert.text# Press the OK buttonalert.accept()
//Click the link to activate the alertdriver.FindElement(By.LinkText("See an example alert")).Click();//Wait for the alert to be displayed and store it in a variableIAlertalert=wait.Until(ExpectedConditions.AlertIsPresent());//Store the alert text in a variablestringtext=alert.Text;//Press the OK buttonalert.Accept();
# Click the link to activate the alertdriver.find_element(:link_text,'See an example alert').click# Store the alert reference in a variablealert=driver.switch_to.alert# Store the alert text in a variablealert_text=alert.text# Press on OK buttonalert.accept
//Click the link to activate the alert
awaitdriver.findElement(By.linkText('See an example alert')).click();// Wait for the alert to be displayed
awaitdriver.wait(until.alertIsPresent());// Store the alert in a variable
letalert=awaitdriver.switchTo().alert();//Store the alert text in a variable
letalertText=awaitalert.getText();//Press the OK button
awaitalert.accept();// Note: To use await, the above code should be inside an async function
//Click the link to activate the alert
driver.findElement(By.linkText("See an example alert")).click()//Wait for the alert to be displayed and store it in a variable
valalert=wait.until(ExpectedConditions.alertIsPresent())//Store the alert text in a variable
valtext=alert.getText()//Press the OK button
alert.accept()
Confirmação
Uma caixa de confirmação é semelhante a um alerta, exceto que o usuário também pode escolher
cancelar a mensagem. Veja
uma amostra de confirmação .
Este exemplo também mostra uma abordagem diferente para armazenar um alerta:
//Click the link to activate the alert
driver.findElement(By.linkText("See a sample confirm")).click();//Wait for the alert to be displayed
wait.until(ExpectedConditions.alertIsPresent());//Store the alert in a variable
Alertalert=driver.switchTo().alert();//Store the alert in a variable for reuse
Stringtext=alert.getText();//Press the Cancel button
alert.dismiss();
# Click the link to activate the alertdriver.find_element(By.LINK_TEXT,"See a sample confirm").click()# Wait for the alert to be displayedwait.until(expected_conditions.alert_is_present())# Store the alert in a variable for reusealert=driver.switch_to.alert# Store the alert text in a variabletext=alert.text# Press the Cancel buttonalert.dismiss()
//Click the link to activate the alertdriver.FindElement(By.LinkText("See a sample confirm")).Click();//Wait for the alert to be displayedwait.Until(ExpectedConditions.AlertIsPresent());//Store the alert in a variableIAlertalert=driver.SwitchTo().Alert();//Store the alert in a variable for reusestringtext=alert.Text;//Press the Cancel buttonalert.Dismiss();
# Click the link to activate the alertdriver.find_element(:link_text,'See a sample confirm').click# Store the alert reference in a variablealert=driver.switch_to.alert# Store the alert text in a variablealert_text=alert.text# Press on Cancel buttonalert.dismiss
//Click the link to activate the alert
awaitdriver.findElement(By.linkText('See a sample confirm')).click();// Wait for the alert to be displayed
awaitdriver.wait(until.alertIsPresent());// Store the alert in a variable
letalert=awaitdriver.switchTo().alert();//Store the alert text in a variable
letalertText=awaitalert.getText();//Press the Cancel button
awaitalert.dismiss();// Note: To use await, the above code should be inside an async function
//Click the link to activate the alert
driver.findElement(By.linkText("See a sample confirm")).click()//Wait for the alert to be displayed
wait.until(ExpectedConditions.alertIsPresent())//Store the alert in a variable
valalert=driver.switchTo().alert()//Store the alert in a variable for reuse
valtext=alert.text//Press the Cancel button
alert.dismiss()
Prompt
Os prompts são semelhantes às caixas de confirmação, exceto que também incluem um texto de
entrada. Semelhante a trabalhar com elementos de formulário, você pode
usar o sendKeys do WebDriver para preencher uma resposta. Isso substituirá
completamente o espaço de texto de exemplo. Pressionar o botão Cancelar não enviará nenhum texto.
Veja um exemplo de prompt .
//Click the link to activate the alert
driver.findElement(By.linkText("See a sample prompt")).click();//Wait for the alert to be displayed and store it in a variable
Alertalert=wait.until(ExpectedConditions.alertIsPresent());//Type your message
alert.sendKeys("Selenium");//Press the OK button
alert.accept();
# Click the link to activate the alertdriver.find_element(By.LINK_TEXT,"See a sample prompt").click()# Wait for the alert to be displayedwait.until(expected_conditions.alert_is_present())# Store the alert in a variable for reusealert=Alert(driver)# Type your messagealert.send_keys("Selenium")# Press the OK buttonalert.accept()
//Click the link to activate the alertdriver.FindElement(By.LinkText("See a sample prompt")).Click();//Wait for the alert to be displayed and store it in a variableIAlertalert=wait.Until(ExpectedConditions.AlertIsPresent());//Type your messagealert.SendKeys("Selenium");//Press the OK buttonalert.Accept();
# Click the link to activate the alertdriver.find_element(:link_text,'See a sample prompt').click# Store the alert reference in a variablealert=driver.switch_to.alert# Type a messagealert.send_keys("selenium")# Press on Ok buttonalert.accept
//Click the link to activate the alert
awaitdriver.findElement(By.linkText('See a sample prompt')).click();// Wait for the alert to be displayed
awaitdriver.wait(until.alertIsPresent());// Store the alert in a variable
letalert=awaitdriver.switchTo().alert();//Type your message
awaitalert.sendKeys("Selenium");//Press the OK button
awaitalert.accept();//Note: To use await, the above code should be inside an async function
//Click the link to activate the alert
driver.findElement(By.linkText("See a sample prompt")).click()//Wait for the alert to be displayed and store it in a variable
valalert=wait.until(ExpectedConditions.alertIsPresent())//Type your message
alert.sendKeys("Selenium")//Press the OK button
alert.accept()
2.6.3 - Trabalhando com cookies
Um cookie é um pequeno pedaço de dado enviado de um site e armazenado no seu computador.
Os cookies são usados principalmente para reconhecer o usuário e carregar as informações armazenadas.
A API WebDriver fornece uma maneira de interagir com cookies com métodos integrados:
Add Cookie
É usado para adicionar um cookie ao contexto de navegação atual.
Add Cookie aceita apenas um conjunto de objetos JSON serializáveis definidos. Aqui
é o link para a lista de valores-chave JSON aceitos.
Em primeiro lugar, você precisa estar no domínio para qual o cookie será
valido. Se você está tentando predefinir cookies antes
de começar a interagir com um site e sua página inicial é grande / demora um pouco para carregar
uma alternativa é encontrar uma página menor no site (normalmente a página 404 é pequena,
por exemplo http://example.com/some404page)
importorg.openqa.selenium.*;importorg.openqa.selenium.chrome.ChromeDriver;publicclassaddCookie{publicstaticvoidmain(String[]args){WebDriverdriver=newChromeDriver();try{driver.get("http://www.example.com");// Adds the cookie into current browser context
driver.manage().addCookie(newCookie("key","value"));}finally{driver.quit();}}}
fromseleniumimportwebdriverdriver=webdriver.Chrome()driver.get("http://www.example.com")# Adds the cookie into current browser contextdriver.add_cookie({"name":"key","value":"value"})
usingOpenQA.Selenium;usingOpenQA.Selenium.Chrome;namespaceAddCookie{classAddCookie{publicstaticvoidMain(string[]args){IWebDriverdriver=newChromeDriver();try{// Navigate to Urldriver.Navigate().GoToUrl("https://example.com");// Adds the cookie into current browser contextdriver.Manage().Cookies.AddCookie(newCookie("key","value"));}finally{driver.Quit();}}}}
require'selenium-webdriver'driver=Selenium::WebDriver.for:chromebegindriver.get'https://www.example.com'# Adds the cookie into current browser contextdriver.manage.add_cookie(name:"key",value:"value")ensuredriver.quitend
it('Create a cookie',asyncfunction(){awaitdriver.get('https://www.selenium.dev/selenium/web/blank.html');// set a cookie on the current domain
awaitdriver.manage().addCookie({name:'key',value:'value'});
importorg.openqa.selenium.Cookieimportorg.openqa.selenium.chrome.ChromeDriverfunmain(){valdriver=ChromeDriver()try{driver.get("https://example.com")// Adds the cookie into current browser context
driver.manage().addCookie(Cookie("key","value"))}finally{driver.quit()}}
Get Named Cookie
Retorna os dados do cookie serializado correspondentes ao nome do cookie entre todos os cookies associados.
importorg.openqa.selenium.*;importorg.openqa.selenium.chrome.ChromeDriver;publicclassgetCookieNamed{publicstaticvoidmain(String[]args){WebDriverdriver=newChromeDriver();try{driver.get("http://www.example.com");driver.manage().addCookie(newCookie("foo","bar"));// Get cookie details with named cookie 'foo'
Cookiecookie1=driver.manage().getCookieNamed("foo");System.out.println(cookie1);}finally{driver.quit();}}}
fromseleniumimportwebdriverdriver=webdriver.Chrome()# Navigate to urldriver.get("http://www.example.com")# Adds the cookie into current browser contextdriver.add_cookie({"name":"foo","value":"bar"})# Get cookie details with named cookie 'foo'print(driver.get_cookie("foo"))
usingOpenQA.Selenium;usingOpenQA.Selenium.Chrome;namespaceGetCookieNamed{classGetCookieNamed{publicstaticvoidMain(string[]args){IWebDriverdriver=newChromeDriver();try{// Navigate to Urldriver.Navigate().GoToUrl("https://example.com");driver.Manage().Cookies.AddCookie(newCookie("foo","bar"));// Get cookie details with named cookie 'foo'varcookie=driver.Manage().Cookies.GetCookieNamed("foo");System.Console.WriteLine(cookie);}finally{driver.Quit();}}}}
require'selenium-webdriver'driver=Selenium::WebDriver.for:chromebegindriver.get'https://www.example.com'driver.manage.add_cookie(name:"foo",value:"bar")# Get cookie details with named cookie 'foo'putsdriver.manage.cookie_named('foo')ensuredriver.quitend
it('Read cookie',asyncfunction(){awaitdriver.get('https://www.selenium.dev/selenium/web/blank.html');// set a cookie on the current domain
awaitdriver.manage().addCookie({name:'foo',value:'bar'});// Get cookie details with named cookie 'foo'
awaitdriver.manage().getCookie('foo').then(function(cookie){console.log('cookie details => ',cookie);});
importorg.openqa.selenium.Cookieimportorg.openqa.selenium.chrome.ChromeDriverfunmain(){valdriver=ChromeDriver()try{driver.get("https://example.com")driver.manage().addCookie(Cookie("foo","bar"))// Get cookie details with named cookie 'foo'
valcookie=driver.manage().getCookieNamed("foo")println(cookie)}finally{driver.quit()}}
Get All Cookies
Retorna ‘dados de cookie serializados com sucesso’ para o contexto de navegação atual.
Se o navegador não estiver mais disponível, ele retornará um erro.
importorg.openqa.selenium.*;importorg.openqa.selenium.chrome.ChromeDriver;importjava.util.Set;publicclassgetAllCookies{publicstaticvoidmain(String[]args){WebDriverdriver=newChromeDriver();try{driver.get("http://www.example.com");// Add few cookies
driver.manage().addCookie(newCookie("test1","cookie1"));driver.manage().addCookie(newCookie("test2","cookie2"));// Get All available cookies
Set<Cookie>cookies=driver.manage().getCookies();System.out.println(cookies);}finally{driver.quit();}}}
fromseleniumimportwebdriverdriver=webdriver.Chrome()# Navigate to urldriver.get("http://www.example.com")driver.add_cookie({"name":"test1","value":"cookie1"})driver.add_cookie({"name":"test2","value":"cookie2"})# Get all available cookiesprint(driver.get_cookies())
usingOpenQA.Selenium;usingOpenQA.Selenium.Chrome;namespaceGetAllCookies{classGetAllCookies{publicstaticvoidMain(string[]args){IWebDriverdriver=newChromeDriver();try{// Navigate to Urldriver.Navigate().GoToUrl("https://example.com");driver.Manage().Cookies.AddCookie(newCookie("test1","cookie1"));driver.Manage().Cookies.AddCookie(newCookie("test2","cookie2"));// Get All available cookiesvarcookies=driver.Manage().Cookies.AllCookies;}finally{driver.Quit();}}}}
require'selenium-webdriver'driver=Selenium::WebDriver.for:chromebegindriver.get'https://www.example.com'driver.manage.add_cookie(name:"test1",value:"cookie1")driver.manage.add_cookie(name:"test2",value:"cookie2")# Get all available cookiesputsdriver.manage.all_cookiesensuredriver.quitend
it('Read all cookies',asyncfunction(){awaitdriver.get('https://www.selenium.dev/selenium/web/blank.html');// Add few cookies
awaitdriver.manage().addCookie({name:'test1',value:'cookie1'});awaitdriver.manage().addCookie({name:'test2',value:'cookie2'});// Get all Available cookies
awaitdriver.manage().getCookies().then(function(cookies){console.log('cookie details => ',cookies);});
importorg.openqa.selenium.Cookieimportorg.openqa.selenium.chrome.ChromeDriverfunmain(){valdriver=ChromeDriver()try{driver.get("https://example.com")driver.manage().addCookie(Cookie("test1","cookie1"))driver.manage().addCookie(Cookie("test2","cookie2"))// Get All available cookies
valcookies=driver.manage().cookiesprintln(cookies)}finally{driver.quit()}}
Delete Cookie
Exclui os dados do cookie que correspondem ao nome do cookie fornecido.
importorg.openqa.selenium.*;importorg.openqa.selenium.chrome.ChromeDriver;publicclassdeleteCookie{publicstaticvoidmain(String[]args){WebDriverdriver=newChromeDriver();try{driver.get("http://www.example.com");driver.manage().addCookie(newCookie("test1","cookie1"));Cookiecookie1=newCookie("test2","cookie2");driver.manage().addCookie(cookie1);// delete a cookie with name 'test1'
driver.manage().deleteCookieNamed("test1");/*
Selenium Java bindings also provides a way to delete
cookie by passing cookie object of current browsing context
*/driver.manage().deleteCookie(cookie1);}finally{driver.quit();}}}
fromseleniumimportwebdriverdriver=webdriver.Chrome()# Navigate to urldriver.get("http://www.example.com")driver.add_cookie({"name":"test1","value":"cookie1"})driver.add_cookie({"name":"test2","value":"cookie2"})# Delete a cookie with name 'test1'driver.delete_cookie("test1")
usingOpenQA.Selenium;usingOpenQA.Selenium.Chrome;namespaceDeleteCookie{classDeleteCookie{publicstaticvoidMain(string[]args){IWebDriverdriver=newChromeDriver();try{// Navigate to Urldriver.Navigate().GoToUrl("https://example.com");driver.Manage().Cookies.AddCookie(newCookie("test1","cookie1"));varcookie=newCookie("test2","cookie2");driver.Manage().Cookies.AddCookie(cookie);// delete a cookie with name 'test1' driver.Manage().Cookies.DeleteCookieNamed("test1");// Selenium .net bindings also provides a way to delete// cookie by passing cookie object of current browsing contextdriver.Manage().Cookies.DeleteCookie(cookie);}finally{driver.Quit();}}}}
require'selenium-webdriver'driver=Selenium::WebDriver.for:chromebegindriver.get'https://www.example.com'driver.manage.add_cookie(name:"test1",value:"cookie1")driver.manage.add_cookie(name:"test2",value:"cookie2")# delete a cookie with name 'test1'driver.manage.delete_cookie('test1')ensuredriver.quitend
it('Delete a cookie',asyncfunction(){awaitdriver.get('https://www.selenium.dev/selenium/web/blank.html');// Add few cookies
awaitdriver.manage().addCookie({name:'test1',value:'cookie1'});awaitdriver.manage().addCookie({name:'test2',value:'cookie2'});// Delete a cookie with name 'test1'
awaitdriver.manage().deleteCookie('test1');// Get all Available cookies
awaitdriver.manage().getCookies().then(function(cookies){console.log('cookie details => ',cookies);});
importorg.openqa.selenium.Cookieimportorg.openqa.selenium.chrome.ChromeDriverfunmain(){valdriver=ChromeDriver()try{driver.get("https://example.com")driver.manage().addCookie(Cookie("test1","cookie1"))valcookie1=Cookie("test2","cookie2")driver.manage().addCookie(cookie1)// delete a cookie with name 'test1'
driver.manage().deleteCookieNamed("test1")// delete cookie by passing cookie object of current browsing context.
driver.manage().deleteCookie(cookie1)}finally{driver.quit()}}
Delete All Cookies
Exclui todos os cookies do contexto de navegação atual.
importorg.openqa.selenium.*;importorg.openqa.selenium.chrome.ChromeDriver;publicclassdeleteAllCookies{publicstaticvoidmain(String[]args){WebDriverdriver=newChromeDriver();try{driver.get("http://www.example.com");driver.manage().addCookie(newCookie("test1","cookie1"));driver.manage().addCookie(newCookie("test2","cookie2"));// deletes all cookies
driver.manage().deleteAllCookies();}finally{driver.quit();}}}
fromseleniumimportwebdriverdriver=webdriver.Chrome()# Navigate to urldriver.get("http://www.example.com")driver.add_cookie({"name":"test1","value":"cookie1"})driver.add_cookie({"name":"test2","value":"cookie2"})# Deletes all cookiesdriver.delete_all_cookies()
usingOpenQA.Selenium;usingOpenQA.Selenium.Chrome;namespaceDeleteAllCookies{classDeleteAllCookies{publicstaticvoidMain(string[]args){IWebDriverdriver=newChromeDriver();try{// Navigate to Urldriver.Navigate().GoToUrl("https://example.com");driver.Manage().Cookies.AddCookie(newCookie("test1","cookie1"));driver.Manage().Cookies.AddCookie(newCookie("test2","cookie2"));// deletes all cookiesdriver.Manage().Cookies.DeleteAllCookies();}finally{driver.Quit();}}}}
require'selenium-webdriver'driver=Selenium::WebDriver.for:chromebegindriver.get'https://www.example.com'driver.manage.add_cookie(name:"test1",value:"cookie1")driver.manage.add_cookie(name:"test2",value:"cookie2")# deletes all cookiesdriver.manage.delete_all_cookiesensuredriver.quitend
it('Delete all cookies',asyncfunction(){awaitdriver.get('https://www.selenium.dev/selenium/web/blank.html');// Add few cookies
awaitdriver.manage().addCookie({name:'test1',value:'cookie1'});awaitdriver.manage().addCookie({name:'test2',value:'cookie2'});// Delete all cookies
awaitdriver.manage().deleteAllCookies();
importorg.openqa.selenium.Cookieimportorg.openqa.selenium.chrome.ChromeDriverfunmain(){valdriver=ChromeDriver()try{driver.get("https://example.com")driver.manage().addCookie(Cookie("test1","cookie1"))driver.manage().addCookie(Cookie("test2","cookie2"))// deletes all cookies
driver.manage().deleteAllCookies()}finally{driver.quit()}}
Same-Site Cookie Attribute
Permite que um usuário instrua os navegadores a controlar se os cookies
são enviados junto com a solicitação iniciada por sites de terceiros.
É usado para evitar ataques CSRF (Cross-Site Request Forgery).
O atributo de cookie Same-Site aceita dois parâmetros como instruções
Strict:
Quando o atributo sameSite é definido como Strict,
o cookie não será enviado junto com
solicitações iniciadas por sites de terceiros.
Lax:
Quando você define um atributo cookie sameSite como Lax,
o cookie será enviado junto com uma solicitação GET
iniciada por um site de terceiros.
Nota: a partir de agora, esse recurso está disponível no Chrome (versão 80+),
Firefox (versão 79+) e funciona com Selenium 4 e versões posteriores.
fromseleniumimportwebdriverdriver=webdriver.Chrome()driver.get("http://www.example.com")# Adds the cookie into current browser context with sameSite 'Strict' (or) 'Lax'driver.add_cookie({"name":"foo","value":"value",'sameSite':'Strict'})driver.add_cookie({"name":"foo1","value":"value",'sameSite':'Lax'})cookie1=driver.get_cookie('foo')cookie2=driver.get_cookie('foo1')print(cookie1)print(cookie2)
require'selenium-webdriver'driver=Selenium::WebDriver.for:chromebegindriver.get'https://www.example.com'# Adds the cookie into current browser context with sameSite 'Strict' (or) 'Lax'driver.manage.add_cookie(name:"foo",value:"bar",same_site:"Strict")driver.manage.add_cookie(name:"foo1",value:"bar",same_site:"Lax")putsdriver.manage.cookie_named('foo')putsdriver.manage.cookie_named('foo1')ensuredriver.quitend
it('Create cookies with sameSite',asyncfunction(){awaitdriver.get('https://www.selenium.dev/selenium/web/blank.html');// set a cookie on the current domain with sameSite 'Strict' (or) 'Lax'
awaitdriver.manage().addCookie({name:'key',value:'value',sameSite:'Strict'});awaitdriver.manage().addCookie({name:'key',value:'value',sameSite:'Lax'});
Frames são um meio obsoleto de construir um layout de site a partir de
vários documentos no mesmo domínio. É improvável que você trabalhe com eles
a menos que você esteja trabalhando com um webapp pré-HTML5. Iframes permitem
a inserção de um documento de um domínio totalmente diferente, e são
ainda comumente usado.
Se você precisa trabalhar com frames ou iframes, o WebDriver permite que você
trabalhe com eles da mesma maneira. Considere um botão dentro de um iframe.
Se inspecionarmos o elemento usando as ferramentas de desenvolvimento do navegador, podemos
ver o seguinte:
# This won't workdriver.find_element(:tag_name,'button').click
// This won't work
awaitdriver.findElement(By.css('button')).click();
//This won't work
driver.findElement(By.tagName("button")).click()
No entanto, se não houver botões fora do iframe, você pode
em vez disso, obter um erro no such element. Isso acontece porque o Selenium é
ciente apenas dos elementos no documento de nível superior. Para interagir com
o botão, precisamos primeiro mudar para o quadro, de forma semelhante
a como alternamos janelas. WebDriver oferece três maneiras de mudar para
um frame.
Usando um WebElement
Alternar usando um WebElement é a opção mais flexível. Você pode
encontrar o quadro usando seu seletor preferido e mudar para ele.
//Store the web element
WebElementiframe=driver.findElement(By.cssSelector("#modal>iframe"));//Switch to the frame
driver.switchTo().frame(iframe);//Now we can click the button
driver.findElement(By.tagName("button")).click();
# Store iframe web elementiframe=driver.find_element(By.CSS_SELECTOR,"#modal > iframe")# switch to selected iframedriver.switch_to.frame(iframe)# Now click on buttondriver.find_element(By.TAG_NAME,'button').click()
//Store the web elementIWebElementiframe=driver.FindElement(By.CssSelector("#modal>iframe"));//Switch to the framedriver.SwitchTo().Frame(iframe);//Now we can click the buttondriver.FindElement(By.TagName("button")).Click();
# Store iframe web elementiframe=driver.find_element(:css,'#modal > iframe')# Switch to the framedriver.switch_to.frameiframe# Now, Click on the buttondriver.find_element(:tag_name,'button').click
// Store the web element
constiframe=driver.findElement(By.css('#modal > iframe'));// Switch to the frame
awaitdriver.switchTo().frame(iframe);// Now we can click the button
awaitdriver.findElement(By.css('button')).click();
//Store the web element
valiframe=driver.findElement(By.cssSelector("#modal>iframe"))//Switch to the frame
driver.switchTo().frame(iframe)//Now we can click the button
driver.findElement(By.tagName("button")).click()
Usando um name ou ID
Se o seu frame ou iframe tiver um atributo id ou name, ele pode ser
usado alternativamente. Se o name ou ID não for exclusivo na página, o
primeiro encontrado será utilizado.
//Using the ID
driver.switchTo().frame("buttonframe");//Or using the name instead
driver.switchTo().frame("myframe");//Now we can click the button
driver.findElement(By.tagName("button")).click();
# Switch frame by iddriver.switch_to.frame('buttonframe')# Now, Click on the buttondriver.find_element(By.TAG_NAME,'button').click()
//Using the IDdriver.SwitchTo().Frame("buttonframe");//Or using the name insteaddriver.SwitchTo().Frame("myframe");//Now we can click the buttondriver.FindElement(By.TagName("button")).Click();
# Switch by IDdriver.switch_to.frame'buttonframe'# Now, Click on the buttondriver.find_element(:tag_name,'button').click
// Using the ID
awaitdriver.switchTo().frame('buttonframe');// Or using the name instead
awaitdriver.switchTo().frame('myframe');// Now we can click the button
awaitdriver.findElement(By.css('button')).click();
//Using the ID
driver.switchTo().frame("buttonframe")//Or using the name instead
driver.switchTo().frame("myframe")//Now we can click the button
driver.findElement(By.tagName("button")).click()
Usando um índice
Também é possível usar o índice do frame, podendo ser
consultado usando window.frames em JavaScript.
// Switches to the second frame
driver.switchTo().frame(1);
# Switch to the second framedriver.switch_to.frame(1)
// Switches to the second framedriver.SwitchTo().Frame(1);
# switching to second iframe based on indexiframe=driver.find_elements(By.TAG_NAME,'iframe')[1]# switch to selected iframedriver.switch_to.frame(iframe)
// Switches to the second frame
awaitdriver.switchTo().frame(1);
// Switches to the second frame
driver.switchTo().frame(1)
Deixando um frame
Para deixar um iframe ou frameset, volte para o conteúdo padrão
como a seguir:
// Return to the top level
driver.switchTo().defaultContent();
# switch back to default contentdriver.switch_to.default_content()
// Return to the top leveldriver.SwitchTo().DefaultContent();
# Return to the top leveldriver.switch_to.default_content
// Return to the top level
awaitdriver.switchTo().defaultContent();
// Return to the top level
driver.switchTo().defaultContent()
2.6.5 - Working with windows and tabs
Janelas e guias
Pegue o idenficador da janela
O WebDriver não faz distinção entre janelas e guias. E se
seu site abre uma nova guia ou janela, o Selenium permitirá que você trabalhe
usando um identificador. Cada janela tem um identificador único que permanece
persistente em uma única sessão. Você pode pegar o identificador atual usando:
driver.getWindowHandle();
driver.current_window_handle
driver.CurrentWindowHandle;
driver.window_handle
awaitdriver.getWindowHandle();
driver.windowHandle
Alternando janelas ou guias
Clicar em um link que abre em uma
nova janela
focará a nova janela ou guia na tela, mas o WebDriver não saberá qual
janela que o sistema operacional considera ativa. Para trabalhar com a nova janela
você precisará mudar para ela. Se você tiver apenas duas guias ou janelas abertas,
e você sabe com qual janela você iniciou, pelo processo de eliminação
você pode percorrer as janelas ou guias que o WebDriver pode ver e alternar
para aquela que não é o original.
No entanto, o Selenium 4 fornece uma nova API NewWindow
que cria uma nova guia (ou) nova janela e muda automaticamente para ela.
//Store the ID of the original window
StringoriginalWindow=driver.getWindowHandle();//Check we don't have other windows open already
assertdriver.getWindowHandles().size()==1;//Click the link which opens in a new window
driver.findElement(By.linkText("new window")).click();//Wait for the new window or tab
wait.until(numberOfWindowsToBe(2));//Loop through until we find a new window handle
for(StringwindowHandle:driver.getWindowHandles()){if(!originalWindow.contentEquals(windowHandle)){driver.switchTo().window(windowHandle);break;}}//Wait for the new tab to finish loading content
wait.until(titleIs("Selenium documentation"));
fromseleniumimportwebdriverfromselenium.webdriver.support.uiimportWebDriverWaitfromselenium.webdriver.supportimportexpected_conditionsasEC# Start the driverwithwebdriver.Firefox()asdriver:# Open URLdriver.get("https://seleniumhq.github.io")# Setup wait for laterwait=WebDriverWait(driver,10)# Store the ID of the original windoworiginal_window=driver.current_window_handle# Check we don't have other windows open alreadyassertlen(driver.window_handles)==1# Click the link which opens in a new windowdriver.find_element(By.LINK_TEXT,"new window").click()# Wait for the new window or tabwait.until(EC.number_of_windows_to_be(2))# Loop through until we find a new window handleforwindow_handleindriver.window_handles:ifwindow_handle!=original_window:driver.switch_to.window(window_handle)break# Wait for the new tab to finish loading contentwait.until(EC.title_is("SeleniumHQ Browser Automation"))
//Store the ID of the original windowstringoriginalWindow=driver.CurrentWindowHandle;//Check we don't have other windows open alreadyAssert.AreEqual(driver.WindowHandles.Count,1);//Click the link which opens in a new windowdriver.FindElement(By.LinkText("new window")).Click();//Wait for the new window or tabwait.Until(wd=>wd.WindowHandles.Count==2);//Loop through until we find a new window handleforeach(stringwindowindriver.WindowHandles){if(originalWindow!=window){driver.SwitchTo().Window(window);break;}}//Wait for the new tab to finish loading contentwait.Until(wd=>wd.Title=="Selenium documentation");
#Store the ID of the original windoworiginal_window=driver.window_handle#Check we don't have other windows open alreadyassert(driver.window_handles.length==1,'Expected one window')#Click the link which opens in a new windowdriver.find_element(link:'new window').click#Wait for the new window or tabwait.until{driver.window_handles.length==2}#Loop through until we find a new window handledriver.window_handles.eachdo|handle|ifhandle!=original_windowdriver.switch_to.windowhandlebreakendend#Wait for the new tab to finish loading contentwait.until{driver.title=='Selenium documentation'}
//Store the ID of the original window
constoriginalWindow=awaitdriver.getWindowHandle();//Check we don't have other windows open already
assert((awaitdriver.getAllWindowHandles()).length===1);//Click the link which opens in a new window
awaitdriver.findElement(By.linkText('new window')).click();//Wait for the new window or tab
awaitdriver.wait(async()=>(awaitdriver.getAllWindowHandles()).length===2,10000);//Loop through until we find a new window handle
constwindows=awaitdriver.getAllWindowHandles();windows.forEach(asynchandle=>{if(handle!==originalWindow){awaitdriver.switchTo().window(handle);}});//Wait for the new tab to finish loading content
awaitdriver.wait(until.titleIs('Selenium documentation'),10000);
//Store the ID of the original window
valoriginalWindow=driver.getWindowHandle()//Check we don't have other windows open already
assert(driver.getWindowHandles().size()===1)//Click the link which opens in a new window
driver.findElement(By.linkText("new window")).click()//Wait for the new window or tab
wait.until(numberOfWindowsToBe(2))//Loop through until we find a new window handle
for(windowHandleindriver.getWindowHandles()){if(!originalWindow.contentEquals(windowHandle)){driver.switchTo().window(windowHandle)break}}//Wait for the new tab to finish loading content
wait.until(titleIs("Selenium documentation"))
Criar nova janela (ou) nova guia e alternar
Cria uma nova janela (ou) guia e focará a nova janela ou guia na tela.
Você não precisa mudar para trabalhar com a nova janela (ou) guia. Se você tiver mais de duas janelas
(ou) guias abertas diferentes da nova janela, você pode percorrer as janelas ou guias que o WebDriver pode ver
e mudar para aquela que não é a original.
Nota: este recurso funciona com Selenium 4 e versões posteriores.
// Opens a new tab and switches to new tab
driver.switchTo().newWindow(WindowType.TAB);// Opens a new window and switches to new window
driver.switchTo().newWindow(WindowType.WINDOW);
# Opens a new tab and switches to new tabdriver.switch_to.new_window('tab')# Opens a new window and switches to new windowdriver.switch_to.new_window('window')
// Opens a new tab and switches to new tabdriver.SwitchTo().NewWindow(WindowType.Tab)// Opens a new window and switches to new windowdriver.SwitchTo().NewWindow(WindowType.Window)
# Note: The new_window in ruby only opens a new tab (or) Window and will not switch automatically# The user has to switch to new tab (or) new window# Opens a new tab and switches to new tabdriver.manage.new_window(:tab)# Opens a new window and switches to new windowdriver.manage.new_window(:window)
// Opens a new tab and switches to new tab
awaitdriver.switchTo().newWindow('tab');// Opens a new window and switches to new window
awaitdriver.switchTo().newWindow('window');
// Opens a new tab and switches to new tab
driver.switchTo().newWindow(WindowType.TAB)// Opens a new window and switches to new window
driver.switchTo().newWindow(WindowType.WINDOW)
Fechando uma janela ou guia
Quando você fechar uma janela ou guia e que não é a
última janela ou guia aberta em seu navegador, você deve fechá-la e alternar
de volta para a janela que você estava usando anteriormente. Supondo que você seguiu a
amostra de código na seção anterior, você terá o identificador da janela
anterior armazenado em uma variável. Junte isso e você obterá:
//Close the tab or window
driver.close();//Switch back to the old tab or window
driver.switchTo().window(originalWindow);
#Close the tab or windowdriver.close()#Switch back to the old tab or windowdriver.switch_to.window(original_window)
//Close the tab or windowdriver.Close();//Switch back to the old tab or windowdriver.SwitchTo().Window(originalWindow);
#Close the tab or windowdriver.close#Switch back to the old tab or windowdriver.switch_to.windoworiginal_window
//Close the tab or window
awaitdriver.close();//Switch back to the old tab or window
awaitdriver.switchTo().window(originalWindow);
//Close the tab or window
driver.close()//Switch back to the old tab or window
driver.switchTo().window(originalWindow)
Esquecer de voltar para outro gerenciador de janela após fechar uma
janela deixará o WebDriver em execução na página agora fechada e
acionara uma No Such Window Exception. Você deve trocar
de volta para um identificador de janela válido para continuar a execução.
Sair do navegador no final de uma sessão
Quando você terminar a sessão do navegador, você deve chamar a função quit(),
em vez de fechar:
driver.quit();
driver.quit()
driver.Quit();
driver.quit
awaitdriver.quit();
driver.quit()
quit() irá:
Fechar todas as janelas e guias associadas a essa sessão do WebDriver
Fechar o processo do navegador
Fechar o processo do driver em segundo plano
Notificar o Selenium Grid de que o navegador não está mais em uso para que possa
ser usado por outra sessão (se você estiver usando Selenium Grid)
A falha em encerrar deixará processos e portas extras em segundo plano
rodando em sua máquina, o que pode causar problemas mais tarde.
Algumas estruturas de teste oferecem métodos e anotações em que você pode ligar para derrubar no final de um teste.
/**
* Example using JUnit
* https://junit.org/junit5/docs/current/api/org/junit/jupiter/api/AfterAll.html
*/@AfterAllpublicstaticvoidtearDown(){driver.quit();}
/*
Example using Visual Studio's UnitTesting
https://msdn.microsoft.com/en-us/library/microsoft.visualstudio.testtools.unittesting.aspx
*/[TestCleanup]publicvoidTearDown(){driver.Quit();}
/**
* Example using Mocha
* https://mochajs.org/#hooks
*/after('Tear down',asyncfunction(){awaitdriver.quit();});
/**
* Example using JUnit
* https://junit.org/junit5/docs/current/api/org/junit/jupiter/api/AfterAll.html
*/@AfterAllfuntearDown(){driver.quit()}
Se não estiver executando o WebDriver em um contexto de teste, você pode considerar o uso do
try/finally que é oferecido pela maioria das linguagens para que uma exceção
ainda limpe a sessão do WebDriver.
O WebDriver do Python agora suporta o gerenciador de contexto python,
que ao usar a palavra-chave with pode encerrar automaticamente o
driver no fim da execução.
withwebdriver.Firefox()asdriver:# WebDriver code here...# WebDriver will automatically quit after indentation
Gerenciamento de janelas
A resolução da tela pode impactar como seu aplicativo da web é renderizado, então
WebDriver fornece mecanismos para mover e redimensionar a janela do navegador.
Coletar o tamanho da janela
Obtém o tamanho da janela do navegador em pixels.
//Access each dimension individually
intwidth=driver.manage().window().getSize().getWidth();intheight=driver.manage().window().getSize().getHeight();//Or store the dimensions and query them later
Dimensionsize=driver.manage().window().getSize();intwidth1=size.getWidth();intheight1=size.getHeight();
# Access each dimension individuallywidth=driver.get_window_size().get("width")height=driver.get_window_size().get("height")# Or store the dimensions and query them latersize=driver.get_window_size()width1=size.get("width")height1=size.get("height")
//Access each dimension individuallyintwidth=driver.Manage().Window.Size.Width;intheight=driver.Manage().Window.Size.Height;//Or store the dimensions and query them laterSystem.Drawing.Sizesize=driver.Manage().Window.Size;intwidth1=size.Width;intheight1=size.Height;
# Access each dimension individuallywidth=driver.manage.window.size.widthheight=driver.manage.window.size.height# Or store the dimensions and query them latersize=driver.manage.window.sizewidth1=size.widthheight1=size.height
// Access each dimension individually
const{width,height}=awaitdriver.manage().window().getRect();// Or store the dimensions and query them later
constrect=awaitdriver.manage().window().getRect();constwidth1=rect.width;constheight1=rect.height;
//Access each dimension individually
valwidth=driver.manage().window().size.widthvalheight=driver.manage().window().size.height//Or store the dimensions and query them later
valsize=driver.manage().window().sizevalwidth1=size.widthvalheight1=size.height
Busca as coordenadas da coordenada superior esquerda da janela do navegador.
// Access each dimension individually
intx=driver.manage().window().getPosition().getX();inty=driver.manage().window().getPosition().getY();// Or store the dimensions and query them later
Pointposition=driver.manage().window().getPosition();intx1=position.getX();inty1=position.getY();
# Access each dimension individuallyx=driver.get_window_position().get('x')y=driver.get_window_position().get('y')# Or store the dimensions and query them laterposition=driver.get_window_position()x1=position.get('x')y1=position.get('y')
//Access each dimension individuallyintx=driver.Manage().Window.Position.X;inty=driver.Manage().Window.Position.Y;//Or store the dimensions and query them laterPointposition=driver.Manage().Window.Position;intx1=position.X;inty1=position.Y;
#Access each dimension individuallyx=driver.manage.window.position.xy=driver.manage.window.position.y# Or store the dimensions and query them laterrect=driver.manage.window.rectx1=rect.xy1=rect.y
// Access each dimension individually
const{x,y}=awaitdriver.manage().window().getRect();// Or store the dimensions and query them later
constrect=awaitdriver.manage().window().getRect();constx1=rect.x;consty1=rect.y;
// Access each dimension individually
valx=driver.manage().window().position.xvaly=driver.manage().window().position.y// Or store the dimensions and query them later
valposition=driver.manage().window().positionvalx1=position.xvaly1=position.y
Definir posição da janela
Move a janela para a posição escolhida.
// Move the window to the top left of the primary monitor
driver.manage().window().setPosition(newPoint(0,0));
# Move the window to the top left of the primary monitordriver.set_window_position(0,0)
// Move the window to the top left of the primary monitordriver.Manage().Window.Position=newPoint(0,0);
driver.manage.window.move_to(0,0)
// Move the window to the top left of the primary monitor
awaitdriver.manage().window().setRect({x:0,y:0});
// Move the window to the top left of the primary monitor
driver.manage().window().position=Point(0,0)
Maximizar janela
Aumenta a janela. Para a maioria dos sistemas operacionais, a janela irá preencher
a tela, sem bloquear os próprios menus do sistema operacional e
barras de ferramentas.
driver.manage().window().maximize();
driver.maximize_window()
driver.Manage().Window.Maximize();
driver.manage.window.maximize
awaitdriver.manage().window().maximize();
driver.manage().window().maximize()
Minimizar janela
Minimiza a janela do contexto de navegação atual.
O comportamento exato deste comando é específico para
gerenciadores de janela individuais.
Minimizar Janela normalmente oculta a janela na bandeja do sistema.
Nota: este recurso funciona com Selenium 4 e versões posteriores.
driver.manage().window().minimize();
driver.minimize_window()
driver.Manage().Window.Minimize();
driver.manage.window.minimize
awaitdriver.manage().window().minimize();
driver.manage().window().minimize()
Janela em tamanho cheio
Preenche a tela inteira, semelhante a pressionar F11 na maioria dos navegadores.
driver.manage().window().fullscreen();
driver.fullscreen_window()
driver.Manage().Window.FullScreen();
driver.manage.window.full_screen
awaitdriver.manage().window().fullscreen();
driver.manage().window().fullscreen()
TakeScreenshot
Usado para capturar a tela do contexto de navegação atual.
O endpoint WebDriver screenshot
retorna a captura de tela codificada no formato Base64.
fromseleniumimportwebdriverdriver=webdriver.Chrome()# Navigate to urldriver.get("http://www.example.com")# Returns and base64 encoded string into imagedriver.save_screenshot('./image.png')driver.quit()
usingOpenQA.Selenium;usingOpenQA.Selenium.Chrome;usingOpenQA.Selenium.Support.UI;vardriver=newChromeDriver();driver.Navigate().GoToUrl("http://www.example.com");Screenshotscreenshot=(driverasITakesScreenshot).GetScreenshot();screenshot.SaveAsFile("screenshot.png",ScreenshotImageFormat.Png);// Format values are Bmp, Gif, Jpeg, Png, Tiff
require'selenium-webdriver'driver=Selenium::WebDriver.for:chromebegindriver.get'https://example.com/'# Takes and Stores the screenshot in specified pathdriver.save_screenshot('./image.png')end
Usado para capturar a imagem de um elemento para o contexto de navegação atual.
O endpoint WebDriver screenshot
retorna a captura de tela codificada no formato Base64.
fromseleniumimportwebdriverfromselenium.webdriver.common.byimportBydriver=webdriver.Chrome()# Navigate to urldriver.get("http://www.example.com")ele=driver.find_element(By.CSS_SELECTOR,'h1')# Returns and base64 encoded string into imageele.screenshot('./image.png')driver.quit()
usingOpenQA.Selenium;usingOpenQA.Selenium.Chrome;usingOpenQA.Selenium.Support.UI;// Webdrivervardriver=newChromeDriver();driver.Navigate().GoToUrl("http://www.example.com");// Fetch element using FindElementvarwebElement=driver.FindElement(By.CssSelector("h1"));// Screenshot for the elementvarelementScreenshot=(webElementasITakesScreenshot).GetScreenshot();elementScreenshot.SaveAsFile("screenshot_of_element.png");
# Works with Selenium4-alpha7 Ruby bindings and aboverequire'selenium-webdriver'driver=Selenium::WebDriver.for:chromebegindriver.get'https://example.com/'ele=driver.find_element(:css,'h1')# Takes and Stores the element screenshot in specified pathele.save_screenshot('./image.jpg')end
const{Builder,By}=require('selenium-webdriver');letfs=require('fs');(asyncfunctionexample(){letdriver=awaitnewBuilder().forBrowser('chrome').build();awaitdriver.get('https://www.example.com');letele=awaitdriver.findElement(By.css("h1"));// Captures the element screenshot
letencodedString=awaitele.takeScreenshot(true);awaitfs.writeFileSync('./image.png',encodedString,'base64');awaitdriver.quit();}())
Executa o snippet de código JavaScript no
contexto atual de um frame ou janela selecionada.
//Creating the JavascriptExecutor interface object by Type casting
JavascriptExecutorjs=(JavascriptExecutor)driver;//Button Element
WebElementbutton=driver.findElement(By.name("btnLogin"));//Executing JavaScript to click on element
js.executeScript("arguments[0].click();",button);//Get return value from script
Stringtext=(String)js.executeScript("return arguments[0].innerText",button);//Executing JavaScript directly
js.executeScript("console.log('hello world')");
# Stores the header elementheader=driver.find_element(By.CSS_SELECTOR,"h1")# Executing JavaScript to capture innerText of header elementdriver.execute_script('return arguments[0].innerText',header)
//creating Chromedriver instanceIWebDriverdriver=newChromeDriver();//Creating the JavascriptExecutor interface object by Type castingIJavaScriptExecutorjs=(IJavaScriptExecutor)driver;//Button ElementIWebElementbutton=driver.FindElement(By.Name("btnLogin"));//Executing JavaScript to click on elementjs.ExecuteScript("arguments[0].click();",button);//Get return value from scriptStringtext=(String)js.ExecuteScript("return arguments[0].innerText",button);//Executing JavaScript directlyjs.ExecuteScript("console.log('hello world')");
# Stores the header elementheader=driver.find_element(css:'h1')# Get return value from scriptresult=driver.execute_script("return arguments[0].innerText",header)# Executing JavaScript directlydriver.execute_script("alert('hello world')")
// Stores the header element
letheader=awaitdriver.findElement(By.css('h1'));// Executing JavaScript to capture innerText of header element
lettext=awaitdriver.executeScript('return arguments[0].innerText',header);
// Stores the header element
valheader=driver.findElement(By.cssSelector("h1"))// Get return value from script
valresult=driver.executeScript("return arguments[0].innerText",header)// Executing JavaScript directly
driver.executeScript("alert('hello world')")
Imprimir Página
Imprime a página atual dentro do navegador
Nota: isto requer que navegadores Chromium estejam no modo sem cabeçalho
Aplicações web podem habilitar um mecanismo de autenticação baseado em chaves públicas conhecido como Web Authentication para autenticar usuários sem usar uma senha.
Web Authentication define APIs que permitem ao usuário criar uma credencial e registra-la com um autenticador.
Um autenticador pode ser um dispositivo ou um software que guarde as chaves públicas do usuário e as acesse caso seja pedido.
Como o nome sugere, Virtual Authenticator emula esses autenticadores para testes.
Virtual Authenticator Options
Um Autenticador Virtual tem uma série de propriedades.
Essas propriedades são mapeadas como VirtualAuthenticatorOptions nos bindings do Selenium.
Uma interface de baixo nível para fornecer ações de entrada de dispositivo virtualizadas para o navegador da web..
Além das interações de alto nível, a API de Ações oferece controle detalhado sobre o que dispositivos de entrada designados podem fazer. O Selenium fornece uma interface para 3 tipos de fontes de entrada: entrada de teclado para dispositivos de teclado, entrada de ponteiro para mouse, caneta ou dispositivos de toque, e entrada de roda para dispositivos de roda de rolagem (introduzida no Selenium 4.2). O Selenium permite que você construa comandos de ação individuais atribuídos a entradas específicas, encadeie-os e chame o método de execução associado para executá-los todos de uma vez.
Construtor de Ações
Na transição do antigo Protocolo JSON Wire para o novo Protocolo W3C WebDriver, os componentes de construção de ações de baixo nível se tornaram especialmente detalhados. Isso é extremamente poderoso, mas cada dispositivo de entrada possui várias maneiras de ser utilizado e, se você precisa gerenciar mais de um dispositivo, é responsável por garantir a sincronização adequada entre eles.
Felizmente, provavelmente você não precisa aprender a usar os comandos de baixo nível diretamente, uma vez que quase tudo o que você pode querer fazer foi fornecido com um método de conveniência que combina os comandos de nível inferior para você. Todos esses métodos estão documentados nas páginas de teclado, mouse, caneta e roda.
Pausa
Movimentos de ponteiro e rolagem da roda permitem que o usuário defina uma duração para a ação, mas às vezes você só precisa esperar um momento entre as ações para que as coisas funcionem corretamente.
Um ponto importante a ser observado é que o driver lembra o estado de todos os itens de entrada ao longo de uma sessão. Mesmo se você criar uma nova instância de uma classe de ações, as teclas pressionadas e a posição do ponteiro permanecerão no estado em que uma ação previamente executada os deixou.
Existe um método especial para liberar todas as teclas pressionadas e botões do ponteiro atualmente pressionados. Esse método é implementado de maneira diferente em cada uma das linguagens porque não é executado com o método de execução (perform).
Uma representação de qualquer dispositivo de entrada de teclado para interagir com uma página da web.
Existem apenas 2 ações que podem ser realizadas com um teclado: pressionar uma tecla e liberar uma tecla pressionada. Além de suportar caracteres ASCII, cada tecla do teclado possui uma representação que pode ser pressionada ou liberada em sequências designadas.
Chaves
Além das teclas representadas pelo Unicode regular, valores Unicode foram atribuídos a outras teclas de teclado para uso com o Selenium. Cada linguagem tem sua própria maneira de fazer referência a essas teclas; a lista completa pode ser encontrada
aqui.
Use the [Java Keys enum](https://github.com/SeleniumHQ/selenium/blob/selenium-4.2.0/java/src/org/openqa/selenium/Keys.java#L28)
Use the [Python Keys class](https://github.com/SeleniumHQ/selenium/blob/selenium-4.2.0/py/selenium/webdriver/common/keys.py#L23)
Use the [.NET static Keys class](https://github.com/SeleniumHQ/selenium/blob/selenium-4.2.0/dotnet/src/webdriver/Keys.cs#L28)
Use the [Ruby KEYS constant](https://github.com/SeleniumHQ/selenium/blob/selenium-4.2.0/rb/lib/selenium/webdriver/common/keys.rb#L28)
Use the [JavaScript KEYS constant](https://github.com/SeleniumHQ/selenium/blob/selenium-4.2.0/javascript/node/selenium-webdriver/lib/input.js#L44)
Use the [Java Keys enum](https://github.com/SeleniumHQ/selenium/blob/selenium-4.2.0/java/src/org/openqa/selenium/Keys.java#L28)
This is a convenience method in the Actions API that combines keyDown and keyUp commands in one action.
Executing this command differs slightly from using the element method, but
primarily this gets used when needing to type multiple characters in the middle of other actions.
Aqui está um exemplo de uso de todos os métodos acima para realizar uma ação de copiar/colar. Note que a tecla a ser usada para essa operação será diferente, dependendo se for um sistema Mac OS ou não. Este código resultará no texto: SeleniumSelenium!
Uma representação de qualquer dispositivo de ponteiro para interagir com uma página da web.
Existem apenas 3 ações que podem ser realizadas com um mouse: pressionar um botão, liberar um botão pressionado e mover o mouse. O Selenium fornece métodos de conveniência que combinam essas ações da maneira mais comum.
Clicar e Manter Pressionado
Este método combina mover o mouse para o centro de um elemento com a pressão do botão esquerdo do mouse. Isso é útil para focar em um elemento específico:
Existem um total de 5 botões definidos para um mouse:
0 — Botão Esquerdo (o padrão)
1 — Botão do Meio (atualmente não suportado)
2 — Botão Direito
3 — Botão X1 (Voltar)
4 — Botão X2 (Avançar)
Context Click
Este método combina mover o mouse para o centro de um elemento com a pressão e liberação do botão direito do mouse (botão 2). Isso é conhecido como “clicar com o botão direito” ou “menu de contexto”
Este termo pode se referir a um clique com o botão X1 (botão de voltar) do mouse. No entanto, essa terminologia específica pode variar dependendo do contexto.
Este termo se refere a um clique com o botão X2 (botão de avançar) do mouse. Não existe um método de conveniência específico para essa ação, sendo apenas a pressão e liberação do botão do mouse de número 4.
Este método combina mover o mouse para o centro de um elemento com a pressão e liberação do botão esquerdo do mouse duas vezes. Isso é conhecido como “duplo clique”.
Este método move o mouse para o ponto central do elemento que está visível na tela. Isso é conhecido como “hovering” ou “pairar”. É importante observar que o elemento deve estar no viewport (área visível na tela) ou então o comando resultará em erro.
Esses métodos primeiro movem o mouse para a origem designada e, em seguida, pelo número de pixels especificado no deslocamento fornecido. É importante observar que a posição do mouse deve estar dentro da janela de visualização (viewport) ou, caso contrário, o comando resultará em erro.
Deslocamento a partir do Elemento
Este método move o mouse para o ponto central do elemento visível na tela e, em seguida, move o mouse pelo deslocamento fornecido.
Deslocamento a partir da Localização Atual do Ponteiro
Este método move o mouse a partir de sua posição atual pelo deslocamento fornecido pelo usuário. Se o mouse não tiver sido movido anteriormente, a posição será no canto superior esquerdo da janela de visualização. É importante notar que a posição do ponteiro não muda quando a página é rolada.
Observe que o primeiro argumento, X, especifica o movimento para a direita quando positivo, enquanto o segundo argumento, Y, especifica o movimento para baixo quando positivo. Portanto, moveByOffset(30, -10) move o mouse 30 unidades para a direita e 10 unidades para cima a partir da posição atual do mouse.
Este método primeiro realiza um clique e mantém pressionado no elemento de origem, move para a localização do elemento de destino e, em seguida, libera o botão do mouse.
Este método primeiro realiza um clique e mantém pressionado no elemento de origem, move para o deslocamento fornecido e, em seguida, libera o botão do mouse.
Uma caneta é um tipo de entrada de ponteiro que possui a maior parte do mesmo comportamento que um mouse, mas também pode ter propriedades de evento únicas para uma caneta stylus. Além disso, enquanto um mouse possui 5 botões, uma caneta possui 3 estados equivalentes de botão:
0 — Contato por Toque (o padrão; equivalente a um clique com o botão esquerdo)
2 — Botão do Barril (equivalente a um clique com o botão direito)
5 — Botão de Borracha (atualmente não suportado pelos drivers)
Este é o cenário mais comum. Diferentemente dos métodos tradicionais de clique e envio de teclas, a classe de ações não rolará automaticamente o elemento de destino para a visualização, portanto, este método precisará ser usado se os elementos não estiverem dentro da janela de visualização.
Este método recebe um elemento da web como único argumento.
Independentemente de o elemento estar acima ou abaixo da tela de visualização atual, a janela de visualização será rolada de forma que a parte inferior do elemento esteja na parte inferior da tela.
Este é o segundo cenário mais comum para a rolagem. Passe um valor delta x e um valor delta y para o quanto rolar nas direções direita e para baixo. Valores negativos representam esquerda e para cima, respectivamente.
Rolagem a partir de um Elemento por uma Quantidade Especificada"
Este cenário é efetivamente uma combinação dos dois métodos mencionados anteriormente.
Para executar isso, use o método “Rolar a Partir de”, que recebe 3 argumentos. O primeiro representa o ponto de origem, que designamos como o elemento, e os dois seguintes são os valores delta x e delta y.
Se o elemento estiver fora da janela de visualização, ele será rolado para a parte inferior da tela e, em seguida, a página será rolada pelos valores delta x e delta y fornecidos.
Rolagem a partir de um Elemento com um Deslocamento
Este cenário é usado quando você precisa rolar apenas uma parte da tela que está fora da janela de visualização ou dentro da janela de visualização, mas a parte da tela que deve ser rolada está a uma distância conhecida de um elemento específico.
Isso utiliza novamente o método “Rolar a Partir”, e além de especificar o elemento, é especificado um deslocamento para indicar o ponto de origem da rolagem. O deslocamento é calculado a partir do centro do elemento fornecido.
Se o elemento estiver fora da janela de visualização, primeiro ele será rolado até a parte inferior da tela. Em seguida, a origem da rolagem será determinada adicionando o deslocamento às coordenadas do centro do elemento, e, finalmente, a página será rolada pelos valores delta x e delta y fornecidos.
Observe que se o deslocamento a partir do centro do elemento estiver fora da janela de visualização, isso resultará em uma exceção.
Rolar a partir de um Deslocamento de Origem (Elemento) por uma Quantidade Especificada
O cenário final é usado quando você precisa rolar apenas uma parte da tela que já está dentro da janela de visualização.
Isso utiliza novamente o método “Rolar a Partir”, mas a janela de visualização é designada em vez de um elemento. Um deslocamento é especificado a partir do canto superior esquerdo da janela de visualização atual. Após determinar o ponto de origem, a página será rolada pelos valores delta x e delta y fornecidos.
Observe que se o deslocamento a partir do canto superior esquerdo da janela de visualização sair da tela, isso resultará em uma exceção.
Page being translated from
English to Portuguese. Do you speak Portuguese? Help us to translate
it by sending us pull requests!
Selenium is working with browser vendors to create the
WebDriver BiDirectional Protocol
as a means to provide a stable, cross-browser API that uses the bidirectional
functionality useful for both browser automation generally and testing specifically.
Before now, users seeking this functionality have had to rely on
with all of its frustrations and limitations.
The traditional WebDriver model of strict request/response commands will be supplemented
with the ability to stream events from the user agent to the controlling software via WebSockets,
better matching the evented nature of the browser DOM.
As it is not a good idea to tie your tests to a specific version of any browser, the
Selenium project recommends using WebDriver BiDi wherever possible.
While the specification is in works, the browser vendors are parallely implementing
the WebDriver BiDirectional Protocol.
Refer web-platform-tests dashboard
to see how far along the browser vendors are.
Selenium is trying to keep up with the browser vendors and has started implementing W3C BiDi APIs.
The goal is to ensure APIs are W3C compliant and uniform among the different language bindings.
However, until the specification and corresponding Selenium implementation is complete there are many useful things that
CDP offers. Selenium offers some useful helper classes that use CDP.
2.8.1 - Chrome DevTools
Many browsers provide “DevTools” – a set of tools that are integrated with the browser that
developers can use to debug web apps and explore the performance of their pages. Google Chrome’s
DevTools make use of a protocol called the Chrome DevTools Protocol (or “CDP” for short).
As the name suggests, this is not designed for testing, nor to have a stable API, so functionality
is highly dependent on the version of the browser.
The WebDriver BiDirectional Protocol is the next generation of the
W3C WebDriver protocol and aims to provide a stable API implemented by all browsers, but it’s not yet complete.
Until it is, Selenium provides access to
the CDP for those browsers that implement it (such as Google Chrome, or Microsoft Edge, and
Firefox), allowing you to enhance your tests in interesting ways. Some examples of what you can
do with it are given below.
Ways to Use Chrome DevTools With Selenium
There are three different ways to access Chrome DevTools in Selenium. If you look for other examples online,
you will likely see each of these mixed and matched.
The CDP Endpoint was the first option available to users.
It only works for the most simple things (setting state, getting basic information), and you
have to know the “magic strings” for the domain and methods and key value pairs.
For basic requirements, this might be simpler than the other options. These methods are only temporarily supported.
The CDP API is an improvement on just using the endpoint because you can set
do things asynchronously. Instead of a String and a Map, you can access the supported classes,
methods and parameters in the code. These methods are also only temporarily supported.
The BiDi API option should be used whenever possible because it
abstracts away the implementation details entirely and will work with either CDP or WebDriver-BiDi
when Selenium moves away from CDP.
Examples With Limited Value
There are a number of commonly cited examples for using CDP that are of limited practical value.
Geo Location — almost all sites use the IP address to determine physical location,
so setting an emulated geolocation rarely has the desired effect.
Overriding Device Metrics — Chrome provides a great API for setting Mobile Emulation
in the Options classes, which is generally superior to attempting to do this with CDP.
Check out the examples in these documents for ways to do additional useful things:
2.8.1.1 - Chrome DevTools Protocol Endpoint
Google provides a /cdp/execute endpoint that can be accessed directly. Each Selenium binding provides a method that allows you to pass the CDP domain as a String, and the required parameters as a simple Map.
These methods will eventually be removed. It is recommended to use the WebDriver-BiDi or WebDriver Bidi APIs
methods where possible to ensure future compatibility.
Usage
Generally you should prefer the use of the CDP API over this approach,
but sometimes the syntax is cleaner or significantly more simple.
Limitations include:
It only works for use cases that are limited to setting or getting information;
any actual asynchronous interactions require another implementation
You have to know the exactly correct “magic strings” for domains and keys
It is possible that an update to Chrome will change the required parameters
Each of the Selenium bindings dynamically generates classes and methods for the various CDP domains and features; these are tied to specific versions of Chrome.
While Selenium 4 provides direct access to the Chrome DevTools Protocol (CDP), these
methods will eventually be removed. It is recommended to use the WebDriver Bidi APIs
methods where possible to ensure future compatibility.
Usage
If your use case has been implemented by WebDriver Bidi or
the BiDi API, you should use those implementations instead of this one.
Generally you should prefer this approach over executing with the CDP Endpoint,
especially in Ruby.
Wait for a download to finish before continuing.
Because getting download status requires setting a listener, this cannot be done with a CDP Endpoint implementation.
These examples are currently implemented with CDP, but the same code should work when the functionality is re-implemented with WebDriver-BiDi.
Usage
A seguinte lista de APIs crescerá à medida que o projeto Selenium se prepara
para suportar casos de uso do mundo real. Se houver funcionalidades adicionais que você gostaria de ver, por favor, levante uma solicitação de recurso.
As these examples are re-implemented with the WebDriver-Bidi protocol, they will
be moved to the WebDriver Bidi pages.
Examples
Basic authentication
Alguns aplicativos fazem o uso da autenticação do navegador para proteger suas páginas. Com o Selenium, você pode automatizar a entrada de credenciais básicas de autenticação sempre que for necessário.
This can be especially useful when executing on a remote server. For example,
whenever you check the visibility of an element, or whenever you use
the classic get attribute method, Selenium is sending the contents of a js file
to the script execution endpoint. These files are each about 50kB, which adds up.
Mutation Observation(Observação de Mutação) é a capacidade de capturar eventos via WebDriver BiDi quando há mutações DOM em um elemento específico no DOM.
Page being translated from
English to Portuguese. Do you speak Portuguese? Help us to translate
it by sending us pull requests!
The following list of APIs will be growing as the WebDriver BiDirectional Protocol grows
and browser vendors implement the same.
Additionally, Selenium will try to support real-world use cases that internally use a combination of W3C BiDi protocol APIs.
If there is additional functionality you’d like to see, please raise a
feature request.
2.8.2.1 - Browsing Context
Page being translated from
English to Portuguese. Do you speak Portuguese? Help us to translate
it by sending us pull requests!
This section contains the APIs related to browsing context commands.
A reference browsing context is a top-level browsing context.
The API allows to pass the reference browsing context, which is used to create a new window. The implementation is operating system specific.
A reference browsing context is a top-level browsing context.
The API allows to pass the reference browsing context, which is used to create a new tab. The implementation is operating system specific.
Provides a tree of all browsing contexts descending from the parent browsing context, including the parent browsing context upto the depth value passed.
Listen to the JS Exceptions
and register callbacks to process the exception details.
logInspector.onJavaScriptLog(future::complete);driver.get("https://www.selenium.dev/selenium/web/bidi/logEntryAdded.html");driver.findElement(By.id("jsException")).click();JavascriptLogEntrylogEntry=future.get(5,TimeUnit.SECONDS);Assertions.assertEquals("Error: Not working",logEntry.getText());
constinspector=awaitLogInspector(driver)awaitinspector.onJavascriptException(function(log){logEntry=log})awaitdriver.get('https://www.selenium.dev/selenium/web/bidi/logEntryAdded.html')awaitdriver.findElement({id:'jsException'}).click()assert.equal(logEntry.text,'Error: Not working')assert.equal(logEntry.type,'javascript')assert.equal(logEntry.level,'error')
As classes de suporte fornecem características opcionais de nível superior.
As bibliotecas principais do Selenium tentam ser de baixo nível e não opinativas.
As classes de suporte em cada linguagem fornecem invólucros opinativos para interações comuns
que podem ser usadas para simplificar alguns comportamentos.
2.9.1 - Command Listeners
These allow you to execute custom actions in every time specific Selenium commands are sent
Ocasionalmente, você desejará validar a cor de algo como parte de seus testes;
o problema é que as definições de cores na web não são constantes.
Não seria bom se houvesse uma maneira fácil de comparar
uma representação HEX de uma cor com uma representação RGB de uma cor,
ou uma representação RGBA de uma cor com uma representação HSLA de uma cor?
Não se preocupe. Existe uma solução: a classe Color!
Em primeiro lugar, você precisará importar a classe:
importorg.openqa.selenium.support.Color;
fromselenium.webdriver.support.colorimportColor
// This feature is not implemented - Help us by sending a pr to implement this feature
includeSelenium::WebDriver::Support
// This feature is not implemented - Help us by sending a pr to implement this feature
importorg.openqa.selenium.support.Color
Agora você pode começar a criar objetos coloridos.
Cada objeto de cor precisará ser criado a partir de uma representação de string de
sua cor.
As representações de cores com suporte são:
Às vezes, os navegadores retornam um valor de cor “transparent”
se nenhuma cor foi definida em um elemento.
A classe Color também oferece suporte para isso:
Agora você pode consultar com segurança um elemento
para obter sua cor / cor de fundo sabendo que
qualquer resposta será analisada corretamente
e convertido em um objeto Color válido:
Esta classe está disponível apenas no Java Binding
ThreadGuard verifica se um driver é chamado apenas da mesma thread que o criou.
Problemas de threading, especialmente durante a execução de testes em paralelo, podem ter erros misteriosos
e difíceis de diagnosticar. Usar este wrapper evita esta categoria de erros
e gerará uma exceção quando isso acontecer.
O exemplo a seguir simula um conflito de threads:
publicclassDriverClash{//thread main (id 1) criou este driver
privateWebDriverprotectedDriver=ThreadGuard.protect(newChromeDriver());static{System.setProperty("webdriver.chrome.driver","<Set path to your Chromedriver>");}//Thread-1 (id 24) está chamando o mesmo driver causando o conflito
Runnabler1=()->{protectedDriver.get("https://selenium.dev");};Threadthr1=newThread(r1);voidrunThreads(){thr1.start();}publicstaticvoidmain(String[]args){newDriverClash().runThreads();}}
O resultado mostrado abaixo:
Exception in thread "Thread-1" org.openqa.selenium.WebDriverException:
Thread safety error; this instance of WebDriver was constructed
on thread main (id 1)and is being accessed by thread Thread-1 (id 24)
This is not permitted and *will* cause undefined behaviour
Conforme visto no exemplo:
protectedDriver será criado no tópico principal
Usamos Java Runnable para ativar um novo processo e uma nova Thread para executar o processo
Ambas as Threads entrarão em conflito porque a thread principal não tem protectedDriver em sua memória.
ThreadGuard.protect lançará uma exceção.
Nota:
Isso não substitui a necessidade de usar ThreadLocal para gerenciar drivers durante a execução em paralelo.
2.9.4 - Trabalhando com elementos select
Select lists have special behaviors compared to other elements.
The Select object will now give you a series of commands
that allow you to interact with a <select> element.
If you are using Java or .NET make sure that you’ve properly required the support package
in your code. See the full code from GitHub in any of the examples below.
Note that this class only works for HTML elements select and option.
It is possible to design drop-downs with JavaScript overlays using div or li,
and this class will not work for those.
Types
Select methods may behave differently depending on which type of <select> element is being worked with.
Single select
This is the standard drop-down object where one and only one option may be selected.
<selectname="selectomatic"><optionselected="selected"id="non_multi_option"value="one">One</option><optionvalue="two">Two</option><optionvalue="four">Four</option><optionvalue="still learning how to count, apparently">Still learning how to count, apparently</option></select>
Multiple select
This select list allows selecting and deselecting more than one option at a time.
This only applies to <select> elements with the multiple attribute.
First locate a <select> element, then use it to initialize a Select object.
Note that as of Selenium 4.5, you can’t create a Select object if the <select> element is disabled.
Get a list of selected options in the <select> element. For a standard select list
this will only be a list with one element, for a multiple select list it can contain
zero or many elements.
The Select class provides three ways to select an option.
Note that for multiple select type Select lists, you can repeat these methods
for each element you want to select.
expected_conditions.ja.md—
title: “Waiting with Expected Conditions”
linkTitle: “Expected Conditions”
weight: 1
description: >
These are classes used to describe what needs to be waited for.
Expected Conditions are used with Explicit Waits.
Instead of defining the block of code to be executed with a lambda, an expected
conditions method can be created to represent common things that get waited on. Some
methods take locators as arguments, others take elements as arguments.
It is not always obvious the root cause of errors in Selenium.
The most common Selenium-related error is a result of poor synchronization.
Read about Waiting Strategies. If you aren’t sure if it
is a synchronization strategy you can try temporarily hard coding a large sleep
where you see the issue, and you’ll know if adding an explicit wait can help.
Note that many errors that get reported to the project are actually caused by
issues in the underlying drivers that Selenium sends the commands to. You can rule
out a driver problem by executing the command in multiple browsers.
If you have questions about how to do things, check out the Support options
for ways get assistance.
If you think you’ve found a problem with Selenium code, go ahead and file a
Bug Report
on GitHub.
2.10.1 - Understanding Common Errors
How to get deal with various problems in your Selenium code.
Invalid Selector Exception
CSS and XPath Selectors are sometimes difficult to get correct.
Likely Cause
The CSS or XPath selector you are trying to use has invalid characters or an invalid query.
An element goes stale when it was previously located, but can not be currently accessed.
Elements do not get relocated automatically; the driver creates a reference ID for the element and
has a particular place it expects to find it in the DOM. If it can not find the element
in the current DOM, any action using that element will result in this exception.
Common Causes
This can happen when:
You have refreshed the page, or the DOM of the page has dynamically changed.
You have navigated to a different page.
You have switched to another window or into or out of a frame or iframe.
Common Solutions
The DOM has changed
When the page is refreshed or items on the page have moved around, there is still
an element with the desired locator on the page, it is just no longer accessible
by the element object being used, and the element must be relocated before it can be used again.
This is often done in one of two ways:
Always relocate the element every time you go to use it. The likelihood of
the element going stale in the microseconds between locating and using the element
is small, though possible. The downside is that this is not the most efficient approach,
especially when running on a remote grid.
Wrap the Web Element with another object that stores the locator, and caches the
located Selenium element. When taking actions with this wrapped object, you can
attempt to use the cached object if previously located, and if it is stale, exception
can be caught, the element relocated with the stored locator, and the method re-tried.
This is more efficient, but it can cause problems if the locator you’re using
references a different element (and not the one you want) after the page has changed.
The Context has changed
Element objects are stored for a given context, so if you move to a different context —
like a different window or a different frame or iframe — the element reference will
still be valid, but will be temporarily inaccessible. In this scenario, it won’t
help to relocate the element, because it doesn’t exist in the current context.
To fix this, you need to make sure to switch back to the correct context before using the element.
The Page has changed
This scenario is when you haven’t just changed contexts, you have navigated to another page
and have destroyed the context in which the element was located.
You can’t just relocate it from the current context,
and you can’t switch back to an active context where it is valid. If this is the reason
for your error, you must both navigate back to the correct location and relocate it.
2.10.1.1 - Unable to Locate Driver Error
Troubleshooting missing path to driver executable.
Historically, this is the most common error beginning Selenium users get
when trying to run code for the first time:
The path to the driver executable must
be set by the webdriver.chrome.driver system property;
for more information, see https://chromedriver.chromium.org/.
The latest version can be downloaded from https://chromedriver.chromium.org/downloads
The executable chromedriver needs to be available in the path.
The file geckodriver does not exist. The driver can be downloaded at https://github.com/mozilla/geckodriver/releases"
Unable to locate the chromedriver executable;
Likely cause
Through WebDriver, Selenium supports all major browsers.
In order to drive the requested browser, Selenium needs to
send commands to it via an executable driver.
This error means the necessary driver could not be
found by any of the means Selenium attempts to use.
Possible solutions
There are several ways to ensure Selenium gets the driver it needs.
Use the latest version of Selenium
As of Selenium 4.6, Selenium downloads the correct driver for you.
You shouldn’t need to do anything. If you are using the latest version
of Selenium and you are getting an error,
please turn on logging
and file a bug report with that information.
If you want to read more information about how Selenium manages driver downloads for you,
you can read about the Selenium Manager.
This is a flexible option to change location of drivers without having to update your code,
and will work on multiple machines without requiring that each machine put the
drivers in the same place.
You can either place the drivers in a directory that is already listed in PATH,
or you can place them in a directory and add it to PATH.
To see what directories are already on PATH, open a Terminal and execute:
echo$PATH
If the location to your driver is not already in a directory listed,
you can add a new directory to PATH:
You can test if it has been added correctly by checking the version of the driver:
chromedriver --version
To see what directories are already on PATH, open a Command Prompt and execute:
echo %PATH%
If the location to your driver is not already in a directory listed,
you can add a new directory to PATH:
setx PATH "%PATH%;C:\WebDriver\bin"
You can test if it has been added correctly by checking the version of the driver:
chromedriver.exe --version
Specify the location of the driver
If you cannot upgrade to the latest version of Selenium, you
do not want Selenium to download drivers for you, and you can’t figure
out the environment variables, you can specify the location of the driver in the Service object.
Specifying the location in the code itself has the advantage of not needing
to figure out Environment Variables on your system, but has the drawback of
making the code less flexible.
Driver management libraries
Before Selenium managed drivers itself, other projects were created to
do so for you.
If you can’t use Selenium Manager because you are using
an older version of Selenium (please upgrade),
or need an advanced feature not yet implemented by Selenium Manager,
you might try one of these tools to keep your drivers automatically updated:
Nota: O Opera driver já não inclui as funcionalidades mais recentes do Selenium e oficialmente deixou de ser suportado.
2.10.2 - Logging Selenium commands
Getting information about Selenium execution.
Turning on logging is a valuable way to get extra information that might help you determine
why you might be having a problem.
Getting a logger
Java logs are typically created per class. You can work with the default logger to
work with all loggers. To filter out specific classes, see Filtering
Java Logging is not exactly straightforward, and if you are just looking for an easy way
to look at the important Selenium logs,
take a look at the Selenium Logger project
Python logs are typically created per module. You can match all submodules by referencing the top
level module. So to work with all loggers in selenium module, you can do this:
.NET does not currently have a Logging implementation
If you want to see as much debugging as possible in all the classes,
you can turn on debugging globally in Ruby by setting $DEBUG = true.
For more fine-tuned control, Ruby Selenium created its own Logger class to wrap the default Logger class.
This implementation provides some interesting additional features.
Obtain the logger directly from the #loggerclass method on the Selenium::WebDriver module:
Things get complicated when you use PyTest, though. By default, PyTest hides logging unless the test
fails. You need to set 3 things to get PyTest to display logs on passing tests.
To always output logs with PyTest you need to run with additional arguments.
First, -s to prevent PyTest from capturing the console.
Second, -p no:logging, which allows you to override the default PyTest logging settings so logs can
be displayed regardless of errors.
So you need to set these flags in your IDE, or run PyTest on command line like:
pytest -s -p no:logging
Finally, since you turned off logging in the arguments above, you now need to add configuration to
turn it back on:
logging.basicConfig(level=logging.WARN)
.NET does not currently have a Logging implementation
Ruby logger has 5 logger levels: :debug, :info, :warn, :error, :fatal.
As of Selenium v4.9.1, The default is :info.
Things are logged as warnings if they are something the user needs to take action on. This is often used
for deprecations. For various reasons, Selenium project does not follow standard Semantic Versioning practices.
Our policy is to mark things as deprecated for 3 releases and then remove them, so deprecations
may be logged as warnings.
Java logs actionable content at logger level WARN
Example:
May 08, 2023 9:23:38 PM dev.selenium.troubleshooting.LoggingTest logging
WARNING: this is a warning
Python logs actionable content at logger level — WARNING
Details about deprecations are logged at this level.
Example:
WARNING selenium:test_logging.py:23 this is a warning
.NET does not currently have a Logging implementation
Ruby logs actionable content at logger level — :warn.
Details about deprecations are logged at this level.
For example:
2023-05-08 20:53:13 WARN Selenium [:example_id] this is a warning
Because these items can get annoying, we’ve provided an easy way to turn them off, see filtering section below.
Content Help
Note:
This section needs additional and/or updated content
This is the default level where Selenium logs things that users should be aware of but do not need to take actions on.
This might reference a new method or direct users to more information about something
Java logs useful information at logger level INFO
Example:
May 08, 2023 9:23:38 PM dev.selenium.troubleshooting.LoggingTest logging
INFO: this is useful information
Python logs useful information at logger level — INFO
Example:
INFO selenium:test_logging.py:22 this is useful information
.NET does not currently have a Logging implementation
Ruby logs useful information at logger level — :info.
Example:
2023-05-08 20:53:13 INFO Selenium [:example_id] this is useful information
Logs useful information at level: INFO
Content Help
Note:
This section needs additional and/or updated content
Java logging is managed on a per class level, so
instead of using the root logger (Logger.getLogger("")), set the level you want to use on a per-class
basis:
.NET does not currently have a Logging implementation
Ruby’s logger allows you to opt in (“allow”) or opt out (“ignore”) of log messages based on their IDs.
Everything that Selenium logs includes an ID. You can also turn on or off all deprecation notices by
using :deprecations.
These methods accept one or more symbols or an array of symbols:
Interessado no Selenium 4? Veja este guia para realizar o upgrade para a ultima versão!
Atualizar para o Selenium 4 deve ser um processo sem dificuldades se você estiver usando uma das linguagens oficialmente suportadas
(Ruby, JavaScript, C#, Python, and Java). Pode haver alguns casos em que alguns problemas podem acontecer,
este guia irá ajudar você a resolvê-los. Vamos passar as etapas para atualizar as dependências do seu
projeto e entender as depreciações e também as mudanças trazidas pela versão atualizada.
Estas são as etapas que seguiremos para atualizar para o Selenium 4:
Preparando nosso código de teste
Atualizando as dependências
Possíveis erros e mensagens de suspensão de uso
Nota: enquanto as versões do Selenium 3.x estavam sendo desenvolvidas, foi implementado o suporte padrão para W3C WebDriver.
Este novo protocolo e o legado JSON Wire Protocol foram suportados. Através da versão 3.11, o código do Selenium passou a ser compátivel com o nível 1 da especificação W3C.
A compatibilidade do código W3C na ultima versão do Selenium 3 irá funcionar como esperado na versão 4.
Preparando nosso código de teste
Selenium 4 remove suporte para protocolos legados e usa o W3C Webdriver por padrão.
Para a maioria das coisas, essa implementação não irá afetar usuários finais.
As maiores exeções são Capabilities e a classe Actions.
Recursos
Se os recursos de teste não forem estruturados para serem compatíveis com W3C, pode fazer com que uma sessão não
seja iniciada. Aqui está a lista de recursos padrão do W3C WebDriver:
browserName
browserVersion (replaces version)
platformName (replaces platform)
acceptInsecureCerts
pageLoadStrategy
proxy
timeouts
unhandledPromptBehavior
Uma lista atualizada de recursos padrão pode ser encontrada aqui:
W3C WebDriver.
Qualquer recurso que não esteja incluido na lista acima, precisa ser incluido um prefixo de fornecedor.
Isso se aplica aos recursos específicos do navegador, bem como aos recursos específicos do fornecedor da nuvem.
Por exemplo, se o seu fornecedor de nuvem usa os recursos build e name para seus testes, você precisa
envolvê-los em um bloco cloud: options (verifique com seu fornecedor de nuvem o prefixo apropriado).
O utilitário para localizar elementos no Java (interfaces FindsBy) foram removidos
visto que se destinavam apenas a uso interno. Os exemplos de código a seguir explicam isso melhor.
Verifique as subseções abaixo para isntalar o Selenium 4 e atualizar as dependências do seu projeto
Java
O processo de atualização do Selenium depende de qual ferramenta de compilação está sendo usada. Vamos mostrar as mais comuns para Java, como Maven e Gradle. A versão minínma do Java ainda é 8.
Maven
Antes
<dependencies><!-- more dependencies ... --><dependency><groupId>org.seleniumhq.selenium</groupId><artifactId>selenium-java</artifactId><version>3.141.59</version></dependency><!-- more dependencies ... --></dependencies>
Depois
<dependencies><!-- more dependencies ... --><dependency><groupId>org.seleniumhq.selenium</groupId><artifactId>selenium-java</artifactId><version>4.4.0</version></dependency><!-- more dependencies ... --></dependencies>
Após realizar a mudança, você pode executar mvn clean compile no mesmo diretório, onde o
arquivo pom.xml está.
Gradle
Antes
plugins {
id 'java'
}
group 'org.example'
version '1.0-SNAPSHOT'
repositories {
mavenCentral()
}
dependencies {
testImplementation 'org.junit.jupiter:junit-jupiter-api:5.7.0'
testRuntimeOnly 'org.junit.jupiter:junit-jupiter-engine:5.7.0'
implementation group: 'org.seleniumhq.selenium', name: 'selenium-java', version: '3.141.59'
}
test {
useJUnitPlatform()
}
Depois
plugins {
id 'java'
}
group 'org.example'
version '1.0-SNAPSHOT'
repositories {
mavenCentral()
}
dependencies {
testImplementation 'org.junit.jupiter:junit-jupiter-api:5.7.0'
testRuntimeOnly 'org.junit.jupiter:junit-jupiter-engine:5.7.0'
implementation group: 'org.seleniumhq.selenium', name: 'selenium-java', version: '4.4.0'
}
test {
useJUnitPlatform()
}
Após realizar a mudança, você pode executar ./gradlew clean build no mesmo diretório onde o arquivo build.gradleestá.
Para verifica todas as versões do Java, você pode ir até MVNRepository.
C#
O local para obter atualizações para Selenium 4 em C# é NuGet
Dentro do pacaote Selenium.WebDriver você pode seguir as instruções para atualizar para ultima versão.
Dentro do Visual Studio, através do NuGet Package Manager você pode executar:
A mudança mais importante para usar o Python é a versão minima requerida. Para Selenium 4 a versão miníma requerida será Python3.7 ou superior.
Mais detalhes podem ser encontrados aqui:Python Package Index.
Para atualizar através da linha de comando, você pode executar:
pip install selenium==4.4.3
Ruby
Detalhes para atualizar para o Selenium 4 podem ser vistos aqui:
selenium-webdriver gem in RubyGems
Para instalar a ultima versão, você pode executar:
gem install selenium-webdriver
Para adicioná-lo ao seu Gemfile:
gem 'selenium-webdriver', '~> 4.4.0'
JavaScript
O pacote selenium-webdriver pode ser encontrado pelo Node package manager,
npmjs. Selenium 4 pode ser encontrado aqui.
Para instalar, você pode executar:
npm install selenium-webdriver
Ou, atualize o seu package.json e execute npm install:
Aqui temos um conjunto de exemplos de código que o ajudarão a superar as mensagens de descontinuação, que você pode
encontrar após atualizar para o Selenium 4.
Java
Waits e Timeout
Os parametros que eram esperados de ser recebidos em um Timeout trocaram de (long time, TimeUnit unit) para
o (Duration duration).
As esperas(waits) também esperam parâmetros diferentes agora. O WebDriverWait
agora espera uma Duration em vez de um tempo limite long em segundos e milissegundos.
Os métodos utilitários withTimeout e pollingEvery do FluentWait passaram do
(long time, TimeUnit unit) para o (Duration duration).
A fusão de recursos não estã mais alterando o objeto de invocação
Antes era possível fundir um conjunto diferente de recursos em outro counjunto, e isso
alterava o objeto de chamada. Agora, o resultado da operação de fusão precisa ser atribuído.
Antes
MutableCapabilitiescapabilities=newMutableCapabilities();capabilities.setCapability("platformVersion","Windows 10");FirefoxOptionsoptions=newFirefoxOptions();options.setHeadless(true);options.merge(capabilities);//Como resultado, o objeto `options` estava sendo modificado.
Depois
MutableCapabilitiescapabilities=newMutableCapabilities();capabilities.setCapability("platformVersion","Windows 10");FirefoxOptionsoptions=newFirefoxOptions();options.setHeadless(true);options=options.merge(capabilities);// O resultado da chamada `merge` precisa ser atribuído a um objeto.
Firefox Legacy
Antes do GeckoDriver existir, o projeto Selenium tinha uma implementação de driver para automatizar
o Firefox(versão<48). Entretanto, esta implementação não é mais necessária, pois não funciona
nas versões mais recentes do Firefox. Para evitar graves problemas ao atualizar para o Selenium 4,
a opção setLegacy será mostrada como obsoleta. A recomendação é parar de utilizar a implementação
antiga e depender apenas do GeckoDriver. O código a seguir mostrará a linha setLegacy obsoleta após
atualizar.
Em vez dela, AddAdditionalOption é recomendada. Aqui está um exemplo mostrando isso:
Antes
var browserOptions = new ChromeOptions();
browserOptions.PlatformName = "Windows 10";
browserOptions.BrowserVersion = "latest";
var cloudOptions = new Dictionary<string, object>();
browserOptions.AddAdditionalCapability("cloud:options", cloudOptions, true);
Depois
var browserOptions = new ChromeOptions();
browserOptions.PlatformName = "Windows 10";
browserOptions.BrowserVersion = "latest";
var cloudOptions = new Dictionary<string, object>();
browserOptions.AddAdditionalOption("cloud:options", cloudOptions);
Python
executable_path foi descontinuada, por favor, passe um Service object
No Selenium 4, você precisara definir o executable_path a partir de um objeto Service para evitar avisos de depreciação.
(Ou não defina o caminho e, em vez disso, certifique-se de que o driver que você precisa esteja no System PATH.)
Passamos pelas principais mudanças a serem levadas em consideração ao atualizar para o Selenium 4.
Cobrimos os diferentes aspectos a serem cobertos quando o código de teste é preparado para a atualização, incluindo
sugestões sobre como evitar possíveis problemas que podem aparecer ao usar a nova versão do
Selenium. Para finalizar, também abordamos um conjunto de possíveis problemas com os quais você pode se deparar depois
da atualização e compartilhamos possíveis correções para esses problemas.
Pretende executar testes em paralelo em várias máquinas? Então a Grid é para si.
Selenium Grid permite a execucão de scripts WebDriver em máquinas remotas,
passando os comandos recebidos pelo cliente para a instância remotas do navegador.
O objectivo da Grid é:
Providenciar uma forma fácil de executar testes em paralelo em multiplas máquinas
Permitir testes em versões diferentes de navegadores
Permitir testes em várias plataformas
Está interessado? Enão siga lendo as próximas secções para entender como a Grid funciona
e também como montar a sua.
3.1 - Configurando a sua
Instruções para criar uma Selenium Grid simples
Início rápido
Pré-requisitos
Java 11 ou superior instalado
Navegador(es) instalados
Drivers do(s) navegador(es)
Selenium Manager will configure the drivers automatically if you add --selenium-manager true.
Para aprender mais sobre as diferentes opções de configuração, veja as secções seguintes.
Grid roles
A Grid é composta de seis componentes diferentes, o que permite ser
instalada de várias formas.
Dependendo das necessidades, podemos iniciar cada um dos componentes (Distribuido) ou agrupar no formato
Hub e Node ou ainda numa única máquina (Standalone).
Standalone
Standalone combina todos os componentes num só sitio.
Executar uma Grid em modo Standalone permite uma Grid totalmente funcionar com um único
comando, num único processo. Standalone só funcionará numa única máquina.
Standalone é também a forma mais simples de colocar uma Selenium Grid em funcionamento.
Por omissão, o servidor irá escutar por pedidos RemoteWebDriver em http://localhost:4444.
O servidor irá também detectar os drivers disponíveis no
PATH.
A comunicação entre Hub e Nodes ocorre via HTTP. Para iniciar o processo de registo, o Node envia
uma mensagem para o Hub através do Event Bus
(o Event Bus reside dentro do Hub). Quando o Hub recebe a mensagem, tenta comunicar com o Node
para confirmar a sua existencia.
Para que um Node se consiga registar no Hub, é importante que as portas do Event Bus sejam expostas
na máquina Hub. As portas por omissão são 4442 e 4443 para o Event Bus e 4444 para o Hub.
Se o Hub estiver a usar as portas por omissão, pode usar a flag --hub para registar o Node
Distributor: consulta New Session Queue para novos pedidos de sessão, que entrega ao um Node quando encontra um capacidade
correspondente. Nodes registam-se no Distributor da mesma forma como numa Grid do tipo Hub/Node.
A porta por omissão é 5553. Distributor interage com New Session Queue, Session Map, Event Bus, e Node(s).
Adicione Metadata aos testes, através de GraphQL
ou visualize parcialmente (como se:name) através da Selenium Grid UI.
Metadata pode ser adicionada como uma capacidade com o prefixo se:. Eis um pequeno exemplo em Java.
ChromeOptionschromeOptions=newChromeOptions();chromeOptions.setCapability("browserVersion","100");chromeOptions.setCapability("platformName","Windows");// Mostrando na Grid UI o nome de um teste ao invés de uma session id
chromeOptions.setCapability("se:name","My simple test");// Outros tipos de metadara podem ser visualizados na Grid UI
// ao clicar na informação de sessão ou via GraphQL
chromeOptions.setCapability("se:sampleMetadata","Valor exemplo de Metadata");WebDriverdriver=newRemoteWebDriver(newURL("http://gridUrl:4444"),chromeOptions);driver.get("http://www.google.com");driver.quit();
Questionando a Selenium Grid
Após iniciar a Gris, existem duas formas de saber o seu estado, através da Grid UI ou
por chamada API.
Para simplificar, todos os exemplos apresentados assumem que os componentes estão a ser executados localmente.
Exemplos mais detalhados podem ser encontrados na secção Configurando Componentes.
Usando o cliente HTTP nativo Java 11
Por omissão, a Grid irá usar AsyncHttpClient.
AsyncHttpClient é uma biblioteca open-source library criada em cima do Netty. Isto permite a
execução de pedidos e respostas HTTP de forma assíncrona. Esta biblioteca é uma boa escolha
pois além de permitir pedidos assíncronos, também suporta WebSockets.
No entanto, a biblioteca AsyncHttpClient não é mantida activamente desde Junho de 2021. Isto coincide com
o facto de que a partir do Java 11, a JVM tem um cliente nativo que suporta camadas assíncronas
e contém um cliente WebSocket.
Atualmente, o projecto Selenium tem planos de atualizar a versão mínima suportada para Java 11.
No entanto, isto é um esforço considerável. Alinhá-lo com os principais lançamentos e anúncios
acompanhados é crucial para garantir que a experiência do usuário esteja intacta.
Para usar o cliente Java 11, terá que baixar o ficheiro jar selenium-http-jdk-client e usar
a flag --ext para funcionar na Grid.
Este ficheiro pode ser obtido directamente de repo1.maven.org
e depois pode iniciar a Grid com:
Se está a usar a Grid em modo Hub/Node ou Distributed, terá que usar as flags
-Dwebdriver.http.factory=jdk-http-client e --ext em cada um dos componentes.
Dimensionar Grid
A escolha de Grid depende de quais sistemas operacionais e navegadores precisam ser suportados,
quantas sessões paralelas precisam ser executadas, a quantidade de máquinas disponíveis e quão
poderosas (CPU, RAM) essas máquinas são.
A criação de sessões simultaneas depende dos processadores disponíveis para o Distributor.
Por exemplo, se uma máquina tiver 4 CPUs, o Distributor só poderá criar quatro sessões
em simultâneo.
Por omissão, a quantidade máxima de sessões simultâneas que um Node suporta é limitada pelo
número de CPUs disponíveis. Por exemplo, se a máquina Node tiver 8 CPUs, ela poderá executar
até 8 sessões de navegador simultâneas (com exceção do Safari, que é sempre uma).
Além disso, espera-se que cada sessão do navegador use cerca de 1 GB de RAM.
Em geral, é recomendado ter Nodes o mais pequenos possíveis. Em vez de ter
uma máquina com 32CPUs e 32GB de RAM para executar 32 sessões de navegador simultâneas, é melhor
tem 32 pequenos Nodes para isolar melhor os processos. Com isso, se um Node
falhar, será de forma isolada. Docker é uma boa ferramenta para alcançar essa abordagem.
Note que os valores 1CPU/1GB RAM por navegador são uma recomendação e podem não ser os mais indicados
para o seu contexto. Recomenda-se que use estea valores como referência, mas meça o desempenho
continuamente para ajudar a determinar os valores ideais para o seu ambiente.
Os tamanhos da Grid são relativos à quantidade de sessões simultâneas suportadas e à quantidade de
Nodes, não existindo um “tamanho único”. Os tamanhos mencionados abaixo são estimativas aproximadas
que podem variar entre diferentes ambientes. Por exemplo, um Hub/Node com 120 Nodes
pode funcionar bem quando o Hub tiver recursos suficientes. Os valores abaixo não são gravados em pedra,
e comentários são bem-vindos!
Pequena
Standalone e Hub/Node com cinco Nodes ou menos.
Média
Hub/Node entre 6 e 60 Nodes.
Grande
Hub/Node entre 60 e 100 Nodes. Distributed com mais de 100 Nodes.
AVISO
Deve proteger a Selenium Grid de acesso externo, usando regras de firewall apropriadas.
Se falhar em proteger a Grid uma ou mais coisas poderão ocorrer:
Permite acesso aberto à sua infraestrutura da Grid
Permitir acesso de terceiros a aplicativos web e a ficheiros
Permitir execução remota de ficheiros binários por terceiros
Para executar testes em paralelo, com vários tipos e versões de navegador e sistemas operativos
Para reduzir o tempo necessário a executar uma bateria de testes
A Selenium Grid executa baterias de testes em paralelo contra várias máquinas (chamadas Nodes).
Para testes longos, isto poderá poupar minutos, horas e talvez dias.
Isto encurta o tempo de espera para obter resultados dos testes de cada vez que sobre a aplicação
em testes é alterada.
A Grid consegue executar testes (em paralelo) contra multiplos e diferentes navegadores, também
é capaz de executar contra várias instâncias do mesmo navegador. Como exemplo, vamos imaginar
uma Grid com seis Nodes. A primeira máquina tem a versão mais recente do Firefox, a segunda tem
a versão “mais recente -1”, a terceira tem o Chrome mais recente e as restantes máquinas são Mac
Mini, que permitem três testes em paralelo com a versão mais recente to Safari.
O tempo de execução pode ser expresso como uma fórmula simples:
Número de testes * Tempo médio de cada teste / Número de Nodes = Tempo total de execução
15 * 45s / 1 = 11m 15s // Sem Grid
15 * 45s / 5 = 2m 15s // Grid com 5 Nodes
15 * 45s / 15 = 45s // Grid com 15 Nodes
100 * 120s / 15 = 13m 20s // Demoraria mais de 3 horas sem Grid
À medida que a bateria de testes executa, a Grid vai alocando os testes contra estes navegadores
como está definido nos testes.
Uma configuração deste tipo pode acelerar bastante o tempo de execução mesmo no caso de baterias de testes grandes.
A Selenium Grid é uma parte integrante do projecto Selenium e é mantida em paralelo pela mesma equipa de developers
que desenvolvem o resto das funcionalidades base do projecto. Dada a importância da velocidade e desempenho da
execução dos testes, a Grid tem sido considerada desde o início como uma parte crítica e fundamental ao projecto.
3.3 - Componentes
Compreender como usar os componentes da Grid
A Selenium Grid 4 é uma re-escrita completa das versões anteriores. Além dos melhoramentos ao desempenho
e aos cumprimentos dos standards, várias funcionalidades da Grid foram separadas para reflectir uma
nova era de computação e desenvolvimento de software. Criada de raíz para containerização e
escalabilidade cloud, Selenium Grid 4 é uma nova solução para a era moderna.
Router
O Router é o ponto de entrada da Grid, recebendo todos os pedidos externos, reenviando para o componente correcto.
Se o Router recebe um novo pedido de sessão, este será enviado para New Session Queue.
Se o pedido recebido pertence a uma sessão existente, o Router irá inquirir o Session Map para obter
o Node ID onde esta sessão está em execução, enviando de seguida o pedido directamente para o Node.
O Router balança a carga na Grid ao enviar o pedido ao componente que está em condições de o receber,
sem sobrecarregar qualquer outro componente que não faz parte do processo.
Distributor
O Distributor tem duas responsabilidades:
Resgistar e manter uma lista de todos os Nodes e as suas capacidades
Um Node regista-se no Distributor enviando um evento de registo Node através do
Event Bus. O Distributor lê o pedido e tenta contactar o Node através de HTTP
para confirmar a sua existência. Se obtiver resposta com sucesso, o Distributor regista
o Node e mantém uma lista de todas as capacidades Nodes através do GridModel.
Processar algum pedido pendente que tenha sido criado na New Session Queue
Quando um novo pedido de sessão é enviado para o Router, ele é reenviado para a New Session Queue,
onde ficará na fila em espera. O Distributor irá processar pedidos pendentes que existam na New Session Queue,
encontrando um Node com as capacidades certas onde a sessão possa ser criada. Após esta nova
sessão ter sido criada, o Distributor guarda na Session Map a relação entre o id da sessão e
o Node onde a sessão está em execução.
Session Map
A Session Map é uma data store que mantém a relação entre o id da sessão e o Node
onde a sessão está em execução. Apoia o Router no processo de envio do pedido para um Node
onde a sessão está em execução. O Router irá pedir ao Session Map qual o Node associado
ao id de sessão.
New Session Queue
A New Session Queue contém todos os pedidos de novas sessões em ordem FIFO. Existem parametros
configuráveis para o timeout de sessão e para o número de tentativas.
O Router adiciona um novo pedido de sessão em New Session Queue e aguarda uma resposta.
A New Session Queue verifica regularmente se algum pedido deu timeout e em caso afirmativo,
rejeita e remove o pedido da queue.
O Distributor verifica regularmente se existe um slot disponível. Em caso afirmativo, o Distributor
obtém um pedido a partir de New Session Queue e tenta criar uma nova sessão.
Assim que existam capacidades pedidas capazes de serem servidas por um dos Node que estejam livres,
o Distributor tenta obter o slot disponível. Caso todos os slots estejam ocupados, o Distributor
envia o pedido de volta para a queue. Se o pedido tiver timeout ao ser readicionado à queue, será rejeitado.
Após um id de sessão ser criado, o Distributor envia a informação se sessão para New Session Queue,
que por sua vez irá enviar para o Router que finalmente entrega ao cliente.
Node
A Grid pode ter múltiplos Nodes. Cada Node gere os slots de disponibilidade para os navegadores existentes
na máquina onde está a executar.
O Node regista-se no Distributor através do Event Bus, sendo que a sua configuração é enviada
como parte da mensagem de registo.
Por omissão, o Node regista automaticamente todos os navegadores que estejam disponíveis no PATH da máquina onde
executa. Cria também um slot de execução por cada CPU para os navegadores Chrome e Firefox. Para Safari,
apenas é criado um slot. Usando uma configuração específica, é também
possível executar sessões em containers Docker.
O Node apenas executa os comandos que recebe, não avalia, faz julgamentos ou controla mais nada que não seja
o fluxo de comandos e respostas. A máquina onde o Node está a executar não necessita de ter o mesmo sistema
operativo do que os restantes componentes. Por exemplo, um Windows Node pode ter a capacidade de oferecer
IE Mode no Edge como opção de navegador, coisa que não é possível em Linux ou Mac. A Grid pode ter múltiplos
Node configurados com Windows, Mac ou Linux.
Event Bus
O Event Bus serve de canal de comunicações entre Nodes, Distributor, New Session Queue,
e Session Map. A Grid usa mensagens para a maioria das comunicações internas. evitando chamadas HTTP.
Quando iniciar a Grid em modo distribuido, deverá iniciar o Event Bus antes dos restantes componentes.
Configurando a sua Grid
Se pretende usar todos estes componentes para criar a sua Grid,
visite a secção “configurando a sua”
para entender como ligar as peças todas.
3.4 - Configurando componentes
Leia aqui como pode configurar cada um dos componentes Grid com base em valores comuns ou específicos para o componente.
3.4.1 - Ajuda de configuração
Obtenha ajuda sobre todas as opções disponíveis para configurar a Grid.
Os comandos de ajuda (help) mostram informação baseada na implementação de código em vigor.
Desta forma, irá obter informação potencialmente mais actual do que esta documentação.
Embora possa não ser a mais detalhada, é sempre a forma mais simples de aprender sobre
as configurações da Grid 4 em qualquer nova versão.
Commando info
O comando info fornece detalhes de documentação sobre os seguintes tópicos:
Configurar Selenium
Segurança
Setup Session Map
Traceamento
Ajuda sobre configuração
Ajuda rápida e resumo pode ser obtida com:
java -jar selenium-server-<version>.jar info config
Segurança
Para obter detalhes em como configurar os servidores Grid para comunicação segura
e para o registo de Nodes:
java -jar selenium-server-<version>.jar info security
Configuração Session Map
Por omissão, a Grid usa um local session map para armazenar informação de sessões.
A Grid permite armazenamento opcional em Redis ou bancos de dados JDBC SQL.
Para obter informação de como usar, use o seguinte comando:
java -jar selenium-server-<version>.jar info sessionmap
Traceamento com OpenTelemetry e Jaeger
Por omissao, traceamento está activo. Para exportar e visualizar através de Jaeger, use o
comando seguinte para instruções de como o efectuar:
java -jar selenium-server-<version>.jar info tracing
Lista de comandos Selenium Grid
Irá mostrar todos os comandos disponíveis e também a descrição de cada um.
Todas os detalhes das opções CLI de cada componente Grid.
Diferentes secções estão disponíveis para configurar uma Grid. Cada secção tem opções que podem ser configuradas
através de opções CLI.
Pode ver abaixo um mapeamento entre o componente e a secção respectiva.
Note que esta documentação pode estar desactualizada se uma opção foi adicionada ou modificada,
mas ainda não ter havido oportunidade de actualizar a documentação.
Caso depare com esta situação, verifique a secção “ajuda de configuração”
e esteja à vontade para nos enviar um pull request com alterações a esta página.
Nome completo da class para uma implementação não padrão do Distributor.
--distributor-port
int
5553
Porta onde o Distributor está à escuta.
--reject-unsupported-caps
boolean
false
Permitir que o Distributor rejeite imediatamente um pedido de sessão se a Grid não suportar a capacidade pedida. Esta configuração é a ideal para Grid que não inicie Nodes a pedido.
--slot-matcher
string
org.openqa.selenium.grid.data.DefaultSlotMatcher
Nome completo da class para uma implementação não padrão do comparador de slots. Isto é usado para determinar se um Node pode suportar uma sessão em particular.
Docker configs which map image name to stereotype capabilities (example `-D selenium/standalone-firefox:latest ‘{“browserName”: “firefox”}’)
--docker-devices
string[]
/dev/kvm:/dev/kvm
Exposes devices to a container. Each device mapping declaration must have at least the path of the device in both host and container separated by a colon like in this example: /device/path/in/host:/device/path/in/container
--docker-host
string
localhost
Host name where the Docker daemon is running
--docker-port
int
2375
Port where the Docker daemon is running
--docker-url
string
http://localhost:2375
URL for connecting to the Docker daemon
--docker-video-image
string
selenium/video:latest
Docker image to be used when video recording is enabled
Events
Opção
Tipo
Valor/Exemplo
Descrição
--bind-bus
boolean
false
Whether the connection string should be bound or connected. When true, the component will be bound to the Event Bus (as in the Event Bus will also be started by the component, typically by the Distributor and the Hub). When false, the component will connect to the Event Bus.
--events-implementation
string
org.openqa.selenium.events.zeromq.ZeroMqEventBus
Full class name of non-default event bus implementation
--publish-events
string
tcp://*:4442
Connection string for publishing events to the event bus
--subscribe-events
string
tcp://*:4443
Connection string for subscribing to events from the event bus
Logging
Opção
Tipo
Valor/Exemplo
Descrição
--http-logs
boolean
false
Enable http logging. Tracing should be enabled to log http logs.
--log-encoding
string
UTF-8
Log encoding
--log
string
Windows path example : '\path\to\file\gridlog.log' or 'C:\path\path\to\file\gridlog.log'
Linux/Unix/MacOS path example : '/path/to/file/gridlog.log'
File to write out logs. Ensure the file path is compatible with the operating system’s file path.
Full classname of non-default Node implementation. This is used to manage a session’s lifecycle.
--grid-url
string
https://grid.example.com
Public URL of the Grid as a whole (typically the address of the Hub or the Router)
--heartbeat-period
int
60
How often, in seconds, will the Node send heartbeat events to the Distributor to inform it that the Node is up.
--max-sessions
int
8
Maximum number of concurrent sessions. Default value is the number of available processors.
--override-max-sessions
boolean
false
The # of available processors is the recommended max sessions value (1 browser session per processor). Setting this flag to true allows the recommended max value to be overwritten. Session stability and reliability might suffer as the host could run out of resources.
--register-cycle
int
10
How often, in seconds, the Node will try to register itself for the first time to the Distributor.
--register-period
int
120
How long, in seconds, will the Node try to register to the Distributor for the first time. After this period is completed, the Node will not attempt to register again.
--session-timeout
int
300
Let X be the session-timeout in seconds. The Node will automatically kill a session that has not had any activity in the last X seconds. This will release the slot for other tests.
--vnc-env-var
string
START_XVFB
Environment variable to check in order to determine if a vnc stream is available or not.
--no-vnc-port
int
7900
If VNC is available, sets the port where the local noVNC stream can be obtained
--drain-after-session-count
int
1
Drain and shutdown the Node after X sessions have been executed. Useful for environments like Kubernetes. A value higher than zero enables this feature.
--hub
string
http://localhost:4444
The address of the Hub in a Hub-and-Node configuration. Can be a hostname or IP address (hostname), in which case the Hub will be assumed to be http://hostname:4444, the --grid-url will be the same --publish-events will be tcp://hostname:4442 and --subscribe-events will be tcp://hostname:4443. If hostname contains a port number, that will be used for --grid-url but the URIs for the event bus will remain the same. Any of these default values may be overridden but setting the correct flags. If the hostname has a protocol (such as https) that will be used too.
--enable-cdp
boolean
true
Enable CDP proxying in Grid. A Grid admin can disable CDP if the network doesnot allow websockets. True by default.
--enable-managed-downloads
boolean
false
This causes the Node to auto manage files downloaded for a given session on the Node.
--selenium-manager
boolean
false
When drivers are not available on the current system, use Selenium Manager. False by default.
Relay
Opção
Tipo
Valor/Exemplo
Descrição
--service-url
string
http://localhost:4723
URL for connecting to the service that supports WebDriver commands like an Appium server or a cloud service.
--service-host
string
localhost
Host name where the service that supports WebDriver commands is running
--service-port
int
4723
Port where the service that supports WebDriver commands is running
--service-status-endpoint
string
/status
Optional, endpoint to query the WebDriver service status, an HTTP 200 response is expected
Configuration for the service where calls will be relayed to. It is recommended to provide this type of configuration through a toml config file to improve readability.
Router
Opção
Tipo
Valor/Exemplo
Descrição
--password
string
myStrongPassword
Password clients must use to connect to the server. Both this and the username need to be set in order to be used.
--username
string
admin
User name clients must use to connect to the server. Both this and the password need to be set in order to be used.
--sub-path
string
my_company/selenium_grid
A sub-path that should be considered for all user facing routes on the Hub/Router/Standalone.
Server
Opção
Tipo
Valor/Exemplo
Descrição
--allow-cors
boolean
true
Whether the Selenium server should allow web browser connections from any host
--host
string
localhost
Server IP or hostname: usually determined automatically.
--bind-host
boolean
true
Whether the server should bind to the host address/name, or only use it to" report its reachable url. Helpful in complex network topologies where the server cannot report itself with the current IP/hostname but rather an external IP or hostname (e.g. inside a Docker container)
--https-certificate
path
/path/to/cert.pem
Server certificate for https. Get more detailed information by running “java -jar selenium-server.jar info security”
--https-private-key
path
/path/to/key.pkcs8
Private key for https. Get more detailed information by running “java -jar selenium-server.jar info security”
--max-threads
int
24
Maximum number of listener threads. Default value is: (available processors) * 3.
--port
int
4444
Port to listen on. There is no default as this parameter is used by different components, for example, Router/Hub/Standalone will use 4444 and Node will use 5555.
SessionQueue
Opção
Tipo
Valor/Exemplo
Descrição
--sessionqueue
uri
http://localhost:1237
Address of the session queue server.
-sessionqueue-host
string
localhost
Host on which the session queue server is listening.
--sessionqueue-port
int
1234
Port on which the session queue server is listening.
--session-request-timeout
int
300
Timeout in seconds. A new incoming session request is added to the queue. Requests sitting in the queue for longer than the configured time will timeout.
--session-retry-interval
int
5
Retry interval in seconds. If all slots are busy, new session request will be retried after the given interval.
Sessions
Opção
Tipo
Valor/Exemplo
Descrição
--sessions
uri
http://localhost:1234
Address of the session map server.
--sessions-host
string
localhost
Host on which the session map server is listening.
--sessions-port
int
1234
Port on which the session map server is listening.
Configuration examples
All the options mentioned above can be used when starting the Grid components. They are a good
way of exploring the Grid options, and trying out values to find a suitable configuration.
We recommend the use of Toml files to configure a Grid.
Configuration files improve readability, and you can also check them in source control.
When needed, you can combine a Toml file configuration with CLI arguments.
Command-line flags
To pass config options as command-line flags, identify the valid options for the component
and follow the template below.
java -jar selenium-server-<version>.jar <component> --<option> value
The Grid infrastructure will try to match a session request with "se:downloadsEnabled" against ONLY those nodes which were started with --enable-managed-downloads true
If a session is matched, then the Node automatically sets the required capabilities to let the browser know, as to where should a file be downloaded.
The Node now allows a user to:
List all the files that were downloaded for a specific session and
Retrieve a specific file from the list of files.
The directory into which files were downloaded for a specific session gets automatically cleaned up when the session ends (or) timesout due to inactivity.
Note: Currently this capability is ONLY supported on:
Edge
Firefox and
Chrome browser
Listing files that can be downloaded for current session:
The endpoint to GET from is /session/<sessionId>/se/files.
The session needs to be active in order for the command to work.
contents - Base64 encoded zipped contents of the file.
The file contents are Base64 encoded and they need to be unzipped.
List files that can be downloaded
The below mentioned curl example can be used to list all the files that were downloaded by the current session in the Node, and which can be retrieved locally.
curl -X GET "http://localhost:4444/session/90c0149a-2e75-424d-857a-e78734943d4c/se/files"
Below is an example in Java that does the following:
Sets the capability to indicate that the test requires automatic managing of downloaded files.
Triggers a file download via a browser.
Lists the files that are available for retrieval from the remote node (These are essentially files that were downloaded in the current session)
Picks one file and downloads the file from the remote node to the local machine.
importcom.google.common.collect.ImmutableMap;importorg.openqa.selenium.By;importorg.openqa.selenium.io.Zip;importorg.openqa.selenium.json.Json;importorg.openqa.selenium.remote.RemoteWebDriver;importorg.openqa.selenium.remote.http.HttpClient;importorg.openqa.selenium.remote.http.HttpRequest;importorg.openqa.selenium.remote.http.HttpResponse;importjava.io.File;importjava.net.URL;importjava.nio.file.Files;importjava.util.List;importjava.util.Map;importjava.util.Optional;importjava.util.concurrent.TimeUnit;import staticorg.openqa.selenium.remote.http.Contents.asJson;import staticorg.openqa.selenium.remote.http.Contents.string;import staticorg.openqa.selenium.remote.http.HttpMethod.GET;import staticorg.openqa.selenium.remote.http.HttpMethod.POST;publicclassDownloadsSample{publicstaticvoidmain(String[]args)throwsException{// Assuming the Grid is running locally.
URLgridUrl=newURL("http://localhost:4444");ChromeOptionsoptions=newChromeOptions();options.setCapability("se:downloadsEnabled",true);RemoteWebDriverdriver=newRemoteWebDriver(gridUrl,options);try{demoFileDownloads(driver,gridUrl);}finally{driver.quit();}}privatestaticvoiddemoFileDownloads(RemoteWebDriverdriver,URLgridUrl)throwsException{driver.get("https://www.selenium.dev/selenium/web/downloads/download.html");// Download the two available files on the page
driver.findElement(By.id("file-1")).click();driver.findElement(By.id("file-2")).click();// The download happens in a remote Node, which makes it difficult to know when the file
// has been completely downloaded. For demonstration purposes, this example uses a
// 10-second sleep which should be enough time for a file to be downloaded.
// We strongly recommend to avoid hardcoded sleeps, and ideally, to modify your
// application under test, so it offers a way to know when the file has been completely
// downloaded.
TimeUnit.SECONDS.sleep(10);//This is the endpoint which will provide us with list of files to download and also to
//let us download a specific file.
StringdownloadsEndpoint=String.format("/session/%s/se/files",driver.getSessionId());StringfileToDownload;try(HttpClientclient=HttpClient.Factory.createDefault().createClient(gridUrl)){// To list all files that are were downloaded on the remote node for the current session
// we trigger GET request.
HttpRequestrequest=newHttpRequest(GET,downloadsEndpoint);HttpResponseresponse=client.execute(request);Map<String,Object>jsonResponse=newJson().toType(string(response),Json.MAP_TYPE);@SuppressWarnings("unchecked")Map<String,Object>value=(Map<String,Object>)jsonResponse.get("value");@SuppressWarnings("unchecked")List<String>names=(List<String>)value.get("names");// Let's say there were "n" files downloaded for the current session, we would like
// to retrieve ONLY the first file.
fileToDownload=names.get(0);}// Now, let's download the file
try(HttpClientclient=HttpClient.Factory.createDefault().createClient(gridUrl)){// To retrieve a specific file from one or more files that were downloaded by the current session
// on a remote node, we use a POST request.
HttpRequestrequest=newHttpRequest(POST,downloadsEndpoint);request.setContent(asJson(ImmutableMap.of("name",fileToDownload)));HttpResponseresponse=client.execute(request);Map<String,Object>jsonResponse=newJson().toType(string(response),Json.MAP_TYPE);@SuppressWarnings("unchecked")Map<String,Object>value=(Map<String,Object>)jsonResponse.get("value");// The returned map would contain 2 keys,
// filename - This represents the name of the file (same as what was provided by the test)
// contents - Base64 encoded String which contains the zipped file.
StringzippedContents=value.get("contents").toString();// The file contents would always be a zip file and has to be unzipped.
FiledownloadDir=Zip.unzipToTempDir(zippedContents,"download","");// Read the file contents
FiledownloadedFile=Optional.ofNullable(downloadDir.listFiles()).orElse(newFile[]{})[0];StringfileContent=String.join("",Files.readAllLines(downloadedFile.toPath()));System.out.println("The file which was "+"downloaded in the node is now available in the directory: "+downloadDir.getAbsolutePath()+" and has the contents: "+fileContent);}}}
3.4.3 - Toml Options
Grid configuration examples using Toml files.
Page being translated from
English to Portuguese. Do you speak Portuguese? Help us to translate
it by sending us pull requests!
All the options shown in CLI options can be configured through
a TOML file. This page shows configuration examples for the
different Grid components.
Note that this documentation could be outdated if an option was modified or added
but has not been documented yet. In case you bump into this situation, please check
the “Config help” section and feel free to send us a
pull request updating this page.
Overview
Selenium Grid uses TOML format for config files.
The config file consists of sections and each section has options and its respective value(s).
Refer to the TOML documentation for detailed usage guidance. In case of
parsing errors, validate the config using TOML linter.
The general configuration structure has the following pattern:
A Standalone or Node server that is able to run each new session in a Docker container. Disabling
drivers detection, having maximum 2 concurrent sessions. Stereotypes configured need to be mapped
to a Docker image, and the Docker daemon needs to be exposed via http/tcp. In addition, it is
possible to define which device files, accessible on the host, will be available in containers
through the devices property. Refer to the docker documentation
for more information about how docker device mapping works.
[node]detect-drivers=falsemax-sessions=2[docker]configs=["selenium/standalone-chrome:93.0","{\"browserName\": \"chrome\", \"browserVersion\": \"91\"}","selenium/standalone-firefox:92.0","{\"browserName\": \"firefox\", \"browserVersion\": \"92\"}"]#Optionally define all device files that should be mapped to docker containers#devices = [# "/dev/kvm:/dev/kvm"#]url="http://localhost:2375"video-image="selenium/video:latest"
Relaying commands to a service endpoint that supports WebDriver
It is useful to connect an external service that supports WebDriver to Selenium Grid.
An example of such service could be a cloud provider or an Appium server. In this way,
Grid can enable more coverage to platforms and versions not present locally.
The following is an en example of connecting an Appium server to Grid.
[node]detect-drivers=false[relay]# Default Appium/Cloud server endpointurl="http://localhost:4723/wd/hub"status-endpoint="/status"# Stereotypes supported by the service. The initial number is "max-sessions", and will allocate # that many test slots to that particular configurationconfigs=["5","{\"browserName\": \"chrome\", \"platformName\": \"android\", \"appium:platformVersion\": \"11\"}"]
Basic auth enabled
It is possible to protect a Grid with basic auth by configuring the Router/Hub/Standalone with
a username and password. This user/password combination will be needed when loading the Grid UI
or starting a new session.
The Node can be instructed to manage downloads automatically. This will cause the Node to save all files that were downloaded for a particular session into a temp directory, which can later be retrieved from the node.
To turn this capability on, use the below configuration:
A Grid está desenhada como um conjunto de componentes, em que cada tem
o seu papel crucial em manter a Grid. Isto pode parecer um pouco complicado,
mas esperamos que este documento ajude a esclarecer alguma confusão.
Os componentes chave
Os componentes principais da Grid são:
Event Bus
Usado para enviar mensagens que podem ser recebidas de forma assíncrona
entre os outros componentes.
New Session Queue
Mantém uma lista de pedidos de sessão que serão assignadas a um Node
pelo Distributor.
Distributor
Responsável por manter um modelo das localizações da Grid (slots) onde uma
sessão pode ser lançada e também por aceitar novos
pedidos de sessão
e assignar a um slot livre.
Node
Executa uma sessão WebDriver. Cada sessão é assignada a um slot e cada Node tem
um ou mais slots.
Session Map
Mantém um mapeamento entre um ID de sessão
e o endereço do Node onde a sessão está a ser executada.
Router
Este é o ponto de entrada da Grid. É também a única parte da Grid
que poderá estar exposta à Internet (embora nós não recomendemos).
Este componente reencaminha novos pedidos para New Session Queue ou
para o Node onde a sessão esteja a ser executada
Ao falar da Grid, há alguns conceitos úteis a ter em mente:
Um slot é o sítio onde uma sessão pode ser executada
Cada slot tem um stereotype. Isto é um conjunto mínimo de capacidades
que um pedido de nova sessão terá que corresponder antes que o
Distributor envie esse pedido ao Node que tenha esse slot
O Grid Model é como o Distributor mantém o estado actual da Grid.
Como o nome sugere, este modelo pode perder o sincronismo com a realidade.
Este mecanismo é preferível do que estar a questionar cada Node, e
desta forma, o Distributor rapidamente consegue alocar uma nova sessão a um slot.
Chamadas Síncronas e Assíncronas
Existem duas formas de comunicação dentro da Grid:
Chamadas Síncronas “REST-ish” que usam JSON sobre pedidos HTTP.
Eventos Assíncronos enviados para o Event Bus.
Como é que escolhemos que tipo de mecanismo de comunicação a usar?
Afinal, podiamos ter escolhido usar apenas comunicação baseada em eventos
e tudo iria funcionar sem problemas.
No entanto a resposta correcta é, se a acção em curso é síncrona, por exemplo
a maioria das chamadas WebDriver, ou se perder uma resposta é problemático,
a Grid usa chamadas síncronas. Se quisermos propagar informação que pode ter
várias partes interessadas, ou se perder a mensagem não for crítico,
a Grid usará o event bus.
Um facto interessante a notar é que as chamadas assíncronas estão menos
“presas” aos processos que as executam do que todas as chamadas síncronas.
Sequência de início e dependencias entre componentes
Embora a Grid seja desenhada para permitir que os componentes possam iniciar
em qualquer ordem, conceptualmente é esperado que a ordem de início seja:
O Event Bus e o Session Map iniciam primeiro. Estes componentes não tem qualquer
dependencia, nem mesmo entre eles e como tal, podem iniciar em paralelo.
A Session Queue inicia de seguida
O Distributor inicia. Irá periodicamente procurar novos pedidos de sessão
na Session Queue, embora possa também receber um evento de um pedidos de sessão.
O Router pode ser agora iniciado. Novos pedidos de sessão são direccionados para
a Session Queue, o Distributor tentará encontrar um slot onde a sessão possa ser
executada.
O Node pode ser iniciado, veja mais abaixo os detalhes de como o Node se
regista na Grid. Uma vez que o registo esteja concluído, a Grid estará
pronta a receber pedidos.
Nesta tabela pode ser visualizada a dependencia ente os vários componentes.
Um “✅” indica que a dependência é síncrona.
Event Bus
Distributor
Node
Router
Session Map
Session Queue
Event Bus
X
Distributor
✅
X
✅
✅
Node
✅
X
Router
✅
X
✅
Session Map
X
Session Queue
✅
X
Registo de Node
O processo de registar um Node na Grid é um processo “leve”.
Quando um Node inicia, vai publicar um evento “heart beat” numa
base regular. Este evento contém o estado do Node.
O Distributor escuta os eventos “heart beat” e quando obtém um,
tenta um GET ao endpoint /status do Node. A Grid é
preparada com base nesta informação.
O Distributor irá usar regularmente o endpoint /status para continuar
a obter o estado do Node. Por seu lado, o Node continua a publicar um
evento “heart beat” mesmo depois do registo ter sido concluído com
sucesso.
Isto é feito para que mesmo que um Distributor não tenha um estado
da Grid possa reiniciar e assim obter novamente uma visão do estado
da Grid e assim ficar actualizado.
Objecto Node Status
O Node Status é um blob JSON com os seguintes campos:
Nome
Tipo
Descrição
availability
string
Uma string com up, draining, ou down. A mais importante é draining, que indica que não devem ser enviados novos pedidos de sessão para o Node e assim que a última sessão termine, o Node irá reiniciar ou concluir.
externalUrl
string
Uma URI que os outros componentes da Grid se devem ligar.
lastSessionCreated
integer
Um timestamp da última sessão que foi criada neste Node. O Distributor irá tentar enviar novos pedidos de sessão para o Node que esteja parado há mais tempo.
maxSessionCount
integer
Embora seja possível inferir o número máximo de sessões a partir da lista de slots disponíveis, este número é usado para determinar qual é o máximo de sessões que este Node pode executar em simultâneo antes que se considere que está “cheio”.
nodeId
string
Um identificador UUID para esta instância do Node.
osInfo
object
Um objecto contendo os campos arch, name, e version. Isto é usado pela Grid UI e pelas queries GraphQL.
slots
array
Um array de objectos Slot (descritos na secção seguinte)
version
string
A versão do Node (para Selenium, será igual à versão do Selenium)
É recomendado que todos os campos tenham valores.
O Objecto Slot
O objecto Slot representa um slot dentro de um Node. Um “slot” é onde uma sessão consegue ser executada. É possível que um Node tenha mais do que um Slot capaz de executar ao mesmo tempo.
Por exemplo, um Node pode ser capaz de executar até 10 sessões em simultâneo, mas podem ser uma qualquer combinação de Chrome, Firefox ou Edge e neste caso, o Node irá indicar 10 como o
número máximo de sessões, indicando que podem ser 10 Chrome, 10 Firefox e 10 Edge.
Nome
Tipo
Descrição
id
string
Um identificador UUID para este slot
lastStarted
string
timestamp no formato ISO-8601 contendo a data em que a última sessão iniciou
stereotype
object
Conjunto mínimo de capacidades que fazem match com este slot. O exemplo mínimo será por exemplo {"browserName": "firefox"}
session
object
O objecto Session (descrito na secção seguinte)
O Objecto Session
Representa uma sessão em execução dentro de um Slot
Nome
Tipo
Descrição
capabilities
object
A lista de capacidades fornecidas pela sessão. Irá coincidir com o valor obtido pelo comando nova sessão
startTime
string
timestamp no formato ISO-8601 contendo a data em que a última sessão iniciou
stereotype
object
Conjunto mínimo de capacidades que fazem match com este slot. O exemplo mínimo será por exemplo {"browserName": "firefox"}
uri
string
A URI usada pelo Node para comunicar com a sessão
3.6 - Características avançadas
Para obter todos os detalhes dos recursos avançados, entenda como funciona e como configurar crie o seu próprio, navegue pelas seções a seguir.
O Grid auxilia na escalabilidade e distribuição de testes, executando testes em várias combinações de navegadores e sistemas operacionais.
Observabilidade
A observabilidade tem três pilares: rastreamentos, métricas e registros. Como o Selenium Grid 4 foi projetado para ser totalmente distribuído, a observabilidade tornará mais fácil entender e depurar os detalhes internos.
Rastreamento Distribuído
Uma única solicitação ou transação abrange vários serviços e componentes. O rastreamento acompanha o ciclo de vida da solicitação à medida que cada serviço a executa. Isso é útil para depurar cenários de erro.
Alguns termos-chave usados no contexto de rastreamento são:
Rastreamento
O rastreamento permite rastrear uma solicitação por meio de vários serviços, desde sua origem até seu destino final. A jornada dessa solicitação ajuda na depuração, no monitoramento do fluxo de ponta a ponta e na identificação de falhas. Um rastreamento representa o fluxo da solicitação de ponta a ponta. Cada rastreamento possui um identificador único.
Segmento
Cada rastreamento é composto por operações cronometradas chamadas segmentos. Um segmento possui um horário de início e término e representa operações realizadas por um serviço. A granularidade do segmento depende de como ele é instrumentado. Cada segmento possui um identificador único. Todos os segmentos dentro de um rastreamento têm o mesmo ID de rastreamento.
Atributos de Segmento
Atributos de segmento são pares de chave e valor que fornecem informações adicionais sobre cada segmento.
Eventos
Eventos são registros com carimbo de data/hora dentro de um segmento. Eles fornecem contexto adicional para os segmentos existentes. Os eventos também contêm pares de chave e valor como atributos de evento.
Registro de Eventos
O registro é essencial para depurar um aplicativo. O registro é frequentemente feito em um formato legível por humanos. Mas, para que as máquinas possam pesquisar e analisar os registros, é necessário ter um formato bem definido. O registro estruturado é uma prática comum de registrar logs de forma consistente em um formato fixo. Ele normalmente contém campos como:
Carimbo de data/horas
Nível de registro
Classe de registro
Mensagem de registro (isso é detalhado em campos relevantes à operação em que o registro foi feito)
Registros e eventos estão intimamente relacionados. Os eventos encapsulam todas as informações possíveis para realizar uma única unidade de trabalho. Os registros são essencialmente subconjuntos de um evento. No cerne, ambos auxiliam na depuração.
Consulte os recursos a seguir para entender em detalhes:
O servidor Selenium é instrumentado com rastreamento usando o OpenTelemetry. Cada solicitação ao servidor é rastreada do início ao fim. Cada rastreamento consiste em uma série de segmentos à medida que uma solicitação é executada no servidor. A maioria dos segmentos no servidor Selenium consiste em dois eventos:
Evento normal - registra todas as informações sobre uma unidade de trabalho e marca a conclusão bem-sucedida do trabalho.
Evento de erro - registra todas as informações até que ocorra o erro e, em seguida, registra as informações do erro. Marca um evento de exceção.
Todos os segmentos, eventos e seus respectivos atributos fazem parte de um rastreamento. O rastreamento funciona enquanto o servidor é executado em todos os modos mencionados acima.
Por padrão, o rastreamento está habilitado no servidor Selenium. O servidor Selenium exporta os rastreamentos por meio de dois exportadores:
Console - Registra todos os rastreamentos e os segmentos incluídos com nível FINE. Por padrão, o servidor Selenium imprime registros no nível INFO e acima.
A opção log-level pode ser usada para definir um nível de registro de sua escolha ao executar o arquivo JAR do Selenium Grid jar/s.
java -jar selenium-server-4.0.0-<selenium-version>.jar standalone --log-level FINE
Jaeger UI - OpenTelemetry fornece as APIs e SDKs para instrumentar rastreamentos no código. Enquanto o Jaeger é um sistema de rastreamento de backend que auxilia na coleta de dados de telemetria de rastreamento e oferece recursos de consulta, filtragem e visualização dos dados.
Instruções detalhadas sobre como visualizar rastreamentos usando a interface do Jaeger podem ser obtidas executando o seguinte comando:
java -jar selenium-server-4.0.0-<selenium-version>.jar info tracing
O rastreamento deve estar habilitado para o registro de eventos, mesmo que alguém não deseje exportar rastreamentos para visualizá-los.
Por padrão, o rastreamento está habilitado. Não é necessário passar parâmetros adicionais para ver os logs no console.
Todos os eventos dentro de um segmento são registrados no nível FINE. Eventos de erro são registrados no nível WARN..
Campo
Valor do Campo
Descrição
Hora do Evento
eventId
Carimbo de data/hora do registro do evento em nanossegundos desde a época.
ID de Rastreamento
tracedId
Cada rastreamento é identificado exclusivamente por um ID de rastreamento.
ID de Segmento
spanId
Cada segmento dentro de um rastreamento é identificado exclusivamente por um ID de segmento.
Tipo de Segmento
spanKind
O tipo de segmento é uma propriedade do segmento que indica o tipo de segmento. Isso ajuda a entender a natureza da unidade de trabalho realizada pelo segmento.
Nome do Evento
eventName
Isso mapeia para a mensagem de registro.
Atributos do Evento
eventAttributes
Isso forma a essência dos registros de eventos, com base na operação executada, ele contém pares chave-valor formatados em JSON. Isso também inclui um atributo de classe do manipulador, para mostrar a classe do registro.
GraphQL é uma linguagem de consulta para APIs e um runtime para atender a essas consultas com seus dados existentes. Ele dá aos usuários o poder de pedir exatamente o que precisam e nada mais.
Enums
Enums representam possíveis conjuntos de valores para um campo.
Por exemplo, o objeto Node possui um campo chamado status. O estado é um enum (especificamente, do tipo Status) porque pode ser UP, DRAINING ou UNAVAILABLE.
Escalares
Escalares são valores primitivos: Int, Float, String, Boolean ou ID.
Ao chamar a API GraphQL, você deve especificar o subcampo aninhado até retornar apenas escalares.
O melhor jeito de consultar GraphQL é utilizando requisições curl. GraphQL permite que você busque apenas os dados que você quer, nada mais, anda menos.
Alguns exemplos de buscas em GraphQL estão abaixo. Você pode montar as queries como quiser.
Buscando o número total de slots (maxSession) e slots usados (sessionCount) na Grid:
O status da Grid fornece o estado atual da grid. Consiste em detalhes sobre cada nó registrado.
Para cada nó, o status inclui informações sobre a disponibilidade, sessões e slots do nó.
cURL GET 'http://localhost:4444/status'
No modo Standalone, o URL da Grid é o endereço do servidor Standalone.
No modo Hub-Node, a URL da Grid é o endereço do servidor Hub.
No modo totalmente distribuído, a URL da Grid é o endereço do servidor do roteador.
A URL padrão para todos os modos acima é http://localhost:4444.
Distribuidor
Remover Nó
Para remover o Nó da Grid, use o comando cURL listado abaixo.
Ele não interrompe nenhuma sessão em andamento em execução nesse nó.
O Node continua rodando como está, a menos que seja explicitamente eliminado.
O Distribuidor não está mais ciente do Nó e, portanto, qualquer solicitação de nova sessão correspondente
não será encaminhado para esse Nó.
No modo Standalone, a URL do distribuidor é o endereço do servidor Standalone.
No modo Hub-Node, a URL do Distribuidor é o endereço do servidor Hub.
O comando de drenagem de nó é para desligamento normal de nó.
A drenagem para o Node após a conclusão de todas as sessões em andamento.
No entanto, ele não aceita novas solicitações de sessão.
No modo Standalone, a URL do distribuidor é o endereço do servidor Standalone.
No modo Hub-Node, a URL do Distribuidor é o endereço do servidor Hub.
cURL --request POST 'http://localhost:4444/se/grid/distributor/node/<node-id>/drain' --header 'X-REGISTRATION-SECRET: <secret> '
No modo totalmente distribuído, a URL é o endereço do servidor Distribuidor.
cURL --request POST 'http://localhost:5553/se/grid/distributor/node/<node-id>/drain' --header 'X-REGISTRATION-SECRET: <secret>'
Se nenhum segredo de registro foi configurado durante a configuração da Grid, use
cURL --request POST 'http://<Distributor-URL>/se/grid/distributor/node/<node-id>/drain' --header 'X-REGISTRATION-SECRET;'
Nó
Os terminais nesta seção são aplicáveis ao modo Hub-Node e ao modo Grid totalmente distribuída, onde o Nó é executado de forma independente.
A URL do Nó padrão é http://localhost:5555 no caso de um Nó.
No caso de vários Nós, use Grid status para obter todos os detalhes do Nó e localizar o endereço do Nó.
Status
O status do Nó é essencialmente uma verificação de integridade do Nó.
O distribuidor executa ping no status do Nó em intervalos regulares e atualiza o modelo de Grid de acordo.
O status inclui informações sobre disponibilidade, sessões e slots.
cURL --request GET 'http://localhost:5555/status'
Drenagem
O Distribuidor passa o comando [drain](# drain-node) para o Nó apropriado identificado pelo ID do Nó.
Para drenar o Nó diretamente, use o comando cuRL listado abaixo.
Ambos as rotas são válidas e produzem o mesmo resultado. Drenar termina as sessões em andamento antes de interromper o Nó.
cURL --request POST 'http://localhost:5555/se/grid/node/drain' --header 'X-REGISTRATION-SECRET: <secret>'
Se nenhum segredo de registro foi configurado durante a configuração da Grid, use
cURL --request POST 'http://<node-URL>/se/grid/node/drain' --header 'X-REGISTRATION-SECRET;'
Checar dono da sessão
Para verificar se uma sessão pertence a um Nó, use o comando cURL listado abaixo.
cURL --request GET 'http://localhost:5555/se/grid/node/owner/<session-id>' --header 'X-REGISTRATION-SECRET: <secret>'
Se nenhum segredo de registro foi configurado durante a configuração da Grid, use
cURL --request GET 'http://<node-URL>/se/grid/node/owner/<session-id>' --header 'X-REGISTRATION-SECRET;'
Ele retornará true se a sessão pertencer ao Nó, caso contrário, retornará false.
Deletar sessão
A exclusão da sessão encerra a sessão do WebDriver, fecha o driver e o remove do mapa de sessões ativas.
Qualquer solicitação usando o id de sessão removido ou reutilizando a instância do driver gerará um erro.
A Fila de Sessão contém as novas solicitações de sessão.
Para limpar a fila, use o comando cURL listado abaixo.
Limpar a fila rejeita todas as solicitações na fila. Para cada solicitação, o servidor retorna uma resposta de erro ao respectivo cliente.
O resultado do comando clear é o número total de solicitações excluídas.
No modo Standalone, a URL Queue é o endereço do servidor Standalone.
No modo Hub-Node, a URL do enfileirador é o endereço do servidor Hub.
Novos pedidos da Fila de Sessão contém os novos pedidos de sessão.
Para obter os pedidos na Fila, utiliza o comando cURL listado abaixo.
É retornado o número total de pedidos na Fila.
No modo Standalone, a URL é a do servidor, em modo Grid, a URL será a do HUB.
cURL --request GET 'http://localhost:4444/se/grid/newsessionqueue/queue'
No modo totalmente distribuido, a URL da Fila é a porta do servidor de Fila.
cURL --request GET 'http://localhost:5559/se/grid/newsessionqueue/queue'
3.6.4 - Personalizando um Nó
Como personalizar um Nó
Há momentos em que gostaríamos de personalizar um Nó de acordo com nossas necessidades.
Por exemplo, podemos desejar fazer alguma configuração adicional antes que uma sessão comece a ser executada e executar alguma limpeza após o término de uma sessão.
Os seguintes passos podem ser seguidos para isso:
Crie uma classe que estenda org.openqa.selenium.grid.node.Node.
Adicione um método estático (este será nosso método de fábrica) à classe recém-criada, cuja assinatura se parece com esta:
public static Node create(Config config). Here:
Node é do tipo org.openqa.selenium.grid.node.Node
Config é do tipo org.openqa.selenium.grid.config.Config
Dentro deste método de fábrica, inclua a lógica para criar sua nova classe..
TPara incorporar esta nova lógica personalizada no hub, inicie o nó e passe o nome da classe totalmente qualificado da classe acima como argumento. --node-implementation
Vamos ver um exemplo de tudo isso:
Node personalizado como um uber jar
Crie um projeto de exemplo usando sua ferramenta de construção favorita. (Maven|Gradle).
Adicione a seguinte dependência ao seu projeto de exemplo..
Observação: Se estiver usando o Maven como ferramenta de construção, é preferível usar o maven-shade-plugin em vez do maven-assembly-plugin porque o plugin maven-assembly parece ter problemas para mesclar vários arquivos de Service Provider Interface (META-INF/services).
Node personalizado como jar
Crie um projeto de exemplo usando a sua ferramenta de construção favorita (Maven|Gradle).
Adicione a seguinte dependência ao seu projeto de exemplo:
Aqui está um exemplo que apenas imprime algumas mensagens no console sempre que houver uma atividade de interesse (sessão criada, sessão excluída, execução de um comando do webdriver, etc.) no Node.
Sample customized node
packageorg.seleniumhq.samples;importjava.net.URI;importjava.util.UUID;importorg.openqa.selenium.Capabilities;importorg.openqa.selenium.NoSuchSessionException;importorg.openqa.selenium.WebDriverException;importorg.openqa.selenium.grid.config.Config;importorg.openqa.selenium.grid.data.CreateSessionRequest;importorg.openqa.selenium.grid.data.CreateSessionResponse;importorg.openqa.selenium.grid.data.NodeId;importorg.openqa.selenium.grid.data.NodeStatus;importorg.openqa.selenium.grid.data.Session;importorg.openqa.selenium.grid.log.LoggingOptions;importorg.openqa.selenium.grid.node.HealthCheck;importorg.openqa.selenium.grid.node.Node;importorg.openqa.selenium.grid.node.local.LocalNodeFactory;importorg.openqa.selenium.grid.security.Secret;importorg.openqa.selenium.grid.security.SecretOptions;importorg.openqa.selenium.grid.server.BaseServerOptions;importorg.openqa.selenium.internal.Either;importorg.openqa.selenium.remote.SessionId;importorg.openqa.selenium.remote.http.HttpRequest;importorg.openqa.selenium.remote.http.HttpResponse;importorg.openqa.selenium.remote.tracing.Tracer;publicclassDecoratedLoggingNodeextendsNode{privateNodenode;protectedDecoratedLoggingNode(Tracertracer,URIuri,SecretregistrationSecret){super(tracer,newNodeId(UUID.randomUUID()),uri,registrationSecret);}publicstaticNodecreate(Configconfig){LoggingOptionsloggingOptions=newLoggingOptions(config);BaseServerOptionsserverOptions=newBaseServerOptions(config);URIuri=serverOptions.getExternalUri();SecretOptionssecretOptions=newSecretOptions(config);// Refer to the foot notes for additional context on this line.
Nodenode=LocalNodeFactory.create(config);DecoratedLoggingNodewrapper=newDecoratedLoggingNode(loggingOptions.getTracer(),uri,secretOptions.getRegistrationSecret());wrapper.node=node;returnwrapper;}@OverridepublicEither<WebDriverException,CreateSessionResponse>newSession(CreateSessionRequestsessionRequest){System.out.println("Before newSession()");try{returnthis.node.newSession(sessionRequest);}finally{System.out.println("After newSession()");}}@OverridepublicHttpResponseexecuteWebDriverCommand(HttpRequestreq){try{System.out.println("Before executeWebDriverCommand(): "+req.getUri());returnnode.executeWebDriverCommand(req);}finally{System.out.println("After executeWebDriverCommand()");}}@OverridepublicSessiongetSession(SessionIdid)throwsNoSuchSessionException{try{System.out.println("Before getSession()");returnnode.getSession(id);}finally{System.out.println("After getSession()");}}@OverridepublicHttpResponseuploadFile(HttpRequestreq,SessionIdid){try{System.out.println("Before uploadFile()");returnnode.uploadFile(req,id);}finally{System.out.println("After uploadFile()");}}@Overridepublicvoidstop(SessionIdid)throwsNoSuchSessionException{try{System.out.println("Before stop()");node.stop(id);}finally{System.out.println("After stop()");}}@OverridepublicbooleanisSessionOwner(SessionIdid){try{System.out.println("Before isSessionOwner()");returnnode.isSessionOwner(id);}finally{System.out.println("After isSessionOwner()");}}@OverridepublicbooleanisSupporting(Capabilitiescapabilities){try{System.out.println("Before isSupporting");returnnode.isSupporting(capabilities);}finally{System.out.println("After isSupporting()");}}@OverridepublicNodeStatusgetStatus(){try{System.out.println("Before getStatus()");returnnode.getStatus();}finally{System.out.println("After getStatus()");}}@OverridepublicHealthCheckgetHealthCheck(){try{System.out.println("Before getHealthCheck()");returnnode.getHealthCheck();}finally{System.out.println("After getHealthCheck()");}}@Overridepublicvoiddrain(){try{System.out.println("Before drain()");node.drain();}finally{System.out.println("After drain()");}}@OverridepublicbooleanisReady(){try{System.out.println("Before isReady()");returnnode.isReady();}finally{System.out.println("After isReady()");}}}
Notas de Rodapé:
No exemplo acima, a linha Node node = LocalNodeFactory.create(config); cria explicitamente um LocalNode.
Basicamente, existem 2 tipos de implementações visíveis para o usuário de org.openqa.selenium.grid.node.Node disponíveis.
Essas classes são bons pontos de partida para aprender como criar um Node personalizado e também para compreender os detalhes internos de um Node.
org.openqa.selenium.grid.node.local.LocalNode - Usado para representar um Node de execução contínua e é a implementação padrão que é usada quando você inicia um node.
Pode ser criado chamando LocalNodeFactory.create(config);, onde:
LocalNodeFactory pertence a org.openqa.selenium.grid.node.local
Config pertence a org.openqa.selenium.grid.config
org.openqa.selenium.grid.node.k8s.OneShotNode - Esta é uma implementação de referência especial em que o Node encerra-se graciosamente após atender a uma sessão de teste. Esta classe atualmente não está disponível como parte de nenhum artefato Maven pré-construído.
Você pode consultar o código-fonte aqui para entender seus detalhes internos.
Selenium Grid allows you to persist information related to currently running sessions into an external data store.
The external data store could be backed by your favourite database (or) Redis Cache system.
Setup
Coursier - As a dependency resolver, so that we can download maven artifacts on the fly and make them available in our classpath
Docker - To manage our PostGreSQL/Redis docker containers.
Database backed Session Map
For the sake of this illustration, we are going to work with PostGreSQL database.
We will spin off a PostGreSQL database as a docker container using a docker compose file.
Steps
You can skip this step if you already have a PostGreSQL database instance available at your disposal.
Create a sql file named init.sql with the below contents:
We can now start our database container by running:
docker-compose up -d
Our database name is selenium_sessions with its username and password set to seluser
If you are working with an already running PostGreSQL DB instance, then you just need to create a database named selenium_sessions and the table sessions_map using the above mentioned SQL statement.
Create a Selenium Grid configuration file named sessions.toml with the below contents:
At this point the current directory should contain the following files:
docker-compose.yml
init.sql
sessions.toml
distributed.sh
You can now spawn the Grid by running distributed.sh shell script and quickly run a test. You will notice that the Grid now stores session information into the PostGreSQL database.
In the line which spawns a SessionMap on a machine:
At this point the current directory should contain the following files:
docker-compose.yml
sessions.toml
distributed.sh
You can now spawn the Grid by running distributed.sh shell script and quickly run a test. You will notice that the Grid now stores session information into the Redis instance. You can perhaps make use of a Redis GUI such as TablePlus to see them (Make sure that you have setup a debug point in your test, because the values will get deleted as soon as the test runs to completion).
In the line which spawns a SessionMap on a machine:
sessions.toml is the configuration file that we created earlier.
4 - Servidor de drivers do IE
O Internet Explorer Driver é um servidor autónomo que implementa a especificação WebDriver.
Esta documentação estava anteriormente localizada on the wiki
O InternetExplorerDriver é um servidor autónomo que implementa o protocolo wire do WebDriver.
Este driver foi testado com o IE 11 e no Windows 10. Ele pode funcionar com versões mais antigas
do IE e do Windows, mas isso não é suportado.
O controlador suporta a execução de versões de 32 e 64 bits do browser. A escolha de como
determinar qual o “bit-ness” a utilizar no lançamento do browser depende de qual a versão do
IEDriverServer.exe é lançada. Se a versão de 32 bits do IEDriverServer.exe for iniciada,
a versão de 32 bits do IE será iniciada. Da mesma forma, se a versão de 64 bits do
IEDriverServer.exe for iniciada, a versão de 64 bits do IE será iniciada.
Instalação
Não é necessário executar um instalador antes de usar o InternetExplorerDriver, embora seja necessária alguma
configuração seja necessária. O executável do servidor standalone deve ser baixado da página
da página Downloads e colocado no seu
PATH.
Pros
Funciona num browser real e suporta JavaScript
Cons
Obviamente, o InternetExplorerDriver só funciona no Windows!
Comparativamente lento (embora ainda bastante rápido :)
Command-Line Switches
Como um executável autónomo, o comportamento do controlador IE pode ser modificado através de vários
argumentos de linha de comando. Para definir o valor destes argumentos da linha de comandos, deve
consultar a documentação do language binding que está a utilizar. As opções de linha de comando
suportadas são descritas na tabela abaixo. Todas as opções -<switch>, –<switch>
e /<switch> são suportados.
Switch
Significado
Especifica a porta na qual o servidor HTTP do driver IE escutará os comandos das associações de idioma. O padrão é 5555.
Especifica o endereço IP do adaptador de anfitrião no qual o servidor HTTP do controlador IE irá escutar os comandos das Language Bindings. O padrão é 127.0.0.1.
–log-level=<logLevel>
Especifica o nível em que as mensagens de registo são emitidas. Os valores válidos são FATAL, ERROR, WARN, INFO, DEBUG e TRACE. O padrão é FATAL.
–log-file=<logFile>
Especifica o caminho completo e o nome do arquivo de log. O padrão é stdout.
–extract-path=<path>
Especifica o caminho completo para o diretório usado para extrair arquivos de suporte usados pelo servidor. O padrão é o diretório TEMP se não for especificado.
–silent
Suprime a saída de diagnóstico quando o servidor é iniciado.
Propriedades importantes do sistema
As seguintes propriedades do sistema (lidas usando System.getProperty() e definidas usando
System.setProperty() no código Java ou o sinalizador de linha de comando “-DpropertyName=value”)
são utilizados pelo InternetExplorerDriver:
Propriedade
O que significa
webdriver.ie.driver
A localização do binário do driver do IE.
Especifica o endereço IP do adaptador do host no qual o driver do IE escutará.
Especifica o nível em que as mensagens de registo são emitidas. Os valores válidos são FATAL, ERROR, WARN, INFO, DEBUG e TRACE. O padrão é FATAL.
Especifica o caminho completo e o nome do arquivo de log.
webdriver.ie.driver.silent
Suprime a saída de diagnóstico quando o driver do IE é iniciado.
Especifica o caminho completo para o diretório usado para extrair arquivos de suporte usados pelo servidor. O padrão é o diretório TEMP se não for especificado.
Configuração Necessária
O executável IEDriverServer deve ser descarregado e colocado no seu PATH.
No IE 7 ou superior no Windows Vista, Windows 7 ou Windows 10, você deve definir as configurações do Modo Protegido para cada zona com o mesmo valor. O valor pode ser ligado ou desligado, desde que seja o mesmo para todas as zonas. Para definir as definições do Modo Protegido, escolha “Opções da Internet…” no menu Ferramentas e clique no separador Segurança. Para cada zona, existe uma caixa de verificação na parte inferior do separador com a designação “Ativar Modo Protegido”.
Além disso, o “Modo Protegido Avançado” deve ser desativado para o IE 10 e superior. Esta opção encontra-se no separador Avançadas da caixa de diálogo Opções da Internet.
O nível de zoom do navegador deve ser definido para 100% para que os eventos nativos do rato possam ser definidos para as coordenadas correctas.
Para o Windows 10, também é necessário definir “Alterar o tamanho do texto, das aplicações e de outros itens” para 100% nas definições de visualização.
Para o IE 11 apenas, terá de definir uma entrada de registo no computador de destino para que o controlador possa manter uma ligação à instância do Internet Explorer que cria. Para instalações Windows de 32 bits, a chave que deve examinar no editor de registo é HKEY_LOCAL_MACHINE\SOFTWARE\Microsoft\Internet Explorer\Main\FeatureControl\FEATURE_BFCACHE. Para instalações do Windows de 64 bits, a chave é HKEY_LOCAL_MACHINE\SOFTWARE\Wow6432Node\Microsoft\Internet Explorer\Main\FeatureControl\FEATURE_BFCACHE. Tenha em atenção que a subchave FEATURE_BFCACHE pode ou não estar presente, e deve ser criada se não estiver presente. Importante: Dentro desta chave, crie um valor DWORD chamado iexplore.exe com o valor 0.
Eventos Nativos e Internet Explorer
Como o InternetExplorerDriver é apenas para Windows, ele tenta usar os chamados eventos “nativos”, ou de nível de SO
para executar operações de mouse e teclado no navegador. Isto está em contraste com o uso de
eventos JavaScript simulados para as mesmas operações. A vantagem de usar eventos nativos é que
não depende da sandbox do JavaScript e garante a propagação adequada de eventos JavaScript
dentro do navegador. No entanto, existem atualmente alguns problemas com eventos de rato quando a janela do browser IE
não tem foco, e quando se tenta passar o mouse sobre elementos.
Foco no navegador
O desafio é que o próprio IE parece não respeitar totalmente as mensagens do Windows que enviamos para a
janela do navegador IE (WM\_MOUSEDOWN e WM\_MOUSEUP) se a janela não tiver o foco.
Especificamente, o elemento que está sendo clicado receberá uma janela de foco em torno dele, mas o clique
não será processado pelo elemento. Provavelmente, nós não deveríamos estar enviando mensagens; ao invés disso,
deveríamos estar usando a API SendInput(), mas essa API requer explicitamente que a janela tenha o
foco. Nós temos dois objetivos conflitantes com o projeto WebDriver.
Primeiro, nós nos esforçamos para emular o usuário o mais próximo possível. Isso significa usar eventos nativos
em vez de simular os eventos usando JavaScript.
Em segundo lugar, queremos não exigir o foco da janela do browser que está a ser automatizada. Isto significa que
apenas forçar a janela do navegador para o primeiro plano é subótimo.
Uma consideração adicional é a possibilidade de várias instâncias do IE serem executadas em várias instâncias do
instâncias do WebDriver, o que significa que qualquer solução do tipo “trazer a janela para o primeiro plano” terá
terá que ser envolvida em algum tipo de construção de sincronização (mutex?) dentro do código C++ do driver do IE.
código C++ do driver do IE. Mesmo assim, esse código ainda estará sujeito a condições de corrida, se, por exemplo, o
utilizador colocar outra janela em primeiro plano entre o driver colocar o IE em primeiro plano
e a execução do evento nativo.
A discussão sobre os requisitos do controlador e a forma de dar prioridade a estes dois objectivos
objectivos contraditórios está em curso. A sabedoria predominante atual é dar prioridade ao primeiro em detrimento do segundo e documentar que a sua máquina
o segundo, e documentar que sua máquina ficará indisponível para outras tarefas ao usar
o driver do IE. No entanto, essa decisão está longe de ser finalizada, e o código para implementá-la é
provavelmente será bastante complicado.
Passar o rato sobre elementos
Quando você tenta passar o mouse sobre elementos e o cursor físico do mouse está dentro dos limites
da janela do navegador IE, o hover não funcionará. Mais especificamente, o hover parecerá
funcionar por uma fração de segundo, e então o elemento voltará ao seu estado anterior.
anterior. A teoria prevalecente sobre o motivo pelo qual isso ocorre é que o IE está fazendo algum tipo de teste de acerto
durante o seu ciclo de eventos, o que faz com que responda à posição física do rato quando o
quando o cursor físico está dentro dos limites da janela. A equipa de desenvolvimento do WebDriver não conseguiu
de descobrir uma solução alternativa para esse comportamento do IE.
Clicando em elementos <option> ou enviando formulários e alert()
Há dois lugares onde o driver do IE não interage com elementos usando eventos nativos
Isso ocorre ao clicar em elementos <option> dentro de um elemento <select>. Sob circunstâncias normais,
o driver do IE calcula onde clicar com base na posição e tamanho do elemento, normalmente
conforme retornado pelo método JavaScript getBoundingClientRect(). No entanto, para elementos <option>,
getBoundingClientRect() retorna um retângulo com posição zero e tamanho zero. O driver do IE
lida com esse cenário usando o Automation Atom click(), que essencialmente define
a propriedade .selected do elemento e simula o evento onChange em JavaScript.
No entanto, isso significa que se o evento onChange do elemento <select> contiver JavaScript
código que chama alert(), confirm() ou prompt(), chamar o método click() do WebElement irá
aguarde até que a caixa de diálogo modal seja descartada manualmente. Não há solução alternativa conhecida para esse comportamento usando apenas o código WebDriver.
Da mesma forma, há alguns cenários em que a submissão de um formulário HTML através do método submit() do WebElement pode ter o mesmo efeito.
do WebElement pode ter o mesmo efeito. Isso pode acontecer se o driver chamar a função JavaScript submit()
do JavaScript no formulário, e houver um manipulador de eventos onSubmit que chame o método JavaScript alert(),
confirm(), ou prompt() do JavaScript.
Esta restrição está registada como problema 3508 (no Google Code).
Múltiplas instâncias do InternetExplorerDriver
Com a criação do IEDriverServer.exe, deve ser possível criar e utilizar múltiplas instâncias simultâneas do InternetExplorerDriver.
instâncias simultâneas do InternetExplorerDriver. Entretanto, esta funcionalidade ainda não foi
não foi testada, e pode haver problemas com cookies, foco de janela, e coisas do tipo. Se você tentar
utilizar múltiplas instâncias do driver do IE, e se deparar com tais problemas, considere utilizar o
RemoteWebDriver e máquinas virtuais.
Existem 2 soluções para o problema dos cookies (e outros itens de sessão) partilhados entre
várias instâncias do InternetExplorer.
A primeira é iniciar o InternetExplorer em modo privado. Depois disso, o InternetExplorer será
iniciado com dados de sessão limpos e não guardará os dados de sessão alterados ao sair. Para o fazer, é necessário
precisa passar 2 capacidades específicas para o driver: ie.forceCreateProcessApi com valor true e ie.browserCommandLineSwitchescom o valorprivate. Note que isso só funcionará para o InternetExplorer 8 e mais recentes, e o Registo do Windows O caminho HKLM_CURRENT_USER\Software\Microsoft\Internet Explorer\Maindeve conter a chave TabProcGrowthcom o valor0`.
A segunda é limpar a sessão durante a inicialização do InternetExplorer. Para isso é necessário passar
capacidade específica ie.ensureCleanSession com valor true para o driver. Isso limpa o cache
para todas as instâncias em execução do InternetExplorer, incluindo aquelas iniciadas manualmente.
Executando o IEDriverServer.exe remotamente
O servidor HTTP iniciado pelo IEDriverServer.exe define uma lista de controlo de acesso para aceitar apenas
conexões da máquina local, e não permite conexões de entrada de máquinas remotas.
No momento, isso não pode ser alterado sem modificar o código fonte do IEDriverServer.exe.
Para executar o driver do Internet Explorer em uma máquina remota, use o servidor remoto Java standalone
em conexão com o equivalente do RemoteWebDriver da sua linguagem de ligação.
Executando o IEDriverServer.exe em um serviço do Windows
A tentativa de usar o IEDriverServer.exe como parte de um aplicativo de serviço do Windows é expressamente
não é suportado. Os processos de serviço, e os processos gerados por eles, têm requisitos muito diferentes
do que aqueles que são executados num contexto de utilizador normal. O IEDriverServer.exe não é explicitamente testado nesse
ambiente, e inclui chamadas da API do Windows que são documentadas como proibidas de serem usadas
em processos de serviço. Embora seja possível fazer com que o driver do IE funcione durante a execução em um processo de serviço, os usuários que encontrarem problemas
um processo de serviço, os utilizadores que encontrarem problemas nesse ambiente terão de procurar as suas
suas próprias soluções.
4.1 - Internet Explorer Driver Internals
More detailed information on the IE Driver.
Client Code Into the Driver
We use the W3C WebDriver protocol to communicate with a local instance of an HTTP server. This greatly simplifies the implementation of the language-specific code, and minimzes the number of entry points into the C++ DLL that must be called using a native-code interop technology such as JNA, ctypes, pinvoke or DL.
Memory Management
The IE driver utilizes the Active Template Library (ATL) to take advantage of its implementation of smart pointers to COM objects. This makes reference counting and cleanup of COM objects much easier.
Why Do We Require Protected Mode Settings Changes?
IE 7 on Windows Vista introduced the concept of Protected Mode, which allows for some measure of protection to the underlying Windows OS when browsing. The problem is that when you manipulate an instance of IE via COM, and you navigate to a page that would cause a transition into or out of Protected Mode, IE requires that another browser session be created. This will orphan the COM object of the previous session, not allowing you to control it any longer.
In IE 7, this will usually manifest itself as a new top-level browser window; in IE 8, a new IExplore.exe process will be created, but it will usually (not always!) seamlessly attach it to the existing IE top-level frame window. Any browser automation framework that drives IE externally (as opposed to using a WebBrowser control) will run into these problems.
In order to work around that problem, we dictate that to work with IE, all zones must have the same Protected Mode setting. As long as it’s on for all zones, or off for all zones, we can prevent the transistions to different Protected Mode zones that would invalidate our browser object. It also allows users to continue to run with UAC turned on, and to run securely in the browser if they set Protected Mode “on” for all zones.
In earlier releases of the IE driver, if the user’s Protected Mode settings were not correctly set, we would launch IE, and the process would simply hang until the HTTP request timed out. This was suboptimal, as it gave no indication what needed to be set. Erring on the side of caution, we do not modify the user’s Protected Mode settings. Current versions, however check that the Protected Mode settings are properly set, and will return an error response if they are not.
There are two ways that we could simulate keyboard and mouse input. The first way, which is used in parts of webdriver, is to synthesize events on the DOM. This has a number of drawbacks, since each browser (and version of a browser) has its own unique quirks; to model each of these is a demanding task, and impossible to get completely right (for example, it’s hard to tell what window.selection should be and this is a read-only property on some browsers) The alternative approach is to synthesize keyboard and mouse input at the OS level, ideally without stealing focus from the user (who tends to be doing other things on their computer as long-running webdriver tests run)
The code for doing this is in interactions.cpp The key thing to note here is that we use PostMessages to push window events on to the message queue of the IE instance. Typing, in particular, is interesting: we only send the “keydown” and “keyup” messages. The “keypress” event is created if necessary by IE’s internal event processing. Because the key press event is not always generated (for example, not every character is printable, and if the default event bubbling is cancelled, listeners don’t see the key press event) we send a “probe” event in after the key down. Once we see that this has been processed, we know that the key press event is on the stack of events to be processed, and that it is safe to send the key up event. If this was not done, it is possible for events to fire in the wrong order, which is definitely sub-optimal.
Working On the InternetExplorerDriver
Currently, there are tests that will run for the InternetExplorerDriver in all languages (Java, C#, Python, and Ruby), so you should be able to test your changes to the native code no matter what language you’re comfortable working in from the client side. For working on the C++ code, you’ll need Visual Studio 2010 Professional or higher. Unfortunately, the C++ code of the driver uses ATL to ease the pain of working with COM objects, and ATL is not supplied with Visual C++ 2010 Express Edition. If you’re using Eclipse, the process for making and testing modifications is:
Edit the C++ code in VS.
Build the code to ensure that it compiles
Do a complete rebuild when you are ready to run a test. This will cause the created DLL to be copied to the right place to allow its use in Eclipse
Load Eclipse (or some other IDE, such as Idea)
Edit the SingleTestSuite so that it is usingDriver(IE)
Create a JUnit run configuration that uses the “webdriver-internet-explorer” project. If you don’t do this, the test won’t work at all, and there will be a somewhat cryptic error message on the console.
Once the basic setup is done, you can start working on the code pretty quickly. You can attach to the process you execute your code from using Visual Studio (from the Debug menu, select Attach to Process…).
5 - Selenium IDE
Selenium IDE é uma extensão do navegador que grava e reproduz uma acção do utilizador.
Selenium’s Integrated Development Environment (Selenium IDE)
é uma ferramenta de utilização simples que grava as acções de um utilizador usando comandos Selenium com parametros definidos conforme o contexto de cada elemento.
Esta é uma forma excelente de aprender todo o sintaxe Selenium.
Está disponível para os navegadores Google Chrome, Mozilla Firefox, e Microsoft Edge.
Selenium Manager is a command-line tool implemented in Rust that provides automated driver and browser management for Selenium. Selenium bindings use this tool by default, so you do not need to download it or add anything to your code or do anything else to use it.
Motivation
TL;DR:Selenium Manager is the official driver manager of the Selenium project, and it is shipped out of the box with every Selenium release.
Selenium uses the native support implemented by each browser to carry out the automation process. For this reason, Selenium users need to place a component called driver (chromedriver, geckodriver, msedgedriver, etc.) between the script using the Selenium API and the browser. For many years, managing these drivers was a manual process for Selenium users. This way, they had to download the required driver for a browser (chromedriver for Chrome, geckodriver for Firefox, etc.) and place it in the PATH or export the driver path as a system property (Java, JavaScript, etc.). But this process was cumbersome and led to maintainability issues.
Let’s consider an example. Imagine you manually downloaded the required chromedriver for driving your Chrome with Selenium. When you did this process, the stable version of Chrome was 113, so you downloaded chromedriver 113 and put it in your PATH. At that moment, your Selenium script executed correctly. But the problem is that Chrome is evergreen. This name refers to Chrome’s ability to upgrade automatically and silently to the next stable version when available. This feature is excellent for end-users but potentially dangerous for browser automation. Let’s go back to the example to discover it. Your local Chrome eventually updates to version 115. And that moment, your Selenium script is broken due to the incompatibility between the manually downloaded driver (113) and the Chrome version (115). Thus, your Selenium script fails with the following error message: “session not created: This version of ChromeDriver only supports Chrome version 113”.
This problem is the primary reason for the existence of the so-called driver managers (such as WebDriverManager for Java,
webdriver-manager for Python, webdriver-manager for JavaScript, WebDriverManager.Net for C#, and webdrivers for Ruby). All these projects were an inspiration and a clear sign that the community needed this feature to be built in Selenium. Thus, the Selenium project has created Selenium Manager, the official driver manager for Selenium, shipped out of the box with each Selenium release as of version 4.6.
Usage
TL;DR:Selenium Manager is used by the Selenium bindings when the drivers (chromedriver, geckodriver, etc.) are unavailable.
Driver management through Selenium Manager is opt-in for the Selenium bindings. Thus, users can continue managing their drivers manually (putting the driver in the PATH or using system properties) or rely on a third-party driver manager to do it automatically. Selenium Manager only operates as a fallback: if no driver is provided, Selenium Manager will come to the rescue.
Selenium Manager is a CLI (command line interface) tool implemented in Rust to allow cross-platform execution and compiled for Windows, Linux, and macOS. The Selenium Manager binaries are shipped with each Selenium release. This way, each Selenium binding language invokes Selenium Manager to carry out the automated driver and browser management explained in the following sections.
Automated driver management
TL;DR:Selenium Manager automatically discovers, downloads, and caches the drivers required by Selenium when these drivers are unavailable.
The primary feature of Selenium Manager is called automated driver management. Let’s consider an example to understand it. Suppose we want to driver Chrome with Selenium (see the doc about how to start a session with Selenium). Before the session begins, and when the driver is unavailable, Selenium Manager manages chromedriver for us. We use the term management for this feature (and not just download) since this process is broader and implies different steps:
Browser version discovery. Selenium Manager discovers the browser version (e.g., Chrome, Firefox, Edge) installed in the machine that executes Selenium. This step uses shell commands (e.g., google-chrome --version).
Driver version discovery. With the discovered browser version, the proper driver version is resolved. For this step, the online metadata/endpoints maintained by the browser vendors (e.g., chromedriver, geckodriver, or msedgedriver) are used.
Driver download. The driver URL is obtained with the resolved driver version; with that URL, the driver artifact is downloaded, uncompressed, and stored locally.
Driver cache. Uncompressed driver binaries are stored in a local cache folder (~/.cache/selenium). The next time the same driver is required, it will be used from there if the driver is already in the cache.
Automated browser management
TL;DR:Selenium Manager automatically discovers, downloads, and caches the browsers driven with Selenium (Chrome, Firefox, and Edge) when these browsers are not installed in the local system.
As of Selenium 4.11.0, Selenium Manager also implements automated browser management. With this feature, Selenium Manager allows us to discover, download, and cache the different browser releases, making them seamlessly available for Selenium. Internally, Selenium Manager uses an equivalent management procedure explained in the section before, but this time, for browser releases.
The browser automatically managed by Selenium Manager are:
Let’s consider again the typical example of driving Chrome with Selenium. And this time, suppose Chrome is not installed on the local machine when starting a new session). In that case, the current stable CfT release will be discovered, downloaded, and cached (in ~/.cache/selenium/chrome) by Selenium Manager.
But there is more. In addition to the stable browser version, Selenium Manager also allows downloading older browser versions (in the case of CfT, starting in version 113, the first version published as CfT). To set a browser version with Selenium, we use a browser option called browserVersion.
Let’s consider another simple example. Suppose we set browserVersion to 114 using Chrome options. In this case, Selenium Manager will check if Chrome 114 is already installed. If it is, it will be used. If not, Selenium Manager will manage (i.e., discover, download, and cache) CfT 114. And in either case, the chromedriver is also managed. Finally, Selenium will start Chrome to be driven programmatically, as usual.
But there is even more. In addition to fixed browser versions (e.g., 113, 114, 115, etc.), we can use the following labels for browserVersion:
stable: Current CfT version.
beta: Next version to stable.
dev: Version in development at this moment.
canary: Nightly build for developers.
esr: Extended Support Release (only for Firefox).
When these labels are specified, Selenium Manager first checks if a given browser is already installed (beta, dev, etc.), and when it is not detected, the browser is automatically managed.
Edge in Windows
Automated Edge management by Selenium Manager in Windows is different from other browsers. Both Chrome and Firefox (and Edge in macOS and Linux) are downloaded automatically to the local cache (~/.cache/selenium) by Selenium Manager. Nevertheless, the same cannot be done for Edge in Windows. The reason is that the Edge installer for Windows is distributed as a Microsoft Installer (MSI) file, designed to be executed with administrator rights. This way, when Edge is attempted to be installed with Selenium Manager in Windows with a non-administrator session, a warning message will be displayed by Selenium Manager as follows:
edge can only be installed in Windows with administrator permissions
Therefore, administrator permissions are required to install Edge in Windows automatically through Selenium Manager, and Edge is eventually installed in the usual program files folder (e.g., C:\Program Files (x86)\Microsoft\Edge).
Configuration
TL;DR:Selenium Manager should work silently and transparently for most users. Nevertheless, there are scenarios (e.g., to specify a custom cache path or setup globally a proxy) where custom configuration can be required.
Selenium Manager is a CLI tool. Therefore, under the hood, the Selenium bindings call Selenium Manager by invoking shell commands. Like any other CLI tool, arguments can be used to specify specific capabilities in Selenium Manager. The different arguments supported by Selenium Manager can be checked by running the following command:
$ ./selenium-manager --help
In addition to CLI arguments, Selenium Manager allows two additional mechanisms for configuration:
Configuration file. Selenium Manager uses a file called se-config.toml located in the Selenium cache (by default, at ~/.cache/selenium) for custom configuration values. This TOML file contains a key-value collection used for custom configuration.
Environmental variables. Each configuration key has its equivalence in environmental variables by converting each key name to uppercase, replacing the dash symbol (-) with an underscore (_), and adding the prefix SE_.
The configuration file is honored by Selenium Manager when it is present, and the corresponding CLI parameter is not specified. Besides, the environmental variables are used when neither of the previous options (CLI arguments and configuration file) is specified. In other words, the order of preference for Selenium Manager custom configuration is as follows:
CLI arguments.
Configuration file.
Environment variables.
Notice that the Selenium bindings use the CLI arguments to specify configuration values, which in turn, are defined in each binding using browser options.
The following table summarizes all the supported arguments supported by Selenium Manager and their correspondence key in the configuration file and environment variables.
CLI argument
Configuration file
Env variable
Description
--browser BROWSER
browser = "BROWSER"
SE_BROWSER=BROWSER
Browser name: chrome, firefox, edge, iexplorer, safari, safaritp, or webview2
--driver <DRIVER>
driver = "DRIVER"
SE_DRIVER=DRIVER
Driver name: chromedriver, geckodriver, msedgedriver, IEDriverServer, or safaridriver
--browser-version <BROWSER_VERSION>
browser-version = "BROWSER_VERSION"
SE_BROWSER_VERSION=BROWSER_VERSION
Major browser version (e.g., 105, 106, etc. Also: beta, dev, canary -or nightly-, and esr -in Firefox- are accepted)
--driver-version <DRIVER_VERSION>
driver-version = "DRIVER_VERSION"
SE_DRIVER_VERSION=DRIVER_VERSION
Driver version (e.g., 106.0.5249.61, 0.31.0, etc.)
--browser-path <BROWSER_PATH>
browser-path = "BROWSER_PATH"
SE_BROWSER_PATH=BROWSER_PATH
Browser path (absolute) for browser version detection (e.g., /usr/bin/google-chrome, /Applications/Google Chrome.app/Contents/MacOS/Google Chrome, C:\Program Files\Google\Chrome\Application\chrome.exe)
Operating system for drivers and browsers (i.e., windows, linux, or macos)
--arch <ARCH>
arch = "ARCH"
SE_ARCH=ARCH
System architecture for drivers and browsers (i.e., x32, x64, or arm64)
--proxy <PROXY>
proxy = "PROXY"
SE_PROXY=PROXY
HTTP proxy for network connection (e.g., myproxy:port, myuser:mypass@myproxy:port)
--timeout <TIMEOUT>
timeout = TIMEOUT
SE_TIMEOUT=TIMEOUT
Timeout for network requests (in seconds). Default: 300
--offline
offline = true
SE_OFFLINE=true
Offline mode (i.e., disabling network requests and downloads)
--force-browser-download
force-browser-download = true
SE_FORCE_BROWSER_DOWNLOAD=true
Force to download browser, e.g., when a browser is already installed in the system, but you want Selenium Manager to download and use it
--avoid-browser-download
avoid-browser-download = true
SE_AVOID_BROWSER_DOWNLOAD=true
Avoid to download browser, e.g., when a browser is supposed to be downloaded by Selenium Manager, but you prefer to avoid it
--debug
debug = true
SE_DEBUG=true
Display DEBUG messages
--trace
trace = true
SE_TRACE=true
Display TRACE messages
--cache-path <CACHE_PATH>
cache-path="CACHE_PATH"
SE_CACHE_PATH=CACHE_PATH
Local folder used to store downloaded assets (drivers and browsers), local metadata, and configuration file. See next section for details. Default: ~/.cache/selenium. For Windows paths in the TOML configuration file, double backslashes are required (e.g., C:\\custom\\cache).
--ttl <TTL>
ttl = TTL
SE_TTL=TTL
Time-to-live in seconds. See next section for details. Default: 3600 (1 hour)
In addition to the configuration keys specified in the table before, there are some special cases, namely:
Browser version. In addition to browser-version, we can use the specific configuration keys to specify custom versions per supported browser. This way, the keys chrome-version, firefox-version, edge-version, etc., are supported. The same applies to environment variables (i.e., SE_CHROME_VERSION, SE_FIREFOX_VERSION, SE_EDGE_VERSION, etc.).
Driver version. Following the same pattern, we can use chromedriver-version, geckodriver-version, msedgedriver-version, etc. (in the configuration file), and SE_CHROMEDRIVER_VERSION, SE_GECKODRIVER_VERSION, SE_MSEDGEDRIVER_VERSION, etc. (as environment variables).
Browser path. Following the same pattern, we can use chrome-path, firefox-path, edge-path, etc. (in the configuration file), and SE_CHROME_PATH, SE_FIREFOX_PATH, SE_EDGE_PATH, etc. (as environment variables). The Selenium bindings also allow to specify a custom location of the browser path using options, namely: Chrome), Edge, or Firefox.
Driver mirror. Following the same pattern, we can use chromedriver-mirror-url, geckodriver-mirror-url, msedgedriver-mirror-url, etc. (in the configuration file), and SE_CHROMEDRIVER_MIRROR_URL, SE_GECKODRIVER_MIRROR_URL, SE_MSEDGEDRIVER_MIRROR_URL, etc. (as environment variables).
Browser mirror. Following the same pattern, we can use chrome-mirror-url, firefox-mirror-url, edge-mirror-url, etc. (in the configuration file), and SE_CHROME_MIRROR_URL, SE_FIREFOX_MIRROR_URL, SE_EDGE_MIRROR_URL, etc. (as environment variables).
Caching
TL;DR:The drivers and browsers managed by Selenium Manager are stored in a local folder (~/.cache/selenium).
The cache in Selenium Manager is a local folder (~/.cache/selenium by default) in which the downloaded assets (drivers and browsers) are stored. For the sake of performance, when a driver or browser is already in the cache (i.e., there is a cache hint), Selenium Manager uses it from there.
In addition to the downloaded drivers and browsers, two additional files live in the cache’s root:
Configuration file (se-config.toml). This file is optional and, as explained in the previous section, allows to store custom configuration values for Selenium Manager. This file is maintained by the end-user and read by Selenium Manager.
Metadata file (se-metadata.json). This file contains versions discovered by Selenium Manger making network requests (e.g., using the CfT JSON endpoints) and the time-to-live (TTL) in which they are valid. Selenium Manager automatically maintains this file.
The TTL in Selenium Manager is inspired by the TTL for DNS, a well-known mechanism that refers to how long some values are cached before they are automatically refreshed. In the case of Selenium Manager, these values are the versions found by making network requests for driver and browser version discovery. By default, the TTL is 3600 seconds (i.e., 1 hour) and can be tuned using configuration values or disabled by setting this configuration value to 0.
The TTL mechanism is a way to improve the overall performance of Selenium. It is based on the fact that the discovered driver and browser versions (e.g., the proper chromedriver version for Chrome 115 is 115.0.5790.170) will likely remain the same in the short term. Therefore, the discovered versions are written in the metadata file and read from there instead of making the same consecutive network request. This way, during the driver version discovery (step 2 of the automated driver management process previously introduced), Selenium Manager first reads the file metadata. When a fresh resolution (i.e., a driver/browser version valid during a TTL) is found, that version is used (saving some time in making a new network request). If not found or the TTL has expired, a network request is made, and the result is stored in the metadata file.
Let’s consider an example. A Selenium binding asks Selenium Manager to resolve chromedriver. Selenium Manager detects that Chrome 115 is installed, so it makes a network request to the CfT endpoints to discover the proper chromedriver version (115.0.5790.170, at that moment). This version is stored in the metadata file and considered valid during the next hour (TTL). If Selenium Manager is asked to resolve chromedriver during that time (which is likely to happen in the execution of a test suite), the chromedriver version is discovered by reading the metadata file instead of making a new request to the CfT endpoints. After one hour, the chromedriver version stored in the cache will be considered as stale, and Selenium Manager will refresh it by making a new network request to the corresponding endpoint.
Selenium Manager includes two additional arguments two handle the cache, namely:
--clear-cache: To remove the cache folder.
--clear-metadata: To remove the metadata file.
Versioning
Selenium Manager follows the same versioning schema as Selenium. Nevertheless, we use the major version 0 for Selenium Manager releases because it is still in beta. For example, the Selenium Manager binaries shipped with Selenium 4.12.0 corresponds to version 0.4.12.
Getting Selenium Manager
For most users, direct interaction with Selenium Manager is not required since the Selenium bindings use it internally. Nevertheless, if you want to play with Selenium Manager or use it for your use case involving driver or browser management, you can get the Selenium Manager binaries in different ways:
From the Selenium repository. The Selenium Manager source code is stored in the main Selenium repo under the folder rust. Moreover, you can find the compiled versions for Windows, Linux, and macOS in the common folder of this repo.
From the build workflow. Selenium Manager is compiled using a GitHub Actions workflow. This workflow creates binaries for Windows, Linux, and macOS. You can download these binaries from these workflow executions.
From the cache. As of version 4.15.0 of the Selenium Java bindings, the Selenium Manager binary is extracted and copied to the cache folder. For instance, the Selenium Manager binary shipped with Selenium 4.15.0 is stored in the folder ~/.cache/selenium/manager/0.4.15).
Examples
Let’s consider a typical example: we want to manage chromedriver automatically. For that, we invoke Selenium Manager as follows (notice that the flag --debug is optional, but it helps us to understand what Selenium Manager is doing):
$ ./selenium-manager --browser chrome --debug
DEBUG chromedriver not found in PATH
DEBUG chrome detected at C:\Program Files\Google\Chrome\Application\chrome.exe
DEBUG Running command: wmic datafile where name='C:\\Program Files\\Google\\Chrome\\Application\\chrome.exe' get Version /value
DEBUG Output: "\r\r\n\r\r\nVersion=116.0.5845.111\r\r\n\r\r\n\r\r\n\r"
DEBUG Detected browser: chrome 116.0.5845.111
DEBUG Discovering versions from https://googlechromelabs.github.io/chrome-for-testing/known-good-versions-with-downloads.json
DEBUG Required driver: chromedriver 116.0.5845.96
DEBUG Downloading chromedriver 116.0.5845.96 from https://edgedl.me.gvt1.com/edgedl/chrome/chrome-for-testing/116.0.5845.96/win64/chromedriver-win64.zip
INFO Driver path: C:\Users\boni\.cache\selenium\chromedriver\win64\116.0.5845.96\chromedriver.exe
INFO Browser path: C:\Program Files\Google\Chrome\Application\chrome.exe
In this case, the local Chrome (in Windows) is detected by Selenium Manager. Then, using its version and the CfT endpoints, the proper chromedriver version (115, in this example) is downloaded to the local cache. Finally, Selenium Manager provides two results: i) the driver path (downloaded) and ii) the browser path (local).
Let’s consider another example. Now we want to use Chrome beta. Therefore, we invoke Selenium Manager specifying that version label as follows (notice that the CfT beta is discovered, downloaded, and stored in the local cache):
$ ./selenium-manager --browser chrome --browser-version beta --debug
DEBUG chromedriver not found in PATH
DEBUG chrome not found in PATH
DEBUG chrome beta not found in the system
DEBUG Discovering versions from https://googlechromelabs.github.io/chrome-for-testing/last-known-good-versions-with-downloads.json
DEBUG Required browser: chrome 117.0.5938.22
DEBUG Downloading chrome 117.0.5938.22 from https://edgedl.me.gvt1.com/edgedl/chrome/chrome-for-testing/117.0.5938.22/win64/chrome-win64.zip
DEBUG chrome 117.0.5938.22 has been downloaded at C:\Users\boni\.cache\selenium\chrome\win64\117.0.5938.22\chrome.exe
DEBUG Discovering versions from https://googlechromelabs.github.io/chrome-for-testing/known-good-versions-with-downloads.json
DEBUG Required driver: chromedriver 117.0.5938.22
DEBUG Downloading chromedriver 117.0.5938.22 from https://edgedl.me.gvt1.com/edgedl/chrome/chrome-for-testing/117.0.5938.22/win64/chromedriver-win64.zip
INFO Driver path: C:\Users\boni\.cache\selenium\chromedriver\win64\117.0.5938.22\chromedriver.exe
INFO Browser path: C:\Users\boni\.cache\selenium\chrome\win64\117.0.5938.22\chrome.exe
Selenium Grid
Selenium Manager allows you to configure the drivers automatically when setting up Selenium Grid. To that aim, you need to include the argument --selenium-manager true in the command to start Selenium Grid. For more details, visit the Selenium Grid starting page.
Moreover, Selenium Manager also allows managing Selenium Grid releases automatically. For that, the argument --grid is used as follows:
$ ./selenium-manager --grid
After this command, Selenium Manager discovers the latest version of Selenium Grid, storing the selenium-server.jar in the local cache.
Optionally, the argument --grid allows to specify a Selenium Grid version (--grid <GRID_VERSION>).
Known Limitations
Connectivity issues
Selenium Manager requests remote endpoints (like Chrome for Testing (CfT), among others) to discover and download drivers and browsers from online repositories. When this operation is done in a corporate environment with a proxy or firewall, it might lead to connectivity problems like the following:
error sending request for url (https://googlechromelabs.github.io/chrome-for-testing/known-good-versions-with-downloads.json)
error trying to connect: dns error: failed to lookup address information
error trying to connect: An existing connection was forcibly closed by the remote host. (os error 10054)
When that happens, consider the following solutions:
Use the proxy capabilities of Selenium (see documentation). Alternatively, use the environment variable SE_PROXY to set the proxy URL or use the configuration file (see configuration).
Review your network setup to enable the remote requests and downloads required by Selenium Manager.
Custom package managers
If you are using a Linux package manager (Anaconda, snap, etc) that requires a specific driver be used for your browsers,
you’ll need to either specify the
driver location,
the browser location,
or both, depending on the requirements.
Alternative architectures
Selenium supports all five architectures managed by Google’s Chrome for Testing, and all six drivers provided for Microsoft Edge.
Each release of the Selenium bindings comes with three separate Selenium Manager binaries — one for Linux, Windows, and Mac.
The Mac version supports both x64 and aarch64 (Intel and Apple).
The Windows version should work for both x86 and x64 (32-bit and 64-bit OS).
The Linux version has only been verified to work for x64.
Reasons for not supporting more architectures:
Neither Chrome for Testing nor Microsoft Edge supports additional architectures, so Selenium Manager would need to
manage something unofficial for it to work.
We currently build the binaries from existing GitHub actions runners, which do not support these architectures
Any additional architectures would get distributed with all Selenium releases, increasing the total build size
If you are running Linux on arm64/aarch64, 32-bit architecture, or a Raspberry Pi, Selenium Manager will not work for you.
The biggest issue for people is that they used to get custom-built drivers and put them on PATH and have them work.
Now that Selenium Manager is responsible for locating drivers on PATH, this approach no longer works, and users
need to use a Service class and set the location directly.
There are a number of advantages to having Selenium Manager look for drivers on PATH instead of managing that logic
in each of the bindings, so that’s currently a trade-off we are comfortable with.
However, as of Selenium 4.13.0, the Selenium bindings allow locating the Selenium Manager binary using an environment variable called SE_MANAGER_PATH. If this variable is set, the bindings will use its value as the Selenium Manager path in the local filesystem. This feature will allow users to provide a custom compilation of Selenium Manager, for instance, if the default binaries (compiled for Windows, Linux, and macOS) are incompatible with a given system (e.g., ARM64 in Linux).
Browser dependencies
When automatically managing browsers in Linux, Selenium Manager relies on the releases published by the browser vendors (i.e., Chrome, Firefox, and Edge). These releases are portable in most cases. Nevertheless, there might be cases in which existing libraries are required. In Linux, this problem might be experienced when trying to run Firefox, e.g., as follows:
libdbus-glib-1.so.2: cannot open shared object file: No such file or directory
Couldn't load XPCOM.
If that happens, the solution is to install that library, for instance, as follows:
sudo apt-get install libdbus-glib-1-2
A similar issue might happen when trying to execute Chrome for Testing in Linux:
error while loading shared libraries: libatk-1.0.so.0: cannot open shared object file: No such file or directory
In this case, the library to be installed is the following:
Guias e recomendações ao preparar soluções de testes com o projecto Selenium.
Uma nota sobre “Melhores práticas”: evitamos intencionalmente a frase “Melhores
Práticas” nesta documentação. Nenhuma abordagem funciona para todas as situações.
Preferimos a ideia de “Diretrizes e Recomendações”. Nós encorajamos
que você leia e decida cuidadosamente quais abordagens
funcionarão para você em seu ambiente específico.
O teste funcional é difícil de acertar por muitos motivos.
Como se o estado, a complexidade e as dependências do aplicativo não tornassem o teste suficientemente difícil,
lidar com navegadores (especialmente com incompatibilidades entre navegadores)
torna a escrita de bons testes um desafio.
Selenium fornece ferramentas para facilitar a interação funcional do usuário,
mas não o ajuda a escrever suítes de teste bem arquitetadas.
Neste capítulo, oferecemos conselhos, diretrizes e recomendações
sobre como abordar a automação funcional de páginas da web.
Este capítulo registra os padrões de design de software populares
entre muitos dos usuários do Selenium
que tiveram sucesso ao longo dos anos.
Over time, projects tend to accumulate large numbers of tests. As the total number of tests increases,
it becomes harder to make changes to the codebase — a single “simple”
change may cause numerous tests to fail, even though the application still
works properly. Sometimes these problems are unavoidable, but when they do
occur you want to be up and running again as quickly as possible. The following
design patterns and strategies have been used before with WebDriver to help make
tests easier to write and maintain. They may help you too.
DomainDrivenDesign: Express your tests in the language of the end-user of the app.
PageObjects: A simple abstraction of the UI of your web app.
LoadableComponent: Modeling PageObjects as components.
BotStyleTests: Using a command-based approach to automating tests, rather than the object-based approach that PageObjects encourage
Loadable Component
What Is It?
The LoadableComponent is a base class that aims to make writing PageObjects
less painful. It does this by providing a standard way of ensuring that
pages are loaded and providing hooks to make debugging the failure of a
page to load easier. You can use it to help reduce the amount of boilerplate
code in your tests, which in turn make maintaining your tests less tiresome.
There is currently an implementation in Java that ships as part of Selenium 2,
but the approach used is simple enough to be implemented in any language.
Simple Usage
As an example of a UI that we’d like to model, take a look at
the new issue page. From
the point of view of a test author, this offers the service of being able to
file a new issue. A basic Page Object would look like:
In order to turn this into a LoadableComponent, all we need to do is to set that as the base type:
publicclassEditIssueextendsLoadableComponent<EditIssue>{// rest of class ignored for now
}
This signature looks a little unusual, but it all means is that this class
represents a LoadableComponent that loads the EditIssue page.
By extending this base class, we need to implement two new methods:
@Overrideprotectedvoidload(){driver.get("https://github.com/SeleniumHQ/selenium/issues/new");}@OverrideprotectedvoidisLoaded()throwsError{Stringurl=driver.getCurrentUrl();assertTrue("Not on the issue entry page: "+url,url.endsWith("/new"));}
The load method is used to navigate to the page, whilst the isLoaded method
is used to determine whether we are on the right page. Although the
method looks like it should return a boolean, instead it performs a
series of assertions using JUnit’s Assert class. There can be as few
or as many assertions as you like. By using these assertions it’s
possible to give users of the class clear information that can be
used to debug tests.
With a little rework, our PageObject looks like:
packagecom.example.webdriver;importorg.openqa.selenium.By;importorg.openqa.selenium.WebDriver;importorg.openqa.selenium.WebElement;importorg.openqa.selenium.support.FindBy;importorg.openqa.selenium.support.PageFactory;import staticjunit.framework.Assert.assertTrue;publicclassEditIssueextendsLoadableComponent<EditIssue>{privatefinalWebDriverdriver;// By default the PageFactory will locate elements with the same name or id
// as the field. Since the summary element has a name attribute of "summary"
// we don't need any additional annotations.
privateWebElementsummary;// Same with the submit element, which has the ID "submit"
privateWebElementsubmit;// But we'd prefer a different name in our code than "comment", so we use the
// FindBy annotation to tell the PageFactory how to locate the element.
@FindBy(name="comment")privateWebElementdescription;publicEditIssue(WebDriverdriver){this.driver=driver;// This call sets the WebElement fields.
PageFactory.initElements(driver,this);}@Overrideprotectedvoidload(){driver.get("https://github.com/SeleniumHQ/selenium/issues/new");}@OverrideprotectedvoidisLoaded()throwsError{Stringurl=driver.getCurrentUrl();assertTrue("Not on the issue entry page: "+url,url.endsWith("/new"));}publicvoidsetSummary(StringissueSummary){clearAndType(summary,issueSummary);}publicvoidenterDescription(StringissueDescription){clearAndType(description,issueDescription);}publicIssueListsubmit(){submit.click();returnnewIssueList(driver);}privatevoidclearAndType(WebElementfield,Stringtext){field.clear();field.sendKeys(text);}}
That doesn’t seem to have bought us much, right? One thing it has done is
encapsulate the information about how to navigate to the page into the page
itself, meaning that this information’s not scattered through the code base.
It also means that we can do this in our tests:
EditIssuepage=newEditIssue(driver).get();
This call will cause the driver to navigate to the page if that’s necessary.
Nested Components
LoadableComponents start to become more useful when they are used in conjunction
with other LoadableComponents. Using our example, we could view the “edit issue”
page as a component within a project’s website (after all, we access it via a
tab on that site). You also need to be logged in to file an issue. We could
model this as a tree of nested components:
+ ProjectPage
+---+ SecuredPage
+---+ EditIssue
What would this look like in code? For a start, each logical component
would have its own class. The “load” method in each of them would “get”
the parent. The end result, in addition to the EditIssue class above is:
packagecom.example.webdriver;importorg.openqa.selenium.By;importorg.openqa.selenium.NoSuchElementException;importorg.openqa.selenium.WebDriver;importorg.openqa.selenium.WebElement;import staticorg.junit.Assert.fail;publicclassSecuredPageextendsLoadableComponent<SecuredPage>{privatefinalWebDriverdriver;privatefinalLoadableComponent<?>parent;privatefinalStringusername;privatefinalStringpassword;publicSecuredPage(WebDriverdriver,LoadableComponent<?>parent,Stringusername,Stringpassword){this.driver=driver;this.parent=parent;this.username=username;this.password=password;}@Overrideprotectedvoidload(){parent.get();StringoriginalUrl=driver.getCurrentUrl();// Sign in
driver.get("https://www.google.com/accounts/ServiceLogin?service=code");driver.findElement(By.name("Email")).sendKeys(username);WebElementpasswordField=driver.findElement(By.name("Passwd"));passwordField.sendKeys(password);passwordField.submit();// Now return to the original URL
driver.get(originalUrl);}@OverrideprotectedvoidisLoaded()throwsError{// If you're signed in, you have the option of picking a different login.
// Let's check for the presence of that.
try{WebElementdiv=driver.findElement(By.id("multilogin-dropdown"));}catch(NoSuchElementExceptione){fail("Cannot locate user name link");}}}
This shows that the components are all “nested” within each other. A call to get() in EditIssue will cause all its dependencies to load too. The example usage:
publicclassFooTest{privateEditIssueeditIssue;@BeforepublicvoidprepareComponents(){WebDriverdriver=newFirefoxDriver();ProjectPageproject=newProjectPage(driver,"selenium");SecuredPagesecuredPage=newSecuredPage(driver,project,"example","top secret");editIssue=newEditIssue(driver,securedPage);}@TestpublicvoiddemonstrateNestedLoadableComponents(){editIssue.get();editIssue.setSummary("Summary");editIssue.enterDescription("This is an example");}}
If you’re using a library such as Guiceberry in your tests,
the preamble of setting up the PageObjects can be omitted leading to nice, clear, readable tests.
Although PageObjects are a useful way of reducing duplication in your tests, it’s not always a pattern that teams feel comfortable following. An alternative approach is to follow a more “command-like” style of testing.
A “bot” is an action-oriented abstraction over the raw Selenium APIs. This means that if you find that commands aren’t doing the Right Thing for your app, it’s easy to change them. As an example:
publicclassActionBot{privatefinalWebDriverdriver;publicActionBot(WebDriverdriver){this.driver=driver;}publicvoidclick(Bylocator){driver.findElement(locator).click();}publicvoidsubmit(Bylocator){driver.findElement(locator).submit();}/**
* Type something into an input field. WebDriver doesn't normally clear these
* before typing, so this method does that first. It also sends a return key
* to move the focus out of the element.
*/publicvoidtype(Bylocator,Stringtext){WebElementelement=driver.findElement(locator);element.clear();element.sendKeys(text+"\n");}}
Once these abstractions have been built and duplication in your tests identified, it’s possible to layer PageObjects on top of bots.
7.2 - Sobre automação de testes
Primeiro, comece perguntando a si mesmo se você realmente precisa ou não de um navegador.
As probabilidades são de que, em algum ponto, se você estiver trabalhando em um aplicativo da web complexo,
você precisará abrir um navegador e realmente testá-lo.
No entanto, os testes funcionais do usuário final, como os testes Selenium, são caros para executar.
Além disso, eles normalmente exigem infraestrutura substancial
para ser executado de forma eficaz.
É uma boa regra sempre se perguntar se o que você deseja testar
pode ser feito usando abordagens de teste mais leves, como testes de unidade
ou com uma abordagem de nível inferior.
Depois de determinar que está no negócio de teste de navegador da web,
e você tem seu ambiente Selenium pronto para começar a escrever testes,
você geralmente executará alguma combinação de três etapas:
Configurar os dados
Executar um conjunto discreto de ações
Avaliar os resultados
Você deve manter essas etapas o mais curtas possível;
uma ou duas operações devem ser suficientes na maioria das vezes.
A automação do navegador tem a reputação de ser “instável”,
mas, na realidade, é porque os usuários freqüentemente exigem muito dele.
Em capítulos posteriores, retornaremos às técnicas que você pode usar
para mitigar problemas aparentemente intermitentes nos testes,
em particular sobre como superar as condições de corrida
entre o navegador e o WebDriver.
Mantendo seus testes curtos
e usando o navegador da web apenas quando você não tiver absolutamente nenhuma alternativa,
você pode ter muitos testes com instabilidade mínima.
Uma vantagem distinta dos testes do Selenium
é sua capacidade inerente de testar todos os componentes do aplicativo,
de back-end para front-end, da perspectiva do usuário.
Em outras palavras, embora os testes funcionais possam ser caros para executar,
eles também abrangem grandes partes críticas para os negócios de uma só vez.
Requerimentos de teste
Como mencionado antes, os testes do Selenium podem ser caros para serem executados.
Até que ponto depende do navegador em que você está executando os testes,
mas historicamente o comportamento dos navegadores tem variado tanto que muitas vezes
foi uma meta declarada testar cruzado contra vários navegadores.
Selenium permite que você execute as mesmas instruções em vários navegadores
em vários sistemas operacionais,
mas a enumeração de todos os navegadores possíveis,
suas diferentes versões e os muitos sistemas operacionais em que são executados
rapidamente se tornará uma tarefa não trivial.
Vamos começar com um exemplo
Larry escreveu um site que permite aos usuários solicitarem seus
unicórnios personalizados.
O fluxo de trabalho geral (o que chamaremos de “caminho feliz”) é algo
como isso:
Criar uma conta
Configurar o unicórnio
Adicionar ao carrinho de compras
Verificar e pagar
Dar feedback sobre o unicórnio
Seria tentador escrever um grande roteiro do Selenium
para realizar todas essas operações - muitos tentarão.
Resista à tentação!
Isso resultará em um teste que
a) leva muito tempo,
b) estará sujeito a alguns problemas comuns em torno de problemas de tempo de renderização de página, e
c) se falhar,
não lhe dará um método conciso e “superficial” para diagnosticar o que deu errado.
A estratégia preferida para testar este cenário seria
dividi-lo em uma série de testes independentes e rápidos,
cada um dos quais tem uma “razão” de existir.
Vamos fingir que você deseja testar a segunda etapa:
Configure o unicórnio.
Ele executará as seguintes ações:
Criar uma conta
Configurar o unicórnio
Observe que estamos pulando o restante dessas etapas,
vamos testar o resto do fluxo de trabalho em outros casos de teste pequenos e discretos
depois de terminarmos com este.
Para começar, você precisa criar uma conta.
Aqui você tem algumas escolhas a fazer:
Deseja usar uma conta existente?
Você deseja criar uma nova conta?
Existem propriedades especiais de tal usuário que precisam ser
levadas em consideração antes do início da configuração?
Independentemente de como você responde a esta pergunta,
a solução é torná-la parte da etapa de “configurar os dados” do teste.
Se Larry expôs uma API que permite a você (ou qualquer pessoa)
criar e atualizar contas de usuário,
certifique-se de usar isso para responder a esta pergunta.
Se possível, você deseja iniciar o navegador somente depois de ter um usuário “em mãos”,
cujas credenciais você pode usar para fazer login.
Se cada teste para cada fluxo de trabalho começar com a criação de uma conta de usuário,
muitos segundos serão adicionados à execução de cada teste.
Chamar uma API e falar com um banco de dados são operações rápidas,
“sem cabeçalho” que não requerem o processo caro de
abrir um navegador, navegar para as páginas certas,
clicando e aguardando o envio dos formulários, etc.
Idealmente, você pode abordar esta fase de configuração em uma linha de código,
que será executado antes que qualquer navegador seja iniciado:
// Crie um usuário que tenha permissões somente leitura - eles podem configurar um unicórnio,
// mas eles não têm informações de pagamento configuradas, nem têm
// privilégios administrativos. No momento em que o usuário é criado, seu endereço
// de e-mail e senha são gerados aleatoriamente - você nem precisa
// conhecê-los.
Useruser=UserFactory.createCommonUser();//Este método está definido em algum outro lugar.
// Faça login como este usuário.
// O login neste site leva você à sua página pessoal "Minha conta", e então
// o objeto AccountPage é retornado pelo método loginAs, permitindo que você
// execute ações da AccountPage.
AccountPageaccountPage=loginAs(user.getEmail(),user.getPassword());
# Crie um usuário que tenha permissões somente leitura - eles podem configurar um unicórnio,# mas eles não têm informações de pagamento configuradas, nem têm# privilégios administrativos. No momento em que o usuário é criado, seu endereço# de e-mail e senha são gerados aleatoriamente - você nem precisa# conhecê-los.user=user_factory.create_common_user()#This method is defined elsewhere.# Faça login como este usuário.# O login neste site leva você à sua página pessoal "Minha conta", e então# o objeto AccountPage é retornado pelo método loginAs, permitindo que você# execute ações da AccountPage.account_page=login_as(user.get_email(),user.get_password())
// Crie um usuário que tenha permissões somente leitura - eles podem configurar um unicórnio,// mas eles não têm informações de pagamento configuradas, nem têm// privilégios administrativos. No momento em que o usuário é criado, seu endereço// de e-mail e senha são gerados aleatoriamente - você nem precisa// conhecê-los.Useruser=UserFactory.CreateCommonUser();//This method is defined elsewhere.// Faça login como este usuário.// O login neste site leva você à sua página pessoal "Minha conta", e então// o objeto AccountPage é retornado pelo método loginAs, permitindo que você// execute ações da AccountPage.AccountPageaccountPage=LoginAs(user.Email,user.Password);
# Crie um usuário que tenha permissões somente leitura - eles podem configurar um unicórnio,# mas eles não têm informações de pagamento configuradas, nem têm# privilégios administrativos. No momento em que o usuário é criado, seu endereço# de e-mail e senha são gerados aleatoriamente - você nem precisa# conhecê-los.user=UserFactory.create_common_user#This method is defined elsewhere.# Faça login como este usuário.# O login neste site leva você à sua página pessoal "Minha conta", e então# o objeto AccountPage é retornado pelo método loginAs, permitindo que você# execute ações da AccountPage.account_page=login_as(user.email,user.password)
// Crie um usuário que tenha permissões somente leitura - eles podem configurar um unicórnio,
// mas eles não têm informações de pagamento configuradas, nem têm
// privilégios administrativos. No momento em que o usuário é criado, seu endereço
// de e-mail e senha são gerados aleatoriamente - você nem precisa
// conhecê-los.
varuser=userFactory.createCommonUser();//This method is defined elsewhere.
// Faça login como este usuário.
// O login neste site leva você à sua página pessoal "Minha conta", e então
// o objeto AccountPage é retornado pelo método loginAs, permitindo que você
// execute ações da AccountPage.
varaccountPage=loginAs(user.email,user.password);
// Crie um usuário que tenha permissões somente leitura - eles podem configurar um unicórnio,
// mas eles não têm informações de pagamento configuradas, nem têm
// privilégios administrativos. No momento em que o usuário é criado, seu endereço
// de e-mail e senha são gerados aleatoriamente - você nem precisa
// conhecê-los.
valuser=UserFactory.createCommonUser()//This method is defined elsewhere.
// Faça login como este usuário.
// O login neste site leva você à sua página pessoal "Minha conta", e então
// o objeto AccountPage é retornado pelo método loginAs, permitindo que você
// execute ações da AccountPage.
valaccountPage=loginAs(user.getEmail(),user.getPassword())
Como você pode imaginar, a UserFactory pode ser estendida
para fornecer métodos como createAdminUser () e createUserWithPayment ().
A questão é que essas duas linhas de código não o distraem do objetivo final deste teste:
configurando um unicórnio.
Os detalhes do modelo de objeto de página
será discutido em capítulos posteriores, mas vamos apresentar o conceito aqui:
Seus testes devem ser compostos de ações,
realizadas do ponto de vista do usuário,
dentro do contexto das páginas do site.
Essas páginas são armazenadas como objetos,
que conterão informações específicas sobre como a página da web é composta
e como as ações são realizadas -
muito pouco disso deve preocupar você como testador.
Que tipo de unicórnio você quer?
Você pode querer rosa, mas não necessariamente.
Roxo tem sido bastante popular ultimamente.
Ela precisa de óculos escuros? Tatuagens de estrelas?
Essas escolhas, embora difíceis, são sua principal preocupação como testador -
você precisa garantir que seu centro de atendimento de pedidos
envia o unicórnio certo para a pessoa certa,
e isso começa com essas escolhas.
Observe que em nenhum lugar desse parágrafo falamos sobre botões,
campos, menus suspensos, botões de opção ou formulários da web.
Nem deveriam seus testes!
Você deseja escrever seu código como o usuário tentando resolver seu problema.
Aqui está uma maneira de fazer isso (continuando do exemplo anterior):
// O Unicórnio é um objeto de nível superior - ele possui atributos, que são definidos aqui.
// Isso armazena apenas os valores; não preenche formulários da web nem interage
// com o navegador de qualquer forma.
Unicornsparkles=newUnicorn("Sparkles",UnicornColors.PURPLE,UnicornAccessories.SUNGLASSES,UnicornAdornments.STAR_TATTOOS);// Uma vez que já estamos "na" página da conta, temos que usá-la para chegar ao
// lugar real onde você configura os unicórnios. Chamar o método "Add Unicorn"
// nos leva lá.
AddUnicornPageaddUnicornPage=accountPage.addUnicorn();// Agora que estamos na AddUnicornPage, passaremos o objeto "sparkles" para
// o método createUnicorn(). Este método pegará os atributos do Sparkles,
// preencher o formulário e clicar em enviar.
UnicornConfirmationPageunicornConfirmationPage=addUnicornPage.createUnicorn(sparkles);
# O Unicórnio é um objeto de nível superior - ele possui atributos, que são definidos aqui.# Isso armazena apenas os valores; não preenche formulários da web nem interage# com o navegador de qualquer forma.sparkles=Unicorn("Sparkles",UnicornColors.PURPLE,UnicornAccessories.SUNGLASSES,UnicornAdornments.STAR_TATTOOS)# Uma vez que já estamos "na" página da conta, temos que usá-la para chegar ao# lugar real onde você configura os unicórnios. Chamar o método "Add Unicorn"# nos leva lá.add_unicorn_page=account_page.add_unicorn()# Agora que estamos na AddUnicornPage, passaremos o objeto "sparkles" para# o método createUnicorn(). Este método pegará os atributos do Sparkles,# preencher o formulário e clicar em enviar.unicorn_confirmation_page=add_unicorn_page.create_unicorn(sparkles)
// O Unicórnio é um objeto de nível superior - ele possui atributos, que são definidos aqui.// Isso armazena apenas os valores; não preenche formulários da web nem interage// com o navegador de qualquer forma.Unicornsparkles=newUnicorn("Sparkles",UnicornColors.Purple,UnicornAccessories.Sunglasses,UnicornAdornments.StarTattoos);// Uma vez que já estamos "na" página da conta, temos que usá-la para chegar ao// lugar real onde você configura os unicórnios. Chamar o método "Add Unicorn"// nos leva lá.AddUnicornPageaddUnicornPage=accountPage.AddUnicorn();// Agora que estamos na AddUnicornPage, passaremos o objeto "sparkles" para// o método createUnicorn(). Este método pegará os atributos do Sparkles,// preencher o formulário e clicar em enviar.UnicornConfirmationPageunicornConfirmationPage=addUnicornPage.CreateUnicorn(sparkles);
# O Unicórnio é um objeto de nível superior - ele possui atributos, que são definidos aqui.# Isso armazena apenas os valores; não preenche formulários da web nem interage# com o navegador de qualquer forma.sparkles=Unicorn.new('Sparkles',UnicornColors.PURPLE,UnicornAccessories.SUNGLASSES,UnicornAdornments.STAR_TATTOOS)# Uma vez que já estamos "na" página da conta, temos que usá-la para chegar ao# lugar real onde você configura os unicórnios. Chamar o método "Add Unicorn"# nos leva lá.add_unicorn_page=account_page.add_unicorn# Agora que estamos na AddUnicornPage, passaremos o objeto "sparkles" para# o método createUnicorn(). Este método pegará os atributos do Sparkles,# preencher o formulário e clicar em enviar.unicorn_confirmation_page=add_unicorn_page.create_unicorn(sparkles)
// O Unicórnio é um objeto de nível superior - ele possui atributos, que são definidos aqui.
// Isso armazena apenas os valores; não preenche formulários da web nem interage
// com o navegador de qualquer forma.
varsparkles=newUnicorn("Sparkles",UnicornColors.PURPLE,UnicornAccessories.SUNGLASSES,UnicornAdornments.STAR_TATTOOS);// Uma vez que já estamos "na" página da conta, temos que usá-la para chegar ao
// lugar real onde você configura os unicórnios. Chamar o método "Add Unicorn"
// nos leva lá.
varaddUnicornPage=accountPage.addUnicorn();// Agora que estamos na AddUnicornPage, passaremos o objeto "sparkles" para
// o método createUnicorn(). Este método pegará os atributos do Sparkles,
// preencher o formulário e clicar em enviar.
varunicornConfirmationPage=addUnicornPage.createUnicorn(sparkles);
// O Unicórnio é um objeto de nível superior - ele possui atributos, que são definidos aqui.
// Isso armazena apenas os valores; não preenche formulários da web nem interage
// com o navegador de qualquer forma.
valsparkles=Unicorn("Sparkles",UnicornColors.PURPLE,UnicornAccessories.SUNGLASSES,UnicornAdornments.STAR_TATTOOS)// Uma vez que já estamos "na" página da conta, temos que usá-la para chegar ao
// lugar real onde você configura os unicórnios. Chamar o método "Add Unicorn"
// nos leva lá.
valaddUnicornPage=accountPage.addUnicorn()// Agora que estamos na AddUnicornPage, passaremos o objeto "sparkles" para
// o método createUnicorn(). Este método pegará os atributos do Sparkles,
// preencher o formulário e clicar em enviar.
unicornConfirmationPage=addUnicornPage.createUnicorn(sparkles)
Agora que você configurou seu unicórnio,
você precisa passar para a etapa 3: certifique-se de que realmente funcionou.
// O método exists() de UnicornConfirmationPage pegará o objeto
// Sparkles - uma especificação dos atributos que você deseja ver e compará-los
// com os campos na página
Assert.assertTrue("Sparkles should have been created, with all attributes intact",unicornConfirmationPage.exists(sparkles));
# O método exists() de UnicornConfirmationPage pegará o objeto# Sparkles - uma especificação dos atributos que você deseja ver e compará-los# com os campos na páginaassertunicorn_confirmation_page.exists(sparkles),"Sparkles should have been created, with all attributes intact"
// O método exists() de UnicornConfirmationPage pegará o objeto// Sparkles - uma especificação dos atributos que você deseja ver e compará-los// com os campos na páginaAssert.True(unicornConfirmationPage.Exists(sparkles),"Sparkles should have been created, with all attributes intact");
# O método exists() de UnicornConfirmationPage pegará o objeto# Sparkles - uma especificação dos atributos que você deseja ver e compará-los# com os campos na páginaexpect(unicorn_confirmation_page.exists?(sparkles)).tobe,'Sparkles should have been created, with all attributes intact'
// O método exists() de UnicornConfirmationPage pegará o objeto
// Sparkles - uma especificação dos atributos que você deseja ver e compará-los
// com os campos na página
assert(unicornConfirmationPage.exists(sparkles),"Sparkles should have been created, with all attributes intact");
// O método exists() de UnicornConfirmationPage pegará o objeto
// Sparkles - uma especificação dos atributos que você deseja ver e compará-los
// com os campos na página
assertTrue("Sparkles should have been created, with all attributes intact",unicornConfirmationPage.exists(sparkles))
Observe que o testador ainda não fez nada além de falar sobre unicórnios neste código–
sem botões, sem localizadores, sem controles do navegador.
Este método de modelagem do aplicativo
permite que você mantenha esses comandos de nível de teste no lugar e imutáveis,
mesmo se Larry decidir na próxima semana que não gosta mais de Ruby-on-Rails
e decidir reimplementar todo o site
em Haskell com um front-end Fortran.
Seus objetos de página exigirão alguma pequena manutenção para
estar conformidade com o redesenho do site,
mas esses testes permanecerão os mesmos.
Pegando esse design básico,
você desejará continuar seus fluxos de trabalho com o menor número possível de etapas voltadas para o navegador.
Seu próximo fluxo de trabalho envolverá adicionar um unicórnio ao carrinho de compras.
Provavelmente, você desejará muitas iterações deste teste para ter certeza de que o carrinho está mantendo o estado adequado:
Existe mais de um unicórnio no carrinho antes de você começar?
Quantos cabem no carrinho de compras?
Se você criar mais de um com o mesmo nome e / ou recursos, ele falhará?
Manterá apenas o existente ou acrescentará outro?
Cada vez que você passa pelo fluxo de trabalho,
você deseja evitar ter que criar uma conta,
fazer login como o usuário e configurar o unicórnio.
Idealmente, você será capaz de criar uma conta
e pré-configurar um unicórnio por meio da API ou banco de dados.
Em seguida, tudo que você precisa fazer é fazer login como o usuário, localizar Sparkles,
e adicioná-lo ao carrinho.
Automatizar ou não automatizar?
A automação é sempre vantajosa? Quando se deve decidir automatizar os casos de teste?
Nem sempre é vantajoso automatizar casos de teste. Tem vezes que
o teste manual pode ser mais apropriado.
Por exemplo, se a interface do aplicativo mudará consideravelmente em um futuro próximo,
então qualquer automação pode precisar ser reescrita de qualquer maneira.
Além disso, às vezes simplesmente não há tempo suficiente para construir automação de testes.
A curto prazo, o teste manual pode ser mais eficaz.
Se um aplicativo tem um prazo muito curto, atualmente não há
automação de teste disponível, e é imperativo que o teste seja feito dentro
nesse período, o teste manual é a melhor solução.
7.3 - Tipos de teste
Teste de aceitação
Este tipo de teste é feito para determinar se um recurso ou sistema
atende às expectativas e requisitos do cliente.
Este tipo de teste geralmente envolve
cooperação ou feedback do cliente, sendo uma atividade de validação que
responde a pergunta:
Estamos construindo o produto certo?.
Para aplicações web, a automação desse teste pode ser feita
diretamente com o Selenium, simulando o comportamento esperado do usuário.
Esta simulação pode ser feita por gravação / reprodução ou por meio dos
diferentes idiomas suportados, conforme explicado nesta documentação.
Observação: o teste de aceitação é um subtipo de teste funcional,
ao qual algumas pessoas também podem se referir.
Teste funcional
Este tipo de teste é feito para determinar se um
recurso ou sistema funciona corretamente sem problemas. Verifica
o sistema em diferentes níveis para garantir que todos os cenários
são cobertos e que o sistema faz o que está
suposto fazer. É uma atividade de verificação que
responde a pergunta:
Estamos construindo o produto corretamente?.
Isso geralmente inclui: os testes funcionam sem erros
(404, exceções …), de forma utilizável (redirecionamentos corretos),
de forma acessível e atendendo às suas especificações
(consulte teste de aceitação acima).
Para aplicativos da web, a automação desse teste pode ser
feito diretamente com o Selenium, simulando os retornos esperados.
Esta simulação pode ser feita por gravação / reprodução ou por meio de
os diferentes idiomas suportados, conforme explicado nesta documentação.
Testes de Integração
Os testes de integração verificam as interações entre diferentes componentes ou módulos de um sistema. Vários módulos são testados juntos. O objetivo dos testes de integração é garantir que todos os módulos se integrem e funcionem juntos conforme esperado. Os testes de integração automatizados ajudam a garantir que essas interações funcionem conforme o esperado e que os componentes integrados funcionem corretamente juntos.
Por exemplo, Testando o fluxo de pedido de um item em um site de comércio eletrônico junto com o pagamento.
Testes de sistema
O System Testing é um teste de produto completo e totalmente integrado. É um teste ponta a ponta onde o ambiente de teste é semelhante ao ambiente de produção. Aqui, navegamos por todos os recursos do software e testamos se o negócio final/recurso final funciona. Apenas testamos o recurso final e não verificamos o fluxo de dados, nem fazemos testes funcionais e tudo mais.
Por exemplo, Testando o fluxo de ponta a ponta desde o login até a colocação e pedido e verificando novamente o pedido na página Meus Pedidos e logoff de um site de comércio eletrônico.
Teste de performance/desempenho
Como o próprio nome indica, testes de desempenho são feitos
para medir o desempenho de um aplicativo.
Existem dois subtipos principais para testes de desempenho:
Teste de carga
O teste de carga é feito para verificar o quão bem o
aplicativo funciona sob diferentes cargas definidas
(geralmente um determinado número de usuários conectados ao mesmo tempo).
Teste de estresse
O teste de estresse é feito para verificar o quão bem
a aplicação funciona sob estresse (ou acima da carga máxima suportada).
Geralmente, os testes de estresse são feitos executando alguns
testes escritos com Selenium simulando diferentes usuários
utilizando uma função específica no aplicativo da web e
recuperando algumas medições significativas.
Isso geralmente é feito por outras ferramentas que recuperam as métricas.
Uma dessas ferramentas é a JMeter.
Para um aplicativo da web, os detalhes a serem medidos incluem
taxa de transferência, latência, perda de dados, tempos de carregamento de componentes individuais …
Nota 1: todos os navegadores têm uma guia de desempenho em seus
seção de ferramentas para desenvolvedores (acessível pressionando F12)
Nota 2: é um subtipo de teste não funcional
já que isso geralmente é medido por sistema e não por função / recurso.
Teste regressivo
Esse teste geralmente é feito após uma alteração, correção ou adição de recurso.
Para garantir que a mudança não quebrou nenhumas das
funcionalidades, alguns testes já executados são executados novamente.
O conjunto de testes re-executados pode ser total ou parcial
e pode incluir vários tipos diferentes, dependendo
da equipe de aplicação e desenvolvimento.
Desenvolvimento orientado a testes (TDD)
Em vez de um tipo de teste per se, o TDD é uma metodologia iterativa de desenvolvimento na qual os testes conduzem o design de um recurso.
Cada ciclo começa criando um conjunto de testes de unidade no qual
o recurso deve eventualmente ser aprovado (eles devem falhar na primeira execução).
Depois disso, ocorre o desenvolvimento para fazer os testes passarem.
Os testes são executados novamente, iniciando outro ciclo
e esse processo continua até que todos os testes sejam aprovados.
Visa acelerar o desenvolvimento de um aplicativo
com base no fato de que os defeitos custam menos quanto mais cedo são encontrados.
Desenvolvimento orientado a comportamento (BDD)
BDD também é uma metodologia de desenvolvimento iterativa
com base no TDD acima, em que o objetivo é envolver
todas as partes no desenvolvimento de um aplicativo.
Cada ciclo começa criando algumas especificações
(que deve falhar). Em seguida, crie a os testes de unidade com falha
(que também devem falhar) e, em seguida, faça o desenvolvimento.
Este ciclo é repetido até que todos os tipos de testes sejam aprovados.
Para fazer isso, uma linguagem de especificação é
usada. Deve ser compreensível por todas as partes e ser
simples, padronizada e explícita.
A maioria das ferramentas usa Gherkin como esse idioma.
O objetivo é ser capaz de detectar ainda mais erros
do que TDD, visando potenciais erros de aceitação
também e tornar a comunicação entre as partes mais fácil.
Um conjunto de ferramentas está atualmente disponível
para escrever as especificações e combiná-las com funções de código,
como Cucumber ou SpecFlow.
Um conjunto de ferramentas é construído em cima do Selenium para tornar este processo
ainda mais rápido, transformando diretamente as especificações BDD em
código executável.
Alguns deles são JBehave, Capybara e Robot Framework.
7.4 - Diretrizes e recomendações
Guias e recomendações ao preparar soluções de testes com o projecto Selenium.
Uma nota sobre “Melhores práticas”: evitamos intencionalmente a frase “Melhores
Práticas” nesta documentação. Nenhuma abordagem funciona para todas as situações.
Preferimos a ideia de “Diretrizes e Recomendações”. Nós encorajamos
que você leia e decida cuidadosamente quais abordagens
funcionarão para você em seu ambiente específico.
O teste funcional é difícil de acertar por muitos motivos.
Como se o estado, a complexidade e as dependências do aplicativo não tornassem o teste suficientemente difícil,
lidar com navegadores (especialmente com incompatibilidades entre navegadores)
torna a escrita de bons testes um desafio.
Selenium fornece ferramentas para facilitar a interação funcional do usuário,
mas não o ajuda a escrever suítes de teste bem arquitetadas.
Neste capítulo, oferecemos conselhos, diretrizes e recomendações
sobre como abordar a automação funcional de páginas da web.
Este capítulo registra os padrões de design de software populares
entre muitos dos usuários do Selenium
que tiveram sucesso ao longo dos anos.
7.4.1 - Modelos de objetos de página
Nota: esta página reuniu conteúdos de várias fontes, incluindo
o Selenium wiki
Visão geral
Dentro da interface de usuário (UI) do seu aplicativo web, existem áreas com as quais seus testes interagem. O Page Object modela apenas essas áreas como objetos dentro do código de teste. Isso reduz a quantidade de código duplicado e significa que, se a UI mudar, a correção precisará ser aplicada apenas em um lugar.
Page Object é um padrão de design (Design Pattern) que se tornou popular na automação de testes para melhorar a manutenção de testes e reduzir a duplicação de código. Page Object é uma classe orientada a objetos que serve como interface para uma página do seu AUT (Aplicativo Sob Teste). Os testes usam então os métodos desta classe de Page Object sempre que precisam interagir com a UI dessa página. A vantagem é que, se a UI da página mudar, os próprios testes não precisam mudar, apenas o código dentro do Page Object precisa mudar. Subsequentemente, todas as mudanças para suportar essa nova UI estão localizadas em um lugar.
Vantagens
Existe uma separação bem definida entre o código do teste e o código da página especifica.
Existe um repositório único para os serviços ou operações que a página oferece, em vez de ter esses serviços espalhados pelos testes.
Em ambos os casos, isso permite que quaisquer modificações necessárias devido a mudanças na UI sejam feitas em um lugar somente. Informações úteis sobre esta técnica podem ser encontradas em vários blogs, pois este ‘padrão de design de teste (test design pattern)’ está se tornando amplamente utilizado. Encorajamos os leitores que desejam saber mais a pesquisar na internet por blogs sobre este assunto. Muitos já escreveram sobre este padrão de design e podem fornecer dicas úteis além do escopo deste guia do usuário. Para começar, vamos ilustrar Page Object com um exemplo simples.
Exemplos
Primeiro, considere um exemplo, típico da automação de testes, que não usa um objeto de página:
/***
* Testes da funcionalidade de login
*/publicclassLogin{publicvoidtestLogin(){// preencha os dados de login na página de entrada
driver.findElement(By.name("user_name")).sendKeys("userName");driver.findElement(By.name("password")).sendKeys("my supersecret password");driver.findElement(By.name("sign-in")).click();// verifique se a tag h1 é "Hello userName" após o login
driver.findElement(By.tagName("h1")).isDisplayed();assertThat(driver.findElement(By.tagName("h1")).getText(),is("Hello userName"));}}
Existem dois problemas com essa abordagem.
Não há separação entre o método de teste e os localizadores do aplicativo em teste (IDs neste exemplo); ambos estão entrelaçados em um único método. Se a UI do aplicativo em teste muda seus identificadores, layout ou como um login é inserido e processado, o próprio teste deve mudar.
Os localizadores ID estariam espalhados em vários testes, em todos os testes que tivessem que usar esta página de login.
Aplicando as técnicas de Page Object, este exemplo poderia ser reescrito da seguinte forma no exemplo para uma página de login.
importorg.openqa.selenium.By;importorg.openqa.selenium.WebDriver;/**
* Page Object encapsula a página de login.
*/publicclassSignInPage{protectedWebDriverdriver;// <input name="user_name" type="text" value="">
privateByusernameBy=By.name("user_name");// <input name="password" type="password" value="">
privateBypasswordBy=By.name("password");// <input name="sign_in" type="submit" value="SignIn">
privateBysigninBy=By.name("sign_in");publicSignInPage(WebDriverdriver){this.driver=driver;if(!driver.getTitle().equals("Sign In Page")){thrownewIllegalStateException("This is not Sign In Page,"+" current page is: "+driver.getCurrentUrl());}}/**
* Faz login como um usuário válido
*
* @param userName
* @param password
* @return pbjeto da Pagina Inicial
*/publicHomePageloginValidUser(StringuserName,Stringpassword){driver.findElement(usernameBy).sendKeys(userName);driver.findElement(passwordBy).sendKeys(password);driver.findElement(signinBy).click();returnnewHomePage(driver);}}
E o objeto de página para uma página inicial poderia parecer assim.
importorg.openqa.selenium.By;importorg.openqa.selenium.WebDriver;/**
* Page Object encapsula a Página Inicial
*/publicclassHomePage{protectedWebDriverdriver;// <h1>Hello userName</h1>
privateBymessageBy=By.tagName("h1");publicHomePage(WebDriverdriver){this.driver=driver;if(!driver.getTitle().equals("Home Page of logged in user")){thrownewIllegalStateException("This is not Home Page of logged in user,"+" current page is: "+driver.getCurrentUrl());}}/**
* Obtém a mensagem (tag h1)
*
* @return String da mensagem de texto
*/publicStringgetMessageText(){returndriver.findElement(messageBy).getText();}publicHomePagemanageProfile(){// Encapsulamento da página para gerenciar a funcionalidade do perfil
returnnewHomePage(driver);}/* Mais métodos que oferecem os serviços representados pela Página inicial do usuário logado. Estes métodos por sua vez podem retornar mais Page Object, por exemplo, clicar no botão "Compor email" pode retornar um objeto da classe ComposeMail */}
Então agora, o teste de login usaria esses dois objetos de página da seguinte maneira.
/***
* Testes da funcionalidade de login
*/publicclassTestLogin{@TestpublicvoidtestLogin(){SignInPagesignInPage=newSignInPage(driver);HomePagehomePage=signInPage.loginValidUser("userName","password");assertThat(homePage.getMessageText(),is("Hello userName"));}}
Há muita flexibilidade em como o Page Object pode ser projetado, mas existem algumas regras básicas para obter a manutenibilidade desejada do seu código de teste.
Afirmações em Page Objects
Os Page Objects em si nunca devem fazer verificações ou afirmações. Isso faz parte do seu teste e sempre deve estar dentro do código do teste, nunca em um objeto de página. O objeto de página conterá a representação da página e os serviços que a página fornece por meio de métodos, mas nenhum código relacionado ao que está sendo testado deve estar dentro do objeto de página.
Há uma única verificação que pode e deve estar dentro do objeto de página, e isso é para verificar se a página e possivelmente elementos críticos na página, foram carregados corretamente. Essa verificação deve ser feita ao instanciar o objeto de página. Nos exemplos acima, tanto os construtores SignInPage quanto HomePage verificam se a página esperada está disponível e pronta para solicitações do teste.
Objetos Componentes de Página (Page Component Object)
Page Object não precisa necessariamente representar todas as partes de uma página. Isso foi notado por Martin Fowler nos primeiros dias, enquanto cunhava o termo “objetos de painel (panel objects)”.
Os mesmos princípios usados para objetos de página podem ser usados para criar “Objetos Componente de Página”, como foi chamado mais tarde, que representam partes discretas da página e podem ser incluídos em Page Object. Esses objetos de componente podem fornecer referências aos elementos dentro dessas partes discretas e métodos para aproveitar a funcionalidade ou comportamento fornecidos por eles.
Por exemplo, uma página de Produtos tem vários produtos.
<!-- Página de Produtos --><divclass="header_container"><spanclass="title">Products</span></div><divclass="inventory_list"><divclass="inventory_item"></div><divclass="inventory_item"></div><divclass="inventory_item"></div><divclass="inventory_item"></div><divclass="inventory_item"></div><divclass="inventory_item"></div></div>
Cada produto é um componente da página de Produtos.
<!-- Inventory Item --><divclass="inventory_item"><divclass="inventory_item_name">Backpack</div><divclass="pricebar"><divclass="inventory_item_price">$29.99</div><buttonid="add-to-cart-backpack">Add to cart</button></div></div>
A página de Produtos “TEM-UMA (HAS-A)” lista de produtos. This object relationship is called Composition. Essa relação de objeto é chamada de Composição. Em termos mais simples, algo é composto de outra coisa.
publicabstractclassBasePage{protectedWebDriverdriver;publicBasePage(WebDriverdriver){this.driver=driver;}}// Page Object
publicclassProductsPageextendsBasePage{publicProductsPage(WebDriverdriver){super(driver);// Sem afirmações, lança uma exceção se o elemento não for carregado
newWebDriverWait(driver,Duration.ofSeconds(3)).until(d->d.findElement(By.className("header_container")));}// Retornar uma lista de produtos é um serviço da página
publicList<Product>getProducts(){returndriver.findElements(By.className("inventory_item")).stream().map(e->newProduct(e))// Mapeia WebElement para um componente do produto
.toList();}// Retorna um produto específico usando uma função booleana (predicado)
// Este é o padrão de estratégia comportamental do GoF
publicProductgetProduct(Predicate<Product>condition){returngetProducts().stream().filter(condition)// Filtra por nome de produto ou preço
.findFirst().orElseThrow();}}
O objeto do componente Produto é usado dentro do objeto de página Produtos.
publicabstractclassBaseComponent{protectedWebElementroot;publicBaseComponent(WebElementroot){this.root=root;}}// Objeto Componente da Página (Page Component Object)
publicclassProductextendsBaseComponent{// O elemento raiz contém todo o componente
publicProduct(WebElementroot){super(root);// inventory_item
}publicStringgetName(){// A localização de um elemento começa na raiz do componente
returnroot.findElement(By.className("inventory_item_name")).getText();}publicBigDecimalgetPrice(){returnnewBigDecimal(root.findElement(By.className("inventory_item_price")).getText().replace("$","")).setScale(2,RoundingMode.UNNECESSARY);// Higienização e formatação
}publicvoidaddToCart(){root.findElement(By.id("add-to-cart-backpack")).click();}}
Agora, o teste dos produtos usaria o Page Objecto e o Page Component Obeject da seguinte maneira.
publicclassProductsTest{@TestpublicvoidtestProductInventory(){varproductsPage=newProductsPage(driver);// page object
varproducts=productsPage.getProducts();assertEquals(6,products.size());// esperado, atual
}@TestpublicvoidtestProductPrices(){varproductsPage=newProductsPage(driver);// Passa uma expressão lambda (predicado) para filtrar a lista de produtos
// O predicado ou "estratégia" é o comportamento passado como parâmetro
varbackpack=productsPage.getProduct(p->p.getName().equals("Backpack"));// page component object
varbikeLight=productsPage.getProduct(p->p.getName().equals("Bike Light"));assertEquals(newBigDecimal("29.99"),backpack.getPrice());assertEquals(newBigDecimal("9.99"),bikeLight.getPrice());}}
A página e o componente são representados por seus próprios objetos. Ambos os objetos têm apenas métodos para os serviços que oferecem, o que corresponde à aplicação do mundo real na programação orientada a objetos.
Você pode até aninhar objetos de componentes dentro de outros objetos de componentes para páginas mais complexas. Se uma página na AUT tiver vários componentes, ou componentes comuns usados em todo o site (por exemplo, uma barra de navegação), então isso pode melhorar a manutenibilidade e reduzir a duplicação de código.
Outros Padrões de Projeto (Design Patterns) Usados em Testes
Existem outros padrões de projeto que também podem ser usados em testes. Discutir todos esses está além do escopo deste guia do usuário. Aqui, apenas queremos introduzir os conceitos para tornar o leitor ciente de algumas das coisas que podem ser feitas. Como foi mencionado anteriormente, muitos escreveram sobre este tópico e encorajamos o leitor a procurar blogs sobre esses tópicos.
Notas de Implementação
Page Objects podem ser pensados como se estivessem voltados para duas direções simultaneamente. Voltado para o desenvolvedor de um teste, eles representam os serviços oferecidos por uma página específica. Virado para longe do desenvolvedor, eles devem ser a única coisa que tem um conhecimento profundo da estrutura do HTML de uma página (ou parte de uma página). É mais simples pensar nos métodos de um Page Object como oferecendo os “serviços” que uma página oferece, em vez de expor os detalhes e a mecânica da página. Como exemplo, pense na caixa de entrada de qualquer sistema de email baseado na web. Entre os serviços que oferece estão a capacidade de compor um novo e-mail, escolher ler um único e-mail e listar as linhas de assunto dos e-mails na caixa de entrada. Como esses são implementados não deve importar para o teste.
Porque estamos encorajando o desenvolvedor de um teste a tentar pensar sobre os serviços com os quais estão interagindo em vez da implementação, os Page Objects raramente devem expor a instância subjacente do WebDriver. Para facilitar isso, os métodos no Page Object devem retornar outros Page Objects. Isso significa que podemos efetivamente modelar a jornada do usuário em nosso aplicativo. Também significa que se a maneira como as páginas se relacionam entre si mudar (como quando a página de login pede ao usuário para alterar sua senha na primeira vez que eles entram em um serviço quando antes não fazia isso), simplesmente mudando a assinatura do método apropriado fará com que os testes falhem em compilação. Colocando de outra forma; podemos dizer quais testes falhariam sem precisar executá-los quando mudamos a relação entre as páginas e refletimos isso nos PageObjects.
Uma consequência dessa abordagem é que pode ser necessário modelar (por exemplo) tanto um login bem-sucedido quanto um mal-sucedido; ou um clique poderia ter um resultado diferente dependendo do estado do aplicativo. Quando isso acontece, é comum ter vários métodos no PageObject:
publicclassLoginPage{publicHomePageloginAs(Stringusername,Stringpassword){// ... mágica inteligente acontece aqui
}publicLoginPageloginAsExpectingError(Stringusername,Stringpassword){// ... falha no login aqui, talvez porque o nome de usuário e/ou a senha estão incorretos
}publicStringgetErrorMessage(){// Para que possamos verificar se o erro correto é mostrado
}}
O código apresentado acima mostra um ponto importante: os testes, não os Page Objects, devem ser responsáveis por fazer asserções sobre o estado de uma página. Por exemplo:
publicvoidtestMessagesAreReadOrUnread(){Inboxinbox=newInbox(driver);inbox.assertMessageWithSubjectIsUnread("I like cheese");inbox.assertMessageWithSubjectIsNotUnread("I'm not fond of tofu");}
could be re-written as:
publicvoidtestMessagesAreReadOrUnread(){Inboxinbox=newInbox(driver);assertTrue(inbox.isMessageWithSubjectIsUnread("I like cheese"));assertFalse(inbox.isMessageWithSubjectIsUnread("I'm not fond of tofu"));}
Claro, como em toda diretriz, existem exceções, e uma que é comumente vista com Page Objects é verificar se o WebDriver está na página correta quando instanciamos o Page Object. Isso é feito no exemplo abaixo.
Finalmente, um Page Object não precisa representar uma página inteira. Pode representar uma seção que aparece com frequência dentro de um site ou página, como a navegação do site. O princípio essencial é que há apenas um lugar em sua suíte de testes com conhecimento da estrutura do HTML de uma determinada (parte de uma) página.
Resumo
Os métodos públicos representam os serviços que a página oferece
Tente não expor as entranhas da página
Geralmente não faça asserções
Métodos retornam outros PageObjects
*Não precisa representar uma página inteira
Resultados diferentes para a mesma ação são modelados como métodos diferentes
Example
publicclassLoginPage{privatefinalWebDriverdriver;publicLoginPage(WebDriverdriver){this.driver=driver;// Verifica se estamos na página correta.
if(!"Login".equals(driver.getTitle())){// Alternativamente, poderíamos navegar para a página de login, talvez fazendo logout primeiro
thrownewIllegalStateException("This is not the login page");}}// A página de login contém vários elementos HTML que serão representados como WebElements.
// Os localizadores para esses elementos devem ser definidos apenas uma vez.
ByusernameLocator=By.id("username");BypasswordLocator=By.id("passwd");ByloginButtonLocator=By.id("login");// A página de login permite que o usuário digite seu nome de usuário no campo de nome de usuário
publicLoginPagetypeUsername(Stringusername){// Este é o único lugar que "sabe" como entrar com um nome de usuário
driver.findElement(usernameLocator).sendKeys(username);// Retorna o objeto de página atual, já que esta ação não navega para uma página representada por outro Page Object
returnthis;}Esteéoúnicolugarque"sabe"comoentrarcomumasenha// A página de login permite que o usuário digite sua senha no campo de senha
publicLoginPagetypePassword(Stringpassword){// Este é o único lugar que "sabe" como entrar com uma senha
driver.findElement(passwordLocator).sendKeys(password);// Retorna o objeto de página atual, já que esta ação não navega para uma página representada por outro Page Object
returnthis;}// A página de login permite que o usuário envie o formulário de login
publicHomePagesubmitLogin(){// Este é o único lugar que envia o formulário de login e espera que o destino seja a página inicial.
// Um método separado deve ser criado para a instância de clicar em login enquanto espera uma falha de login.
driver.findElement(loginButtonLocator).submit();// Retorna um novo objeto de página representando o destino. Caso a página de login vá para algum outro lugar (por exemplo, um aviso legal),
// então a alteração da assinatura do método para este método significará que todos os testes que dependem deste comportamento não serão compilados.
returnnewHomePage(driver);}// A página de login permite que o usuário envie o formulário de login sabendo que um nome de usuário inválido e/ou senha foram inseridos
publicLoginPagesubmitLoginExpectingFailure(){// Este é o único lugar que envia o formulário de login e espera que o destino seja a página de login devido à falha no login.
driver.findElement(loginButtonLocator).submit();// Retorna um novo objeto de página representando o destino. Caso o usuário seja navegado para a página inicial depois de enviar um login com credenciais
// que se espera falhar no login, o script falhará quando tentar instanciar o PageObject LoginPage.
returnnewLoginPage(driver);}// Conceitualmente, a página de login oferece ao usuário o serviço de ser capaz de "entrar"
// no aplicativo usando um nome de usuário e senha.
publicHomePageloginAs(Stringusername,Stringpassword){// Os métodos PageObject que inserem nome de usuário, senha e enviam login já foram definidos e não devem ser repetidos aqui.
typeUsername(username);typePassword(password);returnsubmitLogin();}}
7.4.2 - Linguagem específica de domínio (DSL)
Uma linguagem específica de domínio (DSL) é um sistema que fornece ao usuário
um meio expressivo de resolver um problema. Ele permite a um usuário
interagir com o sistema em seus termos - não apenas na linguagem do programador.
Seus usuários, em geral, não se importam com a aparência do seu site. Eles não
preocupam-se com a decoração, animações ou gráficos. Eles
deseja usar seu sistema para empurrar seus novos funcionários através do
processo com dificuldade mínima; eles querem reservar uma viagem para o Alasca;
eles querem configurar e comprar unicórnios com desconto. Seu trabalho como
testador deve chegar o mais perto possível de “capturar” essa mentalidade.
Com isso em mente, começamos a “modelar” o aplicativo que você está
trabalhando, de modo que os scripts de teste (o único proxy de pré-lançamento do usuário) “fala a linguagem” e representa o usuário.
Com Selenium, DSL é geralmente representado por métodos, escritos para fazer
a API simples e legível - eles permitem um relatório entre o
desenvolvedores e as partes interessadas (usuários, proprietários de produtos, negócios
especialistas em inteligência, etc.).
Benefícios
Legível: As partes interessadas da empresa podem entendê-lo.
Gravável: Fácil de escrever, evita duplicações desnecessárias.
Extensível: Funcionalidade pode (razoavelmente) ser adicionada
sem quebrar contratos e funcionalidades existentes.
Manutenção: Deixando os detalhes de implementação fora do teste
casos, você está bem isolado contra alterações no AUT *.
Java
Aqui está um exemplo de um método DSL razoável em Java.
Por questão de brevidade, ele assume que o objeto driver é pré-definido
e está disponível para o método.
/**
* Recebe um username e password, prrenche os campos, e clica em "login".
* @return Uma instância de AccountPage
*/publicAccountPageloginAsUser(Stringusername,Stringpassword){WebElementloginField=driver.findElement(By.id("loginField"));loginField.clear();loginField.sendKeys(username);// Preenche o campo password. O localizador que estamos usando é "By.id", e devemos
// definí-lo em algum outro lugar dentro da Classe.
WebElementpasswordField=driver.findElement(By.id("password"));passwordField.clear();passwordField.sendKeys(password);// Clica o botão de login, que possui o id "submit".
driver.findElement(By.id("submit")).click();// Cria e retorna uma nova instância de AccountPage (via o Selenium
// PageFactory embutido).
returnPageFactory.newInstance(AccountPage.class);}
Este método abstrai completamente os conceitos de campos de entrada,
botões, cliques e até páginas do seu código de teste. Usando este
abordagem, tudo o que o testador precisa fazer é chamar esse método. Isto dá
uma vantagem de manutenção: se os campos de login mudaram, você
teria apenas que alterar esse método - não seus testes.
publicvoidloginTest(){loginAsUser("cbrown","cl0wn3");// Agora que estamos logados, fazemos alguma outra coisa--como usamos uma DSL para suportar
// nossos testadores, é apenas escolher um dos métodos disponíveis.
do.something();do.somethingElse();Assert.assertTrue("Algo deveria ter sido feito!",something.wasDone());// Note que ainda não nos referimos a nenhum botão ou web control nesse
// script...
}
Vale a pena repetir: um de seus principais objetivos deve ser escrever um
API que permite que seus testes resolvam o problema em questão, e NÃO
o problema da IU. A IU é uma preocupação secundária para o seu
usuários - eles não se importam com a interface do usuário, eles apenas querem fazer seu trabalho
feito. Seus scripts de teste devem ser lidos como uma lista de itens sujos que o usuário deseja FAZER e as coisas que deseja SABER. Os testes
não devem se preocupar com COMO a interface do usuário exige que você vá
sobre isso.
*AUT: Application under test
7.4.3 - Gerando estado da aplicação
Selenium não deve ser usado para preparar um caso de teste. Tudo as
ações repetitivas e preparações para um caso de teste devem ser feitas por meio de outros
métodos. Por exemplo, a maioria das IUs da web tem autenticação (por exemplo, um formulário de login). Eliminar o login via navegador da web antes de cada teste irá
melhorar a velocidade e estabilidade do teste. Um método deve ser
criado para obter acesso à AUT* (por exemplo, usando uma API para fazer login e definir um
cookie). Além disso, a criação de métodos para pré-carregar dados para
o teste não deve ser feito usando Selenium. Como dito anteriormente,
APIs existentes devem ser aproveitadas para criar dados para a AUT *.
*AUT: Application under test
7.4.4 - Simulação de serviços externos
Eliminar as dependências de serviços externos melhorará muito
a velocidade e estabilidade de seus testes.
7.4.5 - Relatórios melhorados
O Selenium não foi projetado para relatar sobre o status de casos de teste. Aproveitar
os recursos de relatórios integrados de frameworks de teste unitários é um bom começo.
A maioria dos frameworks de teste unitários podem gerar relatórios formatados em xUnit ou HTML.
Relatórios xUnit são populares para importar resultados para um servidor de integração contínua
(CI) como Jenkins, Travis, Bamboo, etc. Aqui estão alguns links
para obter mais informações sobre resultados de relatórios em vários idiomas.
Embora mencionado em vários lugares, vale a pena mencionar novamente. Garanta que
os testes são isolados uns dos outros.
Não compartilhe dados de teste. Imagine vários testes em que cada um consulta o banco de dados
para pedidos válidos antes de escolher um para executar uma ação. Caso dois testes
peguem a mesma ordem, provavelmente você obterá um comportamento inesperado.
Limpe dados desatualizados no aplicativo que podem ser obtidos por outro
teste, por exemplo registros de pedidos inválidos.
Crie uma nova instância do WebDriver por teste. Isso ajuda a garantir o isolamento do teste
e torna a paralelização mais simples.
7.4.7 - Tips on working with locators
When to use which locators and how best to manage them in your code.
No geral, se os IDs de HTML estiverem disponíveis, únicos e consistentemente
previsíveis, eles são o método preferido para localizar um elemento
uma página. Eles tendem a trabalhar muito rapidamente e dispensar muito processamento
que vem com travessias de DOM complicadas.
Se IDs exclusivos não estiverem disponíveis, um seletor CSS bem escrito é o
método preferido de localização de um elemento. XPath funciona bem como CSS
seletores, mas a sintaxe é complicada e frequentemente difícil de
depurar. Embora os seletores XPath sejam muito flexíveis, eles não são tipicamente testados em performance por fornecedores de navegadores e tendem a ser bastante lentos.
As estratégias de seleção baseadas em linkText e partialLinkText têm
desvantagens porque eles só funcionam em elementos de link. Além disso, eles
chamam seletores querySelectorAll internamente no WebDriver.
O nome da tag pode ser uma maneira perigosa de localizar elementos. tem
frequentemente, vários elementos da mesma tag presentes na página.
Isso é útil principalmente ao chamar o método _findElements(By) _ que
retorna uma coleção de elementos.
A recomendação é manter seus localizadores compactos e
legíveis quanto possível. Pedir ao WebDriver para percorrer a estrutura DOM
é uma operação cara, e quanto mais você pode restringir o escopo de
sua pesquisa, melhor.
7.4.8 - Independência de Testes
Escreva cada teste como sua própria unidade. Escreva os testes de uma forma que não seja
dependente de outros testes para concluir:
Digamos que existe um sistema de gerenciamento de conteúdo com o qual você pode criar
algum conteúdo personalizado que então aparece em seu site como um módulo após
publicação, e pode levar algum tempo para sincronizar entre o CMS e a aplicação.
Uma maneira errada de testar seu módulo é que o conteúdo seja criado e
publicado em um teste e, em seguida, verificar o módulo em outro teste. Este teste
não é viável, pois o conteúdo pode não estar disponível imediatamente para o
outro teste após a publicação.
Em vez disso, você pode criar um conteúdo stub que pode ser ligado e desligado
dentro do teste e use-o para validar o módulo. Contudo,
para a criação de conteúdo, você ainda pode ter um teste separado.
7.4.9 - Considere usar uma API fluente
Martin Fowler cunhou o termo “API Fluent”. Selenium já
implementa algo assim em sua classe FluentWait, que é
pretende ser uma alternativa à classe padrão Wait.
Você pode habilitar o padrão de design de API fluente em seu objeto de página
e, em seguida, consulte a página de pesquisa do Google com um snippet de código como este:
A classe de objeto da página do Google com este comportamento fluente
pode ser assim:
publicabstractclassBasePage{protectedWebDriverdriver;publicBasePage(WebDriverdriver){this.driver=driver;}}publicclassGoogleSearchPageextendsBasePage{publicGoogleSearchPage(WebDriverdriver){super(driver);// Generally do not assert within pages or components.
// Effectively throws an exception if the lambda condition is not met.
newWebDriverWait(driver,Duration.ofSeconds(3)).until(d->d.findElement(By.id("logo")));}publicGoogleSearchPagesetSearchString(Stringsstr){driver.findElement(By.id("gbqfq")).sendKeys(sstr);returnthis;}publicvoidclickSearchButton(){driver.findElement(By.id("gbqfb")).click();}}
7.4.10 - Navegador novo por teste
Comece cada teste a partir de um estado limpo conhecido.
Idealmente, ligue uma nova máquina virtual para cada teste.
Se ligar uma nova máquina virtual não for prático,
pelo menos inicie um novo WebDriver para cada teste.
Most browser drivers like GeckoDriver and ChromeDriver will start with a clean
known state with a new user profile, by default.
WebDriverdriver=newFirefoxDriver();
7.5 - Piores práticas
Temas a evitar quando automatizar navegadores com Selenium.
7.5.1 - Captchas
CAPTCHA, abreviação de Completely Automated Public Turing test
to tell Computers and Humans Apart,
foi projetado explicitamente para impedir a automação, portanto, não tente!
Existem duas estratégias principais para contornar as verificações CAPTCHA:
Desative CAPTCHAs em seu ambiente de teste
Adicione um hook para permitir que os testes ignorem o CAPTCHA
7.5.2 - Downloads de arquivo
Embora seja possível iniciar um download
clicando em um link com um navegador sob o controle do Selenium,
a API não expõe o progresso do download,
tornando-o menos do que ideal para testar arquivos baixados.
Isso ocorre porque o download de arquivos não é considerado um aspecto importante
de emular a interação do usuário com a plataforma da web.
Em vez disso, encontre o link usando Selenium
(e todos os cookies necessários)
e passe este cookie para uma biblioteca de solicitação HTTP como
libcurl.
O driver HtmlUnit pode baixar
anexos acessando-os como fluxos de entrada, implementando o
AttachmentHandler.
O AttachmentHandler pode ser adicionado ao WebClient HtmlUnit.
7.5.3 - Códigos de respostas HTTP
Para algumas configurações de navegador no Selenium RC,
Selenium atuou como um proxy entre o navegador
e o site sendo automatizado.
Isso significa que todo o tráfego do navegador que passou pelo Selenium
poderia ser capturado ou manipulado.
O método captureNetworkTraffic()
pretendia capturar todo o tráfego de rede entre o navegador
e o site sendo automatizado,
incluindo códigos de resposta HTTP.
Selenium WebDriver é uma abordagem completamente diferente
para a automação do navegador,
preferindo agir mais como um usuário.
Isso é representado na maneira como você escreve testes com o WebDriver.
Em testes funcionais automatizados,
verificar o código de status
não é um detalhe particularmente importante da falha de um teste;
as etapas que o precederam são mais importantes.
O navegador sempre representará o código de status HTTP,
imagine, por exemplo, uma página de erro 404 ou 500.
Uma maneira simples de “falhar rapidamente” quando você encontrar uma dessas páginas de erro
é verificar o título da página ou o conteúdo de um ponto confiável
(por exemplo, a tag <h1>) após cada carregamento de página.
Se você estiver usando o modelo de objeto de página,
você pode incluir esta verificação em seu construtor de classe
ou ponto semelhante onde o carregamento da página é esperado.
Ocasionalmente, o código HTTP pode até ser representado
na página de erro do navegador
e você pode usar o WebDriver para ler isso
e melhorar sua saída de depuração.
Verificar se a própria página da web está alinhada
com a prática ideal do WebDriver
de representar a visão do usuário do site.
Se você insiste, uma solução avançada para capturar códigos de status HTTP
é replicar o comportamento do Selenium RC usando um proxy.
A API WebDriver fornece a capacidade de definir um proxy para o navegador,
e há uma série de proxies que irão
permitir que você manipule de forma programática
o conteúdo das solicitações enviadas e recebidas do servidor da web.
Usar um proxy permite que você decida como deseja responder
para códigos de resposta de redirecionamento.
Além disso, nem todo navegador
torna os códigos de resposta disponíveis para WebDriver,
então optar por usar um proxy
permite que você tenha uma solução que funciona para todos os navegadores.
7.5.4 - Login via Gmail, email e Facebook
Por vários motivos, fazer login em sites como Gmail e Facebook
usando do WebDriver não é recomendado.
Além de ser contra os termos de uso desses sites
(onde você corre o risco de ter a conta encerrada),
é lento e não confiável.
A prática ideal é usar as APIs que os provedores de e-mail oferecem,
ou no caso do Facebook, o serviço de ferramentas para desenvolvedores
que expõe uma API para criar contas de teste, amigos e assim por diante.
Embora usar uma API possa parecer um pouco trabalhoso,
você será recompensado em velocidade, confiabilidade e estabilidade.
A API também não deve mudar,
enquanto as páginas da web e os localizadores de HTML mudam frequentemente
e exigem que você atualize sua estrutura de teste.
Login em sites de terceiros usando WebDriver
em qualquer ponto do seu teste aumenta o risco
de seu teste falhar porque torna o teste mais longo.
Uma regra geral é que testes mais longos
são mais frágeis e não confiáveis.
Implementações WebDriver que estão
em conformidade com W3C
também anotam o objeto navigator
com uma propriedade WebDriver
para que os ataques de negação de serviço possam ser mitigados.
7.5.5 - Dependência entre testes
Uma ideia comum e um equívoco sobre o teste automatizado é sobre uma
ordem de testes específica. Seus testes devem ser executados em qualquer ordem,
e não depender da conclusão de outros testes para ter sucesso.
7.5.6 - Teste de performance/desempenho
Teste de desempenho usando Selenium e WebDriver
geralmente não é recomendado.
Não porque é incapaz,
mas porque não é otimizado para o trabalho
e é improvável que você obtenha bons resultados.
Pode parecer ideal para teste de desempenho
no contexto do usuário, mas um conjunto de testes WebDriver
estão sujeitos a muitos pontos de fragilidade externa e interna
que estão além do seu controle;
por exemplo, velocidade de inicialização do navegador,
velocidade dos servidores HTTP,
resposta de servidores de terceiros que hospedam JavaScript ou CSS,
e a penalidade de instrumentação
da própria implementação do WebDriver.
A variação nesses pontos causará variação em seus resultados.
É difícil separar a diferença
entre o desempenho do seu site
e o desempenho de recursos externos,
e também é difícil dizer qual é a penalidade de desempenho
para usar WebDriver no navegador,
especialmente se você estiver injetando scripts.
A outra atração potencial é “economizar tempo” -
execução de testes funcionais e de desempenho ao mesmo tempo.
No entanto, os testes funcionais e de desempenho têm objetivos opostos.
Para testar a funcionalidade, um testador pode precisar ser paciente
e aguarde o carregamento,
mas isso irá turvar os resultados do teste de desempenho e vice-versa.
Para melhorar o desempenho do seu site,
você precisará ser capaz de analisar o desempenho geral
independente das diferenças de ambiente,
identificar práticas de código ruins,
repartição do desempenho de recursos individuais
(ou seja, CSS ou JavaScript),
para saber o que melhorar.
Existem ferramentas de teste de desempenho disponíveis
que podem fazer este trabalho,
que fornecem relatórios e análises,
e podem até fazer sugestões de melhorias.
Pacotes de exemplo (código aberto) a serem usados são: JMeter
7.5.7 - Navegação por links
Usar o WebDriver para navegar por links
não é uma prática recomendada. Não porque não pode ser feito,
mas porque WebDriver definitivamente não é a ferramenta ideal para isso.
O WebDriver precisa de tempo para inicializar,
e pode levar vários segundos, até um minuto
dependendo de como seu teste é escrito,
apenas para chegar à página e atravessar o DOM.
Em vez de usar o WebDriver para isso,
você poderia economizar muito tempo
executando um comando curl,
ou usando uma biblioteca como BeautifulSoup
uma vez que esses métodos não dependem
em criar um navegador e navegar para uma página.
Você está economizando muito tempo por não usar o WebDriver para essa tarefa.
7.5.8 - Autenticação de Dois Fatores (2FA)
A autenticação de dois fatores, conhecida como 2FA, é um mecanismo de autorização
onde a senha de uso único (OTP) é gerada usando aplicativos móveis “Autenticadores”,
como “Google Authenticator”, “Microsoft Authenticator”
etc., ou por SMS, e-mail para autenticação. Automatizar isso perfeitamente
e consistentemente é um grande desafio no Selenium. Existem algumas maneiras
para automatizar este processo. Mas essa será outra camada em cima de nossos
testes Selenium e não protegidos também. Portanto, você pode evitar a automação do 2FA.
Existem algumas opções para contornar as verificações 2FA:
Desative 2FA para determinados usuários no ambiente de teste, para que você possa
usar essas credenciais de usuário na automação.
Desative 2FA em seu ambiente de teste.
Desative 2FA se você fizer o login de determinados IPs. Dessa forma, podemos configurar nosso
teste os IPs da máquina para evitar isso.
8 - Sobre esta documentação
Essa documentação, como o próprio código, são mantidos 100% por voluntários
dentro da comunidade Selenium.
Muitos têm usado desde o seu início,
mas muitos mais o usam há pouco tempo,
e dedicaram seu tempo para ajudar a melhorar a experiência de integração
para novos usuários.
Se houver algum problema com a documentação, queremos saber!
A melhor maneira de comunicar um problema é visitar
https://github.com/seleniumhq/seleniumhq.github.io/issues
e pesquise se o problema já foi ou não arquivado.
Se não, fique à vontade para abrir um!
Muitos membros da comunidade frequentam
o canal Libera #selenium em Libera.chat.
Sinta-se à vontade para entrar e fazer perguntas
e se você receber ajuda que você acha que poderia ser útil nessa documentação,
certifique-se de adicionar sua contribuição!
Podemos atualizar essa documentação,
mas é muito mais fácil para todos quando recebemos contribuições
de fora dos committers normais.
8.1 - Direitos autorais e atribuições
Copyright, contributions and all attributions for the different projects under the Selenium umbrella.
A Documentação do Selenium
Todo esforço foi feito para tornar esta documentação a mais completa e precisa possível,
mas nenhuma garantia ou adequação está implícita. As informações fornecidas são
“no estado em que se encontram”. Os autores e a editora não terão qualquer responsabilidade
para com qualquer pessoa ou entidade com relação a quaisquer perdas ou danos decorrentes
das informações contidas neste livro. Nenhuma responsabilidade de patente é assumida com
relação ao uso das informações aqui contidas.
Todo o código e documentação proveniente do projeto Selenium
está licenciado sob a licença Apache 2.0,
com a Software Freedom Conservancy
como detentor dos direitos autorais.
A licença está incluída aqui por conveniência,
mas você também pode encontrá-la no
Site da Apache Foundation:
Apache License
Version 2.0, January 2004
http://www.apache.org/licenses/
TERMS AND CONDITIONS FOR USE, REPRODUCTION, AND DISTRIBUTION
1. Definitions.
"License" shall mean the terms and conditions for use, reproduction,
and distribution as defined by Sections 1 through 9 of this document.
"Licensor" shall mean the copyright owner or entity authorized by
the copyright owner that is granting the License.
"Legal Entity" shall mean the union of the acting entity and all
other entities that control, are controlled by, or are under common
control with that entity. For the purposes of this definition,
"control" means (i) the power, direct or indirect, to cause the
direction or management of such entity, whether by contract or
otherwise, or (ii) ownership of fifty percent (50%) or more of the
outstanding shares, or (iii) beneficial ownership of such entity.
"You" (or "Your") shall mean an individual or Legal Entity
exercising permissions granted by this License.
"Source" form shall mean the preferred form for making modifications,
including but not limited to software source code, documentation
source, and configuration files.
"Object" form shall mean any form resulting from mechanical
transformation or translation of a Source form, including but
not limited to compiled object code, generated documentation,
and conversions to other media types.
"Work" shall mean the work of authorship, whether in Source or
Object form, made available under the License, as indicated by a
copyright notice that is included in or attached to the work
(an example is provided in the Appendix below).
"Derivative Works" shall mean any work, whether in Source or Object
form, that is based on (or derived from) the Work and for which the
editorial revisions, annotations, elaborations, or other modifications
represent, as a whole, an original work of authorship. For the purposes
of this License, Derivative Works shall not include works that remain
separable from, or merely link (or bind by name) to the interfaces of,
the Work and Derivative Works thereof.
"Contribution" shall mean any work of authorship, including
the original version of the Work and any modifications or additions
to that Work or Derivative Works thereof, that is intentionally
submitted to Licensor for inclusion in the Work by the copyright owner
or by an individual or Legal Entity authorized to submit on behalf of
the copyright owner. For the purposes of this definition, "submitted"
means any form of electronic, verbal, or written communication sent
to the Licensor or its representatives, including but not limited to
communication on electronic mailing lists, source code control systems,
and issue tracking systems that are managed by, or on behalf of, the
Licensor for the purpose of discussing and improving the Work, but
excluding communication that is conspicuously marked or otherwise
designated in writing by the copyright owner as "Not a Contribution."
"Contributor" shall mean Licensor and any individual or Legal Entity
on behalf of whom a Contribution has been received by Licensor and
subsequently incorporated within the Work.
2. Grant of Copyright License. Subject to the terms and conditions of
this License, each Contributor hereby grants to You a perpetual,
worldwide, non-exclusive, no-charge, royalty-free, irrevocable
copyright license to reproduce, prepare Derivative Works of,
publicly display, publicly perform, sublicense, and distribute the
Work and such Derivative Works in Source or Object form.
3. Grant of Patent License. Subject to the terms and conditions of
this License, each Contributor hereby grants to You a perpetual,
worldwide, non-exclusive, no-charge, royalty-free, irrevocable
(except as stated in this section) patent license to make, have made,
use, offer to sell, sell, import, and otherwise transfer the Work,
where such license applies only to those patent claims licensable
by such Contributor that are necessarily infringed by their
Contribution(s) alone or by combination of their Contribution(s)
with the Work to which such Contribution(s) was submitted. If You
institute patent litigation against any entity (including a
cross-claim or counterclaim in a lawsuit) alleging that the Work
or a Contribution incorporated within the Work constitutes direct
or contributory patent infringement, then any patent licenses
granted to You under this License for that Work shall terminate
as of the date such litigation is filed.
4. Redistribution. You may reproduce and distribute copies of the
Work or Derivative Works thereof in any medium, with or without
modifications, and in Source or Object form, provided that You
meet the following conditions:
(a) You must give any other recipients of the Work or
Derivative Works a copy of this License; and
(b) You must cause any modified files to carry prominent notices
stating that You changed the files; and
(c) You must retain, in the Source form of any Derivative Works
that You distribute, all copyright, patent, trademark, and
attribution notices from the Source form of the Work,
excluding those notices that do not pertain to any part of
the Derivative Works; and
(d) If the Work includes a "NOTICE" text file as part of its
distribution, then any Derivative Works that You distribute must
include a readable copy of the attribution notices contained
within such NOTICE file, excluding those notices that do not
pertain to any part of the Derivative Works, in at least one
of the following places: within a NOTICE text file distributed
as part of the Derivative Works; within the Source form or
documentation, if provided along with the Derivative Works; or,
within a display generated by the Derivative Works, if and
wherever such third-party notices normally appear. The contents
of the NOTICE file are for informational purposes only and
do not modify the License. You may add Your own attribution
notices within Derivative Works that You distribute, alongside
or as an addendum to the NOTICE text from the Work, provided
that such additional attribution notices cannot be construed
as modifying the License.
You may add Your own copyright statement to Your modifications and
may provide additional or different license terms and conditions
for use, reproduction, or distribution of Your modifications, or
for any such Derivative Works as a whole, provided Your use,
reproduction, and distribution of the Work otherwise complies with
the conditions stated in this License.
5. Submission of Contributions. Unless You explicitly state otherwise,
any Contribution intentionally submitted for inclusion in the Work
by You to the Licensor shall be under the terms and conditions of
this License, without any additional terms or conditions.
Notwithstanding the above, nothing herein shall supersede or modify
the terms of any separate license agreement you may have executed
with Licensor regarding such Contributions.
6. Trademarks. This License does not grant permission to use the trade
names, trademarks, service marks, or product names of the Licensor,
except as required for reasonable and customary use in describing the
origin of the Work and reproducing the content of the NOTICE file.
7. Disclaimer of Warranty. Unless required by applicable law or
agreed to in writing, Licensor provides the Work (and each
Contributor provides its Contributions) on an "AS IS" BASIS,
WITHOUT WARRANTIES OR CONDITIONS OF ANY KIND, either express or
implied, including, without limitation, any warranties or conditions
of TITLE, NON-INFRINGEMENT, MERCHANTABILITY, or FITNESS FOR A
PARTICULAR PURPOSE. You are solely responsible for determining the
appropriateness of using or redistributing the Work and assume any
risks associated with Your exercise of permissions under this License.
8. Limitation of Liability. In no event and under no legal theory,
whether in tort (including negligence), contract, or otherwise,
unless required by applicable law (such as deliberate and grossly
negligent acts) or agreed to in writing, shall any Contributor be
liable to You for damages, including any direct, indirect, special,
incidental, or consequential damages of any character arising as a
result of this License or out of the use or inability to use the
Work (including but not limited to damages for loss of goodwill,
work stoppage, computer failure or malfunction, or any and all
other commercial damages or losses), even if such Contributor
has been advised of the possibility of such damages.
9. Accepting Warranty or Additional Liability. While redistributing
the Work or Derivative Works thereof, You may choose to offer,
and charge a fee for, acceptance of support, warranty, indemnity,
or other liability obligations and/or rights consistent with this
License. However, in accepting such obligations, You may act only
on Your own behalf and on Your sole responsibility, not on behalf
of any other Contributor, and only if You agree to indemnify,
defend, and hold each Contributor harmless for any liability
incurred by, or claims asserted against, such Contributor by reason
of your accepting any such warranty or additional liability.
END OF TERMS AND CONDITIONS
APPENDIX: How to apply the Apache License to your work.
To apply the Apache License to your work, attach the following
boilerplate notice, with the fields enclosed by brackets "[]"
replaced with your own identifying information. (Don't include
the brackets!) The text should be enclosed in the appropriate
comment syntax for the file format. We also recommend that a
file or class name and description of purpose be included on the
same "printed page" as the copyright notice for easier
identification within third-party archives.
Copyright [yyyy] [name of copyright owner]
Licensed under the Apache License, Version 2.0 (the "License");
you may not use this file except in compliance with the License.
You may obtain a copy of the License at
http://www.apache.org/licenses/LICENSE-2.0
Unless required by applicable law or agreed to in writing, software
distributed under the License is distributed on an "AS IS" BASIS,
WITHOUT WARRANTIES OR CONDITIONS OF ANY KIND, either express or implied.
See the License for the specific language governing permissions and
limitations under the License.
8.2 - Contribuindo com o Site e Documentação do Selenium
Informações em como melhorar a documentação e exemplos de código para Selenium.
Selenium é um grande projeto de software, seu site e documentação são fundamentais
para entender como as coisas funcionam e aprender maneiras eficazes de explorar
seu potencial.
Este projeto contém o site e a documentação do Selenium. Isto é
um esforço contínuo (não direcionado a nenhuma versão específica) para fornecer
informações atualizadas sobre como usar o Selenium de forma eficaz, como se
envolver e como contribuir para o Selenium.
As contribuições para o site e documentação seguem o processo descrito na seção abaixo sobre contribuições.
O projeto Selenium recebe contribuições de todos. Há um
várias maneiras de ajudar:
Reportar um problema
Ao relatar um novo problema ou comentar sobre problemas existentes, por favor
certifique-se de que as discussões estão relacionadas a questões técnicas concretas sobre o
software Selenium, seu site e/ou documentação.
Todos os componentes do Selenium mudam bastante rápido ao longo do tempo, então este
pode fazer com que a documentação fique desatualizada. Se você observar que este é
o caso, como mencionado, não hesite em criar um problema para isso.
Também pode ser possível que você saiba como atualizar a
documentação, então, envie-nos um Pull Request com a
alteração.
Se você não tem certeza se o que encontrou é um problema ou não,
pergunte através dos canais de comunicação descritos em
https://selenium.dev/support.
We want to be able to run all of our code examples in the CI to ensure that people can copy and paste and
execute everything on the site. So we put the code where it belongs in the
examples directory.
Each page in the documentation correlates to a test file in each of the languages, and should follow naming conventions.
For instance examples for this page https://www.selenium.dev/documentation/webdriver/browsers/chrome/ get added in these
files:
Each example should get its own test. Ideally each test has an assertion that verifies the code works as intended.
Once the code is copied to its own test in the proper file, it needs to be referenced in the markdown file.
For example, the tab in Ruby would look like this:
The line numbers at the end represent only the line or lines of code that actually represent the item being displayed.
If a user wants more context, they can click the link to the GitHub page that will show the full context.
Make sure that if you add a test to the page that all the other line numbers in the markdown file are still
correct. Adding a test at the top of a page means updating every single reference in the documentation that has a line
number for that file.
Everything from the Creating Examples section applies, with one addition.
Make sure the tab includes text=true. By default, the tabs get formatted
for code, so to use markdown or other shortcode statements (like gh-codeblock) it needs to be declared as text.
For most examples, the tabpane declares the text=true, but if some of the tabs have code examples, the tabpane
cannot specify it, and it must be specified in the tabs that do not need automatic code formatting.
Contribuições
O projeto Selenium dá as boas-vindas a novos contribuidores. Indivíduos fazendo
contribuições significativas e valiosas ao longo do tempo são transformados em Committers
e recebem acesso de commit ao projeto.
Este guia irá guiá-lo através do processo de contribuição.
Passo 1: Fork
Faça um fork do projeto no GitHub
e faça checkout na sua cópia localmente.
% git clone git@github.com:seleniumhq/seleniumhq.github.io.git
% cd seleniumhq.github.io
Dependências: Hugo
Usamos Hugo e Docsy theme
para criar e gerar o website. Você vai necessitar de usar a versão “extended”
Sass/SCSS do binário Hugo. Recomendamos a versão 0.110.0 ou superior.
Por favor siga as instruções do Docsy Install Hugo
Passo 2: Branch
Crie uma branch e comece a hackear:
% git checkout -b my-feature-branch
Praticamos o desenvolvimento baseado em HEAD, o que significa que todas as mudanças são aplicadas
diretamente no topo do dev.
Passo 3: Faça mudanças
O repositório contém o website e a documentação. Antes de começar a alterar coisas, por favor
veja o resto dos passos para preparar as dependências e sub-módulos (veja os comandos abaixo).
Para fazer alterações ao website, trabalha na pasta website_and_docs. Para ver uma previsão
do aspecto do website, execute hugo server a partir da raíz do projecto.
% git submodule update --init --recursive
% cd website_and_docs
% hugo server
See Style Guide for more information on our conventions for contribution
Passo 4: Commit
Primeiro, certifique-se de que o git saiba seu nome e endereço de e-mail:
Escrever boas mensagens de commit é importante. Uma mensagem de confirmação
deve descrever o que mudou, por que e conter referência de problemas corrigidos (se
houver). Siga estas diretrizes ao escrever um:
A primeira linha deve ter cerca de 50 caracteres ou menos e conter uma
breve da descrição da mudança.
Mantenha a segunda linha em branco.
Quebra todas as outras linhas em 72 colunas.
Incluir Fixes # N, onde N é o número do problema que o commit corrige
se houver.
Uma boa mensagem de confirmação pode ter a seguinte aparência:
explain commit normatively in one line
Body of commit message is a few lines of text, explaining things
in more detail, possibly giving some background about the issue
being fixed, etc.
The body of the commit message can be several paragraphs, and
please do proper word-wrap and keep columns shorter than about
72 characters or so. That way `git log` will show things
nicely even when it is indented.
Fixes #141
A primeira linha deve ser significativa, pois é o que as pessoas veem quando
executam git shortlog ou git log --oneline.
Passo 5: Rebase
Use git rebase (não git merge) para sincronizar seu trabalho de tempos em tempos.
% git fetch origin
% git rebase origin/trunk
Passo 6: Teste
Lembre-se sempre de executar o servidor local,
com isso, você pode ter certeza de que suas alterações não prejudicaram nada.
Os Pull Requests geralmente são revisados em alguns dias. Se houver
comentários a abordar, aplique suas alterações em novos commits (de preferência
fixups) e envie para a mesma
branch.
Passo 8: Integração
Quando a revisão do código for concluída, um committer integrará seu PR no branch de tronco do repositório. Porque gostamos de manter um
histórico linear no trunk, nós normalmente iremos dar Squash & Rebase no histórico da sua branch.
Comunicação
Todos os detalhes sobre como se comunicar com os colaboradores do projeto
e a comunidade em geral podem ser encontrados em https://selenium.dev/support
8.3 - Style guide for Selenium documentation
Conventions for contributions to the Selenium documentation and code examples
Read our contributing documentation for complete instructions on
how to add content to this documentation.
Alerts
Alerts have been added to direct potential contributors to where specific content is missing.
{{<alert-content/>}}
or
{{<alert-content>}}
Additional information about what specific content is needed
{{</alert-content>}}
Which gets displayed like this:
Content Help
Note:
This section needs additional and/or updated content
Additional information about what specific content is needed
Our documentation uses Title Capitalization for linkTitle which should be short
and Sentence capitalization for title which can be longer and more descriptive.
For example, a linkTitle of Special Heading might have a title of
The importance of a special heading in documentation
Line length
When editing the documentation’s source,
which is written in plain HTML,
limit your line lengths to around 100 characters.
Some of us take this one step further
and use what is called
semantic linefeeds,
which is a technique whereby the HTML source lines,
which are not read by the public,
are split at ‘natural breaks’ in the prose.
In other words, sentences are split
at natural breaks between clauses.
Instead of fussing with the lines of each paragraph
so that they all end near the right margin,
linefeeds can be added anywhere
that there is a break between ideas.
This can make diffs very easy to read
when collaborating through git,
but it is not something we enforce contributors to use.
Translations
Selenium now has official translators for each of the supported languages.
If you add a code example to the important_documentation.en.md file,
also add it to important_documentation.ja.md, important_documentation.pt-br.md,
important_documentation.zh-cn.md.
If you make text changes in the English version, just make a Pull Request.
The new process is for issues to be created and tagged as needs translation based on
changes made in a given PR.
Code examples
All references to code should be language independent,
and the code itself should be placed inside code tabs.
To generate the above tabs, this is what you need to write.
Note that the tabpane includes langEqualsHeader=true.
This auto-formats the code in each tab to match the header name,
and ensures that all tabs on the page with a language are set to the same thing.
To ensure that all code is kept up to date, our goal is to write the code in the repo where it
can be executed when Selenium versions are updated to ensure that everything is correct.
This code can be automatically displayed in the documentation using the gh-codeblock shortcode.
The shortcode automatically generates its own html, so we do not want it to auto-format with the language header.
If all tabs are using this shortcode, set text=true in the tabpane and remove langEqualsHeader=true.
If only some tabs are using this shortcode, keep langEqualsHeader=true in the tabpane and add text=true
to the tab. Note that the gh-codeblock line can not be indented at all.
One great thing about using gh-codeblock is that it adds a link to the full example.
This means you don’t have to include any additional context code, just the line(s) that
are needed, and the user can navigate to the repo to see how to use it.
If you want your example to include something other than code (default) or html (from gh-codeblock),
you need to first set text=true,
then change the Hugo syntax for the tabto use % instead of < and > with curly braces:
This is preferred to writing code comments because those will not be translated.
Only include the code that is needed for the documentation, and avoid over-explaining.
Finally, remember not to indent plain text or it will rendered as a codeblock.
Selenium Level Sponsors
Support the Selenium Project
Want to support the Selenium project? Learn more or view the full list of sponsors.